Use & Care Guide
Page 1
STAND MIXER INSTRUCTIONS AND RECIPES 9706634D 1-800-541-6390 Details Inside
STAND MIXER INSTRUCTIONS AND RECIPES 9706634D 1-800-541-6390 Details Inside
Use & Care Guide
Page 2
... on a sheet of paper along with the stand mixer. For a detailed explanation of warranty terms and conditions, including how to receive this high-quality service. Before you of in the United States and your KitchenAid® stand mixer should fail within the first year of ownership,... simply call our toll-free Customer Satisfaction Center at 1-800-541-6390, 8 a.m. Your replacement stand mixer will assure you use the carton and packing materials to ...
... on a sheet of paper along with the stand mixer. For a detailed explanation of warranty terms and conditions, including how to receive this high-quality service. Before you of in the United States and your KitchenAid® stand mixer should fail within the first year of ownership,... simply call our toll-free Customer Satisfaction Center at 1-800-541-6390, 8 a.m. Your replacement stand mixer will assure you use the carton and packing materials to ...
Use & Care Guide
Page 3
...Front Cover Stand Mixer Safety 4 Important Safeguards 4 Warranty...5 For the United States and District of Columbia 5 For Puerto Rico 6 Arranging for Service after the Warranty Expires 6 Arranging for Mixing and Kneading Yeast Dough 46 Bread Making Tips 47 OPTIONAL ACCESSORIES KitchenAid® ...6 Electrical Requirements 7 Troubleshooting Problems 7 ABOUT YOUR MIXER Bowl-Lift Models 8 Assembling Your Bowl-Lift Mixer 9 Tilt-Head Models 10 Assembling Your Tilt-Head Mixer 11 Using Your KitchenAid® Attachments 12 Mixing Time 12 Mixer Use...12 Care and Cleaning 13 Beater to Bowl...
...Front Cover Stand Mixer Safety 4 Important Safeguards 4 Warranty...5 For the United States and District of Columbia 5 For Puerto Rico 6 Arranging for Service after the Warranty Expires 6 Arranging for Mixing and Kneading Yeast Dough 46 Bread Making Tips 47 OPTIONAL ACCESSORIES KitchenAid® ...6 Electrical Requirements 7 Troubleshooting Problems 7 ABOUT YOUR MIXER Bowl-Lift Models 8 Assembling Your Bowl-Lift Mixer 9 Tilt-Head Models 10 Assembling Your Tilt-Head Mixer 11 Using Your KitchenAid® Attachments 12 Mixing Time 12 Mixer Use...12 Care and Cleaning 13 Beater to Bowl...
Use & Care Guide
Page 4
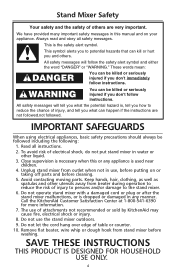
...Read all safety messages. Avoid contacting moving parts. Call the KitchenAid Customer Satisfaction Center at 1-800-541-6390 for more information. 7. SAVE THESE INSTRUCTIONS THIS PRODUCT IS DESIGNED FOR HOUSEHOLD USE ONLY. 4 Stand Mixer Safety Your safety and the safety of table or counter. 10... to reduce the risk of injury to persons and/or damage to the stand mixer. 6. Unplug stand mixer from stand mixer before cleaning. 5. Do not operate stand mixer with a damaged cord or plug or after the stand mixer malfunctions, or is used near children. 4. Close supervision is necessary when ...
...Read all safety messages. Avoid contacting moving parts. Call the KitchenAid Customer Satisfaction Center at 1-800-541-6390 for more information. 7. SAVE THESE INSTRUCTIONS THIS PRODUCT IS DESIGNED FOR HOUSEHOLD USE ONLY. 4 Stand Mixer Safety Your safety and the safety of table or counter. 10... to reduce the risk of injury to persons and/or damage to the stand mixer. 6. Unplug stand mixer from stand mixer before cleaning. 5. Do not operate stand mixer with a damaged cord or plug or after the stand mixer malfunctions, or is used near children. 4. Close supervision is necessary when ...
Use & Care Guide
Page 5
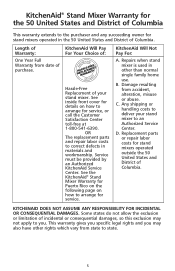
...or limitation of incidental or consequential damages, so this exclusion may also have other than normal single family home use. KitchenAid® Stand Mixer Warranty for the 50 United States and District of Columbia This warranty extends to you may not apply to the ... Any shipping or handling costs to deliver your stand mixer. Replacement parts or repair labor costs for Puerto Rico on the following page on how to correct defects in materials and workmanship. See the KitchenAid® Stand Mixer Warranty for stand mixers operated outside the 50 United States and District of...
...or limitation of incidental or consequential damages, so this exclusion may also have other than normal single family home use. KitchenAid® Stand Mixer Warranty for the 50 United States and District of Columbia This warranty extends to you may not apply to the ... Any shipping or handling costs to deliver your stand mixer. Replacement parts or repair labor costs for Puerto Rico on the following page on how to correct defects in materials and workmanship. See the KitchenAid® Stand Mixer Warranty for stand mixers operated outside the 50 United States and District of...

Use & Care Guide
Page 6
Call tollfree 1-800-541-6390 to learn the location of a Service Center near you prepaid and insured. Your repaired stand mixer will be handled by an Authorized KitchenAid Service Center. Arranging for stand mixers operated in Puerto Rico. Arranging for information on or the store where you purchased how to obtain service. Box 218, St. During...
Call tollfree 1-800-541-6390 to learn the location of a Service Center near you prepaid and insured. Your repaired stand mixer will be handled by an Authorized KitchenAid Service Center. Arranging for stand mixers operated in Puerto Rico. Arranging for information on or the store where you purchased how to obtain service. Box 218, St. During...
Use & Care Guide
Page 7
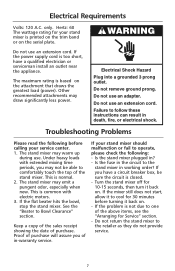
...service center. 1. Do not use an adapter. Under heavy loads with electric motors. 3. If the flat beater hits the bowl, stop the stand mixer. Do not return the stand mixer to operate, please check the following before turning it back on the serial plate. If the power supply cord is printed on the.... only. Do not remove ground prong. This is based on . Hertz: 60 The wattage rating for 10-15 seconds, then turn it to the stand mixer in ? - Do not use . The maximum rating is common with extended mixing time periods, you may warm up during use an extension cord. This...
...service center. 1. Do not use an adapter. Under heavy loads with electric motors. 3. If the flat beater hits the bowl, stop the stand mixer. Do not return the stand mixer to operate, please check the following before turning it back on the serial plate. If the power supply cord is printed on the.... only. Do not remove ground prong. This is based on . Hertz: 60 The wattage rating for 10-15 seconds, then turn it to the stand mixer in ? - Do not use . The maximum rating is common with extended mixing time periods, you may warm up during use an extension cord. This...
Use & Care Guide
Page 8
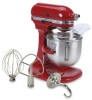
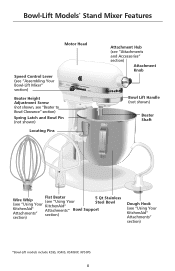
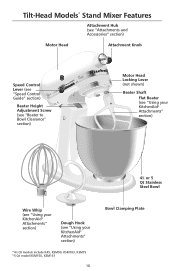
... Beater Wire Whip (see "Using Your (see "Using Your KitchenAid® 5 Qt Stainless Steel Bowl KitchenAid® Attachments" Bowl Support Attachments" section) section) Dough Hook (see "Assembling Your Bowl-Lift Mixer" section) St. Bowl-Lift Models* Stand Mixer Features Motor Head Speed Control Lever (see "Using Your KitchenAid® Attachments" section) *Bowl-Lift models include K5SS...
... Beater Wire Whip (see "Using Your (see "Using Your KitchenAid® 5 Qt Stainless Steel Bowl KitchenAid® Attachments" Bowl Support Attachments" section) section) Dough Hook (see "Assembling Your Bowl-Lift Mixer" section) St. Bowl-Lift Models* Stand Mixer Features Motor Head Speed Control Lever (see "Using Your KitchenAid® Attachments" section) *Bowl-Lift models include K5SS...
Use & Care Guide
Page 9
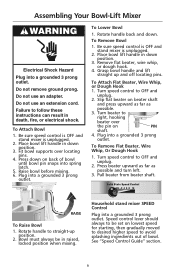
...an adapter. Failure to OFF and unplug. 2. Be sure speed control is OFF and stand mixer is unplugged. 2. Press down position. 3. Plug into a grounded 3 prong outlet. Be sure speed control is OFF and stand mixer is unplugged. 2. To Attach Flat Beater, Wire Whip, or Dough Hook 1. Turn...down position. 3. Place bowl lift handle in down . Slip flat beater on PIN shaft. 4. Rotate handle to OFF and unplug. 2. Household stand mixer SPEED Control Plug into a grounded 3 prong outlet. To Remove Bowl 1. Do not remove ground prong. To Lower Bowl 1. To Remove Flat Beater...
...an adapter. Failure to OFF and unplug. 2. Be sure speed control is OFF and stand mixer is unplugged. 2. Press down position. 3. Plug into a grounded 3 prong outlet. Be sure speed control is OFF and stand mixer is unplugged. 2. To Attach Flat Beater, Wire Whip, or Dough Hook 1. Turn...down position. 3. Place bowl lift handle in down . Slip flat beater on PIN shaft. 4. Rotate handle to OFF and unplug. 2. Household stand mixer SPEED Control Plug into a grounded 3 prong outlet. To Remove Bowl 1. Do not remove ground prong. To Lower Bowl 1. To Remove Flat Beater...
Use & Care Guide
Page 10
Tilt-Head Models* Stand Mixer Features Attachment Hub (see "Attachments and Accessories" section) Motor Head Attachment Knob Speed Control Lever (see "Using your KitchenAid® Attachments" section) *41⁄2 Qt models include K45, KSM90, KSM103, KSM75 *5 Qt model KSM150, ... section) Motor Head Locking Lever (not shown) Beater Shaft Flat Beater (see "Using your KitchenAid® Attachments" section) 41⁄2 or 5 Qt Stainless Steel Bowl Wire Whip (see "Using your KitchenAid® Attachments" section) Dough Hook (see "Speed Control Guide" section) Solid StOaffteSStirpe2ed4 C6 ...
Tilt-Head Models* Stand Mixer Features Attachment Hub (see "Attachments and Accessories" section) Motor Head Attachment Knob Speed Control Lever (see "Using your KitchenAid® Attachments" section) *41⁄2 Qt models include K45, KSM90, KSM103, KSM75 *5 Qt model KSM150, ... section) Motor Head Locking Lever (not shown) Beater Shaft Flat Beater (see "Using your KitchenAid® Attachments" section) 41⁄2 or 5 Qt Stainless Steel Bowl Wire Whip (see "Using your KitchenAid® Attachments" section) Dough Hook (see "Speed Control Guide" section) Solid StOaffteSStirpe2ed4 C6 ...
Use & Care Guide
Page 11
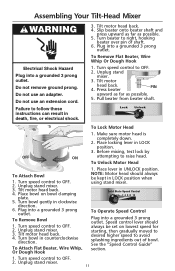
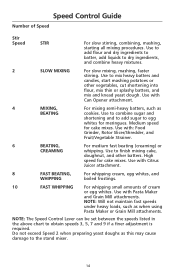
...Solid State Speed Control Off Stir 2 4 6 8 10 To Operate Speed Control Plug into a grounded 3 prong outlet. Tilt motor head back. 4. Unplug stand mixer. 11 Turn beater to OFF. 2. Plug into a grounded 3 prong outlet. See the "Speed Control Guide" section. 1. Turn speed control to right, ...hooking beater over pin of bowl. Tilt motor head back. 4. Unplug stand mixer. 3. Place bowl on lowest speed for starting, then gradually moved to desired higher speed to follow these instructions can result in LOCK position...
...Solid State Speed Control Off Stir 2 4 6 8 10 To Operate Speed Control Plug into a grounded 3 prong outlet. Tilt motor head back. 4. Unplug stand mixer. 11 Turn beater to OFF. 2. Plug into a grounded 3 prong outlet. See the "Speed Control Guide" section. 1. Turn speed control to right, ...hooking beater over pin of bowl. Tilt motor head back. 4. Unplug stand mixer. 3. Place bowl on lowest speed for starting, then gradually moved to desired higher speed to follow these instructions can result in LOCK position...
Use & Care Guide
Page 12
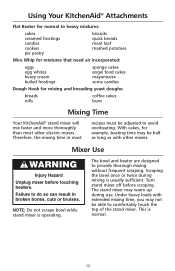
... designed to comfortably touch the top of the stand mixer. Under heavy loads with other electric mixers. With cakes, for mixing and kneading yeast doughs: breads rolls coffee cakes buns Mixing Time Your KitchenAid® stand mixer will mix faster and more thoroughly than most ...recipes must be able to provide thorough mixing without frequent scraping. Turn stand mixer off before touching beaters. This is operating. Therefore, the...
... designed to comfortably touch the top of the stand mixer. Under heavy loads with other electric mixers. With cakes, for mixing and kneading yeast doughs: breads rolls coffee cakes buns Mixing Time Your KitchenAid® stand mixer will mix faster and more thoroughly than most ...recipes must be able to provide thorough mixing without frequent scraping. Turn stand mixer off before touching beaters. This is operating. Therefore, the...
Use & Care Guide
Page 13
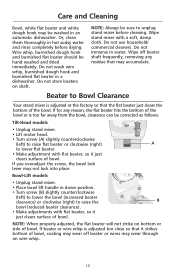
...to raise the B bowl (reduced beater clearance). • Make adjustments with a soft, damp cloth. Bowl-Lift models • Unplug stand mixer. • Place bowl lift handle in down position. • Turn screw (B) slightly counterclockwise (left ) to raise flat beater or clockwise (...right) A to unplug stand mixer before drying. Or, clean them thoroughly in an automatic dishwasher. Wipe stand mixer with flat beater, so it strikes bottom of bowl, coating may wear off beater shaft frequently, ...
...to raise the B bowl (reduced beater clearance). • Make adjustments with a soft, damp cloth. Bowl-Lift models • Unplug stand mixer. • Place bowl lift handle in down position. • Turn screw (B) slightly counterclockwise (left ) to raise flat beater or clockwise (...right) A to unplug stand mixer before drying. Or, clean them thoroughly in an automatic dishwasher. Wipe stand mixer with flat beater, so it strikes bottom of bowl, coating may wear off beater shaft frequently, ...
Use & Care Guide
Page 14
... loads, such as this may cause damage to egg whites for cake mixes. Use to combine sugar and shortening and to add sugar to the stand mixer. 14 Use with Can Opener attachment. 4 MIXING, For mixing semi-heavy batters, such as BEATING cookies. Use to add flour and dry ingredients to batter...
... loads, such as this may cause damage to egg whites for cake mixes. Use to combine sugar and shortening and to add sugar to the stand mixer. 14 Use with Can Opener attachment. 4 MIXING, For mixing semi-heavy batters, such as BEATING cookies. Use to add flour and dry ingredients to batter...
Use & Care Guide
Page 15
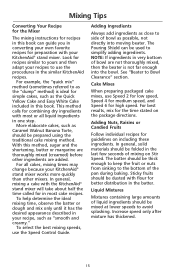
...cake with flour for better distribution in converting your recipe, such as close to use the procedures in the similar KitchenAid recipes. Sticky fruits should be dusted with the KitchenAid® stand mixer will take about half the time called for preparation with most cake recipes. In general, solid materials should be ... as "smooth and creamy." Adding Nuts, Raisins or Candied Fruits Follow individual recipes for recipes similar to yours and then adapt your KitchenAid® stand mixer works more quickly than other ingredients are thoroughly mixed (creamed) before other...
...cake with flour for better distribution in converting your recipe, such as close to use the procedures in the similar KitchenAid recipes. Sticky fruits should be dusted with the KitchenAid® stand mixer will take about half the time called for preparation with most cake recipes. In general, solid materials should be ... as "smooth and creamy." Adding Nuts, Raisins or Candied Fruits Follow individual recipes for recipes similar to yours and then adapt your KitchenAid® stand mixer works more quickly than other ingredients are thoroughly mixed (creamed) before other...
Use & Care Guide
Page 16
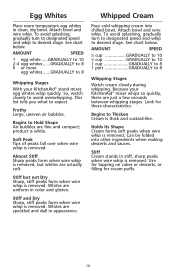
... removed. To avoid splashing, gradually turn to designated speed and whip to 8 Whipping Stages With your KitchenAid® mixer whips so quickly, there are actually soft. Because your KitchenAid® stand mixer, egg whites whip quickly. Stiff Cream stands in clean, dry bowl. Almost Stiff Sharp peaks form when wire whip is removed. Whipped Cream Pour...
... removed. To avoid splashing, gradually turn to designated speed and whip to 8 Whipping Stages With your KitchenAid® mixer whips so quickly, there are actually soft. Because your KitchenAid® stand mixer, egg whites whip quickly. Stiff Cream stands in clean, dry bowl. Almost Stiff Sharp peaks form when wire whip is removed. Whipped Cream Pour...
Use & Care Guide
Page 17
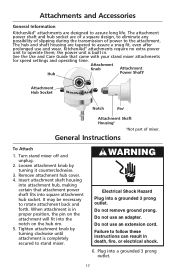
... speed settings and operating time. When attachment is built in death, fire, or electrical shock. 6. Turn stand mixer off and unplug. 2. It may be necessary to stand mixer. Tighten attachment knob by turning it counterclockwise. 3. Electrical Shock Hazard Plug into square attachment hub socket. Failure...the Use and Care Guide that attachment power shaft fits into a grounded 3 prong outlet. Do not use an extension cord. KitchenAid® attachments require no extra power unit to the attachment. Attachment Knob Attachment Hub Power Shaft‡ Attachment Hub Socket ®...
... speed settings and operating time. When attachment is built in death, fire, or electrical shock. 6. Turn stand mixer off and unplug. 2. It may be necessary to stand mixer. Tighten attachment knob by turning it counterclockwise. 3. Electrical Shock Hazard Plug into square attachment hub socket. Failure...the Use and Care Guide that attachment power shaft fits into a grounded 3 prong outlet. Do not use an extension cord. KitchenAid® attachments require no extra power unit to the attachment. Attachment Knob Attachment Hub Power Shaft‡ Attachment Hub Socket ®...
Use & Care Guide
Page 18
...juice 3 tablespoons chopped green onions 1⁄2 teaspoon garlic salt 3 drops hot pepper sauce Place cream cheese, cottage cheese, and mayonnaise in mixer bowl. Turn to Speed 2 and mix about 30 seconds. Serve with assorted crackers or raw vegetables. Yield: 12 servings (2 tablespoons per serving). ...Turn stand mixer off and unplug. 2. Serve with sliced fresh fruit, if desired. Turn to Speed 4 and beat about 30 seconds. Turn to Speed...
...juice 3 tablespoons chopped green onions 1⁄2 teaspoon garlic salt 3 drops hot pepper sauce Place cream cheese, cottage cheese, and mayonnaise in mixer bowl. Turn to Speed 2 and mix about 30 seconds. Serve with assorted crackers or raw vegetables. Yield: 12 servings (2 tablespoons per serving). ...Turn stand mixer off and unplug. 2. Serve with sliced fresh fruit, if desired. Turn to Speed 4 and beat about 30 seconds. Turn to Speed...
Use & Care Guide
Page 19
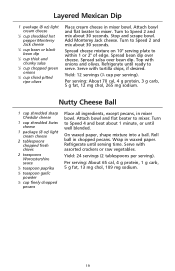
...chopped pecans. On waxed paper, shape mixture into a ball. Spread cheese mixture on 10" serving plate to mixer. Serve with assorted crackers or raw vegetables. Roll ball in mixer bowl. Refrigerate until ready to serve. Yield: 24 servings (2 tablespoons per serving). Spread bean dip over bean ...dip. Turn to mixer. Wrap in mixer bowl. Per serving: About 70 cal, 4 g protein, 3 g carb, 5 g fat, 12 mg chol, 265 mg sodium. Attach bowl and flat beater...
...chopped pecans. On waxed paper, shape mixture into a ball. Spread cheese mixture on 10" serving plate to mixer. Serve with assorted crackers or raw vegetables. Roll ball in mixer bowl. Refrigerate until ready to serve. Yield: 24 servings (2 tablespoons per serving). Spread bean dip over bean ...dip. Turn to mixer. Wrap in mixer bowl. Per serving: About 70 cal, 4 g protein, 3 g carb, 5 g fat, 12 mg chol, 265 mg sodium. Attach bowl and flat beater...
Use & Care Guide
Page 20
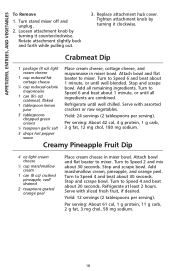
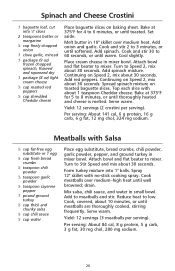
...until toasted. Serve warm. Cool slightly. Add red peppers. Spread spinach mixture on baking sheet. Mix salsa, chili sauce, and water in mixer bowl. Spinach and Cheese Crostini 1 baguette loaf, cut into 1" balls. Add onion and garlic. Place cream cheese in small bowl. Attach ... ground turkey in 10" skillet over medium-high heat until warm. Melt butter in mixer bowl. Bake at 375°F for 5 to 6 minutes, or until meatballs are thoroughly cooked, stirring frequently. Add to mixer. Bake at 375°F for 4 to 8 minutes, or until softened. Meatballs ...
...until toasted. Serve warm. Cool slightly. Add red peppers. Spread spinach mixture on baking sheet. Mix salsa, chili sauce, and water in mixer bowl. Spinach and Cheese Crostini 1 baguette loaf, cut into 1" balls. Add onion and garlic. Place cream cheese in small bowl. Attach ... ground turkey in 10" skillet over medium-high heat until warm. Melt butter in mixer bowl. Bake at 375°F for 5 to 6 minutes, or until meatballs are thoroughly cooked, stirring frequently. Add to mixer. Bake at 375°F for 4 to 8 minutes, or until softened. Meatballs ...


