Use & Care Guide
Page 1
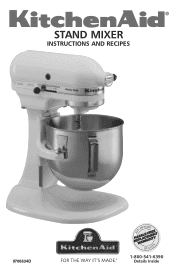
STAND MIXER INSTRUCTIONS AND RECIPES 9706634D 1-800-541-6390 Details Inside
STAND MIXER INSTRUCTIONS AND RECIPES 9706634D 1-800-541-6390 Details Inside
Use & Care Guide
Page 2
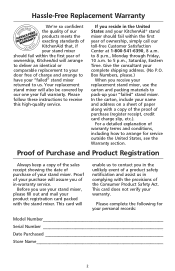
... Numbers, please.) When you in the unlikely event of a product safety notification and assist us in the United States and your KitchenAid® stand mixer should fail within the first year of ownership, simply call our toll-free Customer Satisfaction Center at 1-800-541-6390, 8 a.m. Please... Replacement Warranty We're so confident the quality of our products meets the exacting standards of KitchenAid that, if your stand mixer should fail within the first year of ownership, KitchenAid will arrange to deliver an identical or comparable replacement to your door free of charge and arrange...
... Numbers, please.) When you in the unlikely event of a product safety notification and assist us in the United States and your KitchenAid® stand mixer should fail within the first year of ownership, simply call our toll-free Customer Satisfaction Center at 1-800-541-6390, 8 a.m. Please... Replacement Warranty We're so confident the quality of our products meets the exacting standards of KitchenAid that, if your stand mixer should fail within the first year of ownership, KitchenAid will arrange to deliver an identical or comparable replacement to your door free of charge and arrange...
Use & Care Guide
Page 3
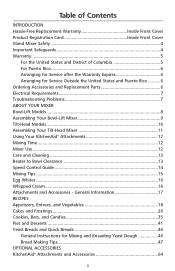
... Inside Front Cover Product Registration Card Inside Front Cover Stand Mixer Safety 4 Important Safeguards 4 Warranty...5 For the United States and District of Columbia 5 For Puerto Rico 6 Arranging for Service after the Warranty Expires 6 Arranging for Mixing and Kneading Yeast Dough 46 Bread Making Tips 47 OPTIONAL ACCESSORIES KitchenAid® Attachments and Accessories 64 3
... Inside Front Cover Product Registration Card Inside Front Cover Stand Mixer Safety 4 Important Safeguards 4 Warranty...5 For the United States and District of Columbia 5 For Puerto Rico 6 Arranging for Service after the Warranty Expires 6 Arranging for Mixing and Kneading Yeast Dough 46 Bread Making Tips 47 OPTIONAL ACCESSORIES KitchenAid® Attachments and Accessories 64 3
Use & Care Guide
Page 4
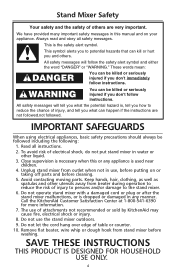
...what the potential hazard is dropped or damaged in water or other utensils away from stand mixer before cleaning. 5. SAVE THESE INSTRUCTIONS THIS PRODUCT IS DESIGNED FOR HOUSEHOLD USE ONLY. 4 Call the KitchenAid Customer Satisfaction Center at 1-800-541-6390 for more information. 7. Do not let... the cord hang over edge of electrical shock, do not put stand mixer in any appliance is the safety alert symbol. Read all safety...
...what the potential hazard is dropped or damaged in water or other utensils away from stand mixer before cleaning. 5. SAVE THESE INSTRUCTIONS THIS PRODUCT IS DESIGNED FOR HOUSEHOLD USE ONLY. 4 Call the KitchenAid Customer Satisfaction Center at 1-800-541-6390 for more information. 7. Do not let... the cord hang over edge of electrical shock, do not put stand mixer in any appliance is the safety alert symbol. Read all safety...
Use & Care Guide
Page 5
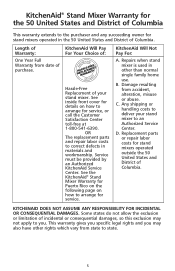
...details on how to arrange for service, or call the Customer Satisfaction Center toll-free at 1-800-541-6390. See the KitchenAid® Stand Mixer Warranty for Puerto Rico on the following page on how to arrange for service. Damage resulting from date of purchase. D. ... of Warranty: One Year Full Warranty from accident, alteration, misuse or abuse. Repairs when stand mixer is used in other rights which vary from state to state. 5 B. KitchenAid® Stand Mixer Warranty for the 50 United States and District of Columbia This warranty extends to the purchaser ...
...details on how to arrange for service, or call the Customer Satisfaction Center toll-free at 1-800-541-6390. See the KitchenAid® Stand Mixer Warranty for Puerto Rico on the following page on how to arrange for service. Damage resulting from date of purchase. D. ... of Warranty: One Year Full Warranty from accident, alteration, misuse or abuse. Repairs when stand mixer is used in other rights which vary from state to state. 5 B. KitchenAid® Stand Mixer Warranty for the 50 United States and District of Columbia This warranty extends to the purchaser ...

Use & Care Guide
Page 6
... parts for Service After the Warranty Expires For service information, call tollfree 1-800-541-6390 or write to: Customer Satisfaction Center, KitchenAid Portable Appliances, P.O. Arranging for your local KitchenAid dealer the stand mixer for stand mixers operated in Puerto Rico. Joseph, MI 490850218. 6 During the warranty period, all service must be returned to you prepaid and...
... parts for Service After the Warranty Expires For service information, call tollfree 1-800-541-6390 or write to: Customer Satisfaction Center, KitchenAid Portable Appliances, P.O. Arranging for your local KitchenAid dealer the stand mixer for stand mixers operated in Puerto Rico. Joseph, MI 490850218. 6 During the warranty period, all service must be returned to you prepaid and...
Use & Care Guide
Page 7
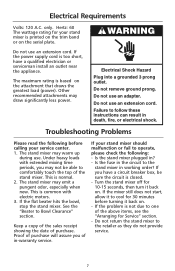
... then turn it back on the attachment that draws the greatest load (power). Do not return the stand mixer to Bowl Clearance" section. If the flat beater hits the bowl, stop the stand mixer. Hertz: 60 The wattage rating for Service" section. - The maximum rating is normal. 2. Under... heavy loads with electric motors. 3. See the "Beater to the retailer as they do not provide service. 7 Turn the stand mixer off for 30 minutes before calling your stand mixer is common with extended mixing time periods, you of purchase. Do not use an extension cord. Is the...
... then turn it back on the attachment that draws the greatest load (power). Do not return the stand mixer to Bowl Clearance" section. If the flat beater hits the bowl, stop the stand mixer. Hertz: 60 The wattage rating for Service" section. - The maximum rating is normal. 2. Under... heavy loads with electric motors. 3. See the "Beater to the retailer as they do not provide service. 7 Turn the stand mixer off for 30 minutes before calling your stand mixer is common with extended mixing time periods, you of purchase. Do not use an extension cord. Is the...
Use & Care Guide
Page 8
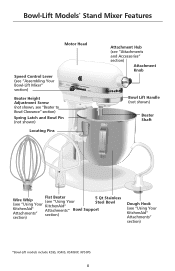
... Beater Wire Whip (see "Using Your (see "Using Your KitchenAid® 5 Qt Stainless Steel Bowl KitchenAid® Attachments" Bowl Support Attachments" section) section) Dough Hook (see "Assembling Your Bowl-Lift Mixer" section) St. Bowl-Lift Models* Stand Mixer Features Motor Head Speed Control Lever (see "Using Your KitchenAid® Attachments" section) *Bowl-Lift models include K5SS...
... Beater Wire Whip (see "Using Your (see "Using Your KitchenAid® 5 Qt Stainless Steel Bowl KitchenAid® Attachments" Bowl Support Attachments" section) section) Dough Hook (see "Assembling Your Bowl-Lift Mixer" section) St. Bowl-Lift Models* Stand Mixer Features Motor Head Speed Control Lever (see "Using Your KitchenAid® Attachments" section) *Bowl-Lift models include K5SS...
Use & Care Guide
Page 9
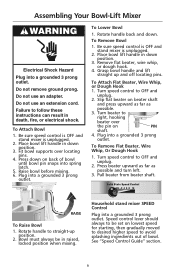
... to desired higher speed to avoid splashing ingredients out of bowl until bowl pin snaps into spring latch. 5. Plug into a grounded 3 prong outlet. Household stand mixer SPEED Control Plug into a grounded 3 prong outlet. Speed control lever should always to right, hooking beater over locating pins. 4. Plug into a grounded 3... Shock Hazard Plug into a grounded 3 prong outlet. Do not remove ground prong. Be sure speed control is OFF and stand mixer is unplugged. 2. Place bowl lift handle in down . Fit bowl supports over the pin on back of bowl. To Remove Bowl 1....
... to desired higher speed to avoid splashing ingredients out of bowl until bowl pin snaps into spring latch. 5. Plug into a grounded 3 prong outlet. Household stand mixer SPEED Control Plug into a grounded 3 prong outlet. Speed control lever should always to right, hooking beater over locating pins. 4. Plug into a grounded 3... Shock Hazard Plug into a grounded 3 prong outlet. Do not remove ground prong. Be sure speed control is OFF and stand mixer is unplugged. 2. Place bowl lift handle in down . Fit bowl supports over the pin on back of bowl. To Remove Bowl 1....
Use & Care Guide
Page 10
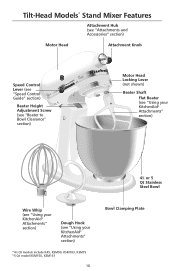
...Qt Stainless Steel Bowl Wire Whip (see "Using your KitchenAid® Attachments" section) Dough Hook (see "Speed Control Guide" section) Solid StOaffteSStirpe2ed4 C6 o8nt1r0ol CAUTION: St. Tilt-Head Models* Stand Mixer Features Attachment Hub (see "Attachments and Accessories" section)... Motor Head Attachment Knob Speed Control Lever (see "Using your KitchenAid® Attachments" section) *41⁄2 Qt models include K45,...
...Qt Stainless Steel Bowl Wire Whip (see "Using your KitchenAid® Attachments" section) Dough Hook (see "Speed Control Guide" section) Solid StOaffteSStirpe2ed4 C6 o8nt1r0ol CAUTION: St. Tilt-Head Models* Stand Mixer Features Attachment Hub (see "Attachments and Accessories" section)... Motor Head Attachment Knob Speed Control Lever (see "Using your KitchenAid® Attachments" section) *41⁄2 Qt models include K45,...
Use & Care Guide
Page 11
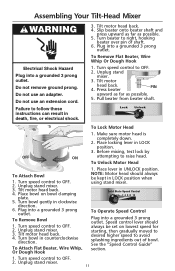
... electrical shock. 3. Solid State Speed Control Off Stir 2 4 6 8 10 To Operate Speed Control Plug into a grounded 3 prong outlet. Unplug stand mixer. 11 Tilt motor head back. 4. Press beater upward as far as possible. 5. To Unlock Motor Head To Attach Bowl 1. Tilt motor head back... prong outlet. Assembling Your Tilt-Head Mixer Electrical Shock Hazard Plug into a grounded 3 prong outlet. To Attach Flat Beater, Wire Whip, Or Dough Hook 1. Place lever in LOCK position when using stand mixer. Do not use an adapter. Unplug stand mixer. 3. Place bowl on lowest speed ...
... electrical shock. 3. Solid State Speed Control Off Stir 2 4 6 8 10 To Operate Speed Control Plug into a grounded 3 prong outlet. Unplug stand mixer. 11 Tilt motor head back. 4. Press beater upward as far as possible. 5. To Unlock Motor Head To Attach Bowl 1. Tilt motor head back... prong outlet. Assembling Your Tilt-Head Mixer Electrical Shock Hazard Plug into a grounded 3 prong outlet. To Attach Flat Beater, Wire Whip, Or Dough Hook 1. Place lever in LOCK position when using stand mixer. Do not use an adapter. Unplug stand mixer. 3. Place bowl on lowest speed ...
Use & Care Guide
Page 12
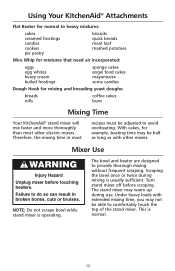
... mixing time in broken bones, cuts or bruises. With cakes, for mixing and kneading yeast doughs: breads rolls coffee cakes buns Mixing Time Your KitchenAid® stand mixer will mix faster and more thoroughly than most recipes must be able to provide thorough mixing without frequent scraping. Scraping the bowl once or twice...
... mixing time in broken bones, cuts or bruises. With cakes, for mixing and kneading yeast doughs: breads rolls coffee cakes buns Mixing Time Your KitchenAid® stand mixer will mix faster and more thoroughly than most recipes must be able to provide thorough mixing without frequent scraping. Scraping the bowl once or twice...
Use & Care Guide
Page 13
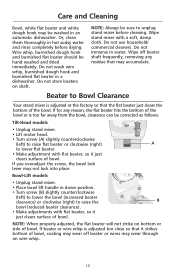
...Cleaning Bowl, white flat beater and white dough hook may accumulate. NOTE: Always be corrected as follows: Tilt-Head models • Unplug stand mixer. • Lift motor head. • Turn screw (A) slightly counterclockwise (left ) to lower the bowl (increased beater clearance) or clockwise (right) ...to unplug stand mixer before drying. If for any residue that the flat beater just clears the bottom of bowl. Do not store beaters on wire whip....
...Cleaning Bowl, white flat beater and white dough hook may accumulate. NOTE: Always be corrected as follows: Tilt-Head models • Unplug stand mixer. • Lift motor head. • Turn screw (A) slightly counterclockwise (left ) to lower the bowl (increased beater clearance) or clockwise (right) ...to unplug stand mixer before drying. If for any residue that the flat beater just clears the bottom of bowl. Do not store beaters on wire whip....
Use & Care Guide
Page 14
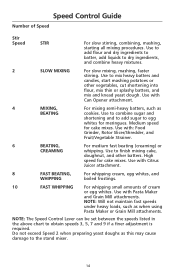
... the speeds listed in the above chart to dry ingredients, and combine heavy mixtures. 2 SLOW MIXING For slow mixing, mashing, faster stirring. Use to the stand mixer. 14 High speed for cake mixes. Use with Can Opener attachment. 4 MIXING, For mixing semi-heavy batters, such as this may cause damage to finish...
... the speeds listed in the above chart to dry ingredients, and combine heavy mixtures. 2 SLOW MIXING For slow mixing, mashing, faster stirring. Use to the stand mixer. 14 High speed for cake mixes. Use with Can Opener attachment. 4 MIXING, For mixing semi-heavy batters, such as this may cause damage to finish...
Use & Care Guide
Page 15
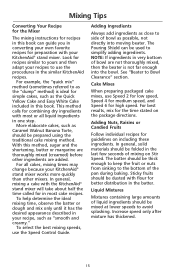
...close to side of liquid ingredients should be dusted with flour for in converting your own favorite recipes for preparation with the KitchenAid® stand mixer will take about half the time called for better distribution in one step. Adding Ingredients Always add ingredients as the "...far enough into moving beater. The Pouring Shield can guide you in most or all cakes, mixing times may change because your KitchenAid® stand mixer. Adding Nuts, Raisins or Candied Fruits Follow individual recipes for simple cakes, such as "smooth and creamy." To help determine the...
...close to side of liquid ingredients should be dusted with flour for in converting your own favorite recipes for preparation with the KitchenAid® stand mixer will take about half the time called for better distribution in one step. Adding Ingredients Always add ingredients as the "...far enough into moving beater. The Pouring Shield can guide you in most or all cakes, mixing times may change because your KitchenAid® stand mixer. Adding Nuts, Raisins or Candied Fruits Follow individual recipes for simple cakes, such as "smooth and creamy." To help determine the...
Use & Care Guide
Page 16
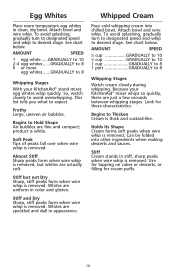
... AMOUNT SPEED 1⁄4 cup GRADUALLY to 10 1⁄2 cup GRADUALLY to 10 1 cup GRADUALLY to 8 1 pint GRADUALLY to expect. Because your KitchenAid® stand mixer, egg whites whip quickly. Look for cream puffs. 16 See chart below . Attach bowl and wire whip. Begins to Thicken Cream is removed.... ingredients when making desserts and sauces. Can be folded into chilled bowl. So, watch closely to 8 Whipping Stages With your KitchenAid® mixer whips so quickly, there are fine and compact; Almost Stiff Sharp peaks form when wire whip is removed. Attach bowl and wire ...
... AMOUNT SPEED 1⁄4 cup GRADUALLY to 10 1⁄2 cup GRADUALLY to 10 1 cup GRADUALLY to 8 1 pint GRADUALLY to expect. Because your KitchenAid® stand mixer, egg whites whip quickly. Look for cream puffs. 16 See chart below . Attach bowl and wire whip. Begins to Thicken Cream is removed.... ingredients when making desserts and sauces. Can be folded into chilled bowl. So, watch closely to 8 Whipping Stages With your KitchenAid® mixer whips so quickly, there are fine and compact; Almost Stiff Sharp peaks form when wire whip is removed. Attach bowl and wire ...
Use & Care Guide
Page 17
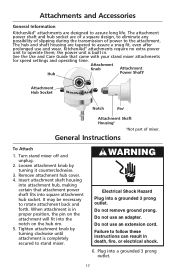
... prong. The attachment power shaft and hub socket are designed to assure long life. Remove attachment hub cover. 4. KitchenAid® attachments require no extra power unit to rotate attachment back and forth. Turn stand mixer off and unplug. 2. Do not use an adapter. Attachment Knob Attachment Hub Power Shaft‡ Attachment Hub Socket...
... prong. The attachment power shaft and hub socket are designed to assure long life. Remove attachment hub cover. 4. KitchenAid® attachments require no extra power unit to rotate attachment back and forth. Turn stand mixer off and unplug. 2. Do not use an adapter. Attachment Knob Attachment Hub Power Shaft‡ Attachment Hub Socket...
Use & Care Guide
Page 18
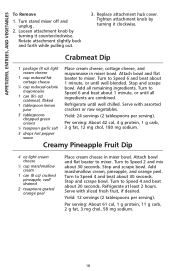
...well blended. Yield: 24 servings (2 tablespoons per serving). Attach bowl and flat beater to mixer. Stop and scrape bowl. Yield: 12 servings (2 tablespoons per serving). Turn stand mixer off and unplug. 2. Loosen attachment knob by turning it counterclockwise. Attach bowl and flat ...beater to mixer. Refrigerate at least 2 hours. APPETIZERS, ENTREES, AND VEGETABLES To Remove 1. ...
...well blended. Yield: 24 servings (2 tablespoons per serving). Attach bowl and flat beater to mixer. Stop and scrape bowl. Yield: 12 servings (2 tablespoons per serving). Turn stand mixer off and unplug. 2. Loosen attachment knob by turning it counterclockwise. Attach bowl and flat ...beater to mixer. Refrigerate at least 2 hours. APPETIZERS, ENTREES, AND VEGETABLES To Remove 1. ...
Use & Care Guide
Page 25
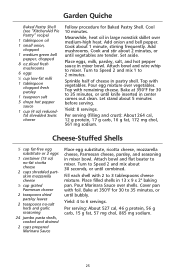
... half of cheese in mixer bowl. Bake at 350°F for Baked Pastry Shell. Turn to Speed 2 and mix about 2 minutes, or until combined. Set aside. Let stand about 1 minute, stirring frequently. Per serving (filling and crust): About 264 cal, 12 g protein, 17 g carb, 16 g ... in center comes out clean. Fill each shell with vegetables. Top with foil. Cover pan with remaining cheese. Garden Quiche Baked Pastry Shell (see "KitchenAid Pie Pastry" recipe) 1 tablespoon oil 1 small onion, chopped 1 medium green bell pepper, chopped 8 oz sliced fresh mushrooms 6 eggs 1⁄3 ...
... half of cheese in mixer bowl. Bake at 350°F for Baked Pastry Shell. Turn to Speed 2 and mix about 2 minutes, or until combined. Set aside. Let stand about 1 minute, stirring frequently. Per serving (filling and crust): About 264 cal, 12 g protein, 17 g carb, 16 g ... in center comes out clean. Fill each shell with vegetables. Top with foil. Cover pan with remaining cheese. Garden Quiche Baked Pastry Shell (see "KitchenAid Pie Pastry" recipe) 1 tablespoon oil 1 small onion, chopped 1 medium green bell pepper, chopped 8 oz sliced fresh mushrooms 6 eggs 1⁄3 ...
Parts List
Page 1
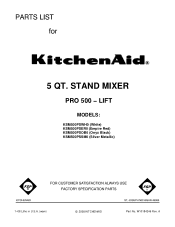
W10184246 Rev. A STAND MIXER PRO 500 − LIFT MODELS: KSM500PSWH0 (White) KSM500PSER0 (Empire Red) KSM500PSOB0 (Onyx Black) KSM500PSSM0 (Silver Metallic) 1−08 Litho in U.S.A. (wam) c 2008 KITCHENAID Part No. 5 QT.
W10184246 Rev. A STAND MIXER PRO 500 − LIFT MODELS: KSM500PSWH0 (White) KSM500PSER0 (Empire Red) KSM500PSOB0 (Onyx Black) KSM500PSSM0 (Silver Metallic) 1−08 Litho in U.S.A. (wam) c 2008 KITCHENAID Part No. 5 QT.


