Use & Care Guide
Page 2
... "failed" stand mixer. Hassle-Free Replacement Warranty We're so confident the quality of our products meets the exacting standards of KitchenAid that, if your stand mixer should fail within the first year of ownership, KitchenAid will enable us to contact you in -warranty service. Before you reside in complying with the stand mixer. Please follow these instructions to arrange for your stand mixer. If you use the...
... "failed" stand mixer. Hassle-Free Replacement Warranty We're so confident the quality of our products meets the exacting standards of KitchenAid that, if your stand mixer should fail within the first year of ownership, KitchenAid will enable us to contact you in -warranty service. Before you reside in complying with the stand mixer. Please follow these instructions to arrange for your stand mixer. If you use the...
Use & Care Guide
Page 3
... and Desserts 41 Yeast Breads and Quick Breads 46 General Instructions for Service Outside the United States and Puerto Rico ..........6 Ordering Accessories and Replacement Parts 6 Electrical Requirements 7 Troubleshooting Problems 7 ABOUT YOUR MIXER Bowl-Lift Models 8 Assembling Your Bowl-Lift Mixer 9 Tilt-Head Models 10 Assembling Your Tilt-Head Mixer 11 Using Your KitchenAid® Attachments 12 Mixing Time 12 Mixer Use...12 Care and Cleaning 13 Beater to Bowl Clearance 13 Speed Control Guide 14 Mixing Tips 15 Egg Whites 16 Whipped Cream 16 Attachments and Accessories -
... and Desserts 41 Yeast Breads and Quick Breads 46 General Instructions for Service Outside the United States and Puerto Rico ..........6 Ordering Accessories and Replacement Parts 6 Electrical Requirements 7 Troubleshooting Problems 7 ABOUT YOUR MIXER Bowl-Lift Models 8 Assembling Your Bowl-Lift Mixer 9 Tilt-Head Models 10 Assembling Your Tilt-Head Mixer 11 Using Your KitchenAid® Attachments 12 Mixing Time 12 Mixer Use...12 Care and Cleaning 13 Beater to Bowl Clearance 13 Speed Control Guide 14 Mixing Tips 15 Egg Whites 16 Whipped Cream 16 Attachments and Accessories -
Use & Care Guide
Page 4
...injured if you don't follow instructions. You can happen if the instructions are very important. Unplug stand mixer from stand mixer before washing. Remove flat beater, wire whip or dough hook from outlet when not in water or other utensils away from beater during operation to reduce the risk of... parts. The use the stand mixer outdoors. 9. Keep hands, hair, clothing, as well as spatulas and other liquid. 3. Do not operate stand mixer with a damaged cord or plug or after the stand mixer malfunctions, or is dropped or damaged in this or any manner. Call the KitchenAid Customer...
...injured if you don't follow instructions. You can happen if the instructions are very important. Unplug stand mixer from stand mixer before washing. Remove flat beater, wire whip or dough hook from outlet when not in water or other utensils away from beater during operation to reduce the risk of... parts. The use the stand mixer outdoors. 9. Keep hands, hair, clothing, as well as spatulas and other liquid. 3. Do not operate stand mixer with a damaged cord or plug or after the stand mixer malfunctions, or is dropped or damaged in this or any manner. Call the KitchenAid Customer...
Use & Care Guide
Page 5
... owner for stand mixers operated in other rights which vary from state to state. 5 KitchenAid Will Not Pay For: A. Any shipping or handling costs to an Authorized Service Center. See inside front cover for details on how to correct defects in materials and workmanship. Damage resulting from accident, alteration, misuse or abuse. OR The replacement parts and repair labor costs to arrange for service...
... owner for stand mixers operated in other rights which vary from state to state. 5 KitchenAid Will Not Pay For: A. Any shipping or handling costs to an Authorized Service Center. See inside front cover for details on how to correct defects in materials and workmanship. Damage resulting from accident, alteration, misuse or abuse. OR The replacement parts and repair labor costs to arrange for service...
Use & Care Guide
Page 7
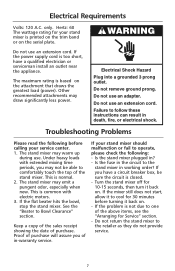
... or serviceman install an outlet near the appliance. The maximum rating is common with extended mixing time periods, you of purchase. Do not use an adapter. Under heavy loads with electric motors. 3. The stand mixer may draw significantly less power. If the flat beater hits the bowl, stop the stand mixer. Proof of purchase will assure you may warm up during use an extension cord. Is the stand mixer plugged in...
... or serviceman install an outlet near the appliance. The maximum rating is common with extended mixing time periods, you of purchase. Do not use an adapter. Under heavy loads with electric motors. 3. The stand mixer may draw significantly less power. If the flat beater hits the bowl, stop the stand mixer. Proof of purchase will assure you may warm up during use an extension cord. Is the stand mixer plugged in...
Use & Care Guide
Page 8
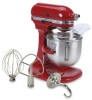
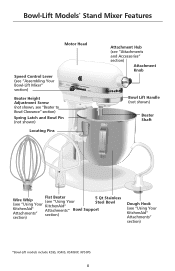
Bowl-Lift Models* Stand Mixer Features Motor Head Speed Control Lever (see "Using Your KitchenAid® Attachments" section) *Bowl-Lift models include K5SS, KSM5, KSM50P, KP50PS 8 JosKeiptch,hMeinchAigiadn USA Solid Off SStatirte2S4pe6ed8 Control 10 CAUTION: Beater Height Adjustment Screw (not shown, see "Beater to Bowl Clearance" section) Spring Latch and Bowl Pin (not shown) Locating Pins Attachment Hub (see "Attachments and Accessories" section) Attachment Knob Bowl Lift Handle (not shown) Beater Shaft Flat Beater Wire Whip (see "Using Your (see "Using Your KitchenAid®...
Bowl-Lift Models* Stand Mixer Features Motor Head Speed Control Lever (see "Using Your KitchenAid® Attachments" section) *Bowl-Lift models include K5SS, KSM5, KSM50P, KP50PS 8 JosKeiptch,hMeinchAigiadn USA Solid Off SStatirte2S4pe6ed8 Control 10 CAUTION: Beater Height Adjustment Screw (not shown, see "Beater to Bowl Clearance" section) Spring Latch and Bowl Pin (not shown) Locating Pins Attachment Hub (see "Attachments and Accessories" section) Attachment Knob Bowl Lift Handle (not shown) Beater Shaft Flat Beater Wire Whip (see "Using Your (see "Using Your KitchenAid®...
Use & Care Guide
Page 9
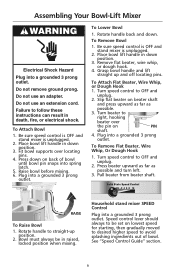
... electrical shock. Remove flat beater, wire whip, or dough hook. 4. Press beater upward as far as possible. 3. Speed control lever should always to avoid splashing ingredients out of bowl until bowl pin snaps into spring latch. 5. To Lower Bowl 1. To Attach Flat Beater, Wire Whip, or Dough Hook 1. Turn speed control to OFF and unplug. 2. To Attach Bowl 1. Press down . Bowl must always be set on back of bowl. See "Speed Control Guide" section. 9 Assembling Your Bowl-Lift Mixer Electrical Shock Hazard Plug into a grounded 3 prong outlet. Place bowl lift handle...
... electrical shock. Remove flat beater, wire whip, or dough hook. 4. Press beater upward as far as possible. 3. Speed control lever should always to avoid splashing ingredients out of bowl until bowl pin snaps into spring latch. 5. To Lower Bowl 1. To Attach Flat Beater, Wire Whip, or Dough Hook 1. Turn speed control to OFF and unplug. 2. To Attach Bowl 1. Press down . Bowl must always be set on back of bowl. See "Speed Control Guide" section. 9 Assembling Your Bowl-Lift Mixer Electrical Shock Hazard Plug into a grounded 3 prong outlet. Place bowl lift handle...
Use & Care Guide
Page 10
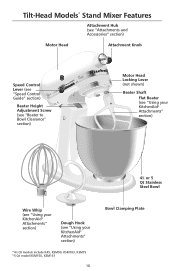
... Beater Height Adjustment Screw (see "Beater to Bowl Clearance" section) Motor Head Locking Lever (not shown) Beater Shaft Flat Beater (see "Using your KitchenAid® Attachments" section) 41⁄2 or 5 Qt Stainless Steel Bowl Wire Whip (see "Using your KitchenAid® Attachments" section) Dough Hook (see "Speed Control Guide" section) Solid StOaffteSStirpe2ed4 C6 o8nt1r0ol CAUTION: St. Tilt-Head Models* Stand Mixer Features Attachment Hub (see "Attachments and Accessories" section) Motor Head Attachment Knob Speed Control Lever (see "Using your KitchenAid® Attachments...
... Beater Height Adjustment Screw (see "Beater to Bowl Clearance" section) Motor Head Locking Lever (not shown) Beater Shaft Flat Beater (see "Using your KitchenAid® Attachments" section) 41⁄2 or 5 Qt Stainless Steel Bowl Wire Whip (see "Using your KitchenAid® Attachments" section) Dough Hook (see "Speed Control Guide" section) Solid StOaffteSStirpe2ed4 C6 o8nt1r0ol CAUTION: St. Tilt-Head Models* Stand Mixer Features Attachment Hub (see "Attachments and Accessories" section) Motor Head Attachment Knob Speed Control Lever (see "Using your KitchenAid® Attachments...
Use & Care Guide
Page 11
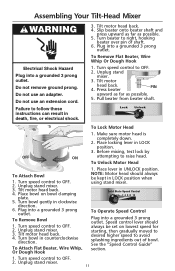
.... To Attach Flat Beater, Wire Whip, Or Dough Hook 1. Lock Unlock To Lock Motor Head 1. To Unlock Motor Head To Attach Bowl 1. Place bowl on lowest speed for starting, then gradually moved to desired higher speed to right, hooking beater over pin of bowl. Speed control lever should always be set on bowl clamping plate. 5. Do not use an extension cord. Turn beater to avoid splashing ingredients out of shaft. 6. Unplug stand mixer. 3. Tilt motor head back. Make sure motor head is completely down. 2. Place locking lever in UNLOCK position. Turn bowl gently in...
.... To Attach Flat Beater, Wire Whip, Or Dough Hook 1. Lock Unlock To Lock Motor Head 1. To Unlock Motor Head To Attach Bowl 1. Place bowl on lowest speed for starting, then gradually moved to desired higher speed to right, hooking beater over pin of bowl. Speed control lever should always be set on bowl clamping plate. 5. Do not use an extension cord. Turn beater to avoid splashing ingredients out of shaft. 6. Unplug stand mixer. 3. Tilt motor head back. Make sure motor head is completely down. 2. Place locking lever in UNLOCK position. Turn bowl gently in...
Use & Care Guide
Page 12
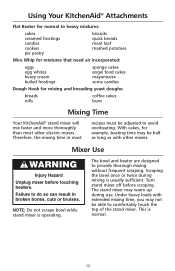
Using Your KitchenAid® Attachments Flat Beater for normal to heavy mixtures: cakes creamed frostings candies cookies pie pastry biscuits quick breads meat loaf mashed potatoes Wire Whip for mixtures that need air incorporated: eggs egg whites heavy cream boiled frostings sponge cakes angel food cakes mayonnaise some candies Dough Hook for example, beating time may be able to comfortably touch the top of the stand mixer. Mixer Use Injury Hazard Unplug mixer before scraping...
Using Your KitchenAid® Attachments Flat Beater for normal to heavy mixtures: cakes creamed frostings candies cookies pie pastry biscuits quick breads meat loaf mashed potatoes Wire Whip for mixtures that need air incorporated: eggs egg whites heavy cream boiled frostings sponge cakes angel food cakes mayonnaise some candies Dough Hook for example, beating time may be able to comfortably touch the top of the stand mixer. Mixer Use Injury Hazard Unplug mixer before scraping...
Use & Care Guide
Page 13
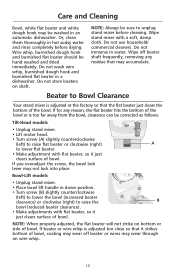
... off beater shaft frequently, removing any reason, the flat beater hits the bottom of bowl. Do not store beaters on bottom or side of the bowl or is too far away from the bowl, clearance can be hand washed and dried immediately. Wire whip, burnished dough hook and burnished flat beater should be corrected as follows: Tilt-Head models • Unplug stand mixer. • Lift motor head. • Turn screw (A) slightly counterclockwise (left ) to lower the bowl (increased beater clearance) or...
... off beater shaft frequently, removing any reason, the flat beater hits the bottom of bowl. Do not store beaters on bottom or side of the bowl or is too far away from the bowl, clearance can be hand washed and dried immediately. Wire whip, burnished dough hook and burnished flat beater should be corrected as follows: Tilt-Head models • Unplug stand mixer. • Lift motor head. • Turn screw (A) slightly counterclockwise (left ) to lower the bowl (increased beater clearance) or...
Use & Care Guide
Page 15
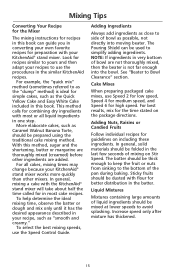
... KitchenAid® stand mixer works more quickly than other ingredients are not thoroughly mixed, then the beater is ideal for simple cakes, such as Caramel Walnut Banana Torte, should be folded in the last few seconds of liquid ingredients should be mixed at lower speeds to Bowl Clearance" section. Mixing Tips Converting Your Recipe for the Mixer The mixing instructions for recipes in this book can be used to use...
... KitchenAid® stand mixer works more quickly than other ingredients are not thoroughly mixed, then the beater is ideal for simple cakes, such as Caramel Walnut Banana Torte, should be folded in the last few seconds of liquid ingredients should be mixed at lower speeds to Bowl Clearance" section. Mixing Tips Converting Your Recipe for the Mixer The mixing instructions for recipes in this book can be used to use...
Use & Care Guide
Page 17
... on the attachment will fit into the notch on the hub rim. 5. See the Use and Care Guide that attachment power shaft fits into attachment hub, making certain that came with your stand mixer attachments for speed settings and operating time. Turn stand mixer off and unplug. 2. Remove attachment hub cover. 4. It may be necessary to follow these instructions can result in . Electrical Shock Hazard Plug into a grounded 3 prong outlet. 17 Insert attachment shaft housing into square attachment hub socket. The attachment power shaft and hub socket are of...
... on the attachment will fit into the notch on the hub rim. 5. See the Use and Care Guide that attachment power shaft fits into attachment hub, making certain that came with your stand mixer attachments for speed settings and operating time. Turn stand mixer off and unplug. 2. Remove attachment hub cover. 4. It may be necessary to follow these instructions can result in . Electrical Shock Hazard Plug into a grounded 3 prong outlet. 17 Insert attachment shaft housing into square attachment hub socket. The attachment power shaft and hub socket are of...
Use & Care Guide
Page 18
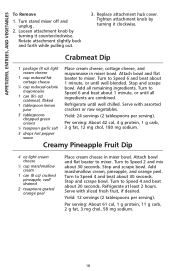
... Speed 6 and beat about 30 seconds. Refrigerate at least 2 hours. Loosen attachment knob by turning it counterclockwise. Tighten attachment knob by turning it clockwise. Stop and scrape bowl. APPETIZERS, ENTREES, AND VEGETABLES To Remove 1. Yield: 24 servings (2 tablespoons per serving). Replace attachment hub cover. Per serving: About 61 cal, 1 g protein, 11 g carb, 2 g fat, 3 mg chol, 58 mg sodium. 18 Crabmeat Dip 1 package (8 oz) light cream...
... Speed 6 and beat about 30 seconds. Refrigerate at least 2 hours. Loosen attachment knob by turning it counterclockwise. Tighten attachment knob by turning it clockwise. Stop and scrape bowl. APPETIZERS, ENTREES, AND VEGETABLES To Remove 1. Yield: 24 servings (2 tablespoons per serving). Replace attachment hub cover. Per serving: About 61 cal, 1 g protein, 11 g carb, 2 g fat, 3 mg chol, 58 mg sodium. 18 Crabmeat Dip 1 package (8 oz) light cream...
Use & Care Guide
Page 22
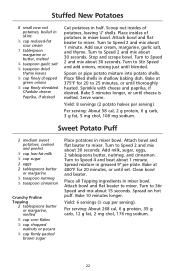
...sugar, eggs, 2 tablespoons butter, nutmeg, and cinnamon. Spread on hot puff. Per serving: About 268 cal, 6 g protein, 35 g carb, 12 g fat, 2 mg chol, 176 mg sodium. 22 Turn to Speed 2 and mix about 15 seconds. Stop and scrape bowl. Turn to 25 minutes, or until set...thoroughly heated. Turn to Speed 2 and mix about 30 seconds. Scoop out insides of potatoes in mixer bowl. Turn to Stir Speed and mix about 1 minute. Attach bowl and flat beater to mixer. Stuffed New Potatoes 8 small new red potatoes, boiled in skins 1⁄4 cup reduced-fat sour cream 1 tablespoon ...
...sugar, eggs, 2 tablespoons butter, nutmeg, and cinnamon. Spread on hot puff. Per serving: About 268 cal, 6 g protein, 35 g carb, 12 g fat, 2 mg chol, 176 mg sodium. 22 Turn to Speed 2 and mix about 15 seconds. Stop and scrape bowl. Turn to 25 minutes, or until set...thoroughly heated. Turn to Speed 2 and mix about 30 seconds. Scoop out insides of potatoes in mixer bowl. Turn to Stir Speed and mix about 1 minute. Attach bowl and flat beater to mixer. Stuffed New Potatoes 8 small new red potatoes, boiled in skins 1⁄4 cup reduced-fat sour cream 1 tablespoon ...
Use & Care Guide
Page 29
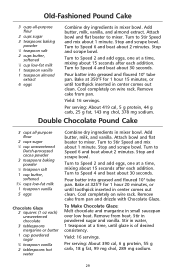
...mixing about 30 seconds. Turn to Speed 6 and beat about 1 minute. Turn to Stir Speed and mix about 2 minutes. Attach bowl and flat beater to Speed 6 and beat about 15 seconds after each addition. Turn to mixer. Pour batter into greased and floured 10" tube pan. To Make Chocolate Glaze: Melt chocolate and margarine in powdered sugar and vanilla. Old-Fashioned Pound Cake...low heat. Stop and scrape bowl. Remove cake from pan. Add butter, milk, and vanilla. Stop and scrape bowl. Stop and scrape bowl. Add butter, milk, vanilla, and almond extract. Turn to Speed 2 and ...
...mixing about 30 seconds. Turn to Speed 6 and beat about 1 minute. Turn to Stir Speed and mix about 2 minutes. Attach bowl and flat beater to Speed 6 and beat about 15 seconds after each addition. Turn to mixer. Pour batter into greased and floured 10" tube pan. To Make Chocolate Glaze: Melt chocolate and margarine in powdered sugar and vanilla. Old-Fashioned Pound Cake...low heat. Stop and scrape bowl. Remove cake from pan. Add butter, milk, and vanilla. Stop and scrape bowl. Stop and scrape bowl. Add butter, milk, vanilla, and almond extract. Turn to Speed 2 and ...
Use & Care Guide
Page 30
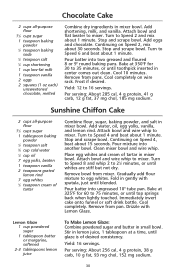
... mix about 1 minute. Add water, oil, egg yolks, vanilla, and lemon rind. Turn to mixer. Turn to Speed 8 and whip 2 to 21⁄2 minutes, or until glaze is of desired consistency. Drizzle with spatula, just until top springs back when lightly touched. Stir in lemon juice, 1 tablespoon at a time, until whites are stiff but not dry. Stop and scrape bowl. Attach bowl and wire whip...
... mix about 1 minute. Add water, oil, egg yolks, vanilla, and lemon rind. Turn to mixer. Turn to Speed 8 and whip 2 to 21⁄2 minutes, or until glaze is of desired consistency. Drizzle with spatula, just until top springs back when lightly touched. Stir in lemon juice, 1 tablespoon at a time, until whites are stiff but not dry. Stop and scrape bowl. Attach bowl and wire whip...

Use & Care Guide
Page 45
... "KitchenAid Pie Pastry" recipe) Place pumpkin, brown sugar, eggs, cinnamon, ginger, salt, and cloves in center of oven. Stop and scrape bowl. Let cheesecake stand in medium bowl; Yield: 16 servings. Continuing on wire rack away from oven. Turn to Stir Speed and mix about 11⁄2 minutes. Place pan of hot water on rack in mixer bowl. open oven door. Remove from drafts. To Make...
... "KitchenAid Pie Pastry" recipe) Place pumpkin, brown sugar, eggs, cinnamon, ginger, salt, and cloves in center of oven. Stop and scrape bowl. Let cheesecake stand in medium bowl; Yield: 16 servings. Continuing on wire rack away from oven. Turn to Stir Speed and mix about 11⁄2 minutes. Place pan of hot water on rack in mixer bowl. open oven door. Remove from drafts. To Make...
Use & Care Guide
Page 62
.... 62 Attach bowl and flat beater to Speed 4 and beat about 30 seconds. Turn to mixer. Cover. Turn to 60 minutes, or until ingredients are tender. Spread half of two pans. Turn to Stir Speed and add eggs, one at a time, mixing about 1 minute. Turn to Stir Speed and mix about 30 seconds, or until doubled in warm place, free from draft, 45 to Speed 2 and mix about...
.... 62 Attach bowl and flat beater to Speed 4 and beat about 30 seconds. Turn to mixer. Cover. Turn to 60 minutes, or until ingredients are tender. Spread half of two pans. Turn to Stir Speed and add eggs, one at a time, mixing about 1 minute. Turn to Stir Speed and mix about 30 seconds, or until doubled in warm place, free from draft, 45 to Speed 2 and mix about...

Parts List
Page 7
... Brush & Spring Assembly 20 9707926 Screw, Set 21 4162546 Brush Holder Assy 22 3179908 Housing, Brush Holder 23 240680 Insert, Brush Holder 24 116286 Cap, Spring Seat 25 116287 Spring, Cap 26 3184212 Cap, Brush Holder 27 W10068260 Screw 28 W10119326 Control Plate Assembly 29 17830 Governor Assembly 30 9706595 Phase Control Board 31 Cord, Power W10164883 Black W10164882 White 32 3184609 Screw, Self Tap 7 W10184246 Part No.
... Brush & Spring Assembly 20 9707926 Screw, Set 21 4162546 Brush Holder Assy 22 3179908 Housing, Brush Holder 23 240680 Insert, Brush Holder 24 116286 Cap, Spring Seat 25 116287 Spring, Cap 26 3184212 Cap, Brush Holder 27 W10068260 Screw 28 W10119326 Control Plate Assembly 29 17830 Governor Assembly 30 9706595 Phase Control Board 31 Cord, Power W10164883 Black W10164882 White 32 3184609 Screw, Self Tap 7 W10184246 Part No.


