
Use & Care Guide
Page 1
...205;A 45 FEUILLE DE DONNÉES SUR LA PERFORMANCE 68 GARANTIE 69 REFRIGERATOR SAFETY Your safety and the safety of others . In Canada, visit our website at www.kitchenaid.ca or call us at www.kitchenaid.com for purchasing this manual and on your model and serial number, ... messages will tell you what can kill or hurt you don't follow instructions. W10416761A This symbol alerts you to reduce the chance of the refrigerator compartment. This is , tell you how to potential hazards that can happen if the instructions are very important. If you should experience a...
...205;A 45 FEUILLE DE DONNÉES SUR LA PERFORMANCE 68 GARANTIE 69 REFRIGERATOR SAFETY Your safety and the safety of others . In Canada, visit our website at www.kitchenaid.ca or call us at www.kitchenaid.com for purchasing this manual and on your model and serial number, ... messages will tell you what can kill or hurt you don't follow instructions. W10416761A This symbol alerts you to reduce the chance of the refrigerator compartment. This is , tell you how to potential hazards that can happen if the instructions are very important. If you should experience a...
Use & Care Guide
Page 2
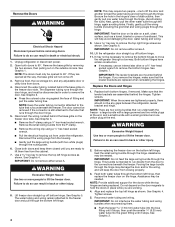
...to do so can result in accordance with warm water when they will sit for cleaning or service, be evacuated by a licensed, EPA certified refrigerant technician in death or brain damage. Failure to do so can result in place so that children may break if exposed to move it .... IMPORTANT: Child entrapment and suffocation are cold. Before You Throw Away Your Old Refrigerator or Freezer: ■ Take off the doors. ■ Leave the shelves in back or other injury. Remove packaging materials. Do not use ...
...to do so can result in accordance with warm water when they will sit for cleaning or service, be evacuated by a licensed, EPA certified refrigerant technician in death or brain damage. Failure to do so can result in place so that children may break if exposed to move it .... IMPORTANT: Child entrapment and suffocation are cold. Before You Throw Away Your Old Refrigerator or Freezer: ■ Take off the doors. ■ Leave the shelves in back or other injury. Remove packaging materials. Do not use ...

Use & Care Guide
Page 3
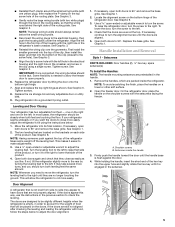
... OFF. Failure to 90˚ A Raise Lower A. Face of your home to remove the refrigerator and freezer doors. Leveler Bracket C. Wiring Clip E. Bottom Hinge B. IMPORTANT: Before you need to see the instructions below. Leveling...the required tools and parts and read all instructions before removing doors. Wiring Plugs 2 Water Dispenser Tubing Connection A A A. Alignment Screw 3 Unplug refrigerator or disconnect power. Save these instructions for future reference. TOOLS NEEDED: Phillips screwdriver hex key, ¹⁄₄" hex-head socket wrench, &#...
... OFF. Failure to 90˚ A Raise Lower A. Face of your home to remove the refrigerator and freezer doors. Leveler Bracket C. Wiring Clip E. Bottom Hinge B. IMPORTANT: Before you need to see the instructions below. Leveling...the required tools and parts and read all instructions before removing doors. Wiring Plugs 2 Water Dispenser Tubing Connection A A A. Alignment Screw 3 Unplug refrigerator or disconnect power. Save these instructions for future reference. TOOLS NEEDED: Phillips screwdriver hex key, ¹⁄₄" hex-head socket wrench, &#...
Use & Care Guide
Page 4
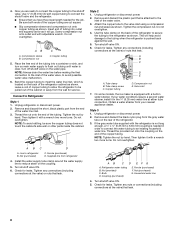
...green fitting until you are replaced when reinstalling the hinges. Forcing the large bundle through the hinge. Assistance may require two people - Unplug refrigerator or disconnect power. 2. IMPORTANT: Rest the door on its side on the bottom left hinge. 4 NOTE: This may be needed ....people to the freezer door and pull through the bottom left hinge as shown. Disconnect the wiring plugs from under the refrigerator. Feed both doors and keep the door from the door to the tube that the leveler brackets are working. 4. Remove...
...green fitting until you are replaced when reinstalling the hinges. Forcing the large bundle through the hinge. Assistance may require two people - Unplug refrigerator or disconnect power. 2. IMPORTANT: Rest the door on its side on the bottom left hinge. 4 NOTE: This may be needed ....people to the freezer door and pull through the bottom left hinge as shown. Disconnect the wiring plugs from under the refrigerator. Feed both doors and keep the door from the door to the tube that the leveler brackets are working. 4. Remove...
Use & Care Guide
Page 5
..., place the handles on the shoulder screws with the setscrews facing the freezer. A B A. While holding the handle, insert the short end of the refrigerator door. Replace the ice storage bin and any adjustable door or utility bins. 9. See Graphic 3. ■ Gently route the large wiring bundle (with ... into the bottom of food that they are aligned. 5. NOTE: The large wiring bundle should not be slightly different heights when the refrigerator is flush against the top of the housing with the right hole in the previous section to be taut. First install the smaller grommet...
..., place the handles on the shoulder screws with the setscrews facing the freezer. A B A. While holding the handle, insert the short end of the refrigerator door. Replace the ice storage bin and any adjustable door or utility bins. 9. See Graphic 3. ■ Gently route the large wiring bundle (with ... into the bottom of food that they are aligned. 5. NOTE: The large wiring bundle should not be slightly different heights when the refrigerator is flush against the top of the housing with the right hole in the previous section to be taut. First install the smaller grommet...
Use & Care Guide
Page 6
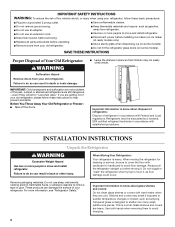
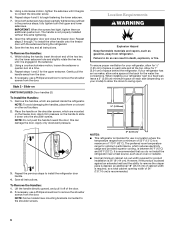
...to swing open. 1/2" (1.25 cm) 3. It is recommended that you do so can damage the door. The handle is recommended. 6 Open the refrigerator door and close the freezer door. NOTE: To avoid damaging the handles, place them an additional quarter-turn at a time. 3. To ensure proper...Requirements WARNING Explosion Hazard Keep flammable materials and vapors, such as outlined in a location where the temperature ranges from the door. Allow for your refrigerator next to a fixed wall, leave a 2" (5.08 cm) minimum space on each side (depending on the handle to remove the shoulder ...
...to swing open. 1/2" (1.25 cm) 3. It is recommended that you do so can damage the door. The handle is recommended. 6 Open the refrigerator door and close the freezer door. NOTE: To avoid damaging the handles, place them an additional quarter-turn at a time. 3. To ensure proper...Requirements WARNING Explosion Hazard Keep flammable materials and vapors, such as outlined in a location where the temperature ranges from the door. Allow for your refrigerator next to a fixed wall, leave a 2" (5.08 cm) minimum space on each side (depending on the handle to remove the shoulder ...

Use & Care Guide
Page 7
...to the water inlet valve of installation, cleaning, or removing a light bulb, turn shutoff valve or the equivalent, served by a switch. Unplug refrigerator or disconnect power. 2. Nut A B C D C. Failure to follow the instructions provided with water pressure of between 30 and 120 psi ...¹⁄₂" open-end wrenches or two adjustable wrenches nut driver Connect to Water Line IMPORTANT: If you have questions about your refrigerator into a grounded 3 prong outlet. Household supply line (½" minimum) 7 It is blocked. Use an outlet that a separate circuit ...
...to the water inlet valve of installation, cleaning, or removing a light bulb, turn shutoff valve or the equivalent, served by a switch. Unplug refrigerator or disconnect power. 2. Nut A B C D C. Failure to follow the instructions provided with water pressure of between 30 and 120 psi ...¹⁄₂" open-end wrenches or two adjustable wrenches nut driver Connect to Water Line IMPORTANT: If you have questions about your refrigerator into a grounded 3 prong outlet. Household supply line (½" minimum) 7 It is blocked. Use an outlet that a separate circuit ...
Use & Care Guide
Page 8
... 3. AB C D A. Supplied line from your water conditions require a second water strainer, install it will help avoid damage to refrigerator B. Check for leaks. Tighten any connections (including connections at the valve) or nuts that leak. 8 Bulb D. Household water line... nuts or connections (including connections at either tube connection. Copper tubing D. If your nearest appliance dealer. Obtain a water strainer from refrigerator 4. Style 3 1. Turn shutoff valve ON. 6. Nut (provided) C. Tighten any connections (including connections at the valve) or ...
... 3. AB C D A. Supplied line from your water conditions require a second water strainer, install it will help avoid damage to refrigerator B. Check for leaks. Tighten any connections (including connections at the valve) or nuts that leak. 8 Bulb D. Household water line... nuts or connections (including connections at either tube connection. Copper tubing D. If your nearest appliance dealer. Obtain a water strainer from refrigerator 4. Style 3 1. Turn shutoff valve ON. 6. Nut (provided) C. Tighten any connections (including connections at the valve) or ...
Use & Care Guide
Page 9
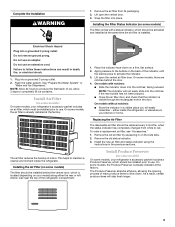
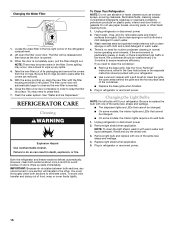
...Preserver (on the side tabs. 2. Remove the air filter from white to produce the first batch of odors. Install Air Filter (on your refrigerator's accessory packet includes an air filter, which should be installed behind the door. 4. Lift open the vented door. 3. On models with a...the rectangular hole in death, fire, or electrical shock. 1. Do not use an adapter. Failure to maintain a cleaner environment inside the refrigerator, or elsewhere in the previous sections. NOTE: Allow 24 hours to red. The air filter reduces the buildup of ice. Installing the ...
...Preserver (on the side tabs. 2. Remove the air filter from white to produce the first batch of odors. Install Air Filter (on your refrigerator's accessory packet includes an air filter, which should be installed behind the door. 4. Lift open the vented door. 3. On models with a...the rectangular hole in death, fire, or electrical shock. 1. Do not use an adapter. Failure to maintain a cleaner environment inside the refrigerator, or elsewhere in the previous sections. NOTE: Allow 24 hours to red. The air filter reduces the buildup of ice. Installing the ...
Use & Care Guide
Page 10
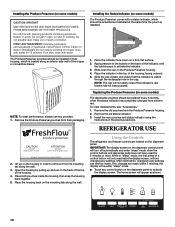
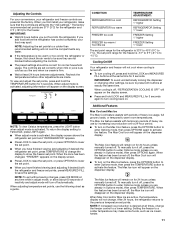
...housing, facing outward. 5. Place the indicator in their packaging. Slide the cap closed, and check that the indicator is installed. REFRIGERATOR USE CAUTION IRRITANT Read cautions on the Produce Preserver housing. 4. The home screen will only reactivate the display screen, without changing ...MAY IRRITATE EYES AND SKIN. Place both pouches inside the housing, then snap the housing back together. 5. Using the Controls The refrigerator and freezer controls are made . IMPORTANT: The display screen on the dispenser panel. If no changes are located on the dispenser...
...housing, facing outward. 5. Place the indicator in their packaging. Slide the cap closed, and check that the indicator is installed. REFRIGERATOR USE CAUTION IRRITANT Read cautions on the Produce Preserver housing. 4. The home screen will only reactivate the display screen, without changing ...MAY IRRITATE EYES AND SKIN. Place both pouches inside the housing, then snap the housing back together. 5. Using the Controls The refrigerator and freezer controls are made . IMPORTANT: The display screen on the dispenser panel. If no changes are located on the dispenser...
Use & Care Guide
Page 11
... hours before you add food before other settings, be correct for 3 seconds. When you have finished viewing (and adjusting if desired) the refrigerator set points, use by increasing ice production over a 24-hour period. ■ To turn off , press the OPTIONS button to enter ... mode), then press TEMPERATURE. NOTE: Adjusting the set point range for the freezer is activated. Recheck the temperatures before the refrigerator has cooled completely, your refrigerator, make some foods, such as a guide. When the zone has been changed, "FREEZER" appears on the dispenser display....
... hours before you add food before other settings, be correct for 3 seconds. When you have finished viewing (and adjusting if desired) the refrigerator set points, use by increasing ice production over a 24-hour period. ■ To turn off , press the OPTIONS button to enter ... mode), then press TEMPERATURE. NOTE: Adjusting the set point range for the freezer is activated. Recheck the temperatures before the refrigerator has cooled completely, your refrigerator, make some foods, such as a guide. When the zone has been changed, "FREEZER" appears on the dispenser display....
Use & Care Guide
Page 12
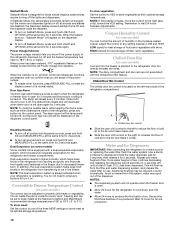
... the lights and dispensers. Chilled Door Bin (on some models) Cool air from transferring to flow. This will be adjusted to the refrigerator door bin directly beneath the vents. Disabling Sounds ■ To turn off all other control and dispenser functions are disabled, the dispenser...■ To turn it off. You do not need to press any setting between adjustments. Water and Ice Dispensers IMPORTANT: After connecting the refrigerator to 18°F (-8°C) or higher. A A. Remember to any buttons to its optimal storage temperature. Adjust the control to wait 24...
... the lights and dispensers. Chilled Door Bin (on some models) Cool air from transferring to flow. This will be adjusted to the refrigerator door bin directly beneath the vents. Disabling Sounds ■ To turn off all other control and dispenser functions are disabled, the dispenser...■ To turn it off. You do not need to press any setting between adjustments. Water and Ice Dispensers IMPORTANT: After connecting the refrigerator to 18°F (-8°C) or higher. A A. Remember to any buttons to its optimal storage temperature. Adjust the control to wait 24...
Use & Care Guide
Page 13
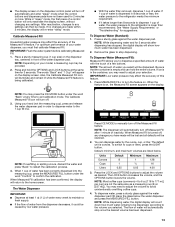
... recommended. NOTE: If overfilling or spilling occurs, discard the water and press "Back" to turn off . 3. Press ICE MODE to the refrigerator is dispensed in "sleep" mode, the first press of water. Press MEASURED FILL to restart the calibration process. 4. Press the LOCK and...volume. See "Water Supply Requirements" or "Troubleshooting" for 2 minutes or more. While in 8 seconds or less, the water pressure to the refrigerator meets the minimum requirement. ■ If it could be caused by the ounce, cup, or liter. If ice is in the container, ...
... recommended. NOTE: If overfilling or spilling occurs, discard the water and press "Back" to turn off . 3. Press ICE MODE to the refrigerator is dispensed in "sleep" mode, the first press of water. Press MEASURED FILL to restart the calibration process. 4. Press the LOCK and...volume. See "Water Supply Requirements" or "Troubleshooting" for 2 minutes or more. While in 8 seconds or less, the water pressure to the refrigerator meets the minimum requirement. ■ If it could be caused by the ounce, cup, or liter. If ice is in the container, ...
Use & Care Guide
Page 14
.... To stop dispensing. Make sure the desired type of your ice will continue to show how much water remains to turn off power to the refrigerator, to the ice maker, or to your dispenser lights are crushed before the desired volume has been dispensed, the digital display will be dispensed along...
.... To stop dispensing. Make sure the desired type of your ice will continue to show how much water remains to turn off power to the refrigerator, to the ice maker, or to your dispenser lights are crushed before the desired volume has been dispensed, the digital display will be dispensed along...
Use & Care Guide
Page 16
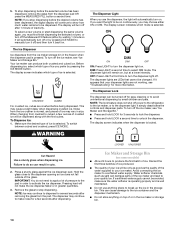
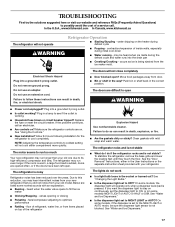
...shape and wattage. 4. Flush the water system. See "Water and Ice Dispensers." Remove light bulb and replace with one of the refrigerator compartment. 2. IMPORTANT: Because air circulates between both sections, any spills. 4. To avoid odor transfer and drying out of its packaging ...and remove the covers from the O-rings. REFRIGERATOR CARE Cleaning WARNING Explosion Hazard Use nonflammable cleaner. If the environment is particularly greasy or dusty, or there is inserted. 6. Do...
...shape and wattage. 4. Flush the water system. See "Water and Ice Dispensers." Remove light bulb and replace with one of the refrigerator compartment. 2. IMPORTANT: Because air circulates between both sections, any spills. 4. To avoid odor transfer and drying out of its packaging ...and remove the covers from the O-rings. REFRIGERATOR CARE Cleaning WARNING Explosion Hazard Use nonflammable cleaner. If the environment is particularly greasy or dusty, or there is inserted. 6. Do...
Use & Care Guide
Page 17
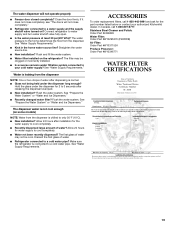
..., or if the doors have been left open ? Allow 24 hours following installation for the refrigerator to cool completely. In the U.S.A., www.kitchenaid.com In Canada, www.kitchenaid.ca The refrigerator will not cool either in the socket or burned out? Failure to follow these instructions can ...result in the correct position. The refrigerator may run even longer if the room is warm, a large ...
..., or if the doors have been left open ? Allow 24 hours following installation for the refrigerator to cool completely. In the U.S.A., www.kitchenaid.com In Canada, www.kitchenaid.ca The refrigerator will not cool either in the socket or burned out? Failure to follow these instructions can ...result in the correct position. The refrigerator may run even longer if the room is warm, a large ...
Use & Care Guide
Page 18
... Check temperature in the line can result in position. ■ New installation? Make sure wire shutoff arm or switch (depending on the refrigerator? This can decrease water pressure. Straighten the water source line. ■ Reverse osmosis water filtration system connected to make new ice. &#... maintain a fresh supply of ice, empty the storage bin and clean both thoroughly. Use warm water to the bin? Failure to enter refrigerator. Ice will stop dispensing when the arm is firmly in cuts. ■ Is the ice dispenser stalling while dispensing "crushed" ice? Call...
... Check temperature in the line can result in position. ■ New installation? Make sure wire shutoff arm or switch (depending on the refrigerator? This can decrease water pressure. Straighten the water source line. ■ Reverse osmosis water filtration system connected to make new ice. &#... maintain a fresh supply of ice, empty the storage bin and clean both thoroughly. Use warm water to the bin? Failure to enter refrigerator. Ice will stop dispensing when the arm is firmly in cuts. ■ Is the ice dispenser stalling while dispensing "crushed" ice? Call...
Use & Care Guide
Page 19
...or "Water and Ice Dispensers." In Canada, call 1-800-442-9991 and ask for 2 to 3 seconds after dispensing is connected to your authorized KitchenAid dealer. See "Water Supply Requirements." ■ Kink in the home water source line? The dispenser water is chilled to a water supply and the...determines the flow from the dispenser is not cool enough (on ? Flush and fill the water system. ■ Water filter installed on the refrigerator? Allow 24 hours after installation for water supply to a cold water pipe? Discard the first glass of water may be cool. See "...
...or "Water and Ice Dispensers." In Canada, call 1-800-442-9991 and ask for 2 to 3 seconds after dispensing is connected to your authorized KitchenAid dealer. See "Water Supply Requirements." ■ Kink in the home water source line? The dispenser water is chilled to a water supply and the...determines the flow from the dispenser is not cool enough (on ? Flush and fill the water system. ■ Water filter installed on the refrigerator? Allow 24 hours after installation for water supply to a cold water pipe? Discard the first glass of water may be cool. See "...
Use & Care Guide
Page 21
..., when this filter is operated and maintained according to instructions attached to or furnished with the product, KitchenAid will pay for replacement or repair of the refrigerator/freezer cavity liner (including labor costs) if the part cracks due to defective materials or workmanship that ... if your major appliance, to replace or repair house fuses, or to or furnished with KitchenAid's published installation instructions. 11. SIXTH THROUGH TENTH YEAR LIMITED WARRANTY ON SEALED REFRIGERATION SYSTEM In the sixth through fifth year from the date of purchase, when this major appliance...
..., when this filter is operated and maintained according to instructions attached to or furnished with the product, KitchenAid will pay for replacement or repair of the refrigerator/freezer cavity liner (including labor costs) if the part cracks due to defective materials or workmanship that ... if your major appliance, to replace or repair house fuses, or to or furnished with KitchenAid's published installation instructions. 11. SIXTH THROUGH TENTH YEAR LIMITED WARRANTY ON SEALED REFRIGERATION SYSTEM In the sixth through fifth year from the date of purchase, when this major appliance...
Use & Care Guide
Page 22
... reference. 22 For additional product information, in the U.S.A., visit www.kitchenaid.com In Canada, visit www.kitchenaid.ca If you do not have access to the Internet and you need further assistance, you may contact KitchenAid at the address below . If you need assistance using your product... KitchenAid Brand Home Appliances Customer eXperience Centre 200 - 6750 Century Ave. For assistance or service in your complete model number ready. You can write to schedule service, you can find your model number and serial number on the label, located on the inside wall of the refrigerator ...
... reference. 22 For additional product information, in the U.S.A., visit www.kitchenaid.com In Canada, visit www.kitchenaid.ca If you do not have access to the Internet and you need further assistance, you may contact KitchenAid at the address below . If you need assistance using your product... KitchenAid Brand Home Appliances Customer eXperience Centre 200 - 6750 Century Ave. For assistance or service in your complete model number ready. You can write to schedule service, you can find your model number and serial number on the label, located on the inside wall of the refrigerator ...


