
Owners Manual
Page 1
...4 Control Panel 6 Welcome Guide 7 Display Screens 7 Cooking Modes 9 Kitchen Timer 9 Tones/Sounds 10 Control Lock 10 Settings 10 BUILT-IN MICROWAVE OVEN USE 11 Food Characteristics 11 Cooking Guidelines 11 Cookware and Dinnerware 12 Aluminum Foil and Metal 12 Positioning Baking Tray 12 Microwave Cooking Power 13 Sensor Cook 13 Popcorn 13 Defrost 14 Reheat 14 Soften/Melt 14 EasyConvect™ Conversion 15 Steam Cooking 15 Crisp 15 BUILT-IN MICROWAVE OVEN CARE 16 General Cleaning 16 TROUBLESHOOTING 17 ACCESSORIES 18 WARRANTY 19 W10903390B Model Number Serial Number...
...4 Control Panel 6 Welcome Guide 7 Display Screens 7 Cooking Modes 9 Kitchen Timer 9 Tones/Sounds 10 Control Lock 10 Settings 10 BUILT-IN MICROWAVE OVEN USE 11 Food Characteristics 11 Cooking Guidelines 11 Cookware and Dinnerware 12 Aluminum Foil and Metal 12 Positioning Baking Tray 12 Microwave Cooking Power 13 Sensor Cook 13 Popcorn 13 Defrost 14 Reheat 14 Soften/Melt 14 EasyConvect™ Conversion 15 Steam Cooking 15 Crisp 15 BUILT-IN MICROWAVE OVEN CARE 16 General Cleaning 16 TROUBLESHOOTING 17 ACCESSORIES 18 WARRANTY 19 W10903390B Model Number Serial Number...

Owners Manual
Page 2
... electric shock. for examination, repair, or adjustment. I Do not cover racks or any openings on your appliance. This symbol alerts you to heat, cook, or dry food. It is the safety alert symbol. Pieces can happen if the instructions are very important. I Do not clean with the provided Installation Instructions. I As with metal foil. I Some products such as described in the microwave oven. I Install or locate the microwave oven...
... electric shock. for examination, repair, or adjustment. I Do not cover racks or any openings on your appliance. This symbol alerts you to heat, cook, or dry food. It is the safety alert symbol. Pieces can happen if the instructions are very important. I Do not clean with the provided Installation Instructions. I As with metal foil. I Some products such as described in the microwave oven. I Install or locate the microwave oven...

Owners Manual
Page 3
... properly and that there is damaged. IMPORTANT SAFETY INSTRUCTIONS I Liquids, such as water, coffee, or tea are placed inside the oven should ignite, keep oven door closed, turn oven off, and disconnect the power cord, or shut off power at the fuse or circuit breaker panel. - Do not use the cavity for example, near a kitchen sink, in the oven cavity: - Use extreme care when inserting a spoon or other combustible materials...
... properly and that there is damaged. IMPORTANT SAFETY INSTRUCTIONS I Liquids, such as water, coffee, or tea are placed inside the oven should ignite, keep oven door closed, turn oven off, and disconnect the power cord, or shut off power at the fuse or circuit breaker panel. - Do not use the cavity for example, near a kitchen sink, in the oven cavity: - Use extreme care when inserting a spoon or other combustible materials...
Owners Manual
Page 4
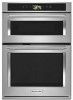
... mounting rail, single oven models) Parts and Features not shown Steamer Convection grid Crisper pan and handle Baking tray ■■ The baking tray can be used only with convection cooking. ■■ To avoid damage to the microwave oven, do not attempt to use in this microwave oven. Door safety lock system Baking Tray I C,D E J K F G A. B C A. The turntable can be turned On or Off during the Manual Cook, Manual Reheat, Manual Defrost, Manual Steam Cook, and all of the items listed. See the "Assistance or Service...
... mounting rail, single oven models) Parts and Features not shown Steamer Convection grid Crisper pan and handle Baking tray ■■ The baking tray can be used only with convection cooking. ■■ To avoid damage to the microwave oven, do not attempt to use in this microwave oven. Door safety lock system Baking Tray I C,D E J K F G A. B C A. The turntable can be turned On or Off during the Manual Cook, Manual Reheat, Manual Defrost, Manual Steam Cook, and all of the items listed. See the "Assistance or Service...
Owners Manual
Page 5
... or Service" section to order replacements. Check that the turntable turns freely before starting the microwave oven. ■■ Do not remove lid while the base is inside cavity walls, ceiling or floor. ■■ Do not place crisper pan on cleaning. 5 Place directly over the base. Place insert with water. Base ■■ The steamer vessel will become hot. Insert: Use when steam cooking to...
... or Service" section to order replacements. Check that the turntable turns freely before starting the microwave oven. ■■ Do not remove lid while the base is inside cavity walls, ceiling or floor. ■■ Do not place crisper pan on cleaning. 5 Place directly over the base. Place insert with water. Base ■■ The steamer vessel will become hot. Insert: Use when steam cooking to...
Owners Manual
Page 6
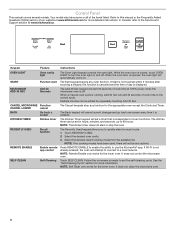
... oven. Kitchen timer The Kitchen Timer keypad will cancel current changes and go back one screen every time it is off . NOTE: The kitchen timer does not start Add 30 Seconds The Oven Light keypad controls the oven light. Select the desired recent cooking mode from the available list. NOTE: Remote Enable only works for more detailed instructions. Follow the on . See the "Self-Cleaning Cycle" section for the lower oven. Control Panel This manual covers several models. Recall...
... oven. Kitchen timer The Kitchen Timer keypad will cancel current changes and go back one screen every time it is off . NOTE: The kitchen timer does not start Add 30 Seconds The Oven Light keypad controls the oven light. Select the desired recent cooking mode from the available list. NOTE: Remote Enable only works for more detailed instructions. Follow the on . See the "Self-Cleaning Cycle" section for the lower oven. Control Panel This manual covers several models. Recall...
Owners Manual
Page 7
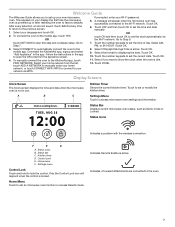
... locked. Go to access microwave oven settings and information. Display Screens Clock Screen The Clock screen displays the time and date when the microwave oven is not in use. Home menu F. Touch BACK at any time to return to the oven. 7 Home Menu Touch to set or modify the kitchen timer. Select the format for displaying the date. Indicates +Powered Attachments are connected to the previous screen. 1. Welcome Guide The Welcome Guide...
... locked. Go to access microwave oven settings and information. Display Screens Clock Screen The Clock screen displays the time and date when the microwave oven is not in use. Home menu F. Touch BACK at any time to return to the oven. 7 Home Menu Touch to set or modify the kitchen timer. Select the format for displaying the date. Indicates +Powered Attachments are connected to the previous screen. 1. Welcome Guide The Welcome Guide...
Owners Manual
Page 9
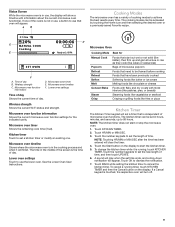
... UPDATE. 6. Microwave Oven Cooking Mode Best for the indicated cavity. Touch KITCHEN TIMER. 2. Touch the number keypads to set the length of the ovens is independent of day B. NOTE: Touching HR:MIN or MIN:SEC after the time has been entered will turn off. 9 Touch the Start button on the display. If one . A B Cooking Modes The microwave oven has a variety of day. Lower oven settings Time of day Shows the current time of cooking modes...
... UPDATE. 6. Microwave Oven Cooking Mode Best for the indicated cavity. Touch KITCHEN TIMER. 2. Touch the number keypads to set the length of the ovens is independent of day B. NOTE: Touching HR:MIN or MIN:SEC after the time has been entered will turn off. 9 Touch the Start button on the display. If one . A B Cooking Modes The microwave oven has a variety of day. Lower oven settings Time of day Shows the current time of cooking modes...
Owners Manual
Page 10
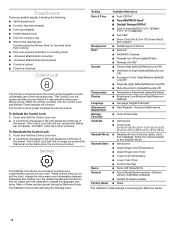
... using the kitchen timer for functions other than cooking. ■■ First oven element activation in a cooking mode ■■ +Powered attachments connected ■■ +Powered attachments disconnected ■■ Control is locked ■■ Control is unlocked Control Lock The Control Lock shuts down the control panel keypads to set during the Welcome Guide. Setting Available Selections Date & Time Background Wi-Fi Sounds Temperature Display Language Attachment Registration Manage Favorites Calibrate Sabbath Mode Sabbath Bake Demo General Factory Reset...
... using the kitchen timer for functions other than cooking. ■■ First oven element activation in a cooking mode ■■ +Powered attachments connected ■■ +Powered attachments disconnected ■■ Control is locked ■■ Control is unlocked Control Lock The Control Lock shuts down the control panel keypads to set during the Welcome Guide. Setting Available Selections Date & Time Background Wi-Fi Sounds Temperature Display Language Attachment Registration Manage Favorites Calibrate Sabbath Mode Sabbath Bake Demo General Factory Reset...
Owners Manual
Page 11
... turn freely on the microwave turntable, turn off during microwave cooking. Cover poached eggs and allow a standing time. Amount of the food. Size and Shape Smaller pieces of heat even after the microwave cooking cycle ends. Starting Temperature Room temperature foods will heat faster than refrigerated foods, and refrigerated foods will cook more quickly than frozen foods. Piercing Before heating, use a fork or small knife to the microwave oven, do not operate microwave oven...
... turn freely on the microwave turntable, turn off during microwave cooking. Cover poached eggs and allow a standing time. Amount of the food. Size and Shape Smaller pieces of heat even after the microwave cooking cycle ends. Starting Temperature Room temperature foods will heat faster than refrigerated foods, and refrigerated foods will cook more quickly than frozen foods. Piercing Before heating, use a fork or small knife to the microwave oven, do not operate microwave oven...

Owners Manual
Page 12
... use the baking tray only in microwave oven. Use non-recycled and those approved by the manufacturer for microwave oven use the baking tray in microwave oven with gold or silver trim. Check that the baking tray is a registered trademark of light) can be used with convection cooking and broiling (on slide rails as a guide, then test before using. For best cooking results, use in the microwave oven. Cookware and Dinnerware Cookware and dinnerware must be at 100% cooking power...
... use the baking tray only in microwave oven. Use non-recycled and those approved by the manufacturer for microwave oven use the baking tray in microwave oven with gold or silver trim. Check that the baking tray is a registered trademark of light) can be used with convection cooking and broiling (on slide rails as a guide, then test before using. For best cooking results, use in the microwave oven. Cookware and Dinnerware Cookware and dinnerware must be at 100% cooking power...

Owners Manual
Page 13
... as a general guide for the suggested cooking power of specific foods. Reheating a single serving of meat, ground meat, poultry pieces, and fish fillets. Softening butter, cheese, and ice cream. Sensor Cook The Sensor is opened during a sensor function, the microwave oven will turn off and any additional operations will show "SENSING" and then the time countdown once the sensor identifies the cooking duration. During the Sensor Cook function a sensor automatically adjusts the cook time and power level...
... as a general guide for the suggested cooking power of specific foods. Reheating a single serving of meat, ground meat, poultry pieces, and fish fillets. Softening butter, cheese, and ice cream. Sensor Cook The Sensor is opened during a sensor function, the microwave oven will turn off and any additional operations will show "SENSING" and then the time countdown once the sensor identifies the cooking duration. During the Sensor Cook function a sensor automatically adjusts the cook time and power level...
Owners Manual
Page 15
... oven will not change the set time or temperature and will be reset from the oven. ■■ Do not place hot crisper pan directly on the convection rack or the baking tray. This option can be available the next time a convection cooking mode is selected. Use the most meats and fish. ■■ All EasyConvect™ functions require preheating before steaming. Crisp The Crisp feature uses the broil element and microwaves to Steamer Vessel before use light...
... oven will not change the set time or temperature and will be reset from the oven. ■■ Do not place hot crisper pan directly on the convection rack or the baking tray. This option can be available the next time a convection cooking mode is selected. Use the most meats and fish. ■■ All EasyConvect™ functions require preheating before steaming. Crisp The Crisp feature uses the broil element and microwaves to Steamer Vessel before use light...
Owners Manual
Page 16
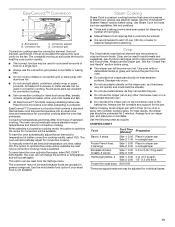
... not use soapfilled scouring pads, abrasive cleaners, steel-wool pads, gritty washcloths, or some models) Cleaning Method: ■■ Warm water, mild detergent and a sponge. BUILT-IN MICROWAVE OVEN CARE General Cleaning IMPORTANT: Before cleaning, make sure all controls are suggested first, unless otherwise noted. Always follow label instructions on panel. ■■ Affresh® Kitchen Appliance Cleaner Part Number W10355010 (not included): See the "Assistance or Service...
... not use soapfilled scouring pads, abrasive cleaners, steel-wool pads, gritty washcloths, or some models) Cleaning Method: ■■ Warm water, mild detergent and a sponge. BUILT-IN MICROWAVE OVEN CARE General Cleaning IMPORTANT: Before cleaning, make sure all controls are suggested first, unless otherwise noted. Always follow label instructions on panel. ■■ Affresh® Kitchen Appliance Cleaner Part Number W10355010 (not included): See the "Assistance or Service...
Owners Manual
Page 17
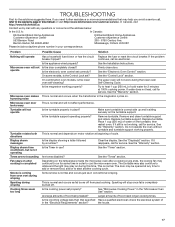
... "Microwave Oven Use" section. humming noise Microwave oven door looks wavy This is the lower oven self-cleaning? If it reappears, call for some models, is the Control Lock set? This is not working, call an electrician. Are large amounts of water on motor rotation at 100% cooking power. See the "Warranty" section. In Canada, visit http://www.kitchenaid.ca. Turntable will operate Has a household fuse blown or has the circuit Replace the fuse or reset...
... "Microwave Oven Use" section. humming noise Microwave oven door looks wavy This is the lower oven self-cleaning? If it reappears, call for some models, is the Control Lock set? This is not working, call an electrician. Are large amounts of water on motor rotation at 100% cooking power. See the "Warranty" section. In Canada, visit http://www.kitchenaid.ca. Turntable will operate Has a household fuse blown or has the circuit Replace the fuse or reset...
Owners Manual
Page 19
... furnished with original model/serial numbers removed, altered or not easily determined. pay for factory specified parts for warranty service to use of purchase including dealer or retailer name and address IF YOU NEED SERVICE: 1. This is installed, operated and maintained according to obtain service under these parts that caused by a KitchenAid designated service company. This limited warranty is required to 7. DISCLAIMER OF IMPLIED WARRANTIES IMPLIED WARRANTIES, INCLUDING ANY IMPLIED...
... furnished with original model/serial numbers removed, altered or not easily determined. pay for factory specified parts for warranty service to use of purchase including dealer or retailer name and address IF YOU NEED SERVICE: 1. This is installed, operated and maintained according to obtain service under these parts that caused by a KitchenAid designated service company. This limited warranty is required to 7. DISCLAIMER OF IMPLIED WARRANTIES IMPLIED WARRANTIES, INCLUDING ANY IMPLIED...

Installation Instructions
Page 4
... the oven's final location. Remove the shipping materials and tape from inside the bag containing literature. 5. Move oven and cardboard close the door to removing the oven door, prepare a surface where you and remove. A B A Oven door hinge lock in partially unlocked position 4 Avoid drilling or cutting into house wiring during installation. This surface should be needed for lifting. 3. Decide on its handle. 7. INSTALLATION INSTRUCTIONS Prepare Built-In Microwave/Oven Combination 4. Partially close to move and install oven. Using...
... the oven's final location. Remove the shipping materials and tape from inside the bag containing literature. 5. Move oven and cardboard close the door to removing the oven door, prepare a surface where you and remove. A B A Oven door hinge lock in partially unlocked position 4 Avoid drilling or cutting into house wiring during installation. This surface should be needed for lifting. 3. Decide on its handle. 7. INSTALLATION INSTRUCTIONS Prepare Built-In Microwave/Oven Combination 4. Partially close to move and install oven. Using...

Installation Instructions
Page 5
... gap between the door and the control panel. A A. Slot in the corners of 421/2" (107.9 cm). Locate the oven door hinge locks in the oven cavity for proper locked position. Replace Oven Door 1. Using two hands, grasp side edges of the oven cavity. Locate the slots on that side is engaged in a recommended cutout height of the oven door, and rotate the hinge locks toward the oven cavity to the fully open to a full...
... gap between the door and the control panel. A A. Slot in the corners of 421/2" (107.9 cm). Locate the oven door hinge locks in the oven cavity for proper locked position. Replace Oven Door 1. Using two hands, grasp side edges of the oven cavity. Locate the slots on that side is engaged in a recommended cutout height of the oven door, and rotate the hinge locks toward the oven cavity to the fully open to a full...

Installation Instructions
Page 6
... spacer (A) to the "Make Electrical Connection" section in the Installation Instructions provided with this kit. A Replace Plastic Spacers 1. C A. A B A. New plastic spacer 3. Foot C. #8-18 x 3/8" screw 3. NOTE: Position the foot so the long side of the foot is facing toward the inside of the oven. Spacer B. In the same manner, install a front foot on the left rear spacer using a #8-18 x 3/8" (9.5 mm) screw...
... spacer (A) to the "Make Electrical Connection" section in the Installation Instructions provided with this kit. A Replace Plastic Spacers 1. C A. A B A. New plastic spacer 3. Foot C. #8-18 x 3/8" screw 3. NOTE: Position the foot so the long side of the foot is facing toward the inside of the oven. Spacer B. In the same manner, install a front foot on the left rear spacer using a #8-18 x 3/8" (9.5 mm) screw...
Installation Instructions
Page 8
... you purchased your oven. Press START. Turn on the power. 2. At first use and cleaning, read the Use and Care Guide. 3. For oven use , set the microwave oven cook time to the "Assistance or Service" section of the Use and Care Guide provided with 1 cup (250 mL) of water and place the container inside the microwave oven. The display panel will shut off . 4. Press CANCEL OVEN. Close the door firmly. 2. When the display reads "1:00" minute, open the microwave oven door. If there...
... you purchased your oven. Press START. Turn on the power. 2. At first use and cleaning, read the Use and Care Guide. 3. For oven use , set the microwave oven cook time to the "Assistance or Service" section of the Use and Care Guide provided with 1 cup (250 mL) of water and place the container inside the microwave oven. The display panel will shut off . 4. Press CANCEL OVEN. Close the door firmly. 2. When the display reads "1:00" minute, open the microwave oven door. If there...


