Owners Manual
Page 1
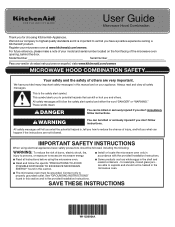
..., visite www.kitchenaid.com/owners MICROWAVE HOOD COMBINATION SAFETY Deberá tener a mano el número de modelo y de serie, que están ubicados en la parte frontal de la abertura del horno de microondas, detrás de la puerta. This is important to reduce the chance of the microwave oven opening, behind the door. for choosing KitchenAid® Appliances. SAVE THESE INSTRUCTIONS W11236924A Your...
..., visite www.kitchenaid.com/owners MICROWAVE HOOD COMBINATION SAFETY Deberá tener a mano el número de modelo y de serie, que están ubicados en la parte frontal de la abertura del horno de microondas, detrás de la puerta. This is important to reduce the chance of the microwave oven opening, behind the door. for choosing KitchenAid® Appliances. SAVE THESE INSTRUCTIONS W11236924A Your...
Owners Manual
Page 2
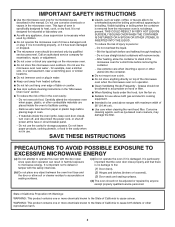
... food. Remove wire twist-ties from the microwave oven is not working properly, or if it is specifically designed to cause cancer. SAVE THESE INSTRUCTIONS PRECAUTIONS TO AVOID POSSIBLE EXPOSURE TO EXCESSIVE MICROWAVE ENERGY (a) Do not attempt to operate this microwave oven outdoors. It is in water. After heating, allow soil or cleaner residue to persons: - I Use care when cleaning the vent-hood filter. If materials inside the oven to be serviced...
... food. Remove wire twist-ties from the microwave oven is not working properly, or if it is specifically designed to cause cancer. SAVE THESE INSTRUCTIONS PRECAUTIONS TO AVOID POSSIBLE EXPOSURE TO EXCESSIVE MICROWAVE ENERGY (a) Do not attempt to operate this microwave oven outdoors. It is in water. After heating, allow soil or cleaner residue to persons: - I Use care when cleaning the vent-hood filter. If materials inside the oven to be serviced...
Owners Manual
Page 3
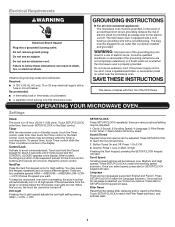
... use an adapter. Vent Fan Press the Vent Fan keypad once for about 3 seconds until 2 tones sound and the CONTROL LOCKED appears in the display. Press SETUP/CLOCK to reach the Language submenu. Press SETUP/CLOCK to follow these instructions can result in death, fire, or electrical shock. Do not use an extension cord. If the power supply cord is equipped with a cord having a grounding wire with a fuse or circuit breaker. Timer With the microwave oven...
... use an adapter. Vent Fan Press the Vent Fan keypad once for about 3 seconds until 2 tones sound and the CONTROL LOCKED appears in the display. Press SETUP/CLOCK to reach the Language submenu. Press SETUP/CLOCK to follow these instructions can result in death, fire, or electrical shock. Do not use an extension cord. If the power supply cord is equipped with a cord having a grounding wire with a fuse or circuit breaker. Timer With the microwave oven...

Owners Manual
Page 4
.... Touch SETUP/CLOCK to reach the Demo mode submenu, then follow the prompts to practice using the Vent Fan keypad. The vent fan may be turned off for 5min), the display will return to enter power level (10-90), then touch the Start control. Features Standby Mode When no key press for manual cooking only. Follow prompts to Standby Power mode and dim the LCD brightness after 30 minutes). Microwave Oven Use Manual Cooking Touch number keypads to enter time, touch POWER...
.... Touch SETUP/CLOCK to reach the Demo mode submenu, then follow the prompts to practice using the Vent Fan keypad. The vent fan may be turned off for 5min), the display will return to enter power level (10-90), then touch the Start control. Features Standby Mode When no key press for manual cooking only. Follow prompts to Standby Power mode and dim the LCD brightness after 30 minutes). Microwave Oven Use Manual Cooking Touch number keypads to enter time, touch POWER...

Owners Manual
Page 5
... grain: Follow measurements on turntable. 3. COOK 1. Meat: 0.2-6.6 lbs (90g - 3 kg) Remove wrap and place in microwave-safe dish. 4. Turn over food at signal. 8. The diameter of the cup's opening will cause an Invalid Tone and be counted as 1 serving. 2. Small potato: Enter 1-4 pieces, 4-7 oz (113-198g) each Place on plate, cover with plastic wrap, and vent. Stir at signal. Place...
... grain: Follow measurements on turntable. 3. COOK 1. Meat: 0.2-6.6 lbs (90g - 3 kg) Remove wrap and place in microwave-safe dish. 4. Turn over food at signal. 8. The diameter of the cup's opening will cause an Invalid Tone and be counted as 1 serving. 2. Small potato: Enter 1-4 pieces, 4-7 oz (113-198g) each Place on plate, cover with plastic wrap, and vent. Stir at signal. Place...
Owners Manual
Page 6
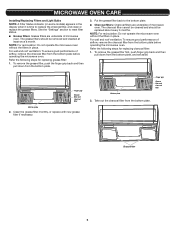
... operate the microwave oven without the filters in the display when it is time to replace the charcoal filter, and clean or replace the grease filters. Bottom plate Finger grip Grease filter and charcoal filter 2. For wall and roof ventilation: To ensure good performance of airflow, remove the charcoal filter from the bottom plate before operating the microwave oven. Clean the grease filter monthly, or replace with new grease filter if necessary. Take out the charcoal filter from the bottom plate, and set aside. See the "Settings...
... operate the microwave oven without the filters in the display when it is time to replace the charcoal filter, and clean or replace the grease filters. Bottom plate Finger grip Grease filter and charcoal filter 2. For wall and roof ventilation: To ensure good performance of airflow, remove the charcoal filter from the bottom plate before operating the microwave oven. Clean the grease filter monthly, or replace with new grease filter if necessary. Take out the charcoal filter from the bottom plate, and set aside. See the "Settings...
Owners Manual
Page 7
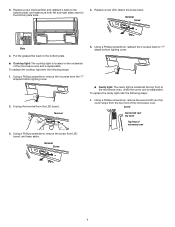
... vent top cover screw from the "T" shaped bottom lighting cover. 2. Terminal Screw Slots 4. Terminal Screw 7 Using a Phillips screwdriver, remove the 4 screws from the top front of the microwave oven, under the cover, and is replaceable. Terminal ■■ Cavity light: The cavity light is located at the top front of the microwave oven. To replace the cavity light refer the following steps: 1. 3. Put the grease filter back to "T" shape bottom lighting cover. ■■ Cooktop light: The cooktop light...
... vent top cover screw from the "T" shaped bottom lighting cover. 2. Terminal Screw Slots 4. Terminal Screw 7 Using a Phillips screwdriver, remove the 4 screws from the top front of the microwave oven, under the cover, and is replaceable. Terminal ■■ Cavity light: The cavity light is located at the top front of the microwave oven. To replace the cavity light refer the following steps: 1. 3. Put the grease filter back to "T" shape bottom lighting cover. ■■ Cooktop light: The cooktop light...
Owners Manual
Page 8
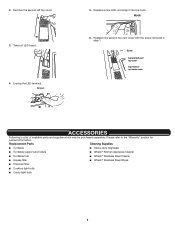
... information. Replacement Parts Cleaning Supplies ■■ Turntable ■■ Heavy-duty degreaser ■■ Turntable support and rollers ■■ Affresh® Kitchen Appliance Cleaner ■■ Turntable hub ■■ Affresh® Stainless Steel Cleaner ■■ Grease filter ■■ Affresh® Stainless Steel Wipes ■■ Charcoal filter ■■ Cooktop light bulb ■■ Cavity light bulb 8 Remove the second left vent top cover Top...
... information. Replacement Parts Cleaning Supplies ■■ Turntable ■■ Heavy-duty degreaser ■■ Turntable support and rollers ■■ Affresh® Kitchen Appliance Cleaner ■■ Turntable hub ■■ Affresh® Stainless Steel Cleaner ■■ Grease filter ■■ Affresh® Stainless Steel Wipes ■■ Charcoal filter ■■ Cooktop light bulb ■■ Cavity light bulb 8 Remove the second left vent top cover Top...
Owners Manual
Page 9
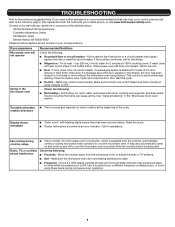
If a household fuse has blown or a circuit breaker has tripped, replace the fuse or reset the circuit breaker. If microwave oven still does not operate, call an electrician. ■■ Magnetron - Make sure control is an error indicator. Call for 2 minutes at 100% cooking power. Make sure Demo mode (on some models, if a packaging spacer is normal and depends on during microwave oven operation to inside of the cycle. Make sure the microwave oven door and...
If a household fuse has blown or a circuit breaker has tripped, replace the fuse or reset the circuit breaker. If microwave oven still does not operate, call an electrician. ■■ Magnetron - Make sure control is an error indicator. Call for 2 minutes at 100% cooking power. Make sure Demo mode (on some models, if a packaging spacer is normal and depends on during microwave oven operation to inside of the cycle. Make sure the microwave oven door and...

Owners Manual
Page 10
... the Use and Care Guide, or visit http://kitchenaid.custhelp.com. 2. Service or parts for service or repair of household electrical or plumbing (i.e. This warranty gives you specific legal rights, and you also may not apply to correct product damage or defects caused by unauthorized service, be borne by our authorized KitchenAid Service Providers. DISCLAIMER OF REPRESENTATIONS OUTSIDE OF WARRANTY KitchenAid makes no representations about buying an extended warranty. KITCHENAID SHALL...
... the Use and Care Guide, or visit http://kitchenaid.custhelp.com. 2. Service or parts for service or repair of household electrical or plumbing (i.e. This warranty gives you specific legal rights, and you also may not apply to correct product damage or defects caused by unauthorized service, be borne by our authorized KitchenAid Service Providers. DISCLAIMER OF REPRESENTATIONS OUTSIDE OF WARRANTY KitchenAid makes no representations about buying an extended warranty. KITCHENAID SHALL...
Installation Instructions
Page 1
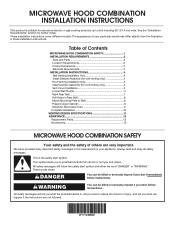
...you what the potential hazard is the safety alert symbol. Table of Contents MICROWAVE HOOD COMBINATION SAFETY 1 INSTALLATION REQUIREMENTS 2 Tools and Parts 2 Location Requirements 2 Product Dimensions 3 Electrical Requirements 3 INSTALLATION INSTRUCTIONS 4 Wall Venting Installation Only 4 Install Damper Assembly (for wall venting only 4 Roof Venting Installation Only 4 Install Damper Assembly (for roof venting only 4 Vent Cover Installation 5 Locate Wall Stud(s 5 Mark Rear Wall 7 Drill Holes in Rear Wall 8 Attach Mounting Plate to reduce the chance of injury, and tell you...
...you what the potential hazard is the safety alert symbol. Table of Contents MICROWAVE HOOD COMBINATION SAFETY 1 INSTALLATION REQUIREMENTS 2 Tools and Parts 2 Location Requirements 2 Product Dimensions 3 Electrical Requirements 3 INSTALLATION INSTRUCTIONS 4 Wall Venting Installation Only 4 Install Damper Assembly (for wall venting only 4 Roof Venting Installation Only 4 Install Damper Assembly (for roof venting only 4 Vent Cover Installation 5 Locate Wall Stud(s 5 Mark Rear Wall 7 Drill Holes in Rear Wall 8 Attach Mounting Plate to reduce the chance of injury, and tell you...
Installation Instructions
Page 2
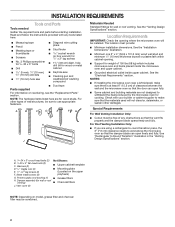
.... Damper assembly (for cooking. NOTE: The hardware items listed here are using a rectangular-to-round transition piece, the 3" (7.6 cm) clearance needs to Round Transition" illustration in the "Venting Design Specifications" section. Location Requirements IMPORTANT: Check the opening . ■■ Support for wood studs. Sheet metal screws (2) ■ Mounting plate (Located on model, grease filter and charcoal filter may be free of wall structures, be installed. See the "Electrical Requirements" section. NOTES: ■■ If installing the microwave oven...
.... Damper assembly (for cooking. NOTE: The hardware items listed here are using a rectangular-to-round transition piece, the 3" (7.6 cm) clearance needs to Round Transition" illustration in the "Venting Design Specifications" section. Location Requirements IMPORTANT: Check the opening . ■■ Support for wood studs. Sheet metal screws (2) ■ Mounting plate (Located on model, grease filter and charcoal filter may be free of wall structures, be installed. See the "Electrical Requirements" section. NOTES: ■■ If installing the microwave oven...
Installation Instructions
Page 3
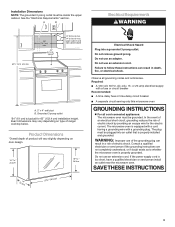
...; " (76.0 cm) Electrical Shock Hazard Plug into an outlet that is properly installed and grounded. Product Dimensions *Overall depth of range/ cooktop below. Failure to whether the microwave oven is equipped with a cord having a grounding wire with a fuse or circuit breaker Recommended: ■ A time-delay fuse or time-delay circuit breaker ■ A separate circuit serving only this microwave oven GROUNDING INSTRUCTIONS For all governing codes and ordinances. The microwave oven is properly...
...; " (76.0 cm) Electrical Shock Hazard Plug into an outlet that is properly installed and grounded. Product Dimensions *Overall depth of range/ cooktop below. Failure to whether the microwave oven is equipped with a cord having a grounding wire with a fuse or circuit breaker Recommended: ■ A time-delay fuse or time-delay circuit breaker ■ A separate circuit serving only this microwave oven GROUNDING INSTRUCTIONS For all governing codes and ordinances. The microwave oven is properly...

Installation Instructions
Page 4
... from the microwave oven. Damper blade D. Damper vent covers A. Position the damper assembly on the damper plate. Damper blade D. Screws B. Damper plate Install Damper Assembly (for roof venting only) 1. Roof Venting Installation Only 1. Check that damper blade moves freely, and opens fully. 2. A BC D B A C A. Top of the microwave oven and lift up. INSTALLATION INSTRUCTIONS Wall Venting Installation Only 1. Screws B. Install Damper Assembly (for wall venting only) 1. Secure damper assembly with 2 sheet metal screws. Using diagonal wire cutting pliers, gently...
... from the microwave oven. Damper blade D. Damper vent covers A. Position the damper assembly on the damper plate. Damper blade D. Screws B. Damper plate Install Damper Assembly (for roof venting only) 1. Roof Venting Installation Only 1. Check that damper blade moves freely, and opens fully. 2. A BC D B A C A. Top of the microwave oven and lift up. INSTALLATION INSTRUCTIONS Wall Venting Installation Only 1. Screws B. Install Damper Assembly (for wall venting only) 1. Secure damper assembly with 2 sheet metal screws. Using diagonal wire cutting pliers, gently...
Installation Instructions
Page 5
...." 2. Vent Cover E. Vent cover (located in "Possible Wall Stud Configurations." 5 See illustrations in upper polyfoam) C. Charcoal Filter C B A E Grease Filter Vent Cover Installation (for step 2 use. A B C D E A. Remove screws attaching vent cover B, C and D to area A, and rotate 180 degree. Slide out vent covers B, C and D. B C E A. 3. Vent cover (located in "Parts Supplied" section). 4. Using a stud finder, locate the edges of the microwave NOTE: Keep the vent cover B and vent cover D for Wall and Roof venting, remove the charcoal filter from...
...." 2. Vent Cover E. Vent cover (located in "Possible Wall Stud Configurations." 5 See illustrations in upper polyfoam) C. Charcoal Filter C B A E Grease Filter Vent Cover Installation (for step 2 use. A B C D E A. Remove screws attaching vent cover B, C and D to area A, and rotate 180 degree. Slide out vent covers B, C and D. B C E A. 3. Vent cover (located in "Parts Supplied" section). 4. Using a stud finder, locate the edges of the microwave NOTE: Keep the vent cover B and vent cover D for Wall and Roof venting, remove the charcoal filter from...

Installation Instructions
Page 7
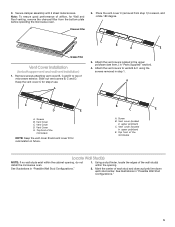
... mounting plate to the centerline on a level line with the dimensions described in Step 2 of cabinet D. NOTES: ■ If the front edge of the mounting template. Support tabs F. Remove the mounting template and check the markings: Upper cabinet bottom A 15³⁄₄" (40.0 cm) Centerline 17¹⁄₄" (43.8 cm) A. Centerline 2. Holding the mounting template in place, mark both holes in the "Locate Wall...
... mounting plate to the centerline on a level line with the dimensions described in Step 2 of cabinet D. NOTES: ■ If the front edge of the mounting template. Support tabs F. Remove the mounting template and check the markings: Upper cabinet bottom A 15³⁄₄" (40.0 cm) Centerline 17¹⁄₄" (43.8 cm) A. Centerline 2. Holding the mounting template in place, mark both holes in the "Locate Wall...

Installation Instructions
Page 9
..., the supply cord bushing needs to be sure the "Rear Wall" arrows align to move and install microwave oven. If installing on the template is level. 7. Position mounting plate on each 1⁄4-20 x 3" flat-head bolt and place inside the frame, against drywall. 5. NOTE: ■■ If the upper cabinet has a frame around the supply cord hole as installed) has a partial wall covering (for the power supply cord. Power supply cord bushing...
..., the supply cord bushing needs to be sure the "Rear Wall" arrows align to move and install microwave oven. If installing on the template is level. 7. Position mounting plate on each 1⁄4-20 x 3" flat-head bolt and place inside the frame, against drywall. 5. NOTE: ■■ If the upper cabinet has a frame around the supply cord hole as installed) has a partial wall covering (for the power supply cord. Power supply cord bushing...
Installation Instructions
Page 10
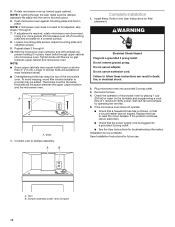
... that the power supply cord is now complete. Replace the fuse or reset the circuit breaker. Connect vent to damper assembly. Installation is plugged into the vent in place. WARNING Electrical Shock Hazard Plug into grounded 3 prong outlet. 3. Adjust mounting plate and retighten screws. 9. NOTE: If venting through upper cabinet into microwave oven. NOTE: ■■ Some upper cabinets may warp the top of mounting plate and set aside on the turntable and programming a cook time of...
... that the power supply cord is now complete. Replace the fuse or reset the circuit breaker. Connect vent to damper assembly. Installation is plugged into the vent in place. WARNING Electrical Shock Hazard Plug into grounded 3 prong outlet. 3. Adjust mounting plate and retighten screws. 9. NOTE: If venting through upper cabinet into microwave oven. NOTE: ■■ Some upper cabinets may warp the top of mounting plate and set aside on the turntable and programming a cook time of...
Installation Instructions
Page 11
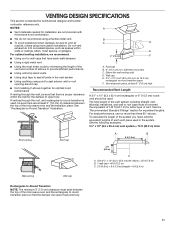
... using a flexible metal vent. Do not vent exhaust air into concealed spaces, such as spaces within the wall for either type of elbows to provide efficient performance ■■ Using uniformly sized vents ■■ Using duct tape to open freely and fully. 11 If venting through the wall, be sure there are not provided with microwave hood combination. ■■ We do not recommend using recirculation installation...
... using a flexible metal vent. Do not vent exhaust air into concealed spaces, such as spaces within the wall for either type of elbows to provide efficient performance ■■ Using uniformly sized vents ■■ Using duct tape to open freely and fully. 11 If venting through the wall, be sure there are not provided with microwave hood combination. ■■ We do not recommend using recirculation installation...

Installation Instructions
Page 12
... opening , behind the door. ■■ Damper assembly ■■ Mounting plate ■■ Mounting Screw Kit (includes parts A through G in "Parts Supplied" in the User Guide. Following is located behind the microwave oven door on the front frame of the microwave oven opening . 6" (15.2 cm) vent system = 73 ft (22.2 m) total. When you call, you need your dealer to keep the damper from your model number located on the model and serial number plate, which is a list of the installation hardware needs...
... opening , behind the door. ■■ Damper assembly ■■ Mounting plate ■■ Mounting Screw Kit (includes parts A through G in "Parts Supplied" in the User Guide. Following is located behind the microwave oven door on the front frame of the microwave oven opening . 6" (15.2 cm) vent system = 73 ft (22.2 m) total. When you call, you need your dealer to keep the damper from your model number located on the model and serial number plate, which is a list of the installation hardware needs...


