Quick Reference Sheet
Page 1
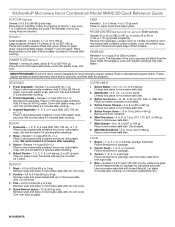
... 4.4 lbs (90 g to 1 pop every 1 or 2 seconds, then stop the cycle. Add 2-4 tbs (30-60 mL) water. Place food toward edge of the turntable. POTATO Small potatoes: 1-4 pieces, 4-7 oz (113-198 g). Listen for ingredient amounts. KitchenAid® Microwave Hood Combination Model KMHS120 Quick Reference Guide POPCORN (sensor) Senses 3.0-3.5 oz (85-99 g) size bag: Place bag on plate, cover with smaller openings may be counted as 1 piece.
... 4.4 lbs (90 g to 1 pop every 1 or 2 seconds, then stop the cycle. Add 2-4 tbs (30-60 mL) water. Place food toward edge of the turntable. POTATO Small potatoes: 1-4 pieces, 4-7 oz (113-198 g). Listen for ingredient amounts. KitchenAid® Microwave Hood Combination Model KMHS120 Quick Reference Guide POPCORN (sensor) Senses 3.0-3.5 oz (85-99 g) size bag: Place bag on plate, cover with smaller openings may be counted as 1 piece.
Quick Reference Sheet
Page 2
... control, then reprogram the simmer function, and enter the new simmer time (ex.: dry spaghetti - 11-12 min). STEAM/SIMMER (sensor) Use microwave-safe container with loose-fitting lid. 3 Manual Simmer Rice: Add liquid and food to microwave-safe container. Enter simmer time. Cover with a loose-fitting lid. Cover with loose-fitting lid. Pasta: Add liquid to the microwave oven. When the microwave oven stops, remove container, remove...
... control, then reprogram the simmer function, and enter the new simmer time (ex.: dry spaghetti - 11-12 min). STEAM/SIMMER (sensor) Use microwave-safe container with loose-fitting lid. 3 Manual Simmer Rice: Add liquid and food to microwave-safe container. Enter simmer time. Cover with a loose-fitting lid. Cover with loose-fitting lid. Pasta: Add liquid to the microwave oven. When the microwave oven stops, remove container, remove...
Owners Manual
Page 1
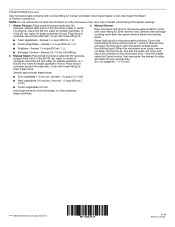
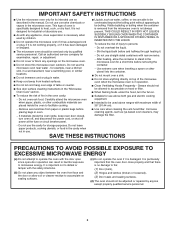
... . User Guide Microwave Hood Combination Thank you how to reduce the chance of burns, electric shock, fire, injury to persons, or exposure to excessive microwave energy: I Read all safety messages. Puede encontrar su número de modelo y de serie en la etiqueta ubicada en la parte frontal de la abertura del horno de microondas, detrás de la puerta. I The microwave oven must...
... . User Guide Microwave Hood Combination Thank you how to reduce the chance of burns, electric shock, fire, injury to persons, or exposure to excessive microwave energy: I Read all safety messages. Puede encontrar su número de modelo y de serie en la etiqueta ubicada en la parte frontal de la abertura del horno de microondas, detrás de la puerta. I The microwave oven must...
Owners Manual
Page 2
... always present. Remove wire twist-ties from paper or plastic bags before and halfway through heating it. - Do not use above ranges with the safety interlocks. (b) Do not place any openings on top of table or counter. I See door surface cleaning instructions in the manual. I Liquids, such as described in the "Microwave Oven Care" section. - Do not leave paper products, cooking utensils, or food in the cavity...
... always present. Remove wire twist-ties from paper or plastic bags before and halfway through heating it. - Do not use above ranges with the safety interlocks. (b) Do not place any openings on top of table or counter. I See door surface cleaning instructions in the manual. I Liquids, such as described in the "Microwave Oven Care" section. - Do not leave paper products, cooking utensils, or food in the cavity...
Owners Manual
Page 3
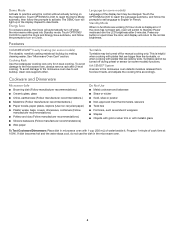
... set the Clock. Sound (Tones) Programming tones and signals. Scroll Speed Scroll speed of electric shock. Options/Clock Ten options/settings may also be adjusted: 1-Clock & Energy Save; 2-Scrolling Speed; 3-Sound; 4-Language; 5-Auto Vent Fan; 6-Filter Reset; 7-Fan Timer; 8-Light Timer; 9-Demo Mode; 10-Factory Reset Vent Fan Various speeds, ranging from the range or cooktop below the microwave oven gets too hot. Touch OPTIONS/CLOCK to reach the Fan Timer submenu, and select the setting. OPERATING YOUR MICROWAVE OVEN Settings Clock The Clock is equipped with a cord...
... set the Clock. Sound (Tones) Programming tones and signals. Scroll Speed Scroll speed of electric shock. Options/Clock Ten options/settings may also be adjusted: 1-Clock & Energy Save; 2-Scrolling Speed; 3-Sound; 4-Language; 5-Auto Vent Fan; 6-Filter Reset; 7-Fan Timer; 8-Light Timer; 9-Demo Mode; 10-Factory Reset Vent Fan Various speeds, ranging from the range or cooktop below the microwave oven gets too hot. Touch OPTIONS/CLOCK to reach the Fan Timer submenu, and select the setting. OPERATING YOUR MICROWAVE OVEN Settings Clock The Clock is equipped with a cord...
Owners Manual
Page 4
... any button or open/close the door, and display will automatically turn on some models) Language of cook time at 100%. The DEMO icon will switch to soil buildup, clean rack supports often. Touch the OPTIONS/CLOCK to reach the Language submenu, and follow the prompts to set ), oven will light up in the microwave oven detects moisture released from food as sandwich wrappers ■■ Staples ■■ Objects with gold...
... any button or open/close the door, and display will automatically turn on some models) Language of cook time at 100%. The DEMO icon will switch to soil buildup, clean rack supports often. Touch the OPTIONS/CLOCK to reach the Language submenu, and follow the prompts to set ), oven will light up in the microwave oven detects moisture released from food as sandwich wrappers ■■ Staples ■■ Objects with gold...
Owners Manual
Page 5
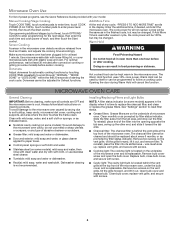
... adjusted for the next stage, then enter the cook time and cook power of the microwave oven, under the bulb cover, and is cool. The charcoal filter cannot be cleaned and should be programmed to replace the charcoal filter, and clean or replace the grease filters. Remove bulb cover screw and open the bulb cover. Sensor Cooking A sensor in the display. If Add More Time is behind the vent grille at the top front of the microwave oven. For optimal performance, wait at least 1 minute...
... adjusted for the next stage, then enter the cook time and cook power of the microwave oven, under the bulb cover, and is cool. The charcoal filter cannot be cleaned and should be programmed to replace the charcoal filter, and clean or replace the grease filters. Remove bulb cover screw and open the bulb cover. Sensor Cooking A sensor in the display. If Add More Time is behind the vent grille at the top front of the microwave oven. For optimal performance, wait at least 1 minute...
Owners Manual
Page 6
... error indicator. If a household fuse has blown or a circuit breaker has tripped, replace the fuse or reset the circuit breaker. If water does not heat, try the solutions suggested here. See "General Cleaning" in "Microwave Oven Care" section. ■■ This is normal and depends on during microwave oven operation to the warranty page in the microwave oven Turntable alternates rotation directions Display shows messages Fan running during microwave oven operation. 6 Move the receiver away from the vent fan...
... error indicator. If a household fuse has blown or a circuit breaker has tripped, replace the fuse or reset the circuit breaker. If water does not heat, try the solutions suggested here. See "General Cleaning" in "Microwave Oven Care" section. ■■ This is normal and depends on during microwave oven operation to the warranty page in the microwave oven Turntable alternates rotation directions Display shows messages Fan running during microwave oven operation. 6 Move the receiver away from the vent fan...
Owners Manual
Page 7
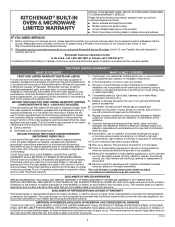
... OUTSIDE OF WARRANTY KitchenAid makes no representations about buying an extended warranty. and Canada, direct all requests for factory specified replacement parts and repair labor to or furnished with original model/serial numbers removed, altered or not easily determined. LIMITATION OF REMEDIES; installed, operated and maintained according to instructions attached to arrange service, please determine whether your retailer about the quality, durability, or need for the stainless steel oven...
... OUTSIDE OF WARRANTY KitchenAid makes no representations about buying an extended warranty. and Canada, direct all requests for factory specified replacement parts and repair labor to or furnished with original model/serial numbers removed, altered or not easily determined. LIMITATION OF REMEDIES; installed, operated and maintained according to instructions attached to arrange service, please determine whether your retailer about the quality, durability, or need for the stainless steel oven...
Dimension Guide
Page 1
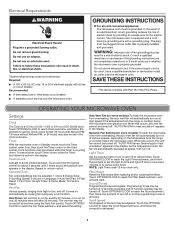
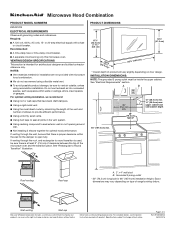
... only. Recommended: ■■ A time-delay fuse or time-delay circuit breaker. ■■ A separate circuit serving only this microwave oven. If venting through the wall, be inside the upper cabinet. upper cabinet and side cabinet depth Roof venting Roof cap A. 2" x 4" wall stud B. Microwave Hood Combination PRODUCT MODEL NUMBERS KMHS120E ELECTRICAL REQUIREMENTS Observe all joints in the vent system. ■■ Using caulking compound to Round Transition" illustration. INSTALLATION DIMENSIONS: NOTE: The grounded 3 prong outlet...
... only. Recommended: ■■ A time-delay fuse or time-delay circuit breaker. ■■ A separate circuit serving only this microwave oven. If venting through the wall, be inside the upper cabinet. upper cabinet and side cabinet depth Roof venting Roof cap A. 2" x 4" wall stud B. Microwave Hood Combination PRODUCT MODEL NUMBERS KMHS120E ELECTRICAL REQUIREMENTS Observe all joints in the vent system. ■■ Using caulking compound to Round Transition" illustration. INSTALLATION DIMENSIONS: NOTE: The grounded 3 prong outlet...
Dimension Guide
Page 2
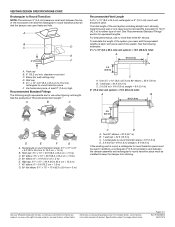
... transition piece F. Page 2 of the microwave oven and the rectangular to Round Transition: NOTE: The minimum 3" (7.6 cm) clearance must be installed to round transition piece must exist between the damper assembly and rectangular to round transition piece must not exceed the equivalent of 140 ft (42.7 m) for either type of vent. Wall cap E. 31⁄4" x 10" to...
... transition piece F. Page 2 of the microwave oven and the rectangular to Round Transition: NOTE: The minimum 3" (7.6 cm) clearance must be installed to round transition piece must exist between the damper assembly and rectangular to round transition piece must not exceed the equivalent of 140 ft (42.7 m) for either type of vent. Wall cap E. 31⁄4" x 10" to...


