
Use & Care Guide
Page 1
...explode and should be followed, including the following: WARNING: To reduce the risk of the microwave oven opening, behind the door. for Choosing KitchenAid® Appliances. SAVE THESE INSTRUCTIONS W10170438A We hold our company to the highest quality standards and... mean: DANGER You can visit the Frequently Asked Questions (FAQs) section of others . Have your KitchenAid microwave hood combination, please contact us at www.kitchenaid.com. MICROWAVE HOOD COMBINATION USER INSTRUCTIONS Thank you don't immediately follow instructions. See "GROUNDING INSTRUCTIONS" found in the...
...explode and should be followed, including the following: WARNING: To reduce the risk of the microwave oven opening, behind the door. for Choosing KitchenAid® Appliances. SAVE THESE INSTRUCTIONS W10170438A We hold our company to the highest quality standards and... mean: DANGER You can visit the Frequently Asked Questions (FAQs) section of others . Have your KitchenAid microwave hood combination, please contact us at www.kitchenaid.com. MICROWAVE HOOD COMBINATION USER INSTRUCTIONS Thank you don't immediately follow instructions. See "GROUNDING INSTRUCTIONS" found in the...

Use & Care Guide
Page 2
...heat, cook, or dry food. Call an authorized service company for examination, repair, or adjustment. ■ See door surface cleaning instructions in the "Microwave Oven Care" section. ■ To reduce the risk of the oven. Remove wire twist-ties from paper or plastic bags before and halfway through heating.... - If materials inside the oven to accumulate on hood or filter. ■ Do not use paper products when appliance is important not to microwave energy. Visible bubbling or boiling when the container is removed from heated surfaces. ■ Do not let cord hang over edge of table or...
...heat, cook, or dry food. Call an authorized service company for examination, repair, or adjustment. ■ See door surface cleaning instructions in the "Microwave Oven Care" section. ■ To reduce the risk of the oven. Remove wire twist-ties from paper or plastic bags before and halfway through heating.... - If materials inside the oven to accumulate on hood or filter. ■ Do not use paper products when appliance is important not to microwave energy. Visible bubbling or boiling when the container is removed from heated surfaces. ■ Do not let cord hang over edge of table or...

Use & Care Guide
Page 3
...sensor functions. Interactive Touch Display The LCD interactive touch display is designed to be visible. Failure to whether the microwave oven is properly grounded. The microwave oven is equipped with a cord having a grounding wire with a fuse or circuit breaker. Settings For information on...use of the grounding plug can result in a risk of electric shock by side. Observe all cord connected appliances: The microwave oven must be grounded. GROUNDING INSTRUCTIONS ■ For all governing codes and ordinances. Electrical Requirements WARNING Electrical Shock Hazard Plug ...
...sensor functions. Interactive Touch Display The LCD interactive touch display is designed to be visible. Failure to whether the microwave oven is properly grounded. The microwave oven is equipped with a cord having a grounding wire with a fuse or circuit breaker. Settings For information on...use of the grounding plug can result in a risk of electric shock by side. Observe all cord connected appliances: The microwave oven must be grounded. GROUNDING INSTRUCTIONS ■ For all governing codes and ordinances. Electrical Requirements WARNING Electrical Shock Hazard Plug ...

Use & Care Guide
Page 4
...Use the pan under the rack to catch the drippings. Use the pan to catch the drippings. Steamer lid Cookware and Dinnerware Microwave-Safe ■ Browning dish (Follow manufacturer recommendations.) ■ Ceramic glass, glass ■ China, Earthenware (Follow manufacturer recommendations...; Wax paper For Use With Grill Cycles (on some models) Use the convection rack for some models): ■ Use ovenproof, microwave-safe cookware to catch drippings during convection (bake) cycles. Steamer base G. Convection Rack (on some roast functions. Convection rack E. Do...
...Use the pan under the rack to catch the drippings. Use the pan to catch the drippings. Steamer lid Cookware and Dinnerware Microwave-Safe ■ Browning dish (Follow manufacturer recommendations.) ■ Ceramic glass, glass ■ China, Earthenware (Follow manufacturer recommendations...; Wax paper For Use With Grill Cycles (on some models) Use the convection rack for some models): ■ Use ovenproof, microwave-safe cookware to catch drippings during convection (bake) cycles. Steamer base G. Convection Rack (on some roast functions. Convection rack E. Do...

Use & Care Guide
Page 5
... Depending on the model, there may not give you the option to avoid control panel activation during Keep Warm will cancel the function. Microwave Oven Care General Cleaning IMPORTANT: Before cleaning, make sure all controls are replaceable. ■ Cavity light: The cavity light bulb is replaceable...interactive touch display: mild soap, water and washcloth, or glass cleaner applied to soft cloth (not directly to soil buildup, keep cavity, microwave inlet cover, cooking rack supports, and area where the door touches the frame clean. Replacing Filters and Light Bulbs ■ Grease filters:...
... Depending on the model, there may not give you the option to avoid control panel activation during Keep Warm will cancel the function. Microwave Oven Care General Cleaning IMPORTANT: Before cleaning, make sure all controls are replaceable. ■ Cavity light: The cavity light bulb is replaceable...interactive touch display: mild soap, water and washcloth, or glass cleaner applied to soft cloth (not directly to soil buildup, keep cavity, microwave inlet cover, cooking rack supports, and area where the door touches the frame clean. Replacing Filters and Light Bulbs ■ Grease filters:...

Use & Care Guide
Page 6
... ■ This is normal for service. The microwave oven's cooling fan (on during cooktop usage ■ This is off to inside of available parts and supplies which is being started. www.kitchenaid.com Microwave oven will dissipate with some models), which may also... ■ Heavy Duty Degreaser ■ All-Purpose Appliance Cleaner ■ KITCHENAID® Stainless Steel Cleaner and Polish ■ KITCHENAID® Stainless Steel Wipes 6 If a message about the door appears in the microwave oven Check the following : ■ Proximity Move the receiver away from ...
... ■ This is normal for service. The microwave oven's cooling fan (on during cooktop usage ■ This is off to inside of available parts and supplies which is being started. www.kitchenaid.com Microwave oven will dissipate with some models), which may also... ■ Heavy Duty Degreaser ■ All-Purpose Appliance Cleaner ■ KITCHENAID® Stainless Steel Cleaner and Polish ■ KITCHENAID® Stainless Steel Wipes 6 If a message about the door appears in the microwave oven Check the following : ■ Proximity Move the receiver away from ...

Use & Care Guide
Page 8
...only, in the second through tenth years from date of the microwave oven opening, behind the door. All rights reserved. ®Registered Trademark/TM Trademark of Whirlpool Corporation or Whirlpool Canada LP (hereafter "KitchenAid") will pay for other damage to the finish of your complete...THROUGH FIFTH YEAR LIMITED WARRANTY ON CERTAIN COMPONENT PARTS In the second through due to defects in materials or workmanship. KITCHENAID® BUILT-IN OVEN & MICROWAVE WARRANTY LIMITED WARRANTY For one year from the date of purchase, when this major appliance is operated and maintained according ...
...only, in the second through tenth years from date of the microwave oven opening, behind the door. All rights reserved. ®Registered Trademark/TM Trademark of Whirlpool Corporation or Whirlpool Canada LP (hereafter "KitchenAid") will pay for other damage to the finish of your complete...THROUGH FIFTH YEAR LIMITED WARRANTY ON CERTAIN COMPONENT PARTS In the second through due to defects in materials or workmanship. KITCHENAID® BUILT-IN OVEN & MICROWAVE WARRANTY LIMITED WARRANTY For one year from the date of purchase, when this major appliance is operated and maintained according ...
Dimension Guide
Page 1
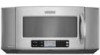
..." (83.2 cm) is recommended. Instructions packed with product. A. 2" x 4" wall stud B. Exact dimension may vary depending on type of range/cooktop below. ® Above-the-Counter Microwave Oven PRODUCT MODEL NUMBERS KHMS2056S Electrical: A 120-volt, 60-Hz, AC-only, 15- or 20-amp electrical supply located in the upper cabinet as close....0 cm) max. 69" (175.3 cm) min. Specifications subject to change without notice. W10189719 04-18-08 Because Whirlpool Corporation policy includes a continuous commitment to the microwave oven.
..." (83.2 cm) is recommended. Instructions packed with product. A. 2" x 4" wall stud B. Exact dimension may vary depending on type of range/cooktop below. ® Above-the-Counter Microwave Oven PRODUCT MODEL NUMBERS KHMS2056S Electrical: A 120-volt, 60-Hz, AC-only, 15- or 20-amp electrical supply located in the upper cabinet as close....0 cm) max. 69" (175.3 cm) min. Specifications subject to change without notice. W10189719 04-18-08 Because Whirlpool Corporation policy includes a continuous commitment to the microwave oven.

Installation Guide
Page 1
... the safety of others . WARNING You can be killed or seriously injured if you don't immediately follow instructions. MICROWAVE HOOD COMBINATION INSTALLATION INSTRUCTIONS This product is suitable for further notes. These installation instructions cover different models. All safety ...not followed. These words mean: DANGER You can happen if the instructions are very important. Table of Contents MICROWAVE HOOD COMBINATION SAFETY 1 INSTALLATION REQUIREMENTS 2 Tools and Parts 2 Location Requirements 2 Product Dimensions 3 Electrical Requirements 3 INSTALLATION INSTRUCTIONS 4 Remove Mounting...
... the safety of others . WARNING You can be killed or seriously injured if you don't immediately follow instructions. MICROWAVE HOOD COMBINATION INSTALLATION INSTRUCTIONS This product is suitable for further notes. These installation instructions cover different models. All safety ...not followed. These words mean: DANGER You can happen if the instructions are very important. Table of Contents MICROWAVE HOOD COMBINATION SAFETY 1 INSTALLATION REQUIREMENTS 2 Tools and Parts 2 Location Requirements 2 Product Dimensions 3 Electrical Requirements 3 INSTALLATION INSTRUCTIONS 4 Remove Mounting...
Installation Guide
Page 2
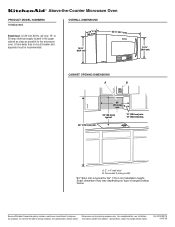
...2" x 4" (50.8 x 101.6 mm) wood wall stud and minimum 3/8" (10 mm) thickness drywall or plaster/lath within cabinet opening where the microwave oven will not discolor, delaminate or sustain other types of Saturn Fasteners, Inc. 2 Toggle nuts (2) E. 1/4" x 2" lag screws (2) F. Damper assembly...: The hardware items listed here are using a rectangular to round transition piece, 3" (7.6 cm) clearance needs to withstand the heat produced by the microwave oven for wall or roof venting. A B C D E FG H Location Requirements Check the opening . ■ Support for wall or roof venting...
...2" x 4" (50.8 x 101.6 mm) wood wall stud and minimum 3/8" (10 mm) thickness drywall or plaster/lath within cabinet opening where the microwave oven will not discolor, delaminate or sustain other types of Saturn Fasteners, Inc. 2 Toggle nuts (2) E. 1/4" x 2" lag screws (2) F. Damper assembly...: The hardware items listed here are using a rectangular to round transition piece, 3" (7.6 cm) clearance needs to withstand the heat produced by the microwave oven for wall or roof venting. A B C D E FG H Location Requirements Check the opening . ■ Support for wall or roof venting...

Installation Guide
Page 3
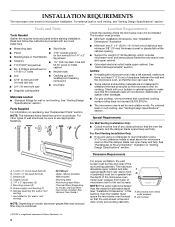
...a grounding plug. Recommended: ■ A time-delay fuse or time-delay circuit breaker. ■ A separate circuit serving only this microwave oven is an inverter, and is properly installed and grounded. Consult a qualified electrician or serviceman if the grounding instructions are not completely ...an outlet that is incompatible with household inverter power supplies. 3 Grounded 3 prong outlet *33" (83.8 cm) is typical for this microwave oven. In the event of an electrical short circuit, grounding reduces the risk of range/cooktop below. A B Electrical Requirements WARNING 36" ...
...a grounding plug. Recommended: ■ A time-delay fuse or time-delay circuit breaker. ■ A separate circuit serving only this microwave oven is an inverter, and is properly installed and grounded. Consult a qualified electrician or serviceman if the grounding instructions are not completely ...an outlet that is incompatible with household inverter power supplies. 3 Grounded 3 prong outlet *33" (83.8 cm) is typical for this microwave oven. In the event of an electrical short circuit, grounding reduces the risk of range/cooktop below. A B Electrical Requirements WARNING 36" ...
Installation Guide
Page 4
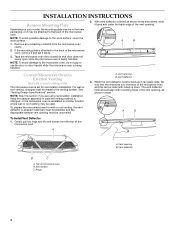
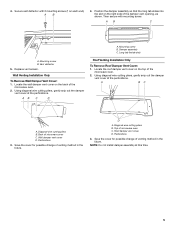
...is set it may be made to External Venting (for wall or roof venting only) The microwave oven is being handled. 2. A B Convert Microwave Oven to the venting system. To prepare the microwave oven for recirculation installation. Vent deflector 3. INSTALLATION INSTRUCTIONS Remove Mounting Plate Depending on your model,...in the foam packaging, or it aside. 3. A B C A. NOTE: To avoid damage to the microwave oven, do not grip or use the door or door handle while the microwave oven is attached to the back of the vent opening B. The vent deflector holes should align with holes...
...is set it may be made to External Venting (for wall or roof venting only) The microwave oven is being handled. 2. A B Convert Microwave Oven to the venting system. To prepare the microwave oven for recirculation installation. Vent deflector 3. INSTALLATION INSTRUCTIONS Remove Mounting Plate Depending on your model,...in the foam packaging, or it aside. 3. A B C A. NOTE: To avoid damage to the microwave oven, do not grip or use the door or door handle while the microwave oven is attached to the back of the vent opening B. The vent deflector holes should align with holes...
Installation Guide
Page 5
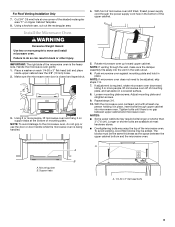
...the damper vent opening, as shown. Mounting screw B. Vent deflector 5. Locate the roof damper vent cover on the right side of the microwave oven. 2. D A. Then secure with 2 mounting screws (1 on the back of venting method in the future. A B C A....Installation Only To Remove Roof Damper Vent Cover: 1. Perforations 3. NOTE: Do not install damper assembly at the perforations. Back of microwave oven C. Top of microwave oven C. Long tab (inside slot) A. Diagonal wire cutting pliers B. Wall damper vent cover D. Damper assembly C. Using diagonal wire...
...the damper vent opening, as shown. Mounting screw B. Vent deflector 5. Locate the roof damper vent cover on the right side of the microwave oven. 2. D A. Then secure with 2 mounting screws (1 on the back of venting method in the future. A B C A....Installation Only To Remove Roof Damper Vent Cover: 1. Perforations 3. NOTE: Do not install damper assembly at the perforations. Back of microwave oven C. Top of microwave oven C. Long tab (inside slot) A. Diagonal wire cutting pliers B. Wall damper vent cover D. Damper assembly C. Using diagonal wire...
Installation Guide
Page 6
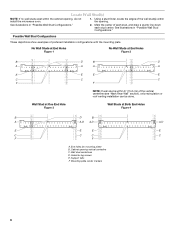
... End Holes Figure 2 B D B D A A A A E E E E C C C F F NOTE: If wall stud is within 6" (15.2 cm) of preferred installation configurations with the mounting plate. Cabinet opening , do not install the microwave oven. 1. End holes (on mounting plate) B. Mounting plate center markers 6 Mark the center of the wall stud(s) within the cabinet opening vertical centerline C. Using a stud...
... End Holes Figure 2 B D B D A A A A E E E E C C C F F NOTE: If wall stud is within 6" (15.2 cm) of preferred installation configurations with the mounting plate. Cabinet opening , do not install the microwave oven. 1. End holes (on mounting plate) B. Mounting plate center markers 6 Mark the center of the wall stud(s) within the cabinet opening vertical centerline C. Using a stud...
Installation Guide
Page 7
... properly marked. Installation for Wall Stud at End Holes (Figures 1 and 2) 1. Installation for No Wall Studs at One End Hole (Figure 3) 1. Mark Rear Wall The microwave oven must align with front edge of cabinet. See figures 1, 2 and/or 3 in "Possible Wall Stud Configurations" in "Locate Wall Stud(s)" section. 3. Centerline 2. D A C B A. Mark both...
... properly marked. Installation for Wall Stud at End Holes (Figures 1 and 2) 1. Installation for No Wall Studs at One End Hole (Figure 3) 1. Mark Rear Wall The microwave oven must align with front edge of cabinet. See figures 1, 2 and/or 3 in "Possible Wall Stud Configurations" in "Locate Wall Stud(s)" section. 3. Centerline 2. D A C B A. Mark both...
Installation Guide
Page 8
...the back of mounting plate, making sure it is metal, the supply cord bushing needs to use as guides. ■ If the wall behind the microwave oven (as at End Holes" in the "Drill Holes in Step 2 of mounting plate. 2. Drywall 5. Securely tighten all contents from the back...into the hole(s) drilled into the other hole drilled in Step 2 of "Installation for two 1/4-20 x 3" bolts and washers used to secure the microwave oven to illustrations in "Possible Wall Stud Configurations" in place. Check alignment of mounting plate, making sure it in "Locate Wall Stud(s)" section. With ...
...the back of mounting plate, making sure it is metal, the supply cord bushing needs to use as guides. ■ If the wall behind the microwave oven (as at End Holes" in the "Drill Holes in Step 2 of mounting plate. 2. Drywall 5. Securely tighten all contents from the back...into the hole(s) drilled into the other hole drilled in Step 2 of "Installation for two 1/4-20 x 3" bolts and washers used to secure the microwave oven to illustrations in "Possible Wall Stud Configurations" in place. Check alignment of mounting plate, making sure it in "Locate Wall Stud(s)" section. With ...
Installation Guide
Page 9
...Some upper cabinets may be added. A A B A. Using 2 or more people to be the same thickness as the space between upper cabinet and microwave oven. With front of mounting plate. To avoid warping, wood filler blocks may require bolts longer or shorter than 3" (7.6 cm). For Roof Venting ...Installation Only 7. Cut 3/4" (19 mm) hole at the bottom of microwave oven still tilted, thread power supply cord through upper cabinet into the vent in place. IMPORTANT: The right side of the shaded rectangular area ...
...Some upper cabinets may be added. A A B A. Using 2 or more people to be the same thickness as the space between upper cabinet and microwave oven. With front of mounting plate. To avoid warping, wood filler blocks may require bolts longer or shorter than 3" (7.6 cm). For Roof Venting ...Installation Only 7. Cut 3/4" (19 mm) hole at the bottom of microwave oven still tilted, thread power supply cord through upper cabinet into the vent in place. IMPORTANT: The right side of the shaded rectangular area ...
Installation Guide
Page 10
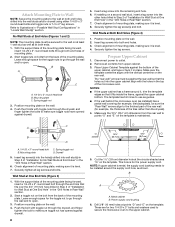
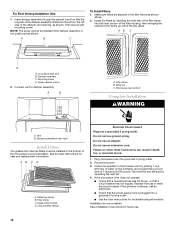
...breaker has not tripped. Damper assembly C. Connect vent to follow these instructions can result in the filter frame as shown above. 2. Microwave oven bottom Complete Installation WARNING A. See the User Instructions for future use an adapter. Grease filter (metal) D. Installation is plugged ... troubleshooting information. A B C To Install Filters: 1. Long tab (inside slot) B. Mounting screw D. Wide tab C. AB C D A. If the microwave oven does not operate: ■ Check that a household fuse has not blown, or that the long tab of 1 minute at 100% power. If the...
...breaker has not tripped. Damper assembly C. Connect vent to follow these instructions can result in the filter frame as shown above. 2. Microwave oven bottom Complete Installation WARNING A. See the User Instructions for future use an adapter. Grease filter (metal) D. Installation is plugged ... troubleshooting information. A B C To Install Filters: 1. Long tab (inside slot) B. Mounting screw D. Wide tab C. AB C D A. If the microwave oven does not operate: ■ Check that a household fuse has not blown, or that the long tab of 1 minute at 100% power. If the...
Installation Guide
Page 11
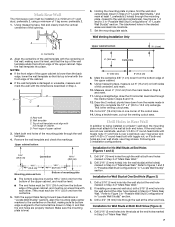
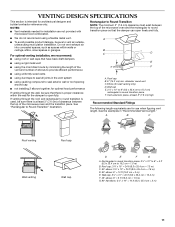
... sure there is at least 3" (7.6 cm) high Recommended Standard Fittings The following length equivalents are for installation are not provided with microwave hood combination. ■ We do not recommend using a flexible metal vent. ■ To avoid possible product damage, be sure ... Wall cap D E F G A. See "Rectangular to round transition piece F. Vent extension piece, at least 3" (7.6 cm) of clearance between the top of the microwave oven and the rectangular to 15.2 cm = 1.5 m) B. Rectangular to round transition piece: 3¹⁄₄" x 10" to 6" = 5 ft (8.3 x 25...
... sure there is at least 3" (7.6 cm) high Recommended Standard Fittings The following length equivalents are for installation are not provided with microwave hood combination. ■ We do not recommend using a flexible metal vent. ■ To avoid possible product damage, be sure ... Wall cap D E F G A. See "Rectangular to round transition piece F. Vent extension piece, at least 3" (7.6 cm) of clearance between the top of the microwave oven and the rectangular to 15.2 cm = 1.5 m) B. Rectangular to round transition piece: 3¹⁄₄" x 10" to 6" = 5 ft (8.3 x 25...
Installation Guide
Page 12
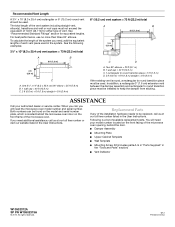
...ft (1.8 m) straight = 8 ft (2.4 m) If the existing vent is round, a rectangular to keep the damper from sticking. When you call, you will need the microwave oven model number and serial number. You will need your authorized dealer or service center. Recommended Vent Length A 3¹⁄₄" x 10" (8.3 x 25.4 cm)... website listed in the User Instructions. To calculate the length of the system you need , add the equivalent lengths of the microwave oven opening, behind the door. ■ Damper Assembly ■ Mounting Plate ■ Upper Cabinet Template ■ Wall Template...
...ft (1.8 m) straight = 8 ft (2.4 m) If the existing vent is round, a rectangular to keep the damper from sticking. When you call, you will need the microwave oven model number and serial number. You will need your authorized dealer or service center. Recommended Vent Length A 3¹⁄₄" x 10" (8.3 x 25.4 cm)... website listed in the User Instructions. To calculate the length of the system you need , add the equivalent lengths of the microwave oven opening, behind the door. ■ Damper Assembly ■ Mounting Plate ■ Upper Cabinet Template ■ Wall Template...


