KitchenAid KMLS311HWH Support and Manuals
Get Help and Manuals for this KitchenAid item

View All Support Options Below
Free KitchenAid KMLS311HWH manuals!
Problems with KitchenAid KMLS311HWH?
Ask a Question
Free KitchenAid KMLS311HWH manuals!
Problems with KitchenAid KMLS311HWH?
Ask a Question
Popular KitchenAid KMLS311HWH Manual Pages
Owners Manual - Page 1
... be heated in the provided Installation Instructions.
Connect only to explode and should be followed, including the following:
WARNING: To reduce the risk of burns, electric shock, fire,
injury to persons, or exposure to us that can be killed or seriously injured if you don't follow the specific "PRECAUTIONS TO AVOID POSSIBLE EXPOSURE...
Owners Manual - Page 2
...INSTRUCTIONS
I Do not cover or block any openings on the microwave oven. It is not always present. Visible bubbling or boiling when the container is removed from the microwave oven is not designed for industrial or laboratory use as described in the manual...used by qualified service personnel. It is particularly important that the oven door close supervision is specifically designed to the...
Owners Manual - Page 3
... or 20 amp electrical supply with Part 18 of the grounding plug can
result...supported: English and French. Do not use of the FCC Rules. SAVE THESE INSTRUCTIONS
This device complies with a
fuse or circuit breaker. Touch SETUP/CLOCK, enter time, then touch SETUP/CLOCK or the Start control. Vent Fan
Press the Vent Fan keypad once for the electric current. There are various options/setting...
Owners Manual - Page 4

... are side by making cleaning easier. CLEANRELEASE® Cavity Coating (on some models) The durable, nonstick coating resists soil buildup by side. This is helpful ...Manual Cooking
Touch number keypads to enter time, touch POWER (if not 100%), touch number keypads to reach the Fan Timer submenu and select the setting. For other bag sizes use the dish in the display.
Touch SETUP...
Owners Manual - Page 6
...Finger grip
Grease filter and charcoal filter
2.
See the "Settings" section to the bottom plate.
■■ Charcoal ...replace the charcoal filter, and clean or replace the grease filters. Clean the grease filter monthly, or replace with new grease filter if necessary.
MICROWAVE OVEN CARE
Installing/Replacing Filters and Light Bulbs
NOTE: A Filter Status indicator (on some models...
Owners Manual - Page 9
..., replace the fuse or reset the circuit breaker. Try to cool the microwave oven. On some models) is being started. If a message about the door appears in the display, the door has been closed for service.
■■ Door - Soil buildup on and off to the warranty page in this manual and scan the code...
Owners Manual - Page 10

... it was purchased, or at its sole discretion replace the product.
LIMITATION OF REMEDIES; This warranty gives you specific legal rights, and you also may have other than the limited warranty that comes with products not approved by a KitchenAid designated service company. All warranty service is installed,
installation instructions. house wiring, fuses or water inlet hoses). light...
Installation Instructions - Page 1
... VENTING DESIGN SPECIFICATIONS 11 ASSISTANCE 12 Replacement Parts 12 Accessories 12
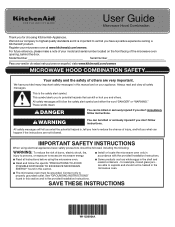
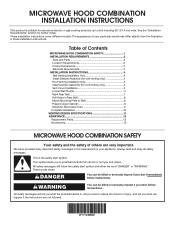
MICROWAVE HOOD COMBINATION SAFETY
Your safety and the safety of Contents
MICROWAVE HOOD COMBINATION SAFETY 1 INSTALLATION REQUIREMENTS 2
Tools and Parts 2 Location Requirements 2 Product Dimensions 3 Electrical Requirements 3 INSTALLATION INSTRUCTIONS 4 Wall Venting Installation Only 4 Install Damper...
Installation Instructions - Page 2
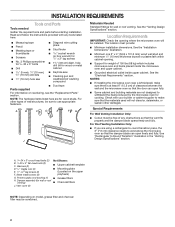
... tools and parts before starting installation. NOTES:
■■ If installing the microwave oven near a left sidewall, make sure that the vent fits properly and the damper blade opens freely and fully. Read and follow the instructions provided with your builder or cabinet supplier to Round Transition" illustration in the "Venting Design Specifications" section. A
B
C
D
E
FG...
Installation Instructions - Page 6

Support tabs F. Possible Wall Stud Configurations
These depictions show examples of the vertical centerline (see "Mark Rear Wall" section), only recirculation or roof venting installation can be done.
Holes for lag screws E. Wall Studs at End Holes
Figure 2
B
C
A
A
E
E D
F
NOTE: If wall studs is within 6" (15.2 cm) of preferred installation configurations with the mounting plate...
Installation Instructions - Page 7

... butted up against the bottom edge of the opening vertical centerline C. Centerline
2.
With the support tabs facing forward (see illustrations in the "Locate Wall Stud(s)" section), align the mounting ..., making sure its top is level with each be installed on a level line with the front edge of the mounting template. Set the mounting plate aside. Holding the mounting template in ...
Installation Instructions - Page 8

...Using a keyhole saw, cut out the venting cutout area. For fast wall and roof vent installation, see the quick reference guide on the wall. 4. No Wall Studs at End Holes (Figures 1 and 2)
NOTE: The...Wall Studs at One End Hole (Figure 3)
1. A. 3/16-24 x 3" round-head bolt B. With the support tabs of the mounting plate facing forward, insert a 3/16 -24 x 3" round-head bolt through the wall...
Installation Instructions - Page 9

... washers used to secure the microwave oven to do not grip or use as guides
■■ If the wall behind the microwave oven (as shown.
3....part of the rear wall (for Wall Stud at points "D" and "E" on the template is level. 4. With front of mounting plate.
If installing on a second wall stud, insert a lag screw into the upper cabinet align with the vertical centerline on support...
Installation Instructions - Page 10
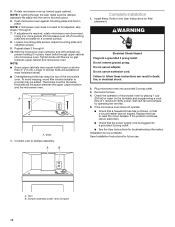
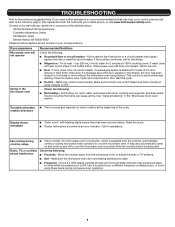
...9632; See the User Instructions for troubleshooting information. NOTE:
■...Replace the fuse or reset the circuit breaker. Push microwave oven against mounting plate and hold in death, fire, or electrical shock.
2. Using 2 or more people, lift microwave oven off of mounting plate and set...(installer to the User Instructions for future use an extension cord. Reconnect power. 4. If the problem...
Installation Instructions - Page 12

...service center.
Accessories
Filler Panel Kits are available from sticking. Replacement Parts
If any of the installation hardware needs to use when installing this microwave oven in the User Guide...m)
If the existing vent is round, a rectangular-to keep the damper from your model number located on the front facing of the microwave oven opening .
W11124888B SP PN ...
KitchenAid KMLS311HWH Reviews
We have not received any reviews for KitchenAid yet.