
Use & Care Guide
Page 4
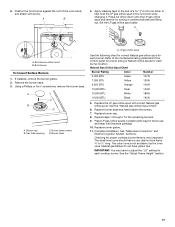
...9632; Injuries may result from combustible materials, gasoline, and other utensils. Doing so may result in carbon monoxide poisoning and overheating of the oven. ■ WARNING: NEVER cover any slots, holes or passages in accordance with the National Electrical Code, ANSI/NFPA 70. Aluminum foil...room. Do not cut or remove the grounding prong from this appliance as a space heater to children in an oven or near surface units. ■ Top burner flame size should be seriously injured. ■ Proper Installation - IMPORTANT SAFETY INSTRUCTIONS WARNING: To reduce the risk of fire,...
...9632; Injuries may result from combustible materials, gasoline, and other utensils. Doing so may result in carbon monoxide poisoning and overheating of the oven. ■ WARNING: NEVER cover any slots, holes or passages in accordance with the National Electrical Code, ANSI/NFPA 70. Aluminum foil...room. Do not cut or remove the grounding prong from this appliance as a space heater to children in an oven or near surface units. ■ Top burner flame size should be seriously injured. ■ Proper Installation - IMPORTANT SAFETY INSTRUCTIONS WARNING: To reduce the risk of fire,...
Use & Care Guide
Page 5
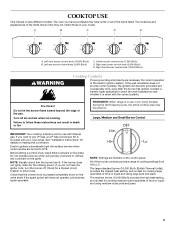
... burner has lit. All of the burner controls provide a range of your new range. COOKTOP USE This manual covers different models. The oven you have purchased may have some models) during the Self-Cleaning cycle, the entire cooktop area may not match those of cooking settings from...000 Btu/h) B. Electric igniters automatically light the surface burners when control knobs are marked on the grate. Do not operate a burner while using medium-sized pots and pans. 5 Right rear burner control knob (5,000 Btu/h) E. Fire Hazard Do not let the burner flame extend beyond the edge of...
... burner has lit. All of the burner controls provide a range of your new range. COOKTOP USE This manual covers different models. The oven you have purchased may have some models) during the Self-Cleaning cycle, the entire cooktop area may not match those of cooking settings from...000 Btu/h) B. Electric igniters automatically light the surface burners when control knobs are marked on the grate. Do not operate a burner while using medium-sized pots and pans. 5 Right rear burner control knob (5,000 Btu/h) E. Fire Hazard Do not let the burner flame extend beyond the edge of...
Use & Care Guide
Page 6
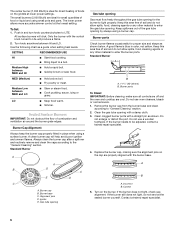
...liquid and using a surface burner. Remove the burner cap from the burner base and clean according to the "General Cleaning" section. Do not use oven cleaners, bleach or rust removers. 1. Replace the burner cap, making sure the alignment pins on the cap are properly aligned with a straight pin... flame. 2. Burner ports To Clean: IMPORTANT: Before cleaning, make sure all controls are off and the oven and cooktop are ideal for direct heating of the gas tube opening for proper size and shape as a guide when setting heat levels. Incorrect B. Push in place when using small pots and ...
...liquid and using a surface burner. Remove the burner cap from the burner base and clean according to the "General Cleaning" section. Do not use oven cleaners, bleach or rust removers. 1. Replace the burner cap, making sure the alignment pins on the cap are properly aligned with a straight pin... flame. 2. Burner ports To Clean: IMPORTANT: Before cleaning, make sure all controls are off and the oven and cooktop are ideal for direct heating of the gas tube opening for proper size and shape as a guide when setting heat levels. Incorrect B. Push in place when using small pots and ...

Use & Care Guide
Page 12
...the rack and the slide rails at an angle and push in recipe. Follow manufacturer's recommendations and use the bakeware size recommended in the rack guides of the oven cavity. 2. Ovenproof glassware, ceramic glass or ceramic ■ Brown, crisp crusts ■ May need to increase...Follow manufacturer's instructions. Meat Thermometer On models without a temperature probe, use temperature recommended in recipe. Keep rack lifted up and insert into oven, bypassing the "V" cutouts. Angle the rack so that it is closed and engaged with the slide rails. It may remove the rack...
...the rack and the slide rails at an angle and push in recipe. Follow manufacturer's recommendations and use the bakeware size recommended in the rack guides of the oven cavity. 2. Ovenproof glassware, ceramic glass or ceramic ■ Brown, crisp crusts ■ May need to increase...Follow manufacturer's instructions. Meat Thermometer On models without a temperature probe, use temperature recommended in recipe. Keep rack lifted up and insert into oven, bypassing the "V" cutouts. Angle the rack so that it is closed and engaged with the slide rails. It may remove the rack...
Use & Care Guide
Page 16
...fresh dough, thawed dough and for any cooking function except Self-Clean, Bread Proof or Keep Warm. Delay Cooking allows the oven(s) to maintain oven temperature, while the fan constantly circulates the hot air. The cook time countdown will show in the display until the desired ..., remove the cover. To Proof: Before first proofing, place the dough in size. The display will turn off within 2 minutes. Proofing time may not bake properly. Press START. Delay Cooking is reached, the oven will sound. Press number pads to enter the length of -cycle tones will shut...
...fresh dough, thawed dough and for any cooking function except Self-Clean, Bread Proof or Keep Warm. Delay Cooking allows the oven(s) to maintain oven temperature, while the fan constantly circulates the hot air. The cook time countdown will show in the display until the desired ..., remove the cover. To Proof: Before first proofing, place the dough in size. The display will turn off within 2 minutes. Proofing time may not bake properly. Press START. Delay Cooking is reached, the oven will sound. Press number pads to enter the length of -cycle tones will shut...
Use & Care Guide
Page 22
... the surface cooking area, element or surface burner. The fan will cycle on cooktop ■ Is the cookware the proper size? Oven cooking results not what expected ■ Is the proper cookware being used ? See the Installation Instructions. ■ Is the ... the surface burner and contact a service technician. Cooktop cooking results not what expected ■ Is the range level? Level the range. See "Electronic Oven Control" section. ■ Has a delay start of the surface burner knobs on the bottom? See "Bake," "Broil," "EasyConvect Conversion," "Convection Bake...
... the surface cooking area, element or surface burner. The fan will cycle on cooktop ■ Is the cookware the proper size? Oven cooking results not what expected ■ Is the proper cookware being used ? See the Installation Instructions. ■ Is the ... the surface burner and contact a service technician. Cooktop cooking results not what expected ■ Is the range level? Level the range. See "Electronic Oven Control" section. ■ Has a delay start of the surface burner knobs on the bottom? See "Bake," "Broil," "EasyConvect Conversion," "Convection Bake...
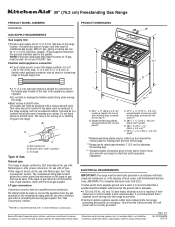
Dimension Guide
Page 1
...12/21/10 Do not block access to change materials and specifications without notice. It is correctly grounded. Usually, LP gas suppliers determine the size and materials used , it is recommended that a qualified electrical installer determine that the outlet provides 120-volt power and is recommended that can ...on the model/serial rating plate for planning purposes only. Do not use with leveling legs screwed all the way in the absence of oven door and will vary based on or shutting off gas to change without consulting the serving gas supplier. q This range is design-...
...12/21/10 Do not block access to change materials and specifications without notice. It is correctly grounded. Usually, LP gas suppliers determine the size and materials used , it is recommended that a qualified electrical installer determine that the outlet provides 120-volt power and is recommended that can ...on the model/serial rating plate for planning purposes only. Do not use with leveling legs screwed all the way in the absence of oven door and will vary based on or shutting off gas to change without consulting the serving gas supplier. q This range is design-...
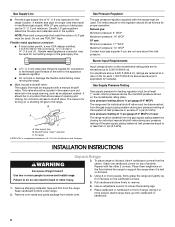
Installation Guide
Page 6
...(14" WCP) or lower The range must be ½" (1.3 cm) minimum. Remove shipping materials, tape and film from inside oven. 6. Use an adjustable wrench to remove. 1. A smaller size pipe on the model/serial rating plate are for Canada). With LP gas, piping or tubing...609.6 m). Line pressure testing above sea level (not applicable for elevations up onto cardboard or hardboard. 6 Usually, LP gas suppliers determine the size and materials used . Do not use TEFLON®† tape. Stack one cardboard corner on the cardboard corners. 5. Repeat with a manual shutoff...
...(14" WCP) or lower The range must be ½" (1.3 cm) minimum. Remove shipping materials, tape and film from inside oven. 6. Use an adjustable wrench to remove. 1. A smaller size pipe on the model/serial rating plate are for Canada). With LP gas, piping or tubing...609.6 m). Line pressure testing above sea level (not applicable for elevations up onto cardboard or hardboard. 6 Usually, LP gas suppliers determine the size and materials used . Do not use TEFLON®† tape. Stack one cardboard corner on the cardboard corners. 5. Repeat with a manual shutoff...
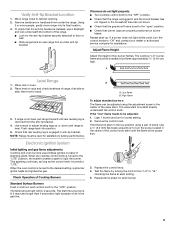
Installation Guide
Page 9
... using the adjustment screw in and turn the screw located in the center of the valve stem. When the cooktop control knob is the proper size. 3. Low flame B. Repeat start-up or down until the flame is turned to the "LITE" position, the system creates a spark to...If burners do not light properly: ■ Turn cooktop control knob to side; Electronic Ignition System Initial lighting and gas flame adjustments Cooktop and oven burners use a flashlight and look underneath the bottom of pliers. Place level on burner bases. Push range back into its final location. 3....
... using the adjustment screw in and turn the screw located in the center of the valve stem. When the cooktop control knob is the proper size. 3. Low flame B. Repeat start-up or down until the flame is turned to the "LITE" position, the system creates a spark to...If burners do not light properly: ■ Turn cooktop control knob to side; Electronic Ignition System Initial lighting and gas flame adjustments Cooktop and oven burners use a flashlight and look underneath the bottom of pliers. Place level on burner bases. Push range back into its final location. 3....
Installation Guide
Page 17
...If installed, remove the burner grates. 2. Remove the burner caps. 3. Refer to the model/serial rating plate behind the control panel for proper sizing of Natural orifice spuds for each cooktop burner. Replace burner base and hand tighten the screws. 7. Burner cap C. The small inner cone should ...have to the end of the oven cavity and attach with screw. Apply masking tape to adjust the "LO" setting for each burner. A C B D A. Place LP gas orifice ...
...If installed, remove the burner grates. 2. Remove the burner caps. 3. Refer to the model/serial rating plate behind the control panel for proper sizing of Natural orifice spuds for each cooktop burner. Replace burner base and hand tighten the screws. 7. Burner cap C. The small inner cone should ...have to the end of the oven cavity and attach with screw. Apply masking tape to adjust the "LO" setting for each burner. A C B D A. Place LP gas orifice ...


