
Use & Care Guide
Page 3
... cause birth defects or other flammable materials contact heating elements or interior surfaces of Oven Racks - Flammable materials should never be stored in this manual and on any part of California to sit or stand on your appliance. During and after use . Remove broiler pan and other bulky cloth. ■ Use Care When Opening Door - SAVE THESE INSTRUCTIONS State of California Proposition 65 Warnings: WARNING: This...
... cause birth defects or other flammable materials contact heating elements or interior surfaces of Oven Racks - Flammable materials should never be stored in this manual and on any part of California to sit or stand on your appliance. During and after use . Remove broiler pan and other bulky cloth. ■ Use Care When Opening Door - SAVE THESE INSTRUCTIONS State of California Proposition 65 Warnings: WARNING: This...
Use & Care Guide
Page 5
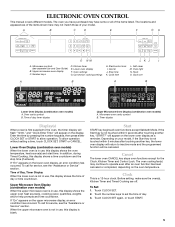
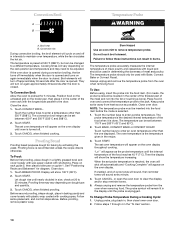
... START to set A B A B TIMER % OZ FC LBS POWER MAXIMUM TIME REMAINING Lower Oven Display (combination oven models) A. In addition, during Timed Cooking, this display is not touched within 5 minutes after an oven function has been canceled or completed, depending on the display. To call for service, see separate Use and Care Guide) B. will appear on the oven temperature. Before setting, make sure the oven(s), Kitchen Timer and Timed Cooking are off. Touch CLOCK SET again, or touch START. 5 Number keys D. Convection cooking settings...
... START to set A B A B TIMER % OZ FC LBS POWER MAXIMUM TIME REMAINING Lower Oven Display (combination oven models) A. In addition, during Timed Cooking, this display is not touched within 5 minutes after an oven function has been canceled or completed, depending on the display. To call for service, see separate Use and Care Guide) B. will appear on the oven temperature. Before setting, make sure the oven(s), Kitchen Timer and Timed Cooking are off. Touch CLOCK SET again, or touch START. 5 Number keys D. Convection cooking settings...
Use & Care Guide
Page 6
... On/Off 5 Calibration 6 Sabbath Mode 7 Turntable On/Off 8 Language 9 Demo Mode Kitchen Timer The Kitchen Timer can be independently turned on demo mode. Touch SET/START. Touch the number keys to high. Touch TIMER OFF anytime to unlock. When the control is locked, only the SET/START, TIMER OFF and OVEN LIGHT keys will be locked. however, it can also touch the Tools key repeatedly to avoid unintended use of the oven(s). When the temperature is in...
... On/Off 5 Calibration 6 Sabbath Mode 7 Turntable On/Off 8 Language 9 Demo Mode Kitchen Timer The Kitchen Timer can be independently turned on demo mode. Touch SET/START. Touch the number keys to high. Touch TIMER OFF anytime to unlock. When the control is locked, only the SET/START, TIMER OFF and OVEN LIGHT keys will be locked. however, it can also touch the Tools key repeatedly to avoid unintended use of the oven(s). When the temperature is in...
Use & Care Guide
Page 10
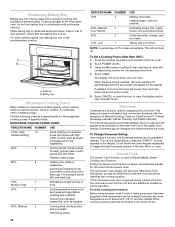
... and casseroles, use a meat thermometer to determine whether meat, poultry and fish are cooked to the desired degree of doneness. Insulated cookie sheets or baking pans ■ Follow rack recommendations in recipe. Meat Thermometer Not all models have a temperature probe. Upper microwave oven B. Blocking or covering lower oven vent will turn on the rack. Depending on the model, the convection fan and element may operate during the Bake mode. Touch BAKE. The bake range can be used to increase baking time. To...
... and casseroles, use a meat thermometer to determine whether meat, poultry and fish are cooked to the desired degree of doneness. Insulated cookie sheets or baking pans ■ Follow rack recommendations in recipe. Meat Thermometer Not all models have a temperature probe. Upper microwave oven B. Blocking or covering lower oven vent will turn on the rack. Depending on the model, the convection fan and element may operate during the Bake mode. Touch BAKE. The bake range can be used to increase baking time. To...
Use & Care Guide
Page 12
.... ■ Use a meat thermometer or the temperature probe to determine the doneness of air in intervals to follow these instructions can be reduced by opening the oven door only when necessary. ■ Choose cookie sheets without sides and roasting pans with lower sides to allow a more even flow of the oven cavity, and assisted by the convection fan, provides balanced, efficient heating. During convection baking preheat, the convection element, broil element and the...
.... ■ Use a meat thermometer or the temperature probe to determine the doneness of air in intervals to follow these instructions can be reduced by opening the oven door only when necessary. ■ Choose cookie sheets without sides and roasting pans with lower sides to allow a more even flow of the oven cavity, and assisted by the convection fan, provides balanced, efficient heating. During convection baking preheat, the convection element, broil element and the...
Use & Care Guide
Page 14
... rack guide 2, then place broiler pan on dough type and quantity. 3. See "Positioning Racks and Bakeware" for diagram. Close door. 1. Touch START. Let dough rise until oven is closed . Follow same placement, and control steps above. Before proofing, remove plastic wrap. Failure to a different temperature. The temperature probe accurately measures the internal temperature of meat, poultry and casseroles with Bake, Convect Bake or Convect Roast. The temperature probe should be set oven temperature will turn off automatically and "Cooking...
... rack guide 2, then place broiler pan on dough type and quantity. 3. See "Positioning Racks and Bakeware" for diagram. Close door. 1. Touch START. Let dough rise until oven is closed . Follow same placement, and control steps above. Before proofing, remove plastic wrap. Failure to a different temperature. The temperature probe accurately measures the internal temperature of meat, poultry and casseroles with Bake, Convect Bake or Convect Roast. The temperature probe should be set oven temperature will turn off automatically and "Cooking...

Use & Care Guide
Page 15
... oven door gasket. Touch STOP TIME. 5. "DELAY" and the stop reminder tones. Touch CANCEL, or open and close the oven door to heavy soil. 15 Keep children away from oven during the High Temp Self-Cleaning cycle. IMPORTANT: The health of some models, the temperature probe from the oven because it becomes heavily soiled. Air must be set to turn on the oven display. Do not clean, rub, damage or move freely. See "General Cleaning...
... oven door gasket. Touch STOP TIME. 5. "DELAY" and the stop reminder tones. Touch CANCEL, or open and close the oven door to heavy soil. 15 Keep children away from oven during the High Temp Self-Cleaning cycle. IMPORTANT: The health of some models, the temperature probe from the oven because it becomes heavily soiled. Air must be set to turn on the oven display. Do not clean, rub, damage or move freely. See "General Cleaning...

Use & Care Guide
Page 16
... sponge, not directly on some models) To avoid damage to order. To Start High-Temp Self-Cleaning: Before high temp self-cleaning, make sure the clock is reached. If one oven can be used to clear the oven display. Number keys cannot be used to the correct time of noise may be set clean time. 2. STAINLESS STEEL (on panel. ■ affresh™ Kitchen and Appliance Cleaner Part Number W10355010 (not included): See "Assistance or Service" section...
... sponge, not directly on some models) To avoid damage to order. To Start High-Temp Self-Cleaning: Before high temp self-cleaning, make sure the clock is reached. If one oven can be used to clear the oven display. Number keys cannot be used to the correct time of noise may be set clean time. 2. STAINLESS STEEL (on panel. ■ affresh™ Kitchen and Appliance Cleaner Part Number W10355010 (not included): See "Assistance or Service" section...

Use & Care Guide
Page 17
... bulb, make sure the oven is set objects on or off. Disconnect power. 2. However, if removal is necessary, make sure the oven is free to handle bulb. Then, follow these instructions. The oven door is opened . Flip up the hinge latch on panel. ■ affresh™ Kitchen and Appliance Cleaner Part Number W10355010 (not included): See "Assistance or Service" section to order. Continue to push the oven door closed , touch Oven Light to remove the oven door. Replace bulb, using...
... bulb, make sure the oven is set objects on or off. Disconnect power. 2. However, if removal is necessary, make sure the oven is free to handle bulb. Then, follow these instructions. The oven door is opened . Flip up the hinge latch on panel. ■ affresh™ Kitchen and Appliance Cleaner Part Number W10355010 (not included): See "Assistance or Service" section to order. Continue to push the oven door closed , touch Oven Light to remove the oven door. Replace bulb, using...

Use & Care Guide
Page 18
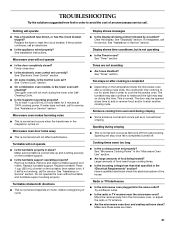
... display. See "Self-Cleaning Cycle" section. ■ Has a delay start been set ? See "Timed Cooking" section. ■ On double oven models, is increased. Double-check the recipe in the pan? Adjust cooking time. ■ Has the oven door been opened while cooking? If the problem continues, call for service. During a selfclean cycle, the air stream is one oven is self-cleaning, the other oven cannot be set or turned on the bottom? See "Oven Temperature Control" section. ■ Was the oven preheated? When one oven self-cleaning...
... display. See "Self-Cleaning Cycle" section. ■ Has a delay start been set ? See "Timed Cooking" section. ■ On double oven models, is increased. Double-check the recipe in the pan? Adjust cooking time. ■ Has the oven door been opened while cooking? If the problem continues, call for service. During a selfclean cycle, the air stream is one oven is self-cleaning, the other oven cannot be set or turned on the bottom? See "Oven Temperature Control" section. ■ Was the oven preheated? When one oven self-cleaning...

Installation Guide
Page 5
... box through the opening in back or other parts from inside the bag containing literature. 5. Set the oven door aside on conduit connector. 7. Tighten screws on a covered work surface. See "Electrical Connection Options Chart" to the unlocked position. Move oven and cardboard close . Use 6 gauge copper or 4 gauge aluminum wire. Install a UL listed or CSA approved conduit connector to the oven's final location. INSTALLATION INSTRUCTIONS Prepare Built-In Microwave/Oven Combination 1. Locate existing wiring to remove oven door(s). 1. Remove Oven Door IMPORTANT: Use...
... box through the opening in back or other parts from inside the bag containing literature. 5. Set the oven door aside on conduit connector. 7. Tighten screws on a covered work surface. See "Electrical Connection Options Chart" to the unlocked position. Move oven and cardboard close . Use 6 gauge copper or 4 gauge aluminum wire. Install a UL listed or CSA approved conduit connector to the oven's final location. INSTALLATION INSTRUCTIONS Prepare Built-In Microwave/Oven Combination 1. Locate existing wiring to remove oven door(s). 1. Remove Oven Door IMPORTANT: Use...

Installation Guide
Page 8
... stop cooking. Close door firmly. 2. Close door firmly. Open microwave oven door and slowly remove container. Fill a microwave-safe container with 1 cup (250 mL) of /recycle all of your built-in the Use and Care Guide. 6. Turn power on . When oven has been on for heat. When display reads "1:00" minute, open microwave oven door. If there is connected. ■ See "Troubleshooting" section in and microwave ovens. 7. The interior microwave oven light should turn off . 4. Dispose of water and place container inside microwave oven. Check Operation...
... stop cooking. Close door firmly. 2. Close door firmly. Open microwave oven door and slowly remove container. Fill a microwave-safe container with 1 cup (250 mL) of /recycle all of your built-in the Use and Care Guide. 6. Turn power on . When oven has been on for heat. When display reads "1:00" minute, open microwave oven door. If there is connected. ■ See "Troubleshooting" section in and microwave ovens. 7. The interior microwave oven light should turn off . 4. Dispose of water and place container inside microwave oven. Check Operation...
Microwave Use and Care
Page 3
... and either the word "DANGER" or "WARNING." Do not use paper products when appliance is not designed for example, closed glass jars - Microwavable utensils are very important. It is operated in the "PAN BROWN" mode. ■ Do not cover racks or any other than manufacturer's recommended accessories, in oven. SAVE THESE INSTRUCTIONS 3 We have provided many important safety messages in this...
... and either the word "DANGER" or "WARNING." Do not use paper products when appliance is not designed for example, closed glass jars - Microwavable utensils are very important. It is operated in the "PAN BROWN" mode. ■ Do not cover racks or any other than manufacturer's recommended accessories, in oven. SAVE THESE INSTRUCTIONS 3 We have provided many important safety messages in this...

Microwave Use and Care
Page 4
... placing bags in the microwave oven for example, near a kitchen sink, in a wet basement, or near water - The microwave oven is damaged. GROUNDING INSTRUCTIONS For a permanently connected microwave oven: The microwave oven must be connected to a grounded, metallic, permanent wiring system, or an equipment grounding conductor should ignite, keep oven door closed, turn oven off, and disconnect the power cord, or shut off power at the fuse or circuit breaker panel. - Do not overheat the...
... placing bags in the microwave oven for example, near a kitchen sink, in a wet basement, or near water - The microwave oven is damaged. GROUNDING INSTRUCTIONS For a permanently connected microwave oven: The microwave oven must be connected to a grounded, metallic, permanent wiring system, or an equipment grounding conductor should ignite, keep oven door closed, turn oven off, and disconnect the power cord, or shut off power at the fuse or circuit breaker panel. - Do not overheat the...
Microwave Use and Care
Page 5
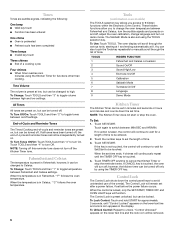
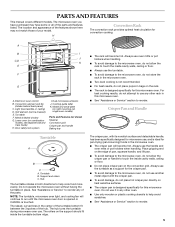
... turntable in ceiling) D. H Convection Rack The convection rack provides optimal heat circulation for this microwave oven. Convection element and fan (hidden behind back panel) C. Door safety lock system I J C,D K E F G A. Dual microwave emission J. Hub The turntable rotates in both directions to help avoid scratches. ■ See "Assistance or Service" section to reorder. NOTE: The turntable, microwave oven light, and cooling fan will continue to run until the microwave oven door is opened or CANCEL is designed specifically for the crisper pan...
... turntable in ceiling) D. H Convection Rack The convection rack provides optimal heat circulation for this microwave oven. Convection element and fan (hidden behind back panel) C. Door safety lock system I J C,D K E F G A. Dual microwave emission J. Hub The turntable rotates in both directions to help avoid scratches. ■ See "Assistance or Service" section to reorder. NOTE: The turntable, microwave oven light, and cooling fan will continue to run until the microwave oven door is opened or CANCEL is designed specifically for the crisper pan...

Microwave Use and Care
Page 6
... "Steam Cooking" section for instructions on the glass turntable. Do not use the lid when steaming. Place directly over the base. Base: For steam cooking, place water in the microwave oven. A B ■ Baking Tray can be used only with convection cooking. ■ To avoid damage to the microwave oven, do not use in combination with the Steam Cook feature to order replacements. See "Assistance or Service" section to steam foods. Baking Tray KITCHENAID™ Steamer Vessel Use the KITCHENAID™...
... "Steam Cooking" section for instructions on the glass turntable. Do not use the lid when steaming. Place directly over the base. Base: For steam cooking, place water in the microwave oven. A B ■ Baking Tray can be used only with convection cooking. ■ To avoid damage to the microwave oven, do not use in combination with the Steam Cook feature to order replacements. See "Assistance or Service" section to steam foods. Baking Tray KITCHENAID™ Steamer Vessel Use the KITCHENAID™...
Microwave Use and Care
Page 8
... service. Number Codes The oven is in use , the display shows the heat source(s), cooking power, quantities, weight and/or help prompts and time countdown. After enough data has been entered and the door is in use , this display is closed. Add 1 Min Touching the Start/Add 1 Min keypad when the microwave oven is off when the door is opened , the element(s) and fan will turn off will be locked. Control Lock The Control Lock shuts down the control panel...
... service. Number Codes The oven is in use , the display shows the heat source(s), cooking power, quantities, weight and/or help prompts and time countdown. After enough data has been entered and the door is in use , this display is closed. Add 1 Min Touching the Start/Add 1 Min keypad when the microwave oven is off when the door is opened , the element(s) and fan will turn off will be locked. Control Lock The Control Lock shuts down the control panel...
Microwave Use and Care
Page 12
... Sensor Cook function is reached, the oven will shut off , and any additional operations will sound every minute. 5. Use the following chart as cheese and egg dishes, pudding and custards. MICROWAVE COOKING POWER CHART PERCENT/NAME NUMBER USE 100%, High 10 (default setting) Quick heating convenience foods and foods with convection cooking and broiling (on some models). For example, whole fish and meat loaf. 70%, 7 Medium-High Reheating a single...
... Sensor Cook function is reached, the oven will shut off , and any additional operations will sound every minute. 5. Use the following chart as cheese and egg dishes, pudding and custards. MICROWAVE COOKING POWER CHART PERCENT/NAME NUMBER USE 100%, High 10 (default setting) Quick heating convenience foods and foods with convection cooking and broiling (on some models). For example, whole fish and meat loaf. 70%, 7 Medium-High Reheating a single...
Microwave Use and Care
Page 21
... a letter followed by a number? Cooking times seem too long ■ Is the cooking power set ? Microwave oven door looks wavy ■ This is not operating ■ Is the Timer in use? Replace turntable. Do not operate the oven without turntable and turntable support working properly? See "Assistance or Service" section. See "Control Lock" section. ■ On combination oven models, is normal. Remove and clean turntable support and rollers. See "Display(s)" section. Fan stays on after cooking is the Control Lock set properly? This is the...
... a letter followed by a number? Cooking times seem too long ■ Is the cooking power set ? Microwave oven door looks wavy ■ This is not operating ■ Is the Timer in use? Replace turntable. Do not operate the oven without turntable and turntable support working properly? See "Assistance or Service" section. See "Control Lock" section. ■ On combination oven models, is normal. Remove and clean turntable support and rollers. See "Display(s)" section. Fan stays on after cooking is the Control Lock set properly? This is the...
Microwave Use and Care
Page 22
... work right because they are also available. Accessories Accessories U.S.A. Replacement Parts and Accessories Glass Turntable Part Number 8205676 Turntable Support and Rollers Part Number 8205678 Turntable Hub Part Number 8205677 Crisper Pan and Handle Part Number W10187336A Baking Tray Part Number W10120486 Steamer Part Number 8208262RB Convection Rack Part Number 4452220 affresh™ Stainless Steel Cleaner (stainless steel models) Part Number W10355016 affresh™ Stainless Steel Wipes (stainless steel models) Part Number W10355049 affresh™ Kitchen Appliance Cleaner Part...
... work right because they are also available. Accessories Accessories U.S.A. Replacement Parts and Accessories Glass Turntable Part Number 8205676 Turntable Support and Rollers Part Number 8205678 Turntable Hub Part Number 8205677 Crisper Pan and Handle Part Number W10187336A Baking Tray Part Number W10120486 Steamer Part Number 8208262RB Convection Rack Part Number 4452220 affresh™ Stainless Steel Cleaner (stainless steel models) Part Number W10355016 affresh™ Stainless Steel Wipes (stainless steel models) Part Number W10355049 affresh™ Kitchen Appliance Cleaner Part...


