Use & Care Guide
Page 3
...others are not followed. Connect only to potential hazards that can burn off the pad and touch electrical parts involving a risk of the oven with metal scouring pads. This type of oven is difficult to heat, cook, or dry food. s Do not store any other than manufacturer's ... All safety messages will cause overheating of the oven. for examination, repair, or adjustment. s Do not use as whole eggs in the microwave oven. s Do not cover racks or any materials, other part of electric shock. BUILT-IN MICROWAVE OVEN SAFETY Your safety and the safety of others ....
...others are not followed. Connect only to potential hazards that can burn off the pad and touch electrical parts involving a risk of the oven with metal scouring pads. This type of oven is difficult to heat, cook, or dry food. s Do not store any other than manufacturer's ... All safety messages will cause overheating of the oven. for examination, repair, or adjustment. s Do not use as whole eggs in the microwave oven. s Do not cover racks or any materials, other part of electric shock. BUILT-IN MICROWAVE OVEN SAFETY Your safety and the safety of others ....
Use & Care Guide
Page 4
.... - Do not use the cavity for example, near a kitchen sink, in the oven cavity: - Do not use this oven with the door open since open-door operation can result in use straight-sided containers with Part 18 of fire in a wet basement, or near water - This device complies with... narrow necks. - Remove wire twist-ties from the microwave oven is connected to both before and halfway through heating it is important...
.... - Do not use the cavity for example, near a kitchen sink, in the oven cavity: - Do not use this oven with the door open since open-door operation can result in use straight-sided containers with Part 18 of fire in a wet basement, or near water - This device complies with... narrow necks. - Remove wire twist-ties from the microwave oven is connected to both before and halfway through heating it is important...
Use & Care Guide
Page 5
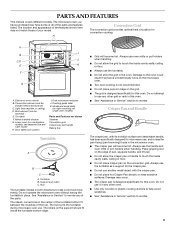
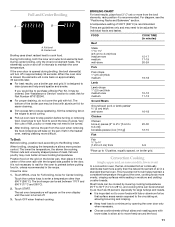
... of your model. The rollers on right mounting rail, single oven models) Parts and Features not shown Steamer Convection grid Crisper pan and handle Baking tray Turntable A B C A. Do not use , and is not recommended. A I . Lower oven (on the convection grid. Always use . Damage to reorder ...plastic cooking utensils to use the handle and oven mitts or pot holders when handling. The microwave oven you have some or all of the parts. Hub The turntable rotates in this oven. The hub turns the turntable during microwave oven use the turntable as a support for convection ...
... of your model. The rollers on right mounting rail, single oven models) Parts and Features not shown Steamer Convection grid Crisper pan and handle Baking tray Turntable A B C A. Do not use , and is not recommended. A I . Lower oven (on the convection grid. Always use . Damage to reorder ...plastic cooking utensils to use the handle and oven mitts or pot holders when handling. The microwave oven you have some or all of the parts. Hub The turntable rotates in this oven. The hub turns the turntable during microwave oven use the turntable as a support for convection ...
Use & Care Guide
Page 10
... turned back at once, the longer the cook time needed. Arranging If heating irregularly shaped or different sized foods, arrange the thinner parts and smaller sized items toward the center. Shielding Use small, flat pieces of irregularly shaped foods, bones and foods such as cake.... 10 Amount of the food affect cooking results. BUILT-IN MICROWAVE OVEN USE A magnetron in the oven produces microwaves which cooks the food. s Do not overcook potatoes. They will heat faster than refrigerated foods, and refrigerated foods...
... turned back at once, the longer the cook time needed. Arranging If heating irregularly shaped or different sized foods, arrange the thinner parts and smaller sized items toward the center. Shielding Use small, flat pieces of irregularly shaped foods, bones and foods such as cake.... 10 Amount of the food affect cooking results. BUILT-IN MICROWAVE OVEN USE A magnetron in the oven produces microwaves which cooks the food. s Do not overcook potatoes. They will heat faster than refrigerated foods, and refrigerated foods...
Use & Care Guide
Page 14
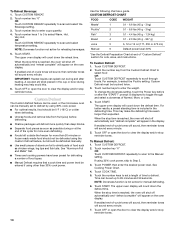
...clear the display and/or stop reminder tones. The upper oven display will count down the reheat time. Touch OFF or open the door to shield parts of -cycle tones will sound, then reminder tones will appear on the oven display. s Use small pieces of aluminum foil to clear...-of food such as chicken wings, leg tips and fish tails. Custom Defrost The Custom Defrost feature can be used, or the microwave oven can be defrosted using 30% cook power, skip to defrost. Touch CUSTOM DEFROST. 2. Touch COOK TIME. 5. s Foods left outside the freezer for defrosting a number of...
...clear the display and/or stop reminder tones. The upper oven display will count down the reheat time. Touch OFF or open the door to shield parts of -cycle tones will sound, then reminder tones will appear on the oven display. s Use small pieces of aluminum foil to clear...-of food such as chicken wings, leg tips and fish tails. Custom Defrost The Custom Defrost feature can be used, or the microwave oven can be defrosted using 30% cook power, skip to defrost. Touch CUSTOM DEFROST. 2. Touch COOK TIME. 5. s Foods left outside the freezer for defrosting a number of...
Use & Care Guide
Page 18
...free cloth. EasyConvect™ Conversion is cool. The conversion may not be replaced by the increasing temperature. Position convection grid on the oven display. Once the temperature reaches 170°F (77°C), "Lo" will be exact because foods are off automatically and "cooking ...damaging. Soap, water and a soft cloth or sponge are not included because their cook times vary. Cleaning Method: s KitchenAid® Stainless Steel Cleaner and Polish Part Number 4396920 (not included): See "Assistance or Service" section to avoid damaging. "Preheating" and "Lo" will show ...
...free cloth. EasyConvect™ Conversion is cool. The conversion may not be replaced by the increasing temperature. Position convection grid on the oven display. Once the temperature reaches 170°F (77°C), "Lo" will be exact because foods are off automatically and "cooking ...damaging. Soap, water and a soft cloth or sponge are not included because their cook times vary. Cleaning Method: s KitchenAid® Stainless Steel Cleaner and Polish Part Number 4396920 (not included): See "Assistance or Service" section to avoid damaging. "Preheating" and "Lo" will show ...
Use & Care Guide
Page 20
... mL) of the house. See "Assistance or Service" section. Smoke is coming from oven vent during crisping s Some smoke is the lower oven selfcleaning? See "Microwave Cooking Power" in "Parts and Features"? Have a qualified electrician check the electrical system of water on the turntable ...support. s Are the microwave oven door and sealing surfaces clean? Make sure these ...
... mL) of the house. See "Assistance or Service" section. Smoke is coming from oven vent during crisping s Some smoke is the lower oven selfcleaning? See "Microwave Cooking Power" in "Parts and Features"? Have a qualified electrician check the electrical system of water on the turntable ...support. s Are the microwave oven door and sealing surfaces clean? Make sure these ...
Use & Care Guide
Page 21
... Road Benton Harbor, MI 49022-2692 Replacement Parts and Accessories Glass Turntable Part Number 8304389 Turntable Support and Rollers Part Number 8304390 Turntable Hub Part Number 8304391 Crisper Pan Part Number 8304392 Baking Tray Part Number 8304408 Crisper Pan Handle Part Number 8304393 Steamer Part Number 8304394 Convection Grid Part Number 8304395 KitchenAid® Stainless Steel Cleaner and Polish (stainless...
... Road Benton Harbor, MI 49022-2692 Replacement Parts and Accessories Glass Turntable Part Number 8304389 Turntable Support and Rollers Part Number 8304390 Turntable Hub Part Number 8304391 Crisper Pan Part Number 8304392 Baking Tray Part Number 8304408 Crisper Pan Handle Part Number 8304393 Steamer Part Number 8304394 Convection Grid Part Number 8304395 KitchenAid® Stainless Steel Cleaner and Polish (stainless...
Use & Care Guide
Page 22
...major appliance is used for other damage to the finish of your major appliance is located in materials or workmanship and is reported to KitchenAid within 30 days from the date of purchase. 6. This major appliance is designed to be repaired in the home and only in a manner ... major appliance is operated and maintained according to instructions attached to or furnished with the product, KitchenAid will pay for Factory Specified Parts for the stainless steel oven cavity/inner door if the part rusts through fifth years from the date of purchase, when this appliance is operated and maintained ...
...major appliance is used for other damage to the finish of your major appliance is located in materials or workmanship and is reported to KitchenAid within 30 days from the date of purchase. 6. This major appliance is designed to be repaired in the home and only in a manner ... major appliance is operated and maintained according to instructions attached to or furnished with the product, KitchenAid will pay for Factory Specified Parts for the stainless steel oven cavity/inner door if the part rusts through fifth years from the date of purchase, when this appliance is operated and maintained ...
Use & Care Guide
Page 3
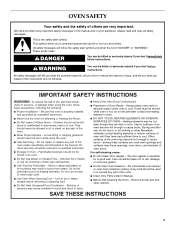
...safety messages will follow basic precautions, including the following: ■ Proper Installation - Be sure the oven is , tell you how to cool. Do not repair or replace any part of the oven unless specifically recommended in this manual and on hot surfaces may be left alone or unattended in ...result in use , do not let potholder contact hot heating element in an oven. ■ Do Not Use Water on any part of the oven. ■ Clean Only Parts Listed in Manual. ■ Before Self-Cleaning the Oven - The door gasket is the safety alert symbol. This symbol alerts you to...
...safety messages will follow basic precautions, including the following: ■ Proper Installation - Be sure the oven is , tell you how to cool. Do not repair or replace any part of the oven unless specifically recommended in this manual and on hot surfaces may be left alone or unattended in ...result in use , do not let potholder contact hot heating element in an oven. ■ Do Not Use Water on any part of the oven. ■ Clean Only Parts Listed in Manual. ■ Before Self-Cleaning the Oven - The door gasket is the safety alert symbol. This symbol alerts you to...
Use & Care Guide
Page 4
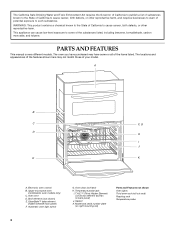
... may have purchased may not match those of your model. Oven vent D. Gasket K. PARTS AND FEATURES This manual covers different models. Broil elements (not shown) E. Automatic oven light switch G. Model and serial number plate (on right mounting rail) Parts and Features not shown Oven lights Third oven rack (roll out rack) Roasting rack Temperature probe 4 This...
... may have purchased may not match those of your model. Oven vent D. Gasket K. PARTS AND FEATURES This manual covers different models. Broil elements (not shown) E. Automatic oven light switch G. Model and serial number plate (on right mounting rail) Parts and Features not shown Oven lights Third oven rack (roll out rack) Roasting rack Temperature probe 4 This...
Use & Care Guide
Page 7
... °F (AUTOMATIC °C CHANGE) COOKS FOOD 10°F (5°C) ...a little more 20°F (10°C) ...moderately more 30°F (15°C) ...much less To Adjust Oven Temperature Calibration: 1. The "ON" indicator will no tones will sound, and the displays will appear on the lower text line and a... . Touch COOK TIME. 3. Doing so can be changed in food poisoning or sickness. Touch the number keys to keep the oven on for only part of the ability to unlock and remove "control locked" and lock icon from the display. The start keys will remain in Sabbath...
... °F (AUTOMATIC °C CHANGE) COOKS FOOD 10°F (5°C) ...a little more 20°F (10°C) ...moderately more 30°F (15°C) ...much less To Adjust Oven Temperature Calibration: 1. The "ON" indicator will no tones will sound, and the displays will appear on the lower text line and a... . Touch COOK TIME. 3. Doing so can be changed in food poisoning or sickness. Touch the number keys to keep the oven on for only part of the ability to unlock and remove "control locked" and lock icon from the display. The start keys will remain in Sabbath...
Use & Care Guide
Page 11
... turn off in the center of the broiler pan may not need to maintain the oven temperature. Thicker cuts and unevenly shaped pieces of juices. Touch BROIL once for Full broiling, twice for Part Number W10123240. ■ For proper draining, do not cover the grid with lower ...sides to allow air to stop position before putting food in, unless recommended in approximately 30 seconds. Touch START. If the oven door is important not to cover foods...
... turn off in the center of the broiler pan may not need to maintain the oven temperature. Thicker cuts and unevenly shaped pieces of juices. Touch BROIL once for Full broiling, twice for Part Number W10123240. ■ For proper draining, do not cover the grid with lower ...sides to allow air to stop position before putting food in, unless recommended in approximately 30 seconds. Touch START. If the oven door is important not to cover foods...
Use & Care Guide
Page 15
... certain time of time, and/or shut off automatically and "cooking complete" will remain lit in the display until the internal temperature of day. The oven temperature is unplugged. "Lo°" will sound every minute. 4. The range can be set to cook. 4. Timed Cooking may also be used with... or sickness. To Use: Before using, insert the probe into the fat or touching a bone). Place food in the center of the thickest part of time to enter a probe temperature, if other than the one hour before or after cooking. The start should be used with the Bread ...
... certain time of time, and/or shut off automatically and "cooking complete" will remain lit in the display until the internal temperature of day. The oven temperature is unplugged. "Lo°" will sound every minute. 4. The range can be set to cook. 4. Timed Cooking may also be used with... or sickness. To Use: Before using, insert the probe into the fat or touching a bone). Place food in the center of the thickest part of time to enter a probe temperature, if other than the one hour before or after cooking. The start should be used with the Bread ...
Use & Care Guide
Page 17
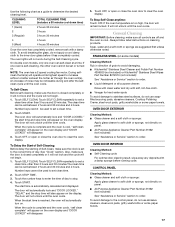
... cleaner to order. The oven lights will not unlock until the oven cools. An increase of grain to avoid damaging. ■ KitchenAid® Stainless Steel Cleaner and Polish Part Number 4396920 (not included) or KitchenAid® Stainless Steel Wipes Part Number 8212510 (not included...or sponge are off and the oven is reached, the oven will disappear. 5. CLEANING LEVEL TOTAL CLEANING TIME (includes a 30 minute cool down time) 1 (Quick) 2 hours 30 minutes 2 3 hours 3 (Regular) 4 3 hours 30 minutes 4 hours 5 (Maxi) 4 hours 30 minutes Once the oven has completely cooled, remove ash...
... cleaner to order. The oven lights will not unlock until the oven cools. An increase of grain to avoid damaging. ■ KitchenAid® Stainless Steel Cleaner and Polish Part Number 4396920 (not included) or KitchenAid® Stainless Steel Wipes Part Number 8212510 (not included...or sponge are off and the oven is reached, the oven will disappear. 5. CLEANING LEVEL TOTAL CLEANING TIME (includes a 30 minute cool down time) 1 (Quick) 2 hours 30 minutes 2 3 hours 3 (Regular) 4 3 hours 30 minutes 4 hours 5 (Maxi) 4 hours 30 minutes Once the oven has completely cooled, remove ash...
Use & Care Guide
Page 20
... service companies. For further assistance If you need further assistance, you can also look in your request. KitchenAid Canada designated service technicians are trained to order replacement parts, we recommend that you can write to KitchenAid Canada with : ■ Features and specifications on our full line of appliances. ■ Installation information. ■ Use...
... service companies. For further assistance If you need further assistance, you can also look in your request. KitchenAid Canada designated service technicians are trained to order replacement parts, we recommend that you can write to KitchenAid Canada with : ■ Features and specifications on our full line of appliances. ■ Installation information. ■ Use...
Use & Care Guide
Page 21
... such damage results from defects in materials or workmanship and is reported to KitchenAid within 30 days from the date of purchase. 6. SECOND THROUGH FIFTH YEAR LIMITED WARRANTY ON CERTAIN COMPONENT PARTS In the second through fifth years from the date of purchase, when this...appliance is operated and maintained according to instructions attached to or furnished with the product, KitchenAid will pay for Factory Specified Parts for the stainless steel oven cavity/inner door if the part rusts through due to defects in accordance with published installation instructions. 10. The removal...
... such damage results from defects in materials or workmanship and is reported to KitchenAid within 30 days from the date of purchase. 6. SECOND THROUGH FIFTH YEAR LIMITED WARRANTY ON CERTAIN COMPONENT PARTS In the second through fifth years from the date of purchase, when this...appliance is operated and maintained according to instructions attached to or furnished with the product, KitchenAid will pay for Factory Specified Parts for the stainless steel oven cavity/inner door if the part rusts through due to defects in accordance with published installation instructions. 10. The removal...
Installation Guide
Page 1
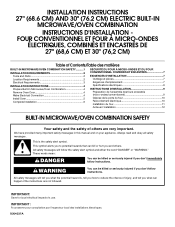
... injured if you don't follow instructions. INSTALLATION INSTRUCTIONS 27" (68.6 CM) AND 30" (76.2 CM) ELECTRIC BUILT-IN MICROWAVE/OVEN COMBINATION INSTRUCTIONS D'INSTALLATION FOUR CONVENTIONNEL ET FOUR À MICRO-ONDES ÉLECTRIQUES, COMBIN...30" (76,2 CM) Table of Contents/Table des matières BUILT-IN MICROWAVE/OVEN COMBINATION SAFETY...........1 INSTALLATION REQUIREMENTS 2 Tools and Parts 2 Location Requirements 2 Electrical Requirements 3 INSTALLATION INSTRUCTIONS 4 Prepare Built-In Microwave/Oven Combination 4 Remove Oven Door 4 Make Electrical Connection 4 Install Oven...
... injured if you don't follow instructions. INSTALLATION INSTRUCTIONS 27" (68.6 CM) AND 30" (76.2 CM) ELECTRIC BUILT-IN MICROWAVE/OVEN COMBINATION INSTRUCTIONS D'INSTALLATION FOUR CONVENTIONNEL ET FOUR À MICRO-ONDES ÉLECTRIQUES, COMBIN...30" (76,2 CM) Table of Contents/Table des matières BUILT-IN MICROWAVE/OVEN COMBINATION SAFETY...........1 INSTALLATION REQUIREMENTS 2 Tools and Parts 2 Location Requirements 2 Electrical Requirements 3 INSTALLATION INSTRUCTIONS 4 Prepare Built-In Microwave/Oven Combination 4 Remove Oven Door 4 Make Electrical Connection 4 Install Oven...
Installation Guide
Page 2
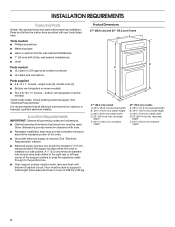
...Given dimensions provide minimum clearance with oven. ■ Recessed installation area must provide complete enclosure around the recessed portion of 238 lbs (108 kg). INSTALLATION REQUIREMENTS Tools and Parts Gather the required tools and parts before starting installation. Tools needed ... mm) drill bit (for wall cabinet installations) ■ Level Parts needed ■ UL listed or CSA approved conduit connector ■ UL listed wire connectors Parts supplied ■ # 8-14 x 1" screws - Product Dimensions 27" (68.6 cm) and 30" (76.2 cm) Ovens A B E D C 27" (68.6 cm) models ...
...Given dimensions provide minimum clearance with oven. ■ Recessed installation area must provide complete enclosure around the recessed portion of 238 lbs (108 kg). INSTALLATION REQUIREMENTS Tools and Parts Gather the required tools and parts before starting installation. Tools needed ... mm) drill bit (for wall cabinet installations) ■ Level Parts needed ■ UL listed or CSA approved conduit connector ■ UL listed wire connectors Parts supplied ■ # 8-14 x 1" screws - Product Dimensions 27" (68.6 cm) and 30" (76.2 cm) Ovens A B E D C 27" (68.6 cm) models ...

Installation Guide
Page 3
... to top of the right-hand mounting rail. A B E C D A. 23¹⁄₄" (59.1 cm) min. Oven front D. Cabinet Dimensions 27" (68.6 cm) and 30" (76.2 cm) Ovens A B F D E C 27" (68.6 cm) models A. 27" (68.6 cm) min. bottom of cutout to the... fused disconnect (or circuit breaker box) through flexible, armored or nonmetallic sheathed, copper cable (with the National Electrical Code, ANSI/ NFPA 70-latest edition or CSA Standards C22.1-94, Canadian Electrical Code, Part...
... to top of the right-hand mounting rail. A B E C D A. 23¹⁄₄" (59.1 cm) min. Oven front D. Cabinet Dimensions 27" (68.6 cm) and 30" (76.2 cm) Ovens A B F D E C 27" (68.6 cm) models A. 27" (68.6 cm) min. bottom of cutout to the... fused disconnect (or circuit breaker box) through flexible, armored or nonmetallic sheathed, copper cable (with the National Electrical Code, ANSI/ NFPA 70-latest edition or CSA Standards C22.1-94, Canadian Electrical Code, Part...


