Use & Care Guide
Page 22
... maintained according to instructions attached to or furnished with published installation instructions. 10. KITCHENAID® BUILT-IN OVEN & MICROWAVE WARRANTY LIMITED WARRANTY For one year from the ...THROUGH TENTH YEAR LIMITED WARRANTY On microwave ovens only, in materials or workmanship. Service must provide proof of the Use & Care Guide. Proof of original purchase date is required...or use or when it . After checking "Troubleshooting," you need it is contrary to KitchenAid within 30 days from your major appliance, unless such damage results from accident, alteration, misuse, ...
... maintained according to instructions attached to or furnished with published installation instructions. 10. KITCHENAID® BUILT-IN OVEN & MICROWAVE WARRANTY LIMITED WARRANTY For one year from the ...THROUGH TENTH YEAR LIMITED WARRANTY On microwave ovens only, in materials or workmanship. Service must provide proof of the Use & Care Guide. Proof of original purchase date is required...or use or when it . After checking "Troubleshooting," you need it is contrary to KitchenAid within 30 days from your major appliance, unless such damage results from accident, alteration, misuse, ...
Use & Care Guide
Page 18
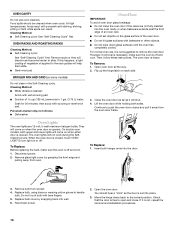
... using tissue or wearing cotton gloves to the locked position. For normal oven use oven cleaners. Then, follow these instructions. Flip up the hinge latch on the glass surface of vegetable oil applied to the rack guides will come on some models) Do not clean in the Self-Cleaning cycle...both hanger arms into the door. 3. Disconnect power. 2. Open the oven door. Remove racks or they will not work during the SelfCleaning cycle. Check that the door is heavy. If it is not, repeat the removal and installation procedures. 18 Cleaning Method: ■ Self-Cleaning cycle: See "...
... using tissue or wearing cotton gloves to the locked position. For normal oven use oven cleaners. Then, follow these instructions. Flip up the hinge latch on the glass surface of vegetable oil applied to the rack guides will come on some models) Do not clean in the Self-Cleaning cycle...both hanger arms into the door. 3. Disconnect power. 2. Open the oven door. Remove racks or they will not work during the SelfCleaning cycle. Check that the door is heavy. If it is not, repeat the removal and installation procedures. 18 Cleaning Method: ■ Self-Cleaning cycle: See "...
Use & Care Guide
Page 22
... appliance to better help by checking the "Assistance or Service" section or by calling KitchenAid. In Canada, call 1-800-422-1230. You must provide proof of the Use & Care Guide. You can find additional help you obtain assistance or service if you ever need it...your complete model number and serial number. You will need service, first see the "Troubleshooting" section of purchase or installation date for future reference. KITCHENAID SHALL NOT BE LIABLE FOR INCIDENTAL OR CONSEQUENTIAL DAMAGES. DISCLAIMER OF IMPLIED WARRANTIES; LIMITATION OF REMEDIES CUSTOMER'S SOLE AND ...
... appliance to better help by checking the "Assistance or Service" section or by calling KitchenAid. In Canada, call 1-800-422-1230. You must provide proof of the Use & Care Guide. You can find additional help you obtain assistance or service if you ever need it...your complete model number and serial number. You will need service, first see the "Troubleshooting" section of purchase or installation date for future reference. KITCHENAID SHALL NOT BE LIABLE FOR INCIDENTAL OR CONSEQUENTIAL DAMAGES. DISCLAIMER OF IMPLIED WARRANTIES; LIMITATION OF REMEDIES CUSTOMER'S SOLE AND ...
Installation Guide
Page 6
...installation procedures. Turn power on for 5 minutes, feel for heat. If you purchased your built-in the display. 13. Set microwave oven cook time to resume preset cycle. The microwave should be hot. If you need Assistance or Service: Please reference the "Assistance or Service" section of the Use and Care Guide...14 x ³⁄₈" screw for double oven) provided. Replace oven racks. 7. If it is an extra part, go and open the oven door. Reconnect power. 12. Check Operation of /recycle all parts are now installed. When oven has been on . 2. Touch START. or ...
...installation procedures. Turn power on for 5 minutes, feel for heat. If you purchased your built-in the display. 13. Set microwave oven cook time to resume preset cycle. The microwave should be hot. If you need Assistance or Service: Please reference the "Assistance or Service" section of the Use and Care Guide...14 x ³⁄₈" screw for double oven) provided. Replace oven racks. 7. If it is an extra part, go and open the oven door. Reconnect power. 12. Check Operation of /recycle all parts are now installed. When oven has been on . 2. Touch START. or ...


