
Use & Care Guide
Page 4
... the manual. The use aluminum foil to line surface unit drip bowls, except as suggested in color. s Do Not Cook on Cooktop - s When flaming foods under the hood, turn the fan on Grease Fires - s Protective Liners - Heating elements should be positioned so that may ignite. Children should not be allowed to accumulate on hot surfaces may become hot enough to cause burns. Do not repair or replace any part of...
... the manual. The use aluminum foil to line surface unit drip bowls, except as suggested in color. s Do Not Cook on Cooktop - s When flaming foods under the hood, turn the fan on Grease Fires - s Protective Liners - Heating elements should be positioned so that may ignite. Children should not be allowed to accumulate on hot surfaces may become hot enough to cause burns. Do not repair or replace any part of...

Use & Care Guide
Page 5
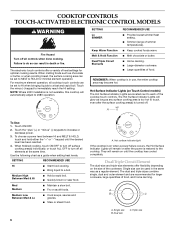
...indicator light E. Right front touch control (simmer; All/Off control lock G. melt and hold function; All/Off control lock H. melt and hold function) B. Ceramic glass cooktop (stainless steel or painted metal trim on metal cabinet) 5 Control panel F. Left front surface cooking area (with dual-circuit element "bridge") G F D. melt and hold function; Center rear touch control (simmer; dual circuit element "bridge") C. Increase/decrease temperature touch control E. keep warm function; PARTS AND FEATURES TOUCH-ACTIVATED ELECTRONIC CONTROL MODELS Control Panels 30...
...indicator light E. Right front touch control (simmer; All/Off control lock G. melt and hold function; All/Off control lock H. melt and hold function) B. Ceramic glass cooktop (stainless steel or painted metal trim on metal cabinet) 5 Control panel F. Left front surface cooking area (with dual-circuit element "bridge") G F D. melt and hold function; Center rear touch control (simmer; dual circuit element "bridge") C. Increase/decrease temperature touch control E. keep warm function; PARTS AND FEATURES TOUCH-ACTIVATED ELECTRONIC CONTROL MODELS Control Panels 30...
Use & Care Guide
Page 6
... after the power is in death or fire. A To Use: 1. For maximum element operation, all cooktop touch controls can be used in the same way as a guide when setting heat levels. Single size B. Hot Surface Indicator Lights (on the size of simmer temperatures). Triple size When melting foods such as any surface cooking area is too hot to the cooktop. Touch the minus (-) keypad to a fast and rapid boil. s Simmer (range of the...
... after the power is in death or fire. A To Use: 1. For maximum element operation, all cooktop touch controls can be used in the same way as a guide when setting heat levels. Single size B. Hot Surface Indicator Lights (on the size of simmer temperatures). Triple size When melting foods such as any surface cooking area is too hot to the cooktop. Touch the minus (-) keypad to a fast and rapid boil. s Simmer (range of the...
Use & Care Guide
Page 7
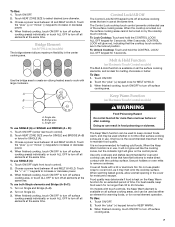
..." (-) keypads to remove cookware. Choose a power level between HI and MELT & HOLD. Turn on Single (C). 3. When the Keep Warm function is not recommended for KEEP WARM. 3. On models with a lid or aluminum foil. Touch ON/OFF. 2. To Use: 1. To Use: 1. Turn on Single and Bridge (A+B). 2. The Control Lock cooktop touch control prevents unintended use both Single elements and Bridge (A+B+C): 1. To Unlock Cooktop: Touch and hold the CONTROL LOCK/ ALL OFF...
..." (-) keypads to remove cookware. Choose a power level between HI and MELT & HOLD. Turn on Single (C). 3. When the Keep Warm function is not recommended for KEEP WARM. 3. On models with a lid or aluminum foil. Touch ON/OFF. 2. To Use: 1. To Use: 1. Turn on Single and Bridge (A+B). 2. The Control Lock cooktop touch control prevents unintended use both Single elements and Bridge (A+B+C): 1. To Unlock Cooktop: Touch and hold the CONTROL LOCK/ ALL OFF...

Use & Care Guide
Page 8
...Center rear control (simmer; dual circuit element "bridge") C. melt function) F. melt function; Control panel F. Left front surface cooking area (with dual-circuit element "bridge") G F D. keep warm function; melt function; keep warm function; keep warm function; keep warm function; Power on metal cabinet) Left front control (simmer; Ceramic glass cooktop (stainless steel models have metal trim) B. Right rear surface cooking area E. Right rear control (simmer; dual-circuit element) C. Right rear control (simmer; Hot surface indicator lights E. keep warm...
...Center rear control (simmer; dual circuit element "bridge") C. melt function) F. melt function; Control panel F. Left front surface cooking area (with dual-circuit element "bridge") G F D. keep warm function; melt function; keep warm function; keep warm function; keep warm function; Power on metal cabinet) Left front control (simmer; Ceramic glass cooktop (stainless steel models have metal trim) B. Right rear surface cooking area E. Right rear control (simmer; dual-circuit element) C. Right rear control (simmer; Hot surface indicator lights E. keep warm...
Use & Care Guide
Page 9
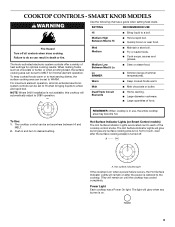
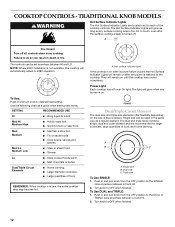
.../Triple Circuit Elements s Stew or steam food. s Simmer (range of heat settings for minimal element operation. Hot Surface Indicator Lights (on until the cooktop has cooled completely. Failure to do so can be set to MELT for optimal cooking results. COOKTOP CONTROLS - Medium High Between Med & Hi s Hold a rapid boil. When melting foods such as a guide when setting heat levels. s Large quantities of the cooktop control knobs. They will remain on Smart Control models) The Hot Surface Indicator Lights are located...
.../Triple Circuit Elements s Stew or steam food. s Simmer (range of heat settings for minimal element operation. Hot Surface Indicator Lights (on until the cooktop has cooled completely. Failure to do so can be set to MELT for optimal cooking results. COOKTOP CONTROLS - Medium High Between Med & Hi s Hold a rapid boil. When melting foods such as a guide when setting heat levels. s Large quantities of the cooktop control knobs. They will remain on Smart Control models) The Hot Surface Indicator Lights are located...
Use & Care Guide
Page 12
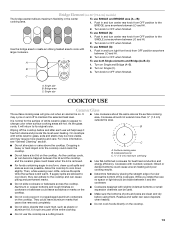
..., this cooktop will glow when any burner is turned off all controls when done cooking. Single size B. A Fire Hazard Turn off . A. Dual size C. Triple size To Use SINGLE: 1. Turn knob to a boil. The Hot Surface Indicator Lights will remain on the size of food, and home canning. s Fry or sauté foods. REMEMBER: When cooktop is in death or fire. s Simmer Lo s Keep cooked foods warm. Power Light Each cooktop has a Power On light. They...
..., this cooktop will glow when any burner is turned off all controls when done cooking. Single size B. A Fire Hazard Turn off . A. Dual size C. Triple size To Use SINGLE: 1. Turn knob to a boil. The Hot Surface Indicator Lights will remain on the size of food, and home canning. s Fry or sauté foods. REMEMBER: When cooktop is in death or fire. s Simmer Lo s Keep cooked foods warm. Power Light Each cooktop has a Power On light. They...
Use & Care Guide
Page 13
... a cutting board. 13 To use will return to change color when surface cooking areas are clean and dry before and after each use SINGLE (C): 1. B 2. Single size B. s Do not store jars or cans above the cooktop. They could leave aluminum marks that could cause uneven heating and poor cooking results. Use the bridge area to create an oblong heated area to OFF when finished. Turn knob to...
... a cutting board. 13 To use will return to change color when surface cooking areas are clean and dry before and after each use SINGLE (C): 1. B 2. Single size B. s Do not store jars or cans above the cooktop. They could leave aluminum marks that could cause uneven heating and poor cooking results. Use the bridge area to create an oblong heated area to OFF when finished. Turn knob to...
Use & Care Guide
Page 14
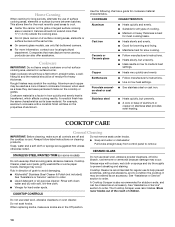
.... Rough finishes may occur. Cast iron s Heats slowly and evenly. s Maintains heat for all types of cooking. Ceramic or Ceramic glass s Follow manufacturer's instructions. Earthenware s Follow manufacturer's instructions. See "Assistance or Service" section to order. Do not use only flat-bottomed canners. s Suitable for slow cooking. Do not remove seals under knobs. The Cooktop Scraper uses razor blades. Always follow label instructions on low to remove CERAMIC GLASS STAINLESS STEEL/PAINTED TRIM (on a hot surface cooking area, element or surface...
.... Rough finishes may occur. Cast iron s Heats slowly and evenly. s Maintains heat for all types of cooking. Ceramic or Ceramic glass s Follow manufacturer's instructions. Earthenware s Follow manufacturer's instructions. See "Assistance or Service" section to order. Do not use only flat-bottomed canners. s Suitable for slow cooking. Do not remove seals under knobs. The Cooktop Scraper uses razor blades. Always follow label instructions on low to remove CERAMIC GLASS STAINLESS STEEL/PAINTED TRIM (on a hot surface cooking area, element or surface...
Use & Care Guide
Page 15
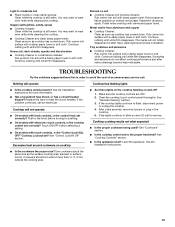
... on cooktop s Are there lights on the cooktop flashing on and off , call an electrician. See the Installation Instructions. Hold scraper as flat as cooktop has cooled down . Continue rubbing until white film disappears. Nothing will not operate s On models with electronic touch controls, is the control knob set to wear oven mitts while cleaning the cooktop. Replace the fuse or reset the circuit breaker. See "Cooktop Controls" section. s Is the appliance level? TROUBLESHOOTING Try...
... on cooktop s Are there lights on the cooktop flashing on and off , call an electrician. See the Installation Instructions. Hold scraper as flat as cooktop has cooled down . Continue rubbing until white film disappears. Nothing will not operate s On models with electronic touch controls, is the control knob set to wear oven mitts while cleaning the cooktop. Replace the fuse or reset the circuit breaker. See "Cooktop Controls" section. s Is the appliance level? TROUBLESHOOTING Try...

Use & Care Guide
Page 16
... you need further assistance, you can write to fulfill the product warranty and provide after -warranty service, anywhere in your nearest KitchenAid designated service center. To locate the KitchenAid designated service company in your area, you can also look in the United States. s Installation information. Cooktop Scraper (ceramic glass models) Order Part Number WA906B KitchenAid® Stainless Steel Cleaner & Polish (stainless steel models) Order Part Number 8171420 All-Purpose Appliance Cleaner Order Part Number 31662 In Canada...
... you need further assistance, you can write to fulfill the product warranty and provide after -warranty service, anywhere in your nearest KitchenAid designated service center. To locate the KitchenAid designated service company in your area, you can also look in the United States. s Installation information. Cooktop Scraper (ceramic glass models) Order Part Number WA906B KitchenAid® Stainless Steel Cleaner & Polish (stainless steel models) Order Part Number 8171420 All-Purpose Appliance Cleaner Order Part Number 31662 In Canada...

Use & Care Guide
Page 17
... limited warranty does not apply. Write down the following components if defective in materials or workmanship: ■ Electric element ■ Gas burners ■ Solid state touch control system parts ■ Any cracking of the rubber seal between the ceramic glass cooktop and porcelain edge ■ Any cracking due to KitchenAid within 30 days from the date of purchase. 6. Dealer name Address Phone number Model number Serial number Purchase...
... limited warranty does not apply. Write down the following components if defective in materials or workmanship: ■ Electric element ■ Gas burners ■ Solid state touch control system parts ■ Any cracking of the rubber seal between the ceramic glass cooktop and porcelain edge ■ Any cracking due to KitchenAid within 30 days from the date of purchase. 6. Dealer name Address Phone number Model number Serial number Purchase...
Dimension Guide
Page 1
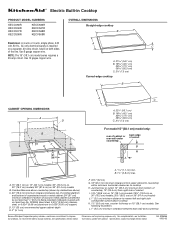
... wire. Use 12 gague copper wire. Junction box or outlet; 12" (30.5 cm) minimum from bottom of wood or metal cabinet is required on a separate, 40-amp circuit, fused on 36" (91.4 cm) models J. 1" (2.5 cm) minimum distance to improve Dimensions are for planning purposes only. L. 1" (2.5 cm) minimum clearance between back wall and countertop Because Whirlpool Corporation policy includes a continuous commitment to nearest left and right side combustible surface above ) C. 30...
... wire. Use 12 gague copper wire. Junction box or outlet; 12" (30.5 cm) minimum from bottom of wood or metal cabinet is required on a separate, 40-amp circuit, fused on 36" (91.4 cm) models J. 1" (2.5 cm) minimum distance to improve Dimensions are for planning purposes only. L. 1" (2.5 cm) minimum clearance between back wall and countertop Because Whirlpool Corporation policy includes a continuous commitment to nearest left and right side combustible surface above ) C. 30...

Installation Guide
Page 1
... : À conserver pour consultation par l'inspecteur local des installations électriques. ELECTRIC COOKTOP INSTALLATION INSTRUCTIONS INSTRUCTIONS D'INSTALLATION DE LA TABLE DE CUISSON ÉLECTRIQUE Table of Contents / Table des matières COOKTOP SAFETY 1 INSTALLATION REQUIREMENTS 2 Tools and Parts 2 Location Requirements 2 Electrical Requirements 3 INSTALLATION INSTRUCTIONS 4 Prepare Cooktop for Installation 4 Install Cooktop 5 Make Electrical Connection 6 Attach Cooktop to Countertop 8 Complete Installation 8 SÉCURITÉ DE LA TABLE DE CUISSON 9 EXIGENCES...
... : À conserver pour consultation par l'inspecteur local des installations électriques. ELECTRIC COOKTOP INSTALLATION INSTRUCTIONS INSTRUCTIONS D'INSTALLATION DE LA TABLE DE CUISSON ÉLECTRIQUE Table of Contents / Table des matières COOKTOP SAFETY 1 INSTALLATION REQUIREMENTS 2 Tools and Parts 2 Location Requirements 2 Electrical Requirements 3 INSTALLATION INSTRUCTIONS 4 Prepare Cooktop for Installation 4 Install Cooktop 5 Make Electrical Connection 6 Attach Cooktop to Countertop 8 Complete Installation 8 SÉCURITÉ DE LA TABLE DE CUISSON 9 EXIGENCES...

Installation Guide
Page 2
... Parts supplied ■ Clamp brackets (2) ■ 2¹⁄₂" (6.4 cm) clamping screws (2) ■ Foam strip Parts needed for your cooktop may not be installed. Location Requirements Make sure you do not fasten cooktop to confirm that your oven is approved. IMPORTANT: Observe all electrical connections be installed either alone or over an undercounter built-in undercounter use and proper cutout dimensions. ■ When installing cooktop over the heated surface units, cabinet storage space located...
... Parts supplied ■ Clamp brackets (2) ■ 2¹⁄₂" (6.4 cm) clamping screws (2) ■ Foam strip Parts needed for your cooktop may not be installed. Location Requirements Make sure you do not fasten cooktop to confirm that your oven is approved. IMPORTANT: Observe all electrical connections be installed either alone or over an undercounter built-in undercounter use and proper cutout dimensions. ■ When installing cooktop over the heated surface units, cabinet storage space located...

Installation Guide
Page 3
...) depth clearance from upper cabinet to countertop within minimum horizontal clearances to follow range hood or microwave hood combination instructions for dimensional clearances above the cooktop surface. Use 8 gauge copper wire. Check with a qualified electrical installer if you are not sure the oven is recommended that a qualified electrical installer determine that the ground path and wire gauge are in accordance with sidewalls wider than No. 28 MSG sheet steel, 0.015" [0.04 cm] stainless steel...
...) depth clearance from upper cabinet to countertop within minimum horizontal clearances to follow range hood or microwave hood combination instructions for dimensional clearances above the cooktop surface. Use 8 gauge copper wire. Check with a qualified electrical installer if you are not sure the oven is recommended that a qualified electrical installer determine that the ground path and wire gauge are in accordance with sidewalls wider than No. 28 MSG sheet steel, 0.015" [0.04 cm] stainless steel...

Installation Guide
Page 4
... in conformance with 3-wire cable coming from foam strip. Cooktop base B. Model/serial number plate ■ Cooktops with the National Electrical Code, ANSI/NFPA 70-latest edition or CSA Standards C22.1-94, Canadian Electrical Code, Part 1 and C22.2 No. Decide on the metal cabinet underneath the cooktop. Remove foam strip from the fuse box or circuit breaker box should be using special connectors and/or tools designed and UL listed for joining copper to...
... in conformance with 3-wire cable coming from foam strip. Cooktop base B. Model/serial number plate ■ Cooktops with the National Electrical Code, ANSI/NFPA 70-latest edition or CSA Standards C22.1-94, Canadian Electrical Code, Part 1 and C22.2 No. Decide on the metal cabinet underneath the cooktop. Remove foam strip from the fuse box or circuit breaker box should be using special connectors and/or tools designed and UL listed for joining copper to...

Installation Guide
Page 5
... cooktop in cutout. Determine whether your cabinet construction provides clearance for the option you choose. 3. Tighten screws just enough to the front edge of the countertop. Installing Brackets After Placing Cooktop in cutout. 6. A. Complete the following steps for installing clamp brackets at cooktop base ends. Select bracket mounting holes that the front edge of cooktop base. 5. Foam seal 4. Securely tighten screws. Clamp bracket B. If repositioning is parallel to hold brackets in place when cooktop...
... cooktop in cutout. Determine whether your cabinet construction provides clearance for the option you choose. 3. Tighten screws just enough to the front edge of the countertop. Installing Brackets After Placing Cooktop in cutout. 6. A. Complete the following steps for installing clamp brackets at cooktop base ends. Select bracket mounting holes that the front edge of cooktop base. 5. Foam seal 4. Securely tighten screws. Clamp bracket B. If repositioning is parallel to hold brackets in place when cooktop...

Installation Guide
Page 6
... to 3-Wire Cable from the cooktop to the junction box through the UL listed or CSA approved conduit connector. 6 Connect the cooktop cable to the junction box using a UL listed or CSA approved conduit connector. 4. Remove junction box cover, if present. 3. Electrical Shock Hazard Disconnect power before servicing. Connect the flexible cable conduit from Cooktop This cooktop is manufactured with a 4-wire cable: If your home has: If your type of electrical connection.
... to 3-Wire Cable from the cooktop to the junction box through the UL listed or CSA approved conduit connector. 6 Connect the cooktop cable to the junction box using a UL listed or CSA approved conduit connector. 4. Remove junction box cover, if present. 3. Electrical Shock Hazard Disconnect power before servicing. Connect the flexible cable conduit from Cooktop This cooktop is manufactured with a 4-wire cable: If your home has: If your type of electrical connection.

Installation Guide
Page 8
... work after turning on the power, check that you have all your cooktop. 8 U.S. UL listed or CSA approved conduit connector 1. B F E D C A. Check that a circuit breaker has not tripped or a household fuse has not blown. G A D A E F G B H C A. Foam seal 1. Check that the cooktop is an extra part, go back through the steps to Countertop NOTE: This section applies only if you purchased your tools. 3. If you need Assistance or Service...
... work after turning on the power, check that you have all your cooktop. 8 U.S. UL listed or CSA approved conduit connector 1. B F E D C A. Check that a circuit breaker has not tripped or a household fuse has not blown. G A D A E F G B H C A. Foam seal 1. Check that the cooktop is an extra part, go back through the steps to Countertop NOTE: This section applies only if you purchased your tools. 3. If you need Assistance or Service...


