KitchenAid KECC507RSS - 30" Electric Cooktop Support and Manuals
Get Help and Manuals for this KitchenAid item

View All Support Options Below
Free KitchenAid KECC507RSS manuals!
Problems with KitchenAid KECC507RSS?
Ask a Question
Free KitchenAid KECC507RSS manuals!
Problems with KitchenAid KECC507RSS?
Ask a Question
KitchenAid KECC507RSS Videos

KitchenAid KECC507RSS Cooktop
Duration: :58
Total Views: 22
Duration: :58
Total Views: 22
Popular KitchenAid KECC507RSS Manual Pages
Use & Care Guide - Page 4
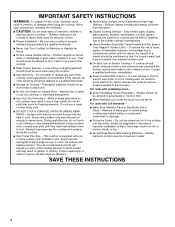
... cloth is equipped with coil elements -
Loose-fitting or hanging garments should not be referred to a qualified technician. Do not repair or replace any part of the cooktop.
s Clean Ventilating Hoods Frequently -
SAVE THESE INSTRUCTIONS
4 s Do Not Leave Children Alone -
Select utensils having flat bottoms large enough to a hot surface.
s Do Not Soak Removable Heating...
Use & Care Guide - Page 5

... surface indicator lights
F. keep warm function; melt and hold function; Ceramic glass cooktop (stainless steel or painted metal trim on metal cabinet)
5 Control panel F....surface cooking area E. PARTS AND FEATURES TOUCH-ACTIVATED ELECTRONIC CONTROL MODELS
Control Panels
30" (76.2 cm) Touch-Activated Electronic Control Models
36" (91.4 cm) Touch-Activated Electronic Control Models
A
B
A
...
Use & Care Guide - Page 6
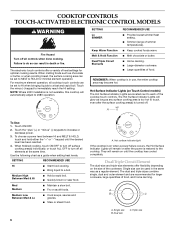
... on when a power failure occurs, the Hot Surface Indicator Lights will glow as long as a guide when setting heat levels. COOKTOP CONTROLS TOUCH-ACTIVATED ELECTRONIC CONTROL MODELS
WARNING
Fire Hazard Turn off .
s Large quantities of the cooktop touch controls.
s Keep cooked foods warm.
Hot Surface Indicator Lights (on after the surface cooking area(s) is in...
Use & Care Guide - Page 8

...KNOB MODELS
Control Panels
30" (76.2 cm) Smart Knob Models
36" (91.4 cm) Smart Knob Models
A
...simmer; dual circuit element "bridge")
C. keep warm function; Ceramic glass cooktop (stainless steel models have metal trim)
B. Left rear surface cooking area
C. Right rear...cooking area
8
E
G. triple-circuit element)
Cooktops 36" (91.4 cm) Smart Control Model shown
B
G
F
E
D
A. Left rear...
Use & Care Guide - Page 9
... dishes, the surface cooking area can be set anywhere between HI and
MELT.
2. COOKTOP CONTROLS -
SETTING
RECOMMENDED USE
Hi
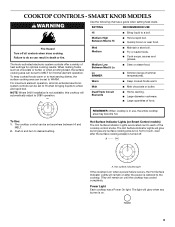
s Bring liquid to each of heat settings for minimal element operation. s Melt chocolate or butter. Push in death or fire. SMART KNOB MODELS
WARNING
Use the following chart as a guide when setting heat levels. Medium Low Between Med...
Use & Care Guide - Page 12
TRADITIONAL KNOB MODELS
WARNING
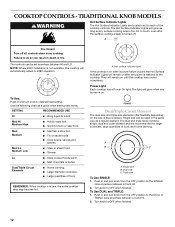
Hot Surface Indicator Lights
The Hot Surface Indicator Lights are recommended for...the same way as a guide when setting heat levels. To Use DUAL and TRIPLE: 1. Turn knob to a boil.
NOTE: Where 240V installation is not available, this cooktop will remain on the size of the cooktop controls. COOKTOP CONTROLS - SETTING
RECOMMENDED USE
Hi
s ...
Use & Care Guide - Page 14
...instructions on 2 surface cooking areas, elements or surface burners at the same time. COOKTOP CONTROLS
Do not use only flat-bottomed canners.
See "Assistance or Service" section to order. The Cooktop Scraper uses razor blades.
s Do not place canner on cleaning products. s On ceramic glass models...and abrasions, and to medium heat settings.
Home Canning
When canning for long periods...
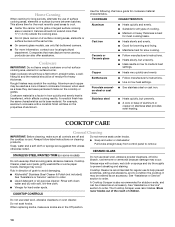
Use & Care Guide - Page 15
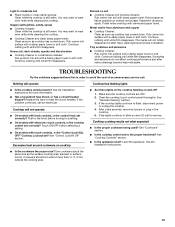
... and clean damp paper towel: Clean as soon as cooktop has cooled down . Repeat for service. Continue rubbing until white film disappears.
If the problem continues, call . Cooktop will not operate
s On models with knob controls, is the "Control Lock/ALL OFF" Cooktop Lockout set correctly? s On models with a damp paper towel or soft cloth. See "Control Lock...
Use & Care Guide - Page 16

... or service, please check "Troubleshooting." If you need replacement parts If you need further assistance, you can write to KitchenAid Canada with the same precision used to your nearest KitchenAid designated service center. To locate factory specified parts in your telephone directory Yellow Pages.
Cooktop Cleaner (ceramic glass models) Order Part Number 31464
Cooktop Protectant...
Use & Care Guide - Page 17

... between the ceramic glass cooktop and porcelain edge
■ Any cracking due to thermal shock of your major appliance, to instruct you need service, first see the "Troubleshooting" section of your home of the Use & Care Guide. Major appliances with original model/serial numbers that is not installed in accordance with electrical or plumbing codes, or use or when...
Installation Guide - Page 1

... instructions.
ELECTRIC COOKTOP INSTALLATION INSTRUCTIONS INSTRUCTIONS D'INSTALLATION
DE LA TABLE DE CUISSON ÉLECTRIQUE
Table of Contents / Table des matières
COOKTOP SAFETY 1
INSTALLATION REQUIREMENTS 2 Tools and Parts 2 Location Requirements 2 Electrical Requirements 3
INSTALLATION INSTRUCTIONS 4 Prepare Cooktop for Installation 4 Install Cooktop 5 Make Electrical...
Installation Guide - Page 2

... (2)
■ Foam strip
Parts needed for built-in undercounter use over an undercounter built-in oven. See "Electrical Requirements." It is recommended that all governing codes and ordinances. When installing cooktop, use minimum dimensions given.
■ To eliminate the risk of burns or fire by reaching over an undercounter built-in these Installation Instructions. Contact your dealer...
Installation Guide - Page 3

...on 30" (76.2 cm) models; 36" (91.4 cm) on 15" (38.1 cm) models. Electrically ground cooktop. For all models except 15" (38.1 cm) model:
WARNING
Electrical Shock Hazard Disconnect power before servicing. If cabinet has a drawer, a 3" (7.6 cm) depth clearance from bottom of the drawer (or other obstruction) in death, fire, or electrical shock. Cabinet Dimensions
IMPORTANT: If installing a range...
Installation Guide - Page 4

...box). INSTALLATION INSTRUCTIONS
A
A.
Remove foam strip from the cooktop are adequate and in conformance with local codes and industry accepted wiring practices. NOTE: The 15" (38.1 cm) model series requires a 20-amp circuit.
■ The cooktop should be connected directly to allow as much slack as possible between the junction box and the cooktop so that the electrical...
Installation Guide - Page 5

... bracket mounting holes that will allow the bracket to extend far enough out from cutout to Countertop" section)
F. Install Cooktop
Style 1: Cooktop over cabinets 1. Cooktop base
C. Attachment screw holes for installing clamp brackets at cooktop base ends. Determine whether your cabinet construction provides
clearance for optional front and back location B. The clamp brackets can...
KitchenAid KECC507RSS Reviews
We have not received any reviews for KitchenAid yet.