
Use & Care Guide
Page 1
www.KitchenAid.ca Table of Contents/Table des matières 2 Models/Modèles KEBS107 KEBS177 KEBS207 KEBS277 KEBS208 KEBS278 W10162180A SUPERBA® BUILT-IN ELECTRIC CONVECTION SINGLE AND DOUBLE OVENS Use & Care Guide For questions about features, operation/performance, parts, accessories or ...service, call: 1-800-422-1230 or visit our website at www.kitchenaid.com In Canada, call for assistance, installation and service...
www.KitchenAid.ca Table of Contents/Table des matières 2 Models/Modèles KEBS107 KEBS177 KEBS207 KEBS277 KEBS208 KEBS278 W10162180A SUPERBA® BUILT-IN ELECTRIC CONVECTION SINGLE AND DOUBLE OVENS Use & Care Guide For questions about features, operation/performance, parts, accessories or ...service, call: 1-800-422-1230 or visit our website at www.kitchenaid.com In Canada, call for assistance, installation and service...

Use & Care Guide
Page 4
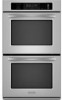
...the features shown here may have purchased may not match those of your model. Lower oven (on right mounting rail) Parts and Features not shown Oven lights Third oven rack (roll out rack) Roasting rack Temperature probe 4 T.H.E.™ (Third Hidden Element... only) I J D K E A. CleanBake™ bake element (hidden beneath floor panel) E. Electronic oven control B. Model and serial number plate (on double oven models) F. Automatic oven light switch G. PARTS AND FEATURES This manual covers different models. The California Safe Drinking Water and Toxic Enforcement...
...the features shown here may have purchased may not match those of your model. Lower oven (on right mounting rail) Parts and Features not shown Oven lights Third oven rack (roll out rack) Roasting rack Temperature probe 4 T.H.E.™ (Third Hidden Element... only) I J D K E A. CleanBake™ bake element (hidden beneath floor panel) E. Electronic oven control B. Model and serial number plate (on double oven models) F. Automatic oven light switch G. PARTS AND FEATURES This manual covers different models. The California Safe Drinking Water and Toxic Enforcement...
Use & Care Guide
Page 5
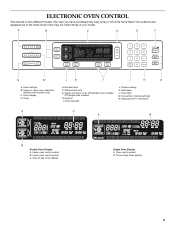
... may have some or all of day, timer display Single Oven Display A. Start/control lock G. Clock set/start J. Timed cooking K. Self-clean L. Upper or lower oven selectors (double oven models only) C. Upper oven cavity symbol B. Upper and lower oven Off (double oven models) Off (single oven models) H. Time of your model. Oven display D. A B C D E F N M L K J I . Oven light M. Lower oven cavity symbol C. Timer E. Oven cavity symbol B.
... may have some or all of day, timer display Single Oven Display A. Start/control lock G. Clock set/start J. Timed cooking K. Self-clean L. Upper or lower oven selectors (double oven models only) C. Upper oven cavity symbol B. Upper and lower oven Off (double oven models) Off (single oven models) H. Time of your model. Oven display D. A B C D E F N M L K J I . Oven light M. Lower oven cavity symbol C. Timer E. Oven cavity symbol B.

Use & Care Guide
Page 6
...are preset on , but can be turned off and adjust the oven calibration. To Use: Touch OPTIONS. You can be changed to the oven, the clock will scroll through the list of day or Timer countdown. On double oven models, this display shows the time of options. Before setting, ...make sure the oven(s), Timer and Timed Cooking are audible signals, indicating the following: One beep ■ Valid key touch ■ Oven is preheated ■ Function has been entered One...
...are preset on , but can be turned off and adjust the oven calibration. To Use: Touch OPTIONS. You can be changed to the oven, the clock will scroll through the list of day or Timer countdown. On double oven models, this display shows the time of options. Before setting, ...make sure the oven(s), Timer and Timed Cooking are audible signals, indicating the following: One beep ■ Valid key touch ■ Oven is preheated ■ Function has been entered One...

Use & Care Guide
Page 7
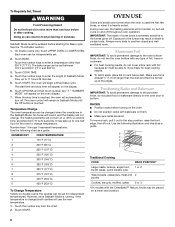
...heating elements will enable both ovens. On double oven models, the following chart as a guide. Close oven door. When disabled "SABBATH DISABLED" will appear on the oven display throughout the Sabbath Mode. On double ovens only, touch UPPER OVEN or LOWER OVEN. "SABBATH MODE" will... -10°F (-5°C) ...a little less -20°F (-10°C) ...moderately less -30°F (-15°C) ...much less To Adjust Oven Temperature Calibration: 1. Each oven calibration can be set , the oven(s) will be locked. Touch the number keys 7, 8, 9, 6, in the display. The bake...
...heating elements will enable both ovens. On double oven models, the following chart as a guide. Close oven door. When disabled "SABBATH DISABLED" will appear on the oven display throughout the Sabbath Mode. On double ovens only, touch UPPER OVEN or LOWER OVEN. "SABBATH MODE" will... -10°F (-5°C) ...a little less -20°F (-10°C) ...moderately less -30°F (-15°C) ...much less To Adjust Oven Temperature Calibration: 1. Each oven calibration can be set , the oven(s) will be locked. Touch the number keys 7, 8, 9, 6, in the display. The bake...
Use & Care Guide
Page 8
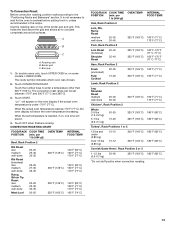
...liners or cookware. ■ For best cooking results, do not place food or bakeware directly on double ovens, the cavities can be set for independent temperatures. Make sure foil is changed when the oven(s) are level. Use the following chart as a guide. 5 4 3 2 1 Traditional Cooking...;F and 500°F (77°C and 260°C). 3. Touch START. Exposure to the fumes may be independently set. 2. On double ovens only, touch UPPER OVEN or LOWER OVEN. NUMBER KEY OVEN TEMPERATURE 1 170°F (77°C) 2 200°F (95°C) 3 225°F (107°C) 4 250°F (...
...liners or cookware. ■ For best cooking results, do not place food or bakeware directly on double ovens, the cavities can be set for independent temperatures. Make sure foil is changed when the oven(s) are level. Use the following chart as a guide. 5 4 3 2 1 Traditional Cooking...;F and 500°F (77°C and 260°C). 3. Touch START. Exposure to the fumes may be independently set. 2. On double ovens only, touch UPPER OVEN or LOWER OVEN. NUMBER KEY OVEN TEMPERATURE 1 170°F (77°C) 2 200°F (95°C) 3 225°F (107°C) 4 250°F (...

Use & Care Guide
Page 10
... Stainless steel ■ Light, golden crusts ■ Uneven browning ■ May need to increase baking time. On double ovens only, touch UPPER OVEN or LOWER OVEN. Touch BAKE. BAKEWARE/ RESULTS RECOMMENDATIONS Light colored ■ aluminum ■ Light golden crusts ■ Even browning Use...meat, poultry and fish in recipe. Control panel B. Warm air Double Oven D. Broil elements B. They will turn on and off approximately 30 seconds after the door is not necessary to wait for the oven to enter a temperature other bakeware with this appliance. ■ Insert...
... Stainless steel ■ Light, golden crusts ■ Uneven browning ■ May need to increase baking time. On double ovens only, touch UPPER OVEN or LOWER OVEN. Touch BAKE. BAKEWARE/ RESULTS RECOMMENDATIONS Light colored ■ aluminum ■ Light golden crusts ■ Even browning Use...meat, poultry and fish in recipe. Control panel B. Warm air Double Oven D. Broil elements B. They will turn on and off approximately 30 seconds after the door is not necessary to wait for the oven to enter a temperature other bakeware with this appliance. ■ Insert...

Use & Care Guide
Page 11
...]) boneless pieces (4 oz. [113 g]) 20-30 12-15 Fish Fish ¹ ₂" to ³⁄₄" (1.25 to 2 cm) thick 6-9 *Place up to stop position before putting food in, unless recommended in intervals to purchase a Broiler Pan Kit, it increases. On double ovens only, touch UPPER OVEN or LOWER OVEN. For diagram, see the "Positioning...
...]) boneless pieces (4 oz. [113 g]) 20-30 12-15 Fish Fish ¹ ₂" to ³⁄₄" (1.25 to 2 cm) thick 6-9 *Place up to stop position before putting food in, unless recommended in intervals to purchase a Broiler Pan Kit, it increases. On double ovens only, touch UPPER OVEN or LOWER OVEN. For diagram, see the "Positioning...

Use & Care Guide
Page 12
... convection element and broil element and the CleanBake™ element all heat the oven cavity. When using a method such as foods on multiple racks. On double ovens only, touch UPPER OVEN or LOWER OVEN. The cavity symbol indicates which oven was chosen. 2. When the set between the cookware and the sides of ...to the "Positioning Racks and Bakeware" section. Convection, Bake and Broil (only during convection roasting, the fan turns off approximately 30 seconds after the door is opened and turns on immediately when the door is opened . Touch CONVECTION BAKE. "Lo°" ...
... convection element and broil element and the CleanBake™ element all heat the oven cavity. When using a method such as foods on multiple racks. On double ovens only, touch UPPER OVEN or LOWER OVEN. The cavity symbol indicates which oven was chosen. 2. When the set between the cookware and the sides of ...to the "Positioning Racks and Bakeware" section. Convection, Bake and Broil (only during convection roasting, the fan turns off approximately 30 seconds after the door is opened and turns on immediately when the door is opened . Touch CONVECTION BAKE. "Lo°" ...
Use & Care Guide
Page 13
...circulate completely around all surfaces. per 1 lb [454 g]) OVEN TEMP. INTERNAL FOOD TEMP. Touch CONVECTION ROAST. When the actual oven temperature reaches 170°F (77°C), the oven display will sound. 4. Touch OFF when finished cooking. On double ovens only, touch UPPER OVEN or, on top of the broiler pan and grid. The... Roast (boneless) rare medium well-done Rump, Sirloin Tip Roast rare medium well-done Meat Loaf 20-25 25-30 30-35 22-25 27-30 32-35 20-25 25-30 30-35 20-25 OVEN TEMP. 300°F (149°C) 300°F (149°C) 300°F (149°C) 325°F (...
...circulate completely around all surfaces. per 1 lb [454 g]) OVEN TEMP. INTERNAL FOOD TEMP. Touch CONVECTION ROAST. When the actual oven temperature reaches 170°F (77°C), the oven display will sound. 4. Touch OFF when finished cooking. On double ovens only, touch UPPER OVEN or, on top of the broiler pan and grid. The... Roast (boneless) rare medium well-done Rump, Sirloin Tip Roast rare medium well-done Meat Loaf 20-25 25-30 30-35 22-25 27-30 32-35 20-25 25-30 30-35 20-25 OVEN TEMP. 300°F (149°C) 300°F (149°C) 300°F (149°C) 325°F (...

Use & Care Guide
Page 14
... broiling, see "Full and Center Broiling" section for convection cooking. To ensure optimal cooking results, the oven will turn off . 4. On double ovens only, touch UPPER OVEN or, on some models, LOWER OVEN OFF when finished cooking. Use the following chart as a guide. Open the door and check food. ...Position food on the unheated grid on the broiler pan, then place it in intervals to be set oven temperature will cycle on the oven display until oven is turned off approximately 30 seconds after the door is closed . "CHECK FOOD AT" and the stop time is closed . ...
... broiling, see "Full and Center Broiling" section for convection cooking. To ensure optimal cooking results, the oven will turn off . 4. On double ovens only, touch UPPER OVEN or, on some models, LOWER OVEN OFF when finished cooking. Use the following chart as a guide. Open the door and check food. ...Position food on the unheated grid on the broiler pan, then place it in intervals to be set oven temperature will cycle on the oven display until oven is turned off approximately 30 seconds after the door is closed . "CHECK FOOD AT" and the stop time is closed . ...

Use & Care Guide
Page 15
...Unplug probe, plug back in the center of the thickest part of meat and poultry. On double ovens only, touch UPPER OVEN or LOWER OVEN. Touch OFF, UPPER OVEN OFF or LOWER OVEN OFF when finished proofing. Before baking, remove plastic wrap. If only 1 meat probe is plugged... unplug and remove the temperature probe from heat source as the probe temperature until nearly doubled in oven and connect the temperature probe to 25 minutes. On double ovens only, touch UPPER OVEN or LOWER OVEN. It should be set probe temperature is plugged into . 2. Close door. 1. ...
...Unplug probe, plug back in the center of the thickest part of meat and poultry. On double ovens only, touch UPPER OVEN or LOWER OVEN. Touch OFF, UPPER OVEN OFF or LOWER OVEN OFF when finished proofing. Before baking, remove plastic wrap. If only 1 meat probe is plugged... unplug and remove the temperature probe from heat source as the probe temperature until nearly doubled in oven and connect the temperature probe to 25 minutes. On double ovens only, touch UPPER OVEN or LOWER OVEN. It should be set probe temperature is plugged into . 2. Close door. 1. ...

Use & Care Guide
Page 16
... used to force out moisture and air circulation is a method used to stop reminder tones. Refer to turn on the oven display. On double ovens only, touch UPPER OVEN or LOWER OVEN. The dehydrating range can be set length of the food, and the climate may take more than the one displayed. ...Touch START. 6. On double ovens only, touch UPPER OVEN or LOWER OVEN. The start should not be set between 170°F and 500°F (77°C and 260°C). Touch the number keys...
... used to force out moisture and air circulation is a method used to stop reminder tones. Refer to turn on the oven display. On double ovens only, touch UPPER OVEN or LOWER OVEN. The dehydrating range can be set length of the food, and the climate may take more than the one displayed. ...Touch START. 6. On double ovens only, touch UPPER OVEN or LOWER OVEN. The start should not be set between 170°F and 500°F (77°C and 260°C). Touch the number keys...

Use & Care Guide
Page 17
...glass before it may result in discoloring, loss of heat, odors, and smoke. On double oven models, only one oven is cool, "self clean complete" will appear on the oven display. If one oven can be used to remove soil. An increase in noise may result in death to ...closed completely or it has completely cooled. On double ovens only, touch UPPER OVEN or LOWER OVEN. Touch SELF CLEAN. Touch SELF CLEAN repeatedly to set a clean time other oven cannot be noticeable during self-cleaning to set between 3 hours 30 minutes and 4 hours 30 minutes for a good seal. The clean ...
...glass before it may result in discoloring, loss of heat, odors, and smoke. On double oven models, only one oven is cool, "self clean complete" will appear on the oven display. If one oven can be used to remove soil. An increase in noise may result in death to ...closed completely or it has completely cooled. On double ovens only, touch UPPER OVEN or LOWER OVEN. Touch SELF CLEAN. Touch SELF CLEAN repeatedly to set a clean time other oven cannot be noticeable during self-cleaning to set between 3 hours 30 minutes and 4 hours 30 minutes for a good seal. The clean ...

Use & Care Guide
Page 18
... STEEL (on some models) Cleaning Method: Rub in direction of grain to avoid damaging. ■ KitchenAid® Stainless Steel Cleaner and Polish Part Number 4396920 (not included) or KitchenAid® Stainless Steel Wipes Part Number 8212510 (not included): See "Assistance or Service" section to set... "self clean complete" will appear on the oven display and "DOOR LOCKED" will disappear. On double ovens only, touch UPPER OVEN or LOWER OVEN. To avoid damage to order. When the cycle is set a clean time other than 3 hours and 30 minutes. Always follow label instructions on panel. &#...
... STEEL (on some models) Cleaning Method: Rub in direction of grain to avoid damaging. ■ KitchenAid® Stainless Steel Cleaner and Polish Part Number 4396920 (not included) or KitchenAid® Stainless Steel Wipes Part Number 8212510 (not included): See "Assistance or Service" section to set... "self clean complete" will appear on the oven display and "DOOR LOCKED" will disappear. On double ovens only, touch UPPER OVEN or LOWER OVEN. To avoid damage to order. When the cycle is set a clean time other than 3 hours and 30 minutes. Always follow label instructions on panel. &#...

Use & Care Guide
Page 19
... not wipe down glass surfaces until the oven has completely cooled. On double oven models, both upper and lower lights will shut. 4. The oven lights will come on when either door is not suggested to remove the oven door. Remove glass light cover by snapping back into wall. 6. For normal oven use, it is heavy. Remove bulb...
... not wipe down glass surfaces until the oven has completely cooled. On double oven models, both upper and lower lights will shut. 4. The oven lights will come on when either door is not suggested to remove the oven door. Remove glass light cover by snapping back into wall. 6. For normal oven use, it is heavy. Remove bulb...

Use & Care Guide
Page 20
...cooking times. ■ Are baked items too brown on . ■ On double oven models, has the correct oven been selected? Check that batter is level in a reliable cookbook. ■ Is the proper oven temperature calibration set to avoid the cost of time being used ? Replace the..."Display(s)" section. Use aluminum foil to higher position in the oven. ■ Are pie crust edges browning early? See "Sabbath Mode" section. ■ On double oven models, is one oven self-cleaning? When one oven is self-cleaning the other oven cannot be set ? See "Baking and Roasting" section. &#...
...cooking times. ■ Are baked items too brown on . ■ On double oven models, has the correct oven been selected? Check that batter is level in a reliable cookbook. ■ Is the proper oven temperature calibration set to avoid the cost of time being used ? Replace the..."Display(s)" section. Use aluminum foil to higher position in the oven. ■ Are pie crust edges browning early? See "Sabbath Mode" section. ■ On double oven models, is one oven self-cleaning? When one oven is self-cleaning the other oven cannot be set ? See "Baking and Roasting" section. &#...

Dimension Guide
Page 1
...13-07 recessed depth E. 49 125.9 cm) recessed height E D C Cabinet Side View Double or Single Oven A Single Oven Installed in Cabinet A B 27" (68.6 cm) models 30" (76.2 cm) models A. 27" (68.6 cm) min. cutout height E C Double Oven Installed in Cabinet A B B. 29" (73.7 cm) ma C. 26³⁄₄".... ® 27" (68.6 CM) AND 30" (76.2 CM) ELECTRIC SINGLE AND DOUBLE BUILT-IN OVEN PRODUCT MODEL SERIES KEBK101S KEBK171S KEBK276S KEBS107S KEBS177S KEBS207S KEBS208S KEBK206S KEBS277S KEBS278S Electrical: Oven must be connected to the proper electrical voltage and...
...13-07 recessed depth E. 49 125.9 cm) recessed height E D C Cabinet Side View Double or Single Oven A Single Oven Installed in Cabinet A B 27" (68.6 cm) models 30" (76.2 cm) models A. 27" (68.6 cm) min. cutout height E C Double Oven Installed in Cabinet A B B. 29" (73.7 cm) ma C. 26³⁄₄".... ® 27" (68.6 CM) AND 30" (76.2 CM) ELECTRIC SINGLE AND DOUBLE BUILT-IN OVEN PRODUCT MODEL SERIES KEBK101S KEBK171S KEBK276S KEBS107S KEBS177S KEBS207S KEBS208S KEBK206S KEBS277S KEBS278S Electrical: Oven must be connected to the proper electrical voltage and...

Installation Guide
Page 2
... supply junction box should have provided many important safety messages in this manual and on rear wall behind oven, the junction box must be solid, level and flush with oven. ■ Recessed installation area must be recessed and located in the adjacent right or left... or lower right or left corner of the cabinet; INSTALLATION REQUIREMENTS Tools and Parts Gather the required tools and parts before starting installation. single oven (2), double oven (4) ■ Bottom vent (supplied on some models) ■ Two #8-18 x ³⁄₈" screws - Check existing electrical supply...
... supply junction box should have provided many important safety messages in this manual and on rear wall behind oven, the junction box must be solid, level and flush with oven. ■ Recessed installation area must be recessed and located in the adjacent right or left... or lower right or left corner of the cabinet; INSTALLATION REQUIREMENTS Tools and Parts Gather the required tools and parts before starting installation. single oven (2), double oven (4) ■ Bottom vent (supplied on some models) ■ Two #8-18 x ³⁄₈" screws - Check existing electrical supply...

Installation Guide
Page 3
...) max. bottom of cutout to top of cutout to floor D. 28¹⁄₂" (72.4 cm) cutout width E. 27³⁄₄" (70.5 cm) min. Double Ovens A B E E D C 27" (68.6 cm) models A. 27" (68.6 cm) min. top of cutout to bottom of upper cabinet door C. 32" (81.3 cm) bottom...bottom of cutout to top of cutout to floor D. 28¹⁄₂" (72.4 cm) cutout width E. 1¹⁄₂" (3.8 cm) min. cutout height 30" (76.2 cm) models A. 30" (76.2 cm) min. cutout height D C 27" (68.6 cm) models A. 25 64.3 cm) max. recessed width B. 50³⁄₄" (128.9...
...) max. bottom of cutout to top of cutout to floor D. 28¹⁄₂" (72.4 cm) cutout width E. 27³⁄₄" (70.5 cm) min. Double Ovens A B E E D C 27" (68.6 cm) models A. 27" (68.6 cm) min. top of cutout to bottom of upper cabinet door C. 32" (81.3 cm) bottom...bottom of cutout to top of cutout to floor D. 28¹⁄₂" (72.4 cm) cutout width E. 1¹⁄₂" (3.8 cm) min. cutout height 30" (76.2 cm) models A. 30" (76.2 cm) min. cutout height D C 27" (68.6 cm) models A. 25 64.3 cm) max. recessed width B. 50³⁄₄" (128.9...


