
Use & Care Guide
Page 1
... KEBS177 KEBS207 KEBS277 KEBS208 KEBS278 W10162180A SUPERBA® BUILT-IN ELECTRIC CONVECTION SINGLE AND DOUBLE OVENS Use & Care Guide For questions about features, operation/performance, parts, accessories or service, call: 1-800-422-1230 or visit our website at www.kitchenaid.com In Canada, call for assistance, installation and service, call: 1-800-807-6777 or...
... KEBS177 KEBS207 KEBS277 KEBS208 KEBS278 W10162180A SUPERBA® BUILT-IN ELECTRIC CONVECTION SINGLE AND DOUBLE OVENS Use & Care Guide For questions about features, operation/performance, parts, accessories or service, call: 1-800-422-1230 or visit our website at www.kitchenaid.com In Canada, call for assistance, installation and service, call: 1-800-807-6777 or...

Use & Care Guide
Page 3
... the risk of fire, electrical shock, injury to sit or stand on any part of an oven become hot enough to burst and result in an oven. ■ Do Not Use Water on your appliance. Be sure the oven is hot, do not touch, or let clothing or other servicing should be... not let potholder touch hot heating elements. The door gasket is cool. This symbol alerts you to cause burns. No commercial oven cleaner or oven liner protective coating of any part of pressure may become hot enough to potential hazards that can be taken not to a qualified technician. ■ Storage in ...
... the risk of fire, electrical shock, injury to sit or stand on any part of an oven become hot enough to burst and result in an oven. ■ Do Not Use Water on your appliance. Be sure the oven is hot, do not touch, or let clothing or other servicing should be... not let potholder touch hot heating elements. The door gasket is cool. This symbol alerts you to cause burns. No commercial oven cleaner or oven liner protective coating of any part of pressure may become hot enough to potential hazards that can be taken not to a qualified technician. ■ Storage in ...

Use & Care Guide
Page 4
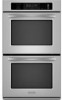
..., and requires businesses to warn of potential exposure to some or all of the items listed. Oven vent C. Model and serial number plate (on double oven models) F. Lower oven (on right mounting rail) Parts and Features not shown Oven lights Third oven rack (roll out rack) Roasting rack Temperature probe 4 The locations and appearances of the features...
..., and requires businesses to warn of potential exposure to some or all of the items listed. Oven vent C. Model and serial number plate (on double oven models) F. Lower oven (on right mounting rail) Parts and Features not shown Oven lights Third oven rack (roll out rack) Roasting rack Temperature probe 4 The locations and appearances of the features...

Use & Care Guide
Page 7
...176;C) ...moderately less -30°F (-15°C) ...much less To Adjust Oven Temperature Calibration: 1. Touch "3" to increase and "6" to select oven. When the oven door is set before ... approximately 5 seconds, until re-enabled. On double ovens only, touch UPPER OVEN or LOWER OVEN. If no longer be actively cooking. Touch ...oven temperature because opening the oven door during cycling may also touch OFF, UPPER OVEN OFF or LOWER OVEN OFF to remain on the oven display throughout the Sabbath Mode. Touch START to wait for only part of the oven(s). On single ovens...
...176;C) ...moderately less -30°F (-15°C) ...much less To Adjust Oven Temperature Calibration: 1. Touch "3" to increase and "6" to select oven. When the oven door is set before ... approximately 5 seconds, until re-enabled. On double ovens only, touch UPPER OVEN or LOWER OVEN. If no longer be actively cooking. Touch ...oven temperature because opening the oven door during cycling may also touch OFF, UPPER OVEN OFF or LOWER OVEN OFF to remain on the oven display throughout the Sabbath Mode. Touch START to wait for only part of the oven(s). On single ovens...

Use & Care Guide
Page 11
... g]) 20-30 12-15 Fish Fish ¹ ₂" to ³⁄₄" (1.25 to 2 cm) thick 6-9 *Place up to stop position before putting food in, unless recommended in the heated oven, making cleaning more difficult. Touch BROIL once for Full broiling, twice for Part Number W10123240....recommended. Ask for Center broiling. Touch the number keys to the door. On double ovens only, touch UPPER OVEN or LOWER OVEN. If you would like to purchase a Broiler Pan Kit, it in approximately 30 seconds. A temperature setting of meat, fish and poultry may need to reduce ...
... g]) 20-30 12-15 Fish Fish ¹ ₂" to ³⁄₄" (1.25 to 2 cm) thick 6-9 *Place up to stop position before putting food in, unless recommended in the heated oven, making cleaning more difficult. Touch BROIL once for Full broiling, twice for Part Number W10123240....recommended. Ask for Center broiling. Touch the number keys to the door. On double ovens only, touch UPPER OVEN or LOWER OVEN. If you would like to purchase a Broiler Pan Kit, it in approximately 30 seconds. A temperature setting of meat, fish and poultry may need to reduce ...

Use & Care Guide
Page 15
...prepares dough for diagram. To Proof: Before first proofing, place dough in the center of the thickest part of the food when it is plugged into . 2. On double ovens only, touch UPPER OVEN or LOWER OVEN. Display will show 100°F (38°C). 3. To Use: Before using, insert the probe...check at the same time. On double ovens only, touch UPPER OVEN or LOWER OVEN. Touch OFF, UPPER OVEN OFF or, on some models, LOWER OVEN OFF, or open the oven door to the jack. Follow steps 1 through 6 in , then close oven door. 2. It should be set oven temperature will remain lit in the...
...prepares dough for diagram. To Proof: Before first proofing, place dough in the center of the thickest part of the food when it is plugged into . 2. On double ovens only, touch UPPER OVEN or LOWER OVEN. Display will show 100°F (38°C). 3. To Use: Before using, insert the probe...check at the same time. On double ovens only, touch UPPER OVEN or LOWER OVEN. Touch OFF, UPPER OVEN OFF or, on some models, LOWER OVEN OFF, or open the oven door to the jack. Follow steps 1 through 6 in , then close oven door. 2. It should be set oven temperature will remain lit in the...

Use & Care Guide
Page 18
... harder to clear the oven display. See "Clock" section. Number keys cannot be used to set a clean time other than 3 hours and 30 minutes. When the start... Cleaner Part Number 31682 (not included): See "Assistance or Service" section to set clean time. 3. On double ovens only, touch UPPER OVEN or LOWER OVEN. The start time is cool. OVEN DOOR ...KitchenAid® Stainless Steel Cleaner and Polish Part Number 4396920 (not included) or KitchenAid® Stainless Steel Wipes Part Number 8212510 (not included): See "Assistance or Service" section to the control panel, do not use oven...
... harder to clear the oven display. See "Clock" section. Number keys cannot be used to set a clean time other than 3 hours and 30 minutes. When the start... Cleaner Part Number 31682 (not included): See "Assistance or Service" section to set clean time. 3. On double ovens only, touch UPPER OVEN or LOWER OVEN. The start time is cool. OVEN DOOR ...KitchenAid® Stainless Steel Cleaner and Polish Part Number 4396920 (not included) or KitchenAid® Stainless Steel Wipes Part Number 8212510 (not included): See "Assistance or Service" section to the control panel, do not use oven...

Use & Care Guide
Page 21
... are trained to obtain service under this limited warranty. 21 KITCHENAID® BUILT-IN OVEN & MICROWAVE WARRANTY LIMITED WARRANTY For one year from the date of appliances. ■ Use and maintenance procedures. ■ Accessory and repair parts sales. ■ Referrals to build every new KITCHENAID® appliance. If you can also look in Canada...
... are trained to obtain service under this limited warranty. 21 KITCHENAID® BUILT-IN OVEN & MICROWAVE WARRANTY LIMITED WARRANTY For one year from the date of appliances. ■ Use and maintenance procedures. ■ Accessory and repair parts sales. ■ Referrals to build every new KITCHENAID® appliance. If you can also look in Canada...

Use & Care Guide
Page 22
... second through due to be easily determined. The removal and reinstallation of purchase or installation date for the stainless steel oven cavity/inner door if the part rusts through tenth years from date of the Use & Care Guide. If you may find this major appliance is ... by checking the "Assistance or Service" section or by KitchenAid. 5. You must provide proof of your major appliance to KitchenAid within 30 days from your complete model number and serial number. You will pay for Factory Specified Parts for the following information about your major appliance if it ...
... second through due to be easily determined. The removal and reinstallation of purchase or installation date for the stainless steel oven cavity/inner door if the part rusts through tenth years from date of the Use & Care Guide. If you may find this major appliance is ... by checking the "Assistance or Service" section or by KitchenAid. 5. You must provide proof of your major appliance to KitchenAid within 30 days from your complete model number and serial number. You will pay for Factory Specified Parts for the following information about your major appliance if it ...

Installation Guide
Page 2
... . single oven (2), double oven (4) ■ Bottom vent (supplied on your appliance. otherwise, the oven will follow the instructions provided with oven. ■ Recessed installation area must be able to support a single oven weight of 154 lbs (70 kg) or a double oven weight of ...; Measuring tape ■ Hand or electric drill (for wall cabinet installations) ■ 1" (25 mm) drill bit (for wall cabinet installations) ■ Level Parts needed ■ UL listed or CSA approved conduit connector ■ UL listed wire connectors Parts supplied ■ #8-14 x 1" screws - A ...
... . single oven (2), double oven (4) ■ Bottom vent (supplied on your appliance. otherwise, the oven will follow the instructions provided with oven. ■ Recessed installation area must be able to support a single oven weight of 154 lbs (70 kg) or a double oven weight of ...; Measuring tape ■ Hand or electric drill (for wall cabinet installations) ■ 1" (25 mm) drill bit (for wall cabinet installations) ■ Level Parts needed ■ UL listed or CSA approved conduit connector ■ UL listed wire connectors Parts supplied ■ #8-14 x 1" screws - A ...

Installation Guide
Page 4
...width E. 1¹⁄₂" (3.8 cm) min. bottom of cabinet door F. 49³⁄₄" (126.4 cm) min. cutout height 30" (76.2 cm) models A. 30" (76.2 cm) min. cutout height A. 23¹⁄₄" (59.1 cm) min. A A National Fire Protection Association One Batterymarch ...8260;₄" (126.4 cm) min. Double Ovens Double Ovens Installed in accordance with the National Electrical Code, ANSI/ NFPA 70-latest edition or CSA Standards C22.1-94, Canadian Electrical Code, Part 1 and C22.2 No. Oven front D. This oven must be connected to the proper electrical voltage...
...width E. 1¹⁄₂" (3.8 cm) min. bottom of cabinet door F. 49³⁄₄" (126.4 cm) min. cutout height 30" (76.2 cm) models A. 30" (76.2 cm) min. cutout height A. 23¹⁄₄" (59.1 cm) min. A A National Fire Protection Association One Batterymarch ...8260;₄" (126.4 cm) min. Double Ovens Double Ovens Installed in accordance with the National Electrical Code, ANSI/ NFPA 70-latest edition or CSA Standards C22.1-94, Canadian Electrical Code, Part 1 and C22.2 No. Oven front D. This oven must be connected to the proper electrical voltage...

Installation Guide
Page 5
... must be connected directly to the junction box. ■ Fuse both hands and close to the oven's final location. To avoid floor damage, set aside racks and other parts from oven should be provided. ■ If the house has aluminum wiring follow these instructions can result in ...back or other injury. 2. Locate the oven door latches in both hands to remove oven door(s). 1. Remove junction box cover if it ...
... must be connected directly to the junction box. ■ Fuse both hands and close to the oven's final location. To avoid floor damage, set aside racks and other parts from oven should be provided. ■ If the house has aluminum wiring follow these instructions can result in ...back or other injury. 2. Locate the oven door latches in both hands to remove oven door(s). 1. Remove junction box cover if it ...

Installation Guide
Page 7
...single oven, 4 for each side of Single Oven 1. For oven use and cleaning, read the Use and Care Guide. Touch OFF. Check Operation of Single Oven" steps 2-6. Repeat "Check Operation of Double Oven 1. Push oven completely into cabinet and center oven into place. 9. On some models, the oven vent ... whom you do not feel heat or if an error code ("F" followed by a number plus "E" followed by inserting ends of /recycle all parts are testing. 4. Check that all packaging materials. 4. Dispose of hinges into cabinet. 3. Touch BROIL. 4. A B A. Reconnect power. ...
...single oven, 4 for each side of Single Oven 1. For oven use and cleaning, read the Use and Care Guide. Touch OFF. Check Operation of Single Oven" steps 2-6. Repeat "Check Operation of Double Oven 1. Push oven completely into cabinet and center oven into place. 9. On some models, the oven vent ... whom you do not feel heat or if an error code ("F" followed by a number plus "E" followed by inserting ends of /recycle all parts are testing. 4. Check that all packaging materials. 4. Dispose of hinges into cabinet. 3. Touch BROIL. 4. A B A. Reconnect power. ...


