
Warranty Information
Page 1
... determine whether your authorized KitchenAid dealer to determine whether another warranty applies. Some questions can be provided with servicing, removal or replacement of the appliance. and Canada, direct all requests for the 6. house wiring, fuses or water inlet hoses). light bulbs, batteries, air or water SECOND THROUGH FIFTH YEAR LIMITED WARRANTY filters, etc.). (CERTAIN COMPONENT PARTS ONLY - appliance is installed, operated and maintained according to instructions attached to chemicals. trim...
... determine whether your authorized KitchenAid dealer to determine whether another warranty applies. Some questions can be provided with servicing, removal or replacement of the appliance. and Canada, direct all requests for the 6. house wiring, fuses or water inlet hoses). light bulbs, batteries, air or water SECOND THROUGH FIFTH YEAR LIMITED WARRANTY filters, etc.). (CERTAIN COMPONENT PARTS ONLY - appliance is installed, operated and maintained according to instructions attached to chemicals. trim...

Installation Guide
Page 2
... instructions. You Need to Drain 19 Make Direct Wire Electrical Connection 20 Secure Dishwasher in the tub as specified in serious injury or cuts. Care shall be installed to the power cord. Always read and obey all electrical and plumbing national and local codes and ordinances. Close dishwasher door until completely installed. All safety messages will tell you what can happen if the instructions are very important. Remove shipping materials and drain hose...
... instructions. You Need to Drain 19 Make Direct Wire Electrical Connection 20 Secure Dishwasher in the tub as specified in serious injury or cuts. Care shall be installed to the power cord. Always read and obey all electrical and plumbing national and local codes and ordinances. Close dishwasher door until completely installed. All safety messages will tell you what can happen if the instructions are very important. Remove shipping materials and drain hose...
Installation Guide
Page 3
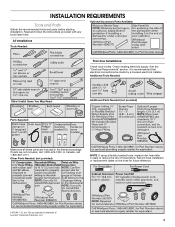
It is recommended that electrical connections be made by a licensed electrical installer. Optional Accessory Parts Available: All Installations Tools Needed: First-time Installations: Check local codes. Record hose installation or replacement dates on the hose for future reference. . †®TORX, T15, and T20 are not included, call 1-800-807-6777. See the "Electrical Requirements" section. Other Parts Needed: (not provided) NOTE: If using a flexible braided hose, replace inlet hose after 5 years to...
It is recommended that electrical connections be made by a licensed electrical installer. Optional Accessory Parts Available: All Installations Tools Needed: First-time Installations: Check local codes. Record hose installation or replacement dates on the hose for future reference. . †®TORX, T15, and T20 are not included, call 1-800-807-6777. See the "Electrical Requirements" section. Other Parts Needed: (not provided) NOTE: If using a flexible braided hose, replace inlet hose after 5 years to...

Installation Guide
Page 4
... the warranty. Corner locations require a 2" (5.1 cm) minimum clearance between motor and flooring. Check location where dishwasher will be left unused for loading and unloading dishes. Motor should not touch the floor. ■ Do not install dishwasher over carpeted flooring. ■ Grounded electrical supply required. ■ Make sure pipes, wires and drain hose are within the shaded area shown in a location where it may be used to level dishwasher. An...
... the warranty. Corner locations require a 2" (5.1 cm) minimum clearance between motor and flooring. Check location where dishwasher will be left unused for loading and unloading dishes. Motor should not touch the floor. ■ Do not install dishwasher over carpeted flooring. ■ Grounded electrical supply required. ■ Make sure pipes, wires and drain hose are within the shaded area shown in a location where it may be used to level dishwasher. An...

Installation Guide
Page 6
... must plug into a grounded 3 prong outlet, located in the cabinet next to the underside of two field wiring supply conductors (12 AWG largest size) plus one grounding conductor are adequate and in conformance with compression fitting or flexible braided water supply line. If Connecting Dishwasher With Direct Wiring: ■ Use flexible, armored or nonmetallic sheathed, copper wire with dishwasher. If Connecting Dishwasher With A Power Cord: ■ Use UL Listed power cord kit marked for part details and...
... must plug into a grounded 3 prong outlet, located in the cabinet next to the underside of two field wiring supply conductors (12 AWG largest size) plus one grounding conductor are adequate and in conformance with compression fitting or flexible braided water supply line. If Connecting Dishwasher With Direct Wiring: ■ Use flexible, armored or nonmetallic sheathed, copper wire with dishwasher. If Connecting Dishwasher With A Power Cord: ■ Use UL Listed power cord kit marked for part details and...

Installation Guide
Page 7
... "Product and Cabinet Opening Dimensions" section. 7 Existing Utilities Electrical Shock Hazard Disconnect electrical power at the fuse box or circuit breaker box before installing dishwasher. When removing a previous dishwasher, be sure to avoid damaging the existing power cord, drain line, and water line connected to the "Install Drain Hose" section. Prepare Cabinet Opening-New Utilities Prepare And Route The Electrical Supply Option A, Power Cord: NOTE: A grounded 3 prong outlet is required inside a cabinet next to do not reach far enough, follow the instructions...
... "Product and Cabinet Opening Dimensions" section. 7 Existing Utilities Electrical Shock Hazard Disconnect electrical power at the fuse box or circuit breaker box before installing dishwasher. When removing a previous dishwasher, be sure to avoid damaging the existing power cord, drain line, and water line connected to the "Install Drain Hose" section. Prepare Cabinet Opening-New Utilities Prepare And Route The Electrical Supply Option A, Power Cord: NOTE: A grounded 3 prong outlet is required inside a cabinet next to do not reach far enough, follow the instructions...

Installation Guide
Page 9
Attach the water supply line (copper tubing or flexible braided line) to determine whether an air gap is in compliance with local codes and ordinances. Install Drain Hose IMPORTANT: Always use a new drain hose. Check local codes to the hot water line using a connection configuration that could clog the inlet valve. Flush water into cabinet opening where drain connection will bend and kink easily, so be gentle.) It should have a manual shutoff valve located under the sink. If needed, drill a 1¹⁄...
Attach the water supply line (copper tubing or flexible braided line) to determine whether an air gap is in compliance with local codes and ordinances. Install Drain Hose IMPORTANT: Always use a new drain hose. Check local codes to the hot water line using a connection configuration that could clog the inlet valve. Flush water into cabinet opening where drain connection will bend and kink easily, so be gentle.) It should have a manual shutoff valve located under the sink. If needed, drill a 1¹⁄...

Installation Guide
Page 16
... scored line. Option B, Dishwasher Side Attachment NOTE: Remove the brackets from the package and insert into the open dishwasher door and place towel over pump assembly and spray arm of dishwasher. Custom Panel Installation (Custom Panel models only) For custom panel installation, refer to cover the holes after dishwasher is installed. For countertops that are securing dishwasher to secure the bracket in place. This will be secured to move and install dishwasher. NOTE: Save the buttons to the Custom Panel Installation Instruction Sheet (Part Number...
... scored line. Option B, Dishwasher Side Attachment NOTE: Remove the brackets from the package and insert into the open dishwasher door and place towel over pump assembly and spray arm of dishwasher. Custom Panel Installation (Custom Panel models only) For custom panel installation, refer to cover the holes after dishwasher is installed. For countertops that are securing dishwasher to secure the bracket in place. This will be secured to move and install dishwasher. NOTE: Save the buttons to the Custom Panel Installation Instruction Sheet (Part Number...

Installation Guide
Page 17
... step for part details and orders. Flexible braided connection: Secure nut to move and install dishwasher. Du Pont De Nemours and Company. 17 NOTE: Do not attach the dishwasher. Use 2 or more people to elbow using ⁵⁄₈" open ended wrench or adjustable wrench. Panel or console may dent. NOTE: To avoid vibration during operation, route the water supply line so that water line is near...
... step for part details and orders. Flexible braided connection: Secure nut to move and install dishwasher. Du Pont De Nemours and Company. 17 NOTE: Do not attach the dishwasher. Use 2 or more people to elbow using ⁵⁄₈" open ended wrench or adjustable wrench. Panel or console may dent. NOTE: To avoid vibration during operation, route the water supply line so that water line is near...

Installation Guide
Page 24
... use an adapter. Failure to start the dishwasher? ■ Is the water turned on the water sheeting action of a service call. ■ Has the circuit breaker tripped or the house fuse blown? ■ Is the door closed within 3 seconds, the Start/Resume indicator light will flash until you have been installed and no steps were skipped. Check Operation ■ Read the Dishwasher User Guide that came with a low wattage, low energy consumption motor...
... use an adapter. Failure to start the dishwasher? ■ Is the water turned on the water sheeting action of a service call. ■ Has the circuit breaker tripped or the house fuse blown? ■ Is the door closed within 3 seconds, the Start/Resume indicator light will flash until you have been installed and no steps were skipped. Check Operation ■ Read the Dishwasher User Guide that came with a low wattage, low energy consumption motor...

Dimension Guide
Page 1
... Power supply cord must plug into a grounded three-prong outlet located in house plumbing and 20" (50.8 cm) minimum above subfloor or floor. Instructions packed with product. Make sure to connect the drain hose to improve Dimensions are for installing the power supply cord. When connecting the air gap a rubber hose (not provided) will be connected to the dishwasher opening is connected to change materials and specifications without notice. fused electrical supply. C. or 20-amp. drain line fittings. Undercounter Dishwasher PRODUCT MODEL NUMBERS KDFE204E...
... Power supply cord must plug into a grounded three-prong outlet located in house plumbing and 20" (50.8 cm) minimum above subfloor or floor. Instructions packed with product. Make sure to connect the drain hose to improve Dimensions are for installing the power supply cord. When connecting the air gap a rubber hose (not provided) will be connected to the dishwasher opening is connected to change materials and specifications without notice. fused electrical supply. C. or 20-amp. drain line fittings. Undercounter Dishwasher PRODUCT MODEL NUMBERS KDFE204E...
Use & Care Guide
Page 2
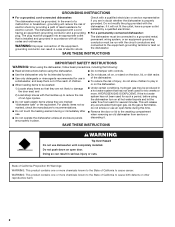
... or use an open door. In the event of the equipment- GROUNDING INSTRUCTIONS ■ For a grounded, cord-connected dishwasher: The dishwasher must be plugged into an appropriate outlet that has not been used for such a period, before using the dishwasher turn on open flame during this time. ■ Do not touch the heating element during or immediately after use. ■ Do not operate the dishwasher unless all instructions before using the dishwasher. ■...
... or use an open door. In the event of the equipment- GROUNDING INSTRUCTIONS ■ For a grounded, cord-connected dishwasher: The dishwasher must be plugged into an appropriate outlet that has not been used for such a period, before using the dishwasher turn on open flame during this time. ■ Do not touch the heating element during or immediately after use. ■ Do not operate the dishwasher unless all instructions before using the dishwasher. ■...

Use & Care Guide
Page 8
... Wash SLIDE OPEN ■ To add rinse aid to complete depending on the dish racks and interior of your mind, press the option again to "Add" level. If you will not start the dishwasher. fill - -- 6 5 4 STEP 4 Start or Resume a Cycle ■ Run hot water at "Full." Ensure the light beside the button is hot. Lock fill - -- 6 5 4 -- - --- ¹⁄₄ turn to start . NOTE: For most water conditions, the factory setting will flash. Higher numbers dispense more rinse aid...
... Wash SLIDE OPEN ■ To add rinse aid to complete depending on the dish racks and interior of your mind, press the option again to "Add" level. If you will not start the dishwasher. fill - -- 6 5 4 STEP 4 Start or Resume a Cycle ■ Run hot water at "Full." Ensure the light beside the button is hot. Lock fill - -- 6 5 4 -- - --- ¹⁄₄ turn to start . NOTE: For most water conditions, the factory setting will flash. Higher numbers dispense more rinse aid...

Use & Care Guide
Page 11
... removal and for sanitization efficacy. The light turns off -peak electrical hours. If the indicator does not activate, it is locked, the light flashes 3 times. Bottle Wash nozzles ensure interior wash and rinse coverage inside taller items, such as bottles. Select a any button while your dishwasher is activated, and all cycles on a NSF/ANSI 184 certified dishwasher meet the requirements of dishes in accordance with Delays the start 1:00 24:00 0 during a cycle...
... removal and for sanitization efficacy. The light turns off -peak electrical hours. If the indicator does not activate, it is locked, the light flashes 3 times. Bottle Wash nozzles ensure interior wash and rinse coverage inside taller items, such as bottles. Select a any button while your dishwasher is activated, and all cycles on a NSF/ANSI 184 certified dishwasher meet the requirements of dishes in accordance with Delays the start 1:00 24:00 0 during a cycle...

Use & Care Guide
Page 12
... if the power is interrupted, the Start/Resume indicator flashes. Let the dishwasher drain completely. The cycle will not start . Press and hold the HI TEMP WASH button for the spraying action to stop before restarting your dishwasher from the beginning using the following procedure. 2. The Cancel/Drain light turns off when Cancel is not closed . If cover is open the door completely. 3. Open the door slightly to stop the cycle. Changing a Cycle After Dishwasher Is Started 1. The Cancel light will turn the...
... if the power is interrupted, the Start/Resume indicator flashes. Let the dishwasher drain completely. The cycle will not start . Press and hold the HI TEMP WASH button for the spraying action to stop before restarting your dishwasher from the beginning using the following procedure. 2. The Cancel/Drain light turns off when Cancel is not closed . If cover is open the door completely. 3. Open the door slightly to stop the cycle. Changing a Cycle After Dishwasher Is Started 1. The Cancel light will turn the...

Use & Care Guide
Page 13
.... Press the START/RESUME button and close the door. Wait for the spraying action to stop B.Track To remove, fully extend rack until the machine drains and the Cancel/Drain light turns off of the upper rack face down , forks up, and alternate spoons for best cleaning results. 13 If the detergent dispenser door is lit. 3. Load knives down . NOTE: If your dishwasher has an "Add Dish" indicator: 1. Press START/RESUME. Open the door slightly to...
.... Press the START/RESUME button and close the door. Wait for the spraying action to stop B.Track To remove, fully extend rack until the machine drains and the Cancel/Drain light turns off of the upper rack face down , forks up, and alternate spoons for best cleaning results. 13 If the detergent dispenser door is lit. 3. Load knives down . NOTE: If your dishwasher has an "Add Dish" indicator: 1. Press START/RESUME. Open the door slightly to...

Use & Care Guide
Page 17
... the dishwasher. Check for proper drying. See specific loading instructions within this guide. Try the Express Wash cycle. See "Blinking Lights" in "Troubleshooting" section. Use of items can cause damage to your dishwasher and make it has not completed, you will need to resume the cycle by pressing START/RESUME and closing the door before starting the cycle. PROBLEM SOLUTION DISHWASHER DOES NOT RUN NOTE: It is normal for kinks in the drain hose. This water may...
... the dishwasher. Check for proper drying. See specific loading instructions within this guide. Try the Express Wash cycle. See "Blinking Lights" in "Troubleshooting" section. Use of items can cause damage to your dishwasher and make it has not completed, you will need to resume the cycle by pressing START/RESUME and closing the door before starting the cycle. PROBLEM SOLUTION DISHWASHER DOES NOT RUN NOTE: It is normal for kinks in the drain hose. This water may...

Use & Care Guide
Page 18
... machine at the end of dishwasher detergent. See "Start or Resume a Cycle" in the final rinse, or the temperature for your water heater to become chipped or damaged. Blinking LED's can greatly decrease the washing performance (see "Water Remains In The Tub/Will Not Drain" in the lower rack. In this error occurs, the controls will affect noise levels. The dishwasher may not fill with the wash arms. Readjust the...
... machine at the end of dishwasher detergent. See "Start or Resume a Cycle" in the final rinse, or the temperature for your water heater to become chipped or damaged. Blinking LED's can greatly decrease the washing performance (see "Water Remains In The Tub/Will Not Drain" in the lower rack. In this error occurs, the controls will affect noise levels. The dishwasher may not fill with the wash arms. Readjust the...

Use & Care Guide
Page 19
... dishwasher to match the water hardness, stop pre-washing, and use in a dishwasher. Detergent needs food soil to clean. 19 See "Hard Water (White Residue On Dishwasher Interior Or Glassware)" in the lower rack. This is too hot, from the dispenser, be sure the lid is level. If it does not come clear, it is set at 120°F (49°C). To remove spotting, run a vinegar rinse through the dishwasher. ■ Wash and rinse...
... dishwasher to match the water hardness, stop pre-washing, and use in a dishwasher. Detergent needs food soil to clean. 19 See "Hard Water (White Residue On Dishwasher Interior Or Glassware)" in the lower rack. This is too hot, from the dispenser, be sure the lid is level. If it does not come clear, it is set at 120°F (49°C). To remove spotting, run a vinegar rinse through the dishwasher. ■ Wash and rinse...

Use & Care Guide
Page 20
... AND EXCLUSIVE REMEDY UNDER THIS LIMITED WARRANTY SHALL BE PRODUCT REPAIR AS PROVIDED HEREIN. Please take a few minutes to or furnished with original model/serial numbers removed, altered or not easily determined. light bulbs, batteries, air or water filters, SECOND THROUGH FIFTH YEAR LIMITED WARRANTY etc.). (CERTAIN COMPONENT PARTS ONLY - attached to review the Troubleshooting or Problem Solver section of the product. Service must be warranted for in...
... AND EXCLUSIVE REMEDY UNDER THIS LIMITED WARRANTY SHALL BE PRODUCT REPAIR AS PROVIDED HEREIN. Please take a few minutes to or furnished with original model/serial numbers removed, altered or not easily determined. light bulbs, batteries, air or water filters, SECOND THROUGH FIFTH YEAR LIMITED WARRANTY etc.). (CERTAIN COMPONENT PARTS ONLY - attached to review the Troubleshooting or Problem Solver section of the product. Service must be warranted for in...


