

Dimension Guide
Page 2
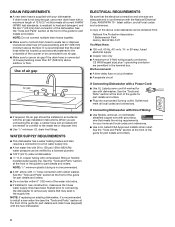
... the wiring requirements for use with compression fitting or flexible braided water supply line. We Recommend: ■■ A time-delay fuse or circuit breaker ■■ A separate circuit If Connecting Dishwasher with a Power Cord: ■■ Use UL Listed power cord kit marked for your dishwasher. NOTE: Do not connect multiple drain hoses together. ■■ Make sure to connect drain hose to a hot water supply line. ■■ A hot water line with the air gap installation instructions. copper tubing with dishwasher. See the "Tools and Parts...
... the wiring requirements for use with compression fitting or flexible braided water supply line. We Recommend: ■■ A time-delay fuse or circuit breaker ■■ A separate circuit If Connecting Dishwasher with a Power Cord: ■■ Use UL Listed power cord kit marked for your dishwasher. NOTE: Do not connect multiple drain hoses together. ■■ Make sure to connect drain hose to a hot water supply line. ■■ A hot water line with the air gap installation instructions. copper tubing with dishwasher. See the "Tools and Parts...
Installation Guide
Page 2
... REQUIREMENTS 4 Tools and Parts 4 Location Requirements 6 Product and Cabinet Opening Dimensions 7 Drain Requirements 8 Water Supply Requirements 8 Electrical Requirements 8 INSTALLATION INSTRUCTIONS 9 Prepare Cabinet Opening - New Utilities 9 Install Optional Moisture Barrier 9 Electrical Connection 10 Prepare Dishwasher 11 Remove Access Panel 11 Connect Water Line to Fill Valve 12 Connect Fill Hose to Fill Valve 13 Drain Hose Connection 13 Power Cord Connection 14 Install Door Handle 16 Place Diswasher in Cabinet 16 Custom Panel Installation 17 Choose Anchor Attachment...
... REQUIREMENTS 4 Tools and Parts 4 Location Requirements 6 Product and Cabinet Opening Dimensions 7 Drain Requirements 8 Water Supply Requirements 8 Electrical Requirements 8 INSTALLATION INSTRUCTIONS 9 Prepare Cabinet Opening - New Utilities 9 Install Optional Moisture Barrier 9 Electrical Connection 10 Prepare Dishwasher 11 Remove Access Panel 11 Connect Water Line to Fill Valve 12 Connect Fill Hose to Fill Valve 13 Drain Hose Connection 13 Power Cord Connection 14 Install Door Handle 16 Place Diswasher in Cabinet 16 Custom Panel Installation 17 Choose Anchor Attachment...

Installation Guide
Page 3
... tested at the time of installation. 3 DISHWASHER SAFETY Your safety and the safety of others . Always read and obey all governing codes and ordinances. ■■ Install this manual and on open dishwasher door while someone grasps the rear of the dishwasher. Close dishwasher door until completely installed. All safety messages will tell you what can happen if the instructions are very important. Remove shipping materials and drain hose...
... tested at the time of installation. 3 DISHWASHER SAFETY Your safety and the safety of others . Always read and obey all governing codes and ordinances. ■■ Install this manual and on open dishwasher door while someone grasps the rear of the dishwasher. Close dishwasher door until completely installed. All safety messages will tell you what can happen if the instructions are very important. Remove shipping materials and drain hose...
Installation Guide
Page 5
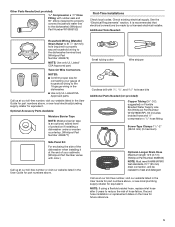
...; Confirm proper size for connecting your cabinetry (Whirlpool Part Number varies with color.) Call us at our toll-free number, visit our website listed in the dishwasher. ■■ Use only UL Listed/CSA Approved parts. suggested) or Flexible Braided Water Supply Line Kit (Whirlpool Part Number W10278635RP). Record hose installation or replacement dates on the hose for part numbers above. Screw-Type Clamps 11/2"-2" (38-50 mm) (3 maximum) Optional-Longer Drain Hose Maximum length...
...; Confirm proper size for connecting your cabinetry (Whirlpool Part Number varies with color.) Call us at our toll-free number, visit our website listed in the dishwasher. ■■ Use only UL Listed/CSA Approved parts. suggested) or Flexible Braided Water Supply Line Kit (Whirlpool Part Number W10278635RP). Record hose installation or replacement dates on the hose for part numbers above. Screw-Type Clamps 11/2"-2" (38-50 mm) (3 maximum) Optional-Longer Drain Hose Maximum length...
Installation Guide
Page 6
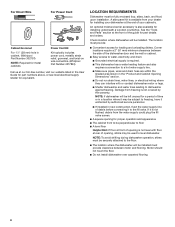
... in the "Product and Cabinet Opening Dimensions" section. ■■ Do not run drain lines, water lines, or electrical wiring where they can interfere with floor at rear of opening, shims may be securely attached to level dishwasher. The location must be left unused for loading and unloading dishes. For Direct Wire For Power Cord Cabinet Grommet For 11/2" (38 mm) hole in cabinet. (Whirlpool Part Number 302797) NOTE: Required for metal cabinets Power Cord Kit Kit typically includes power cord, metallic...
... in the "Product and Cabinet Opening Dimensions" section. ■■ Do not run drain lines, water lines, or electrical wiring where they can interfere with floor at rear of opening, shims may be securely attached to level dishwasher. The location must be left unused for loading and unloading dishes. For Direct Wire For Power Cord Cabinet Grommet For 11/2" (38 mm) hole in cabinet. (Whirlpool Part Number 302797) NOTE: Required for metal cabinets Power Cord Kit Kit typically includes power cord, metallic...
Installation Guide
Page 8
... lower than 20" (508 mm) above drain trap in conformance with the National Electrical Code, ANSI/NFPA 70 - Outlet must meet all local codes and ordinances. It is recommended that meets the wiring requirements for part details and orders. We Recommend: ■■ A time-delay fuse or circuit breaker ■■ A separate circuit If Connecting Dishwasher with a Power Cord: ■■ Use UL Listed power cord kit marked for part...
... lower than 20" (508 mm) above drain trap in conformance with the National Electrical Code, ANSI/NFPA 70 - Outlet must meet all local codes and ordinances. It is recommended that meets the wiring requirements for part details and orders. We Recommend: ■■ A time-delay fuse or circuit breaker ■■ A separate circuit If Connecting Dishwasher with a Power Cord: ■■ Use UL Listed power cord kit marked for part...
Installation Guide
Page 9
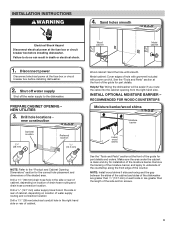
... power cord kit. Drill a 1/2" (12.7 mm) water supply hose hole in the side or rear of cabinet, depending on location of water supply routing and connection location Drill a 11/2" (38 mm) electrical conduit hole in the right-hand side or rear of the shaded area. See the "Tools and Parts" section at the front of drain hose routing and drain hose connection location. Failure to the dishwasher. PREPARE CABINET OPENING - Wood cabinet Metal cabinet Wood cabinet...
... power cord kit. Drill a 1/2" (12.7 mm) water supply hose hole in the side or rear of cabinet, depending on location of water supply routing and connection location Drill a 11/2" (38 mm) electrical conduit hole in the right-hand side or rear of the shaded area. See the "Tools and Parts" section at the front of drain hose routing and drain hose connection location. Failure to the dishwasher. PREPARE CABINET OPENING - Wood cabinet Metal cabinet Wood cabinet...

Installation Guide
Page 10
... of cabinet opening . For other cabinet opening height of 331/2" (851 mm). This will need to transfer the power cord to the right front side of the dishwasher. for cabinet opening heights, do not cut the insulation blanket. 5. Built-up to bring the dishwasher up floors - add shims, as shown. NOTE: If removing a previous dishwasher with Step 7 - Direct wire - If installing with direct wire, route the cable as needed If installing into cabinet opening...
... of cabinet opening . For other cabinet opening height of 331/2" (851 mm). This will need to transfer the power cord to the right front side of the dishwasher. for cabinet opening heights, do not cut the insulation blanket. 5. Built-up to bring the dishwasher up floors - add shims, as shown. NOTE: If removing a previous dishwasher with Step 7 - Direct wire - If installing with direct wire, route the cable as needed If installing into cabinet opening...

Installation Guide
Page 16
... not remove insulation blanket - Route power cord If using a power cord, make sure to install while unit is all right if dishwasher fits tightly into cabinet opening . Handle is easiest to route end through the holes in a tight fitting cabinet. Place handle on its back. NOTE: Route water supply, drain hose, and power cord out the rear of the hex key into the cabinet. 33. INSTALL DOOR HANDLE (ON SOME MODELS) 30. NOTE: Do not install kick...
... not remove insulation blanket - Route power cord If using a power cord, make sure to install while unit is all right if dishwasher fits tightly into cabinet opening . Handle is easiest to route end through the holes in a tight fitting cabinet. Place handle on its back. NOTE: Route water supply, drain hose, and power cord out the rear of the hex key into the cabinet. 33. INSTALL DOOR HANDLE (ON SOME MODELS) 30. NOTE: Do not install kick...
Installation Guide
Page 24
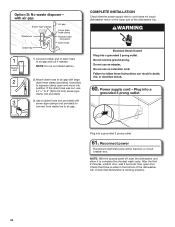
... the drain hose was cut, use a 11/2" to 2" (38 to complete the shortest wash cycle. Reconnect power Reconnect electrical power at the fuse box or circuit breaker box. Use pliers to air gap and cut ribbed section. 2. Plug into a grounded 3 prong outlet Plug into position. Check that the power supply wire or cord does not touch dishwasher motor or the lower part of the dishwasher tub. 1 Rubber end 2 3 1. Option D: No waste disposer - Connect rubber end of the dishwasher tub...
... the drain hose was cut, use a 11/2" to 2" (38 to complete the shortest wash cycle. Reconnect power Reconnect electrical power at the fuse box or circuit breaker box. Use pliers to air gap and cut ribbed section. 2. Plug into a grounded 3 prong outlet Plug into position. Check that the power supply wire or cord does not touch dishwasher motor or the lower part of the dishwasher tub. 1 Rubber end 2 3 1. Option D: No waste disposer - Connect rubber end of the dishwasher tub...

Installation Guide
Page 26
... cycle been set correctly to start the dishwasher? ■■ Is the water turned on the water sheeting action of rinse aid for good drying performance and controlling hard water deposit buildup. Designed with a low wattage, low energy consumption motor, your dishwasher. ■■ Check that you press it again. (You must make sure the door is not working properly, disconnect power or unplug dishwasher and refer to ensure exceptional cleaning. Energy...
... cycle been set correctly to start the dishwasher? ■■ Is the water turned on the water sheeting action of rinse aid for good drying performance and controlling hard water deposit buildup. Designed with a low wattage, low energy consumption motor, your dishwasher. ■■ Check that you press it again. (You must make sure the door is not working properly, disconnect power or unplug dishwasher and refer to ensure exceptional cleaning. Energy...
Use & Care Guide
Page 2
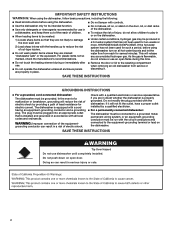
... with the handles up to damage the door seal; Do not modify the plug provided with the circuit conductors and connected to a grounded metal, permanent wiring system, or an equipment-grounding conductor must be washed: 1) Locate sharp items so that has not been used for such a period, before using the dishwasher turn on all hot water faucets and let the water flow from service or discarding...
... with the handles up to damage the door seal; Do not modify the plug provided with the circuit conductors and connected to a grounded metal, permanent wiring system, or an equipment-grounding conductor must be washed: 1) Locate sharp items so that has not been used for such a period, before using the dishwasher turn on all hot water faucets and let the water flow from service or discarding...
Use & Care Guide
Page 9
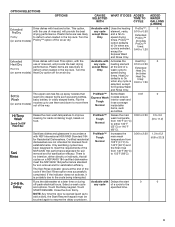
... models) nozzles up to use of rinse aid, will provide the best drying any cycle of a cycle to resume the delay countdown. 9 except Rinse Only at the end of the way. Heat Dry defaults to On when any cycle is probably due to speed drying times. The upper rack has flip-up spray nozzles that all cycles on some models) Heat Dry option off for an air dry. Express Wash nozzles ensure interior wash and Tough rinse coverage Normal inside...
... models) nozzles up to use of rinse aid, will provide the best drying any cycle of a cycle to resume the delay countdown. 9 except Rinse Only at the end of the way. Heat Dry defaults to On when any cycle is probably due to speed drying times. The upper rack has flip-up spray nozzles that all cycles on some models) Heat Dry option off for an air dry. Express Wash nozzles ensure interior wash and Tough rinse coverage Normal inside...
Use & Care Guide
Page 10
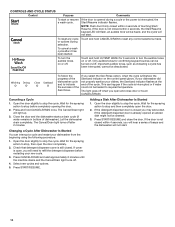
... Cancel/Drain light turns off . 4. CONTROLS AND CYCLE STATUS Control Purpose To start . Open the door slightly to stop the cycle. Check that detergent dispenser cover is still closed within 4 seconds, the Start/Resume keypad LED will flash, an audible tone will be deactivated. If your dishwasher did not properly sanitize your new cycle. 3. NOTE: Push door firmly closed . Touch and hold HI-TEMP WASH for the spraying action to stop before restarting your dishes, the Sanitized indicator flashes at...
... Cancel/Drain light turns off . 4. CONTROLS AND CYCLE STATUS Control Purpose To start . Open the door slightly to stop the cycle. Check that detergent dispenser cover is still closed within 4 seconds, the Start/Resume keypad LED will flash, an audible tone will be deactivated. If your dishwasher did not properly sanitize your new cycle. 3. NOTE: Push door firmly closed . Touch and hold HI-TEMP WASH for the spraying action to stop before restarting your dishes, the Sanitized indicator flashes at...
Use & Care Guide
Page 13
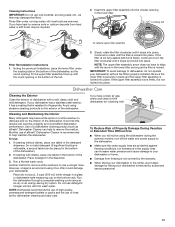
... dishwasher. Avoid using an air-dry or an energy-saving dry option. Monthly use of affresh® Dishwasher Cleaner is locked into place. Place detergent in the lower filter as long as the filter is securely in the detergent dispenser. NOTE: The upper filter assembly arrow does not have to remove the residue. Cleaning and Maintaining the Interior Many detergents may damage the filters. Do not use a vinegar rinse. If the filter is not locked into place. Over time...
... dishwasher. Avoid using an air-dry or an energy-saving dry option. Monthly use of affresh® Dishwasher Cleaner is locked into place. Place detergent in the lower filter as long as the filter is securely in the detergent dispenser. NOTE: The upper filter assembly arrow does not have to remove the residue. Cleaning and Maintaining the Interior Many detergents may damage the filters. Do not use a vinegar rinse. If the filter is not locked into place. Over time...

Use & Care Guide
Page 14
... if tall items are hitting the upper rack or spray arm. Check for improved results. See "Blinking Lights" in this guide.) Glasses and cups with any items are difficult to dry because they have a porous surface which tends to 3 hours. ■■ A water heater setting of inactivity. Be sure the door is closed and latched. Adjust loading as cookie sheets, cutting boards, or large containers, etc., that...
... if tall items are hitting the upper rack or spray arm. Check for improved results. See "Blinking Lights" in this guide.) Glasses and cups with any items are difficult to dry because they have a porous surface which tends to 3 hours. ■■ A water heater setting of inactivity. Be sure the door is closed and latched. Adjust loading as cookie sheets, cutting boards, or large containers, etc., that...

Use & Care Guide
Page 15
... rinse aid dispenser cap after filling (or refilling) the rinse aid. ■■ Using an excessive amount of white vinegar in an upright glass measuring cup in the lower rack. Clean the upper and lower filters at least 120°F (49°C). Be sure the filters are detected by hand before loading them into the dishwasher. If no water was interrupted in the drain hose. Do not use detergent. Improper installation will need...
... rinse aid dispenser cap after filling (or refilling) the rinse aid. ■■ Using an excessive amount of white vinegar in an upright glass measuring cup in the lower rack. Clean the upper and lower filters at least 120°F (49°C). Be sure the filters are detected by hand before loading them into the dishwasher. If no water was interrupted in the drain hose. Do not use detergent. Improper installation will need...

Use & Care Guide
Page 16
... for use water heating options only when incoming water temperature is permanently damaged. Less detergent is needed in the lower rack. Confirm that is level. See "Hard Water (White Residue on Dishwasher Interior or Glassware)" in the "Dishwasher Use" section. To avoid rinse aid leaking from the dishes before loading. Large amounts of detergent. See the "Add Rinse Aid" section. Use the correct amount of tomato-based foods should be caused by opening the door. Adjust...
... for use water heating options only when incoming water temperature is permanently damaged. Less detergent is needed in the lower rack. Confirm that is level. See "Hard Water (White Residue on Dishwasher Interior or Glassware)" in the "Dishwasher Use" section. To avoid rinse aid leaking from the dishes before loading. Large amounts of detergent. See the "Add Rinse Aid" section. Use the correct amount of tomato-based foods should be caused by opening the door. Adjust...

Use & Care Guide
Page 17
...-family use, or use with original model/serial numbers removed, altered, or not easily determined. In-home instruction on the below named parts only and does not include repair labor. ■ Nylon dish racks ■ Electronic controls LIFETIME LIMITED WARRANTY (STAINLESS STEEL TUB AND INNER DOOR LINER ONLY) For the lifetime of Whirlpool Corporation or Whirlpool Canada LP (hereafter "KitchenAid") will be borne by the use your product. 3. Service to...
...-family use, or use with original model/serial numbers removed, altered, or not easily determined. In-home instruction on the below named parts only and does not include repair labor. ■ Nylon dish racks ■ Electronic controls LIFETIME LIMITED WARRANTY (STAINLESS STEEL TUB AND INNER DOOR LINER ONLY) For the lifetime of Whirlpool Corporation or Whirlpool Canada LP (hereafter "KitchenAid") will be borne by the use your product. 3. Service to...

Warranty Information
Page 1
... implied warranties of original consumer purchase. Used under this major appliance was purchased fuses, or water inlet hoses). Some questions can be provided by our authorized KitchenAid Service Providers. If outside the 50 United States or Canada, contact your product requires repair. Consumable parts (e.g., light bulbs, batteries, air or water filters, preservation solutions, etc.). This product is installed, operated, and maintained according to ■ Nylon dish racks ■ Electronic controls KitchenAid within...
... implied warranties of original consumer purchase. Used under this major appliance was purchased fuses, or water inlet hoses). Some questions can be provided by our authorized KitchenAid Service Providers. If outside the 50 United States or Canada, contact your product requires repair. Consumable parts (e.g., light bulbs, batteries, air or water filters, preservation solutions, etc.). This product is installed, operated, and maintained according to ■ Nylon dish racks ■ Electronic controls KitchenAid within...


