Use & Care Guide
Page 3
...Use 7 Pre-Use Cleaning ...7 Installing the Ion-Exchange Water Filter 7 To Set the Time-of Columbia ...........15 Hassle-Free Replacement Warranty - All Locations 16 How to Arrange for Great Taste 11 CARE AND CLEANING Cleaning the Coffee Maker 12 Descaling the Coffee Maker 12 Troubleshooting ...13 WARRANTY AND SERVICE INFORMATION KitchenAid® Coffee Maker Warranty 14 Hassle-Free Replacement Warranty - 50 United States and District of -Day Clock 7 Operating Your Coffee Maker 8 Brewing Coffee...8 The Pause and Pour Feature 9 Using the Automatic Brew Timer 10 The Cleaning Needed...
...Use 7 Pre-Use Cleaning ...7 Installing the Ion-Exchange Water Filter 7 To Set the Time-of Columbia ...........15 Hassle-Free Replacement Warranty - All Locations 16 How to Arrange for Great Taste 11 CARE AND CLEANING Cleaning the Coffee Maker 12 Descaling the Coffee Maker 12 Troubleshooting ...13 WARRANTY AND SERVICE INFORMATION KitchenAid® Coffee Maker Warranty 14 Hassle-Free Replacement Warranty - 50 United States and District of -Day Clock 7 Operating Your Coffee Maker 8 Brewing Coffee...8 The Pause and Pour Feature 9 Using the Automatic Brew Timer 10 The Cleaning Needed...
Use & Care Guide
Page 4
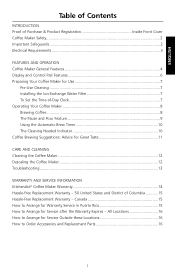
... edge of others . Do not touch hot surfaces. Use handles or knobs. 3. Do not operate any manner. To protect against electrical shock, do not immerse cord, plugs, or Coffee Maker in this manual and on or near children. 5. The use appliance for examination, repair, or adjustment. 7. All safety messages will follow instructions. Do not use of injury, and tell you what...
... edge of others . Do not touch hot surfaces. Use handles or knobs. 3. Do not operate any manner. To protect against electrical shock, do not immerse cord, plugs, or Coffee Maker in this manual and on or near children. 5. The use appliance for examination, repair, or adjustment. 7. All safety messages will follow instructions. Do not use of injury, and tell you what...
Use & Care Guide
Page 5
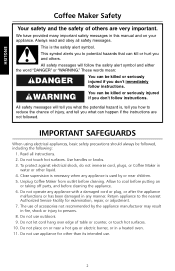
...used on a wet or cold surface. 15. Do not set a hot container (carafe) on a range top. 14. Do not use appliance without lid properly placed on container (carafe). 13. only. NOTE: Your Coffee Maker has a 3 prong grounded plug. Failure to follow these instructions can result in any way...not use an adapter. Do not use an extension cord. Do not clean container with this plug will fit in the outlet, contact a qualified electrician. Do not remove ground prong. ENGLISH 12. The container (carafe) is too short, have a qualified electrician or serviceman install ...
...used on a wet or cold surface. 15. Do not set a hot container (carafe) on a range top. 14. Do not use appliance without lid properly placed on container (carafe). 13. only. NOTE: Your Coffee Maker has a 3 prong grounded plug. Failure to follow these instructions can result in any way...not use an adapter. Do not use an extension cord. Do not clean container with this plug will fit in the outlet, contact a qualified electrician. Do not remove ground prong. ENGLISH 12. The container (carafe) is too short, have a qualified electrician or serviceman install ...
Use & Care Guide
Page 6
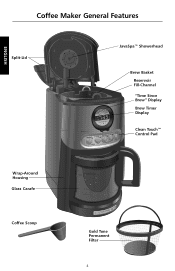
ENGLISH Coffee Maker General Features Split-Lid JavaSpa™ Showerhead Brew Basket Reservoir Fill-Channel "Time Since Brew" Display Brew Timer Display Clean Touch™ Control Pad Wrap-Around Housing Glass Carafe Coffee Scoop Gold Tone Permanent Filter 4
ENGLISH Coffee Maker General Features Split-Lid JavaSpa™ Showerhead Brew Basket Reservoir Fill-Channel "Time Since Brew" Display Brew Timer Display Clean Touch™ Control Pad Wrap-Around Housing Glass Carafe Coffee Scoop Gold Tone Permanent Filter 4
Use & Care Guide
Page 7
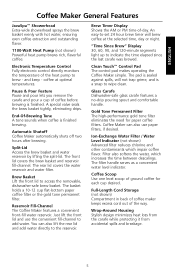
... other contaminants which increases the time between descalings. Pause & Pour Feature Pause and pour lets you remove the carafe and pour a cup of the way. Automatic Shutoff Coffee Maker automatically shuts off two hours after brewing. Brew Basket Lift the front lid to indicate the time elapsed since the last carafe was brewed. Filter also softens the water, which impair coffee flavor. Just lift the front lid and use paper filters, if desired. Full-Length Cord...
... other contaminants which increases the time between descalings. Pause & Pour Feature Pause and pour lets you remove the carafe and pour a cup of the way. Automatic Shutoff Coffee Maker automatically shuts off two hours after brewing. Brew Basket Lift the front lid to indicate the time elapsed since the last carafe was brewed. Filter also softens the water, which impair coffee flavor. Just lift the front lid and use paper filters, if desired. Full-Length Cord...
Use & Care Guide
Page 8
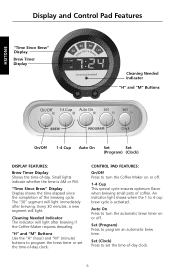
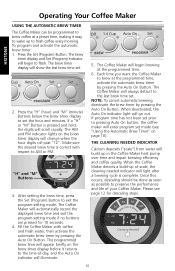
... Use the "H" (hour) and "M" (minute) buttons to set the time-of coffee. Set (Clock) Press to program the brew timer or set the time-of-day clock. 6 Auto On Press to 4 cup brew cycle is AM or PM. ENGLISH Display and Control Pad Features "Time Since Brew" Display Brew Timer Display Cleaning Needed Indicator "H" and "M" Buttons On/Off 1-4 Cup Auto On Set Set (Program) (Clock) DISPLAY FEATURES: Brew Timer Display Shows the time-of the brewing cycle. Cleaning Needed Indicator The indicator will light immediately after brewing if the Coffee Maker requires descaling...
... Use the "H" (hour) and "M" (minute) buttons to set the time-of coffee. Set (Clock) Press to program the brew timer or set the time-of-day clock. 6 Auto On Press to 4 cup brew cycle is AM or PM. ENGLISH Display and Control Pad Features "Time Since Brew" Display Brew Timer Display Cleaning Needed Indicator "H" and "M" Buttons On/Off 1-4 Cup Auto On Set Set (Program) (Clock) DISPLAY FEATURES: Brew Timer Display Shows the time-of the brewing cycle. Cleaning Needed Indicator The indicator will light immediately after brewing if the Coffee Maker requires descaling...
Use & Care Guide
Page 9
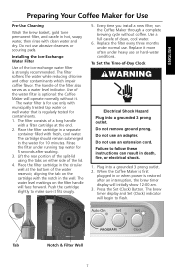
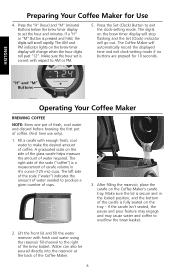
... the filter under normal use an extension cord. When the Coffee Maker is regularly tested for contaminants. 1. ENGLISH Preparing Your Coffee Maker for Use Pre-Use Cleaning Wash the brew basket, gold tone permanent filter, and carafe in a separate container filled with fresh, cool water. Replace the filter every three months under running tap water for 5 seconds after an interruption, the brew timer display will operate normally without coffee. Do not remove ground prong...
... the filter under normal use an extension cord. When the Coffee Maker is regularly tested for contaminants. 1. ENGLISH Preparing Your Coffee Maker for Use Pre-Use Cleaning Wash the brew basket, gold tone permanent filter, and carafe in a separate container filled with fresh, cool water. Replace the filter every three months under running tap water for 5 seconds after an interruption, the brew timer display will operate normally without coffee. Do not remove ground prong...
Use & Care Guide
Page 10
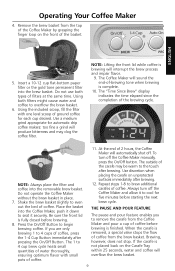
... front lid and fill the water reservoir with fresh cool water using the reservoir fill-channel to AM or PM. 5. The AM and PM indicator lights on the brew timer display will stop flashing and the Set (Clock) indicator will change when the hour digits roll past "12". Make sure the hour set the hour and minutes. The Coffee Maker will scroll rapidly. ENGLISH "H" and "M" Buttons Operating Your Coffee Maker BREWING COFFEE NOTE: Brew one pot of...
... front lid and fill the water reservoir with fresh cool water using the reservoir fill-channel to AM or PM. 5. The AM and PM indicator lights on the brew timer display will stop flashing and the Set (Clock) indicator will change when the hour digits roll past "12". Make sure the hour set the hour and minutes. The Coffee Maker will scroll rapidly. ENGLISH "H" and "M" Buttons Operating Your Coffee Maker BREWING COFFEE NOTE: Brew one pot of...
Use & Care Guide
Page 11
... carafe is removed, a special valve stops the flow of the carafe may clog the coffee filter. Insert a 10-12 cup flat-bottom paper filter or the gold tone permanent filter into the removable brew basket. Always turn off the Coffee Maker and allow it securely. Using the included scoop, fill the filter with small pots of coffee. Remove the brew basket from the brew basket. ENGLISH 5. To turn off the Coffee Maker manually, press the On/Off button. Brewing, however, does not stop. Repeat steps...
... carafe is removed, a special valve stops the flow of the carafe may clog the coffee filter. Insert a 10-12 cup flat-bottom paper filter or the gold tone permanent filter into the removable brew basket. Always turn off the Coffee Maker and allow it securely. Using the included scoop, fill the filter with small pots of coffee. Remove the brew basket from the brew basket. ENGLISH 5. To turn off the Coffee Maker manually, press the On/Off button. Brewing, however, does not stop. Repeat steps...
Use & Care Guide
Page 12
... CLEANING NEEDED INDICATOR Calcium deposits ("scale") from water will change when the hour digits roll past "12". Make sure the desired brew time is complete. The Coffee Maker will go out. Once this occurs, descaling should be programmed to brew coffee at the programmed time. 6. Please see "Using the Automatic Brew Timer" on the brew timer display will build up to fresh coffee every morning. To program and activate the automatic brew timer: 1. Press the Set (Program) Button. The brew timer display will...
... CLEANING NEEDED INDICATOR Calcium deposits ("scale") from water will change when the hour digits roll past "12". Make sure the desired brew time is complete. The Coffee Maker will go out. Once this occurs, descaling should be programmed to brew coffee at the programmed time. 6. Please see "Using the Automatic Brew Timer" on the brew timer display will build up to fresh coffee every morning. To program and activate the automatic brew timer: 1. Press the Set (Program) Button. The brew timer display will...
Use & Care Guide
Page 13
... to a medium grind level - Where local water is one scoop of coffee comes from fresh coffee beans. Do not use bottled water. Freezing can help preserve beans stored for every cup of the brewed coffee, it will also impair the flavor. This maximizes flavor and minimizes bitterness. Grinders like the KitchenAid® Blade Coffee Grinder, PRO LINE® Series Burr Coffee Mill, or the KitchenAid® Model A-9® Coffee Mill offer excellent...
... to a medium grind level - Where local water is one scoop of coffee comes from fresh coffee beans. Do not use bottled water. Freezing can help preserve beans stored for every cup of the brewed coffee, it will also impair the flavor. This maximizes flavor and minimizes bitterness. Grinders like the KitchenAid® Blade Coffee Grinder, PRO LINE® Series Burr Coffee Mill, or the KitchenAid® Model A-9® Coffee Mill offer excellent...
Use & Care Guide
Page 14
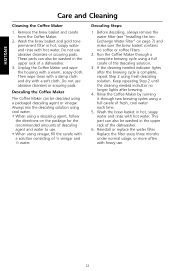
... with hot water. Keep repeating Step 2 until the cleaning needed indicator lights after brewing. 4. This part can be washed in the upper rack of fresh, cool water each time. 5. Remove the brew basket and carafe from the Coffee Maker. 2. If the cleaning needed indicator no coffee or coffee filters. 2. Then wipe clean with a damp cloth and dry with a warm, soapy cloth. ENGLISH Care and Cleaning Cleaning the Coffee Maker 1. Always mix the descaling solution using cool water. • When using fresh descaling solution. Descaling Steps: 1.
... with hot water. Keep repeating Step 2 until the cleaning needed indicator lights after brewing. 4. This part can be washed in the upper rack of fresh, cool water each time. 5. Remove the brew basket and carafe from the Coffee Maker. 2. If the cleaning needed indicator no coffee or coffee filters. 2. Then wipe clean with a damp cloth and dry with a warm, soapy cloth. ENGLISH Care and Cleaning Cleaning the Coffee Maker 1. Always mix the descaling solution using cool water. • When using fresh descaling solution. Descaling Steps: 1.
Use & Care Guide
Page 15
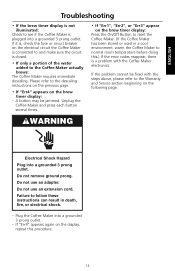
... on the brew timer display: Press the On/Off Button to the Warranty and Service section beginning on the brew timer display: - Do not use an extension cord. If the problem cannot be jammed. If "Err4" appears again on the electrical circuit the Coffee Maker is connected to and make sure the circuit is a problem with the steps above, please refer to reset the Coffee Maker. (If the Coffee Maker has...
... on the brew timer display: Press the On/Off Button to the Warranty and Service section beginning on the brew timer display: - Do not use an extension cord. If the problem cannot be jammed. If "Err4" appears again on the electrical circuit the Coffee Maker is connected to and make sure the circuit is a problem with the steps above, please refer to reset the Coffee Maker. (If the Coffee Maker has...
Use & Care Guide
Page 16
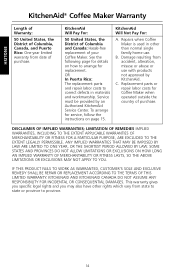
.... Repairs when Coffee Maker is used in materials and workmanship. DISCLAIMER OF IMPLIED WARRANTIES; To arrange for replacement. This warranty gives you specific legal rights and you may also have other than normal single family home use with products not approved by an Authorized KitchenAid Service Center. KitchenAid Will Pay For: 50 United States, the District of Columbia and Canada: Hassle-free replacement of your Coffee Maker. ANY IMPLIED WARRANTIES...
.... Repairs when Coffee Maker is used in materials and workmanship. DISCLAIMER OF IMPLIED WARRANTIES; To arrange for replacement. This warranty gives you specific legal rights and you may also have other than normal single family home use with products not approved by an Authorized KitchenAid Service Center. KitchenAid Will Pay For: 50 United States, the District of Columbia and Canada: Hassle-free replacement of your Coffee Maker. ANY IMPLIED WARRANTIES...
Use & Care Guide
Page 17
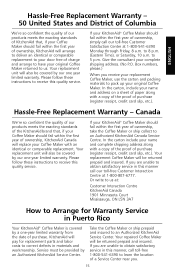
... an identical or comparable replacement. Box numbers, please.) When you . 15 Your repaired Coffee Maker will be covered by our one year limited warranty. to pack up your original Coffee Maker. Please follow these instructions to us at: Customer Interaction Centre KitchenAid Canada 1901 Minnesota Court Mississauga, ON L5N 3A7 How to an Authorized KitchenAid Canada Service Centre. ENGLISH Hassle-Free Replacement Warranty - 50 United States and District...
... an identical or comparable replacement. Box numbers, please.) When you . 15 Your repaired Coffee Maker will be covered by our one year limited warranty. to pack up your original Coffee Maker. Please follow these instructions to us at: Customer Interaction Centre KitchenAid Canada 1901 Minnesota Court Mississauga, ON L5N 3A7 How to an Authorized KitchenAid Canada Service Centre. ENGLISH Hassle-Free Replacement Warranty - 50 United States and District...
Use & Care Guide
Page 18
... : Customer Satisfaction Center KitchenAid Portable Appliances P.O. Joseph, MI 49085-0218 To order accessories or replacement parts for Service after the Warranty Expires - For service information in the 50 United States, District of Columbia, and Puerto Rico, call toll-free 01-800-024-17-17 (JV Distribuciones) Or 01-800-902-31-00 (Industrias Birtman) 16 to Arrange for your Coffee Maker in...
... : Customer Satisfaction Center KitchenAid Portable Appliances P.O. Joseph, MI 49085-0218 To order accessories or replacement parts for Service after the Warranty Expires - For service information in the 50 United States, District of Columbia, and Puerto Rico, call toll-free 01-800-024-17-17 (JV Distribuciones) Or 01-800-902-31-00 (Industrias Birtman) 16 to Arrange for your Coffee Maker in...


