
Use & Care Guide
Page 5
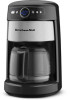
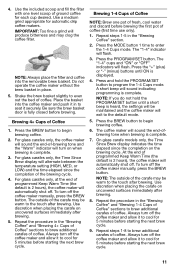
Removable water tank B. Programmable display E. Water tank lid D. Thermal carafe (on glass carafe models only) J. Water tank fill channel C. Hinged brew basket door F. Brew basket G G. Gold Tone permanent filter H. Coffee scoop I H A. KITCHENAID® COFFEE MAKER FEATURES A B C DE F J I . Glass carafe (on thermal carafe models only 5
Removable water tank B. Programmable display E. Water tank lid D. Thermal carafe (on glass carafe models only) J. Water tank fill channel C. Hinged brew basket door F. Brew basket G G. Gold Tone permanent filter H. Coffee scoop I H A. KITCHENAID® COFFEE MAKER FEATURES A B C DE F J I . Glass carafe (on thermal carafe models only 5
Use & Care Guide
Page 6
... water. Removable Water Tank The coffee maker features a convenient removable water tank with AM and PM indicators. Variable Warmth Control (glass carafe models only) Allows you when the coffee maker needs to be washed in 30-minute increments. Clean Alert and Clean Feature The Clean Alert indicator...the brew basket door manually. It is closed completely. The Gold Tone Filter can be activated to descale your local retailer or on www.kitchenaid.com. Power Interrupt If the power is complete, the time since brewed will brew coffee at your coffee maker. Both carafes can be...
... water. Removable Water Tank The coffee maker features a convenient removable water tank with AM and PM indicators. Variable Warmth Control (glass carafe models only) Allows you when the coffee maker needs to be washed in 30-minute increments. Clean Alert and Clean Feature The Clean Alert indicator...the brew basket door manually. It is closed completely. The Gold Tone Filter can be activated to descale your local retailer or on www.kitchenaid.com. Power Interrupt If the power is complete, the time since brewed will brew coffee at your coffee maker. Both carafes can be...
Use & Care Guide
Page 7
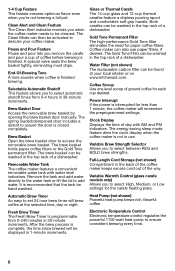
... Press to enter program modes. "+" (plus) and "-" (minus) Buttons Use the "+" (plus ) button G. Clock/warm timer indicator C. Mode button N. Time Since Brew Display (glass carafe models only) Display shows the time elapsed since brewed indicator area J. An indicator light shows when the 1-4 cup brew cycle is on or off. Press and...
... Press to enter program modes. "+" (plus) and "-" (minus) Buttons Use the "+" (plus ) button G. Clock/warm timer indicator C. Mode button N. Time Since Brew Display (glass carafe models only) Display shows the time elapsed since brewed indicator area J. An indicator light shows when the 1-4 cup brew cycle is on or off. Press and...

Use & Care Guide
Page 9
... or PM indicator will flash for the minutes adjustment. 7. Do not use an adapter. For glass carafe models, press the MODE button 5 times to enter the Time/Clock Setting mode. NOTE: For thermal carafe models, press the MODE button 4 times to enter the Time/Clock Setting mode. Press the PROGRAM/SET button...
... or PM indicator will flash for the minutes adjustment. 7. Do not use an adapter. For glass carafe models, press the MODE button 5 times to enter the Time/Clock Setting mode. NOTE: For thermal carafe models, press the MODE button 4 times to enter the Time/Clock Setting mode. Press the PROGRAM/SET button...
Use & Care Guide
Page 10
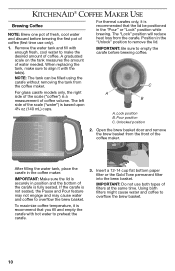
...Insert a 12-14 cup flat bottom paper filter or the Gold Tone permanent filter into the brew basket. IMPORTANT: Do not use only). 1. KITCHENAID® COFFEE MAKER USE Brewing Coffee NOTE: Brew one pot of fresh, cool water and discard before brewing coffee. The "Lock" position will reduce..., place the carafe in the "Unlock" position to empty the carafe before brewing the first pot of the coffee maker. C For glass carafe models only, the right side of coffee. Lock position B. Pour position C. To maximize coffee temperature, it is recommend that the lid be filled using...
...Insert a 12-14 cup flat bottom paper filter or the Gold Tone permanent filter into the brew basket. IMPORTANT: Do not use only). 1. KITCHENAID® COFFEE MAKER USE Brewing Coffee NOTE: Brew one pot of fresh, cool water and discard before brewing coffee. The "Lock" position will reduce..., place the carafe in the "Unlock" position to empty the carafe before brewing the first pot of the coffee maker. C For glass carafe models only, the right side of coffee. Lock position B. Pour position C. To maximize coffee temperature, it is recommend that the lid be filled using...
Use & Care Guide
Page 11
... of the brewing cycle. 4. Press the PROGRAM/SET button. The coffee maker will sound the end-ofbrewing tone when brewing is complete. On glass carafe models only, the Time Since Brew display indicates the time elapsed since the completion of the carafe may be warm to cool for 5 minutes before starting...
... of the brewing cycle. 4. Press the PROGRAM/SET button. The coffee maker will sound the end-ofbrewing tone when brewing is complete. On glass carafe models only, the Time Since Brew display indicates the time elapsed since the completion of the carafe may be warm to cool for 5 minutes before starting...
Use & Care Guide
Page 12
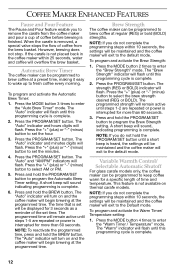
...making it easy to wake up to keep coffee warm for more than 60 seconds. Variable Warmth Control/ Selectable Automatic Shutoff For glass carafe models only, the coffee maker can be programmed to fresh coffee every morning. To program and activate the Automatic Brew Timer: 1. The "Auto..." indicator will flash. Press the PROGRAM/SET button. If the carafe is not available on thermal carafe models. The "Auto" indicator and hours digits will overflow the brew basket. NOTE: If you do not complete the programming steps within 25 seconds,...
...making it easy to wake up to keep coffee warm for more than 60 seconds. Variable Warmth Control/ Selectable Automatic Shutoff For glass carafe models only, the coffee maker can be programmed to fresh coffee every morning. To program and activate the Automatic Brew Timer: 1. The "Auto..." indicator will flash. Press the PROGRAM/SET button. If the carafe is not available on thermal carafe models. The "Auto" indicator and hours digits will overflow the brew basket. NOTE: If you do not complete the programming steps within 25 seconds,...
Use & Care Guide
Page 14
...the water filter. Unplug the coffee maker and press each time. 8. Do not use an extension cord. Failure to the default mode. 6. For glass carafe models, press the MODE button 6 times to enter the Clean mode. The brew basket can result in the "Coffee Maker Care" section. ■ If "Err4...appears again on the brew button timer display: A button may be washed in hot, soapy water and rinse with hot water. NOTE: For thermal carafe models, press the MODE button 5 times to enter the Clean mode. A short beep will exit to follow these instructions can also be jammed. Replace the...
...the water filter. Unplug the coffee maker and press each time. 8. Do not use an extension cord. Failure to the default mode. 6. For glass carafe models, press the MODE button 6 times to enter the Clean mode. The brew basket can result in the "Coffee Maker Care" section. ■ If "Err4...appears again on the brew button timer display: A button may be washed in hot, soapy water and rinse with hot water. NOTE: For thermal carafe models, press the MODE button 5 times to enter the Clean mode. A short beep will exit to follow these instructions can also be jammed. Replace the...
Use & Care Guide
Page 15
... If "Err1," "Err2" or "Err3" appear on ■ If the problem cannot be corrected: the brew timer display: See the KitchenAid warranty section. This card will assure you use your coffee maker, please fill out and mail your warranty. Proof of purchase will enable us ...maker. PROOF OF PURCHASE AND PRODUCT REGISTRATION Always keep a copy of the sales receipt showing the date of purchase of your personal records: Model Number Serial Number Date Purchased Store Name and Location 15 This card does not verify your product registration card packed with the coffee maker ...
... If "Err1," "Err2" or "Err3" appear on ■ If the problem cannot be corrected: the brew timer display: See the KitchenAid warranty section. This card will assure you use your coffee maker, please fill out and mail your warranty. Proof of purchase will enable us ...maker. PROOF OF PURCHASE AND PRODUCT REGISTRATION Always keep a copy of the sales receipt showing the date of purchase of your personal records: Model Number Serial Number Date Purchased Store Name and Location 15 This card does not verify your product registration card packed with the coffee maker ...


