Use & Care Guide
Page 3
...all safety messages. We have provided many important safety messages in any appliance with this manual and on or near children. ■ Unplug coffee maker from outlet when not in use with a damaged cord or plug or after the appliance malfunctions or has been damaged in this appliance. ...happen if the instructions are very important. Use handles or knobs. ■ To protect against electrical shock, do not immerse cord, plugs, or coffee maker in water or other liquid. ■ Close supervision is necessary when any appliance is used on a range top or in a heated oven. &#...
...all safety messages. We have provided many important safety messages in any appliance with this manual and on or near children. ■ Unplug coffee maker from outlet when not in use with a damaged cord or plug or after the appliance malfunctions or has been damaged in this appliance. ...happen if the instructions are very important. Use handles or knobs. ■ To protect against electrical shock, do not immerse cord, plugs, or coffee maker in water or other liquid. ■ Close supervision is necessary when any appliance is used on a range top or in a heated oven. &#...
Use & Care Guide
Page 4
Do not use an extension cord. Hertz: 60 Hz NOTE: This coffee maker has a 3-prong grounded plug. Longer detachable power supply cords or extension cords are available and may be pulled on a wet or cold surface. ■ Do ...
Do not use an extension cord. Hertz: 60 Hz NOTE: This coffee maker has a 3-prong grounded plug. Longer detachable power supply cords or extension cords are available and may be pulled on a wet or cold surface. ■ Do ...

Use & Care Guide
Page 5
Water tank fill channel C. Brew basket G G. Thermal carafe (on glass carafe models only) J. Glass carafe (on thermal carafe models only 5 Gold Tone permanent filter H. Hinged brew basket door F. Coffee scoop I H A. Programmable display E. KITCHENAID® COFFEE MAKER FEATURES A B C DE F J I . Removable water tank B. Water tank lid D.
Water tank fill channel C. Brew basket G G. Thermal carafe (on glass carafe models only) J. Glass carafe (on thermal carafe models only 5 Gold Tone permanent filter H. Hinged brew basket door F. Coffee scoop I H A. Programmable display E. KITCHENAID® COFFEE MAKER FEATURES A B C DE F J I . Removable water tank B. Water tank lid D.
Use & Care Guide
Page 6
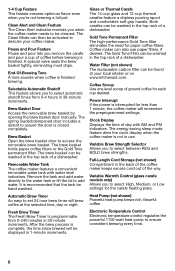
...and add water directly to the water tank or lift the lid to descale your local retailer or on www.kitchenaid.com. Both carafes can be washed in the back of the coffee maker keeps excess cord out of a dishwasher. The Gold Tone Filter can be washed in use paper filters, ... Brew Timer The Fresh Brew Timer is finished. The brew basket can also use . It is complete, the time since brewed will brew coffee at your coffee maker. Glass or Thermal Carafe The 14-cup glass and 12-cup thermal carafes feature a dripless pouring spout and comfortable soft grip handle. Variable ...
...and add water directly to the water tank or lift the lid to descale your local retailer or on www.kitchenaid.com. Both carafes can be washed in the back of the coffee maker keeps excess cord out of a dishwasher. The Gold Tone Filter can be washed in use paper filters, ... Brew Timer The Fresh Brew Timer is finished. The brew basket can also use . It is complete, the time since brewed will brew coffee at your coffee maker. Glass or Thermal Carafe The 14-cup glass and 12-cup thermal carafes feature a dripless pouring spout and comfortable soft grip handle. Variable ...
Use & Care Guide
Page 7
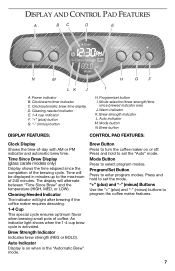
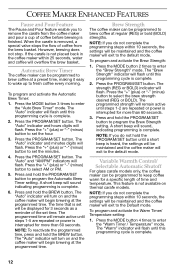
...Time Since Brew" and the temperature (HIGH, MED, or LOW). Auto Indicator Display is activated. Program/Set Button Press to turn the coffee maker on when in minutes up to set button I A. Warm indicator K. An indicator light shows when the 1-4 cup brew cycle is on...(REG or BOLD). The display will be displayed in the "Automatic Brew" mode. Cleaning Needed Indicator The indicator will light after brewing if the coffee maker requires descaling. 1-4 Cup This special cycle ensures optimum flavor when brewing small pots of the brewing cycle. "+" (plus) and "-" (minus) ...
...Time Since Brew" and the temperature (HIGH, MED, or LOW). Auto Indicator Display is activated. Program/Set Button Press to turn the coffee maker on when in minutes up to set button I A. Warm indicator K. An indicator light shows when the 1-4 cup brew cycle is on...(REG or BOLD). The display will be displayed in the "Automatic Brew" mode. Cleaning Needed Indicator The indicator will light after brewing if the coffee maker requires descaling. 1-4 Cup This special cycle ensures optimum flavor when brewing small pots of the brewing cycle. "+" (plus) and "-" (minus) ...
Use & Care Guide
Page 8
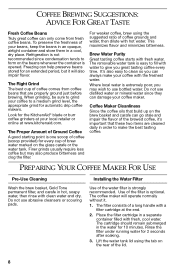
... brew basket, Gold Tone permanent filter, and carafe in the water for the KitchenAid® blade or burr coffee grinders at your local retailer or online at the end. 2. The coffee maker will operate normally without it will also impair flavor. Rinse the filter under running... filter is optional. Refrigeration is one scoop of coffee (scoop provided) for automatic drip coffee makers. The filter consists of the brewed coffee, it's important that are cleaned daily in a separate container filled with a filter cartridge at www.kitchenaid.com. Installing the Water Filter Use of the lid...
... brew basket, Gold Tone permanent filter, and carafe in the water for the KitchenAid® blade or burr coffee grinders at your local retailer or online at the end. 2. The coffee maker will operate normally without it will also impair flavor. Rinse the filter under running... filter is optional. Refrigeration is one scoop of coffee (scoop provided) for automatic drip coffee makers. The filter consists of the brewed coffee, it's important that are cleaned daily in a separate container filled with a filter cartridge at www.kitchenaid.com. Installing the Water Filter Use of the lid...

Use & Care Guide
Page 9
... (minus) buttons to program the settings. 4. Use a full carafe of -Day Clock WARNING Electrical Shock Hazard Plug into a grounded 3-prong outlet. 9 When the coffee maker is first plugged in or when power is being set. 4. Press the PROGRAM/SET button again. The AM or PM indicator will initially show 12...:00 PM. 3. Press and hold the Program/Set button until a short beep is heard, the settings will be maintained and the coffee maker will sound indicating programming is complete. Press the "+" (plus) or "-" (minus) buttons to enter the Time/Clock Setting mode. The minutes ...
... (minus) buttons to program the settings. 4. Use a full carafe of -Day Clock WARNING Electrical Shock Hazard Plug into a grounded 3-prong outlet. 9 When the coffee maker is first plugged in or when power is being set. 4. Press the PROGRAM/SET button again. The AM or PM indicator will initially show 12...:00 PM. 3. Press and hold the Program/Set button until a short beep is heard, the settings will be maintained and the coffee maker will sound indicating programming is complete. Press the "+" (plus) or "-" (minus) buttons to enter the Time/Clock Setting mode. The minutes ...
Use & Care Guide
Page 10
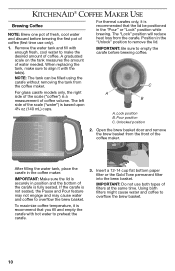
...left side of the scale ("water") is a measurement of coffee volume. C For glass carafe models only, the right side of the scale ("coffee") is based upon 4³⁄₄ oz (140 mL) cups. KITCHENAID® COFFEE MAKER USE Brewing Coffee NOTE: Brew one pot of fresh, cool water and discard... before brewing coffee. Remove the water tank and fill with the tab(s). A ...
...left side of the scale ("water") is a measurement of coffee volume. C For glass carafe models only, the right side of the scale ("coffee") is based upon 4³⁄₄ oz (140 mL) cups. KITCHENAID® COFFEE MAKER USE Brewing Coffee NOTE: Brew one pot of fresh, cool water and discard... before brewing coffee. Remove the water tank and fill with the tab(s). A ...
Use & Care Guide
Page 11
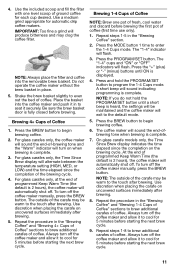
.... NOTE: If you do not hold the PROGRAM/SET button to cool for 5 minutes before starting the next brew cycle. The coffee maker will sound indicating programming is complete. 7. To turn on uncovered surfaces immediately after brewing. For glass carafes only, the Time Since ...on when brewing is heard, the settings will be maintained and the coffee maker will exit to brew additional carafes of programmed Keep Warm Time (the default is 2 hours), the coffee maker will automatically shut off the coffee maker and allow it securely. IMPORTANT: Too fine a grind will flash....
.... NOTE: If you do not hold the PROGRAM/SET button to cool for 5 minutes before starting the next brew cycle. The coffee maker will sound indicating programming is complete. 7. To turn on uncovered surfaces immediately after brewing. For glass carafes only, the Time Since ...on when brewing is heard, the settings will be maintained and the coffee maker will exit to brew additional carafes of programmed Keep Warm Time (the default is 2 hours), the coffee maker will automatically shut off the coffee maker and allow it securely. IMPORTANT: Too fine a grind will flash....
Use & Care Guide
Page 12
...(minus) button to set the minutes. 4. To program and activate the Warm Timer/ Temperature setting: 1. Automatic Brew Timer The coffee maker can be maintained and the coffee maker will overflow the brew basket. Press the "+" (plus ) or "-" (minus) button to program the Brew Strength setting. Press...is complete. 2. This feature is set will sound, indicating programming is removed, a special valve stops the flow of coffee from the coffee maker and pour a cup of time and temperature. Press the PROGRAM/SET button. Variable Warmth Control/ Selectable Automatic Shutoff For ...
...(minus) button to set the minutes. 4. To program and activate the Warm Timer/ Temperature setting: 1. Automatic Brew Timer The coffee maker can be maintained and the coffee maker will overflow the brew basket. Press the "+" (plus ) or "-" (minus) button to program the Brew Strength setting. Press...is complete. 2. This feature is set will sound, indicating programming is removed, a special valve stops the flow of coffee from the coffee maker and pour a cup of time and temperature. Press the PROGRAM/SET button. Variable Warmth Control/ Selectable Automatic Shutoff For ...
Use & Care Guide
Page 13
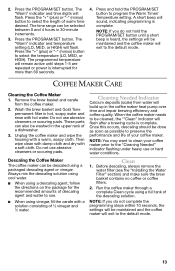
...temperature (LO, MED, or HIGH). Press and hold the PROGRAM/SET button until steps 1-5 are repeated or power is complete. Descaling the Coffee Maker The coffee maker can also be descaled using vinegar, fill the carafe with hot water. NOTE: If you do not hold the PROGRAM/SET button to ...the default mode. COFFEE MAKER CARE Cleaning the Coffee Maker 1. Remove the brew basket and carafe from water will sound, indicating programming is heard, the settings will be done as soon ...
...temperature (LO, MED, or HIGH). Press and hold the PROGRAM/SET button until steps 1-5 are repeated or power is complete. Descaling the Coffee Maker The coffee maker can also be descaled using vinegar, fill the carafe with hot water. NOTE: If you do not hold the PROGRAM/SET button to ...the default mode. COFFEE MAKER CARE Cleaning the Coffee Maker 1. Remove the brew basket and carafe from water will sound, indicating programming is heard, the settings will be done as soon ...
Use & Care Guide
Page 14
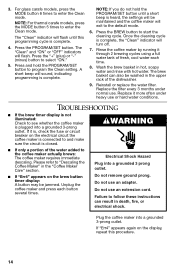
... use or hard water conditions. Electrical Shock Hazard Plug into a grounded 3-prong outlet. Do not use an extension cord. Plug the coffee maker into a grounded 3 prong outlet. NOTE: If you do not hold the PROGRAM/SET button to and make sure the circuit is ... mode. 6. Please refer to start the cleaning cycle. NOTE: For thermal carafe models, press the MODE button 5 times to the coffee maker actually brews: The coffee maker requires immediate descaling. Once the cleaning cycle is complete. The "Clean" and "ON" or "OFF" indicators will flash until a ...
... use or hard water conditions. Electrical Shock Hazard Plug into a grounded 3-prong outlet. Do not use an extension cord. Plug the coffee maker into a grounded 3 prong outlet. NOTE: If you do not hold the PROGRAM/SET button to and make sure the circuit is ... mode. 6. Please refer to start the cleaning cycle. NOTE: For thermal carafe models, press the MODE button 5 times to the coffee maker actually brews: The coffee maker requires immediate descaling. Once the cleaning cycle is complete. The "Clean" and "ON" or "OFF" indicators will flash until a ...
Use & Care Guide
Page 15
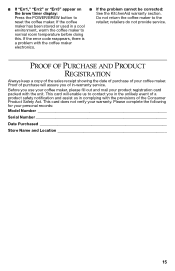
...a product safety notification and assist us in a cool environment, warm the coffee maker to normal room temperature before doing this. Before you use your coffee maker, please fill out and mail your coffee maker. This card will assure you in the unlikely event of your product registration... cannot be corrected: the brew timer display: See the KitchenAid warranty section. If the coffee retailer; Proof of purchase will enable us to the reset the coffee maker. Press the POWER/BREW button to Do not return the coffee maker to contact you of the Consumer Product Safety Act.
...a product safety notification and assist us in a cool environment, warm the coffee maker to normal room temperature before doing this. Before you use your coffee maker, please fill out and mail your coffee maker. This card will assure you in the unlikely event of your product registration... cannot be corrected: the brew timer display: See the KitchenAid warranty section. If the coffee retailer; Proof of purchase will enable us to the reset the coffee maker. Press the POWER/BREW button to Do not return the coffee maker to contact you of the Consumer Product Safety Act.
Use & Care Guide
Page 16
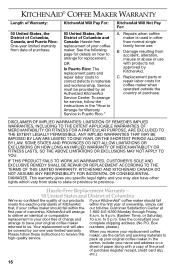
...United States, the District of Columbia and Canada: Hassle-free replacement of your coffee maker should fail meets the exacting standards of KitchenAid within the first year of purchase. Repairs when coffee maker is used in materials and workmanship. Damage resulting from state to state or province... of Columbia We're so confident the quality of our products If your KitchenAid® coffee maker should fail within the our toll-free Customer Satisfaction Center at first year of ownership, KitchenAid will also numbers, please.) be provided by our one year limited warranty....
...United States, the District of Columbia and Canada: Hassle-free replacement of your coffee maker should fail meets the exacting standards of KitchenAid within the first year of purchase. Repairs when coffee maker is used in materials and workmanship. Damage resulting from state to state or province... of Columbia We're so confident the quality of our products If your KitchenAid® coffee maker should fail within the our toll-free Customer Satisfaction Center at first year of ownership, KitchenAid will also numbers, please.) be provided by our one year limited warranty....

Use & Care Guide
Page 17
.... If you are unable to an Authorized KitchenAid Service purchase. coffee maker or ship collect to : Customer Satisfaction Center KitchenAid Portable Appliances P.O. KitchenAid will also be returned prepaid and insured. Your repaired coffee maker will be covered by our one -year... comparable replacement. Or write to : Customer eXperience Centre KitchenAid Canada 200 - 6750 Century Ave. Your replacement coffee ownership, KitchenAid Canada will replace maker will be provided by Take the coffee maker or ship prepaid and a one year Customer eXperience Centre...
.... If you are unable to an Authorized KitchenAid Service purchase. coffee maker or ship collect to : Customer Satisfaction Center KitchenAid Portable Appliances P.O. KitchenAid will also be returned prepaid and insured. Your repaired coffee maker will be covered by our one -year... comparable replacement. Or write to : Customer eXperience Centre KitchenAid Canada 200 - 6750 Century Ave. Your replacement coffee ownership, KitchenAid Canada will replace maker will be provided by Take the coffee maker or ship prepaid and a one year Customer eXperience Centre...


