Use & Care Guide
Page 3
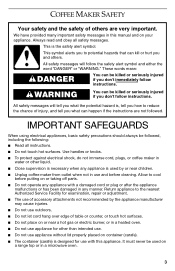
...following: ■ Read all safety messages. Use handles or knobs. ■ To protect against electrical shock, do not immerse cord, plugs, or coffee maker in water or other than intended use. ■ Do not use and before putting on your appliance. Return appliance to cool before cleaning. We ... adjustment. ■ The use with a damaged cord or plug or after the appliance malfunctions or has been damaged in a microwave oven. 3 COFFEE MAKER SAFETY Your safety and the safety of others . This symbol alerts you to reduce the chance of injury, and tell you and others are not...
...following: ■ Read all safety messages. Use handles or knobs. ■ To protect against electrical shock, do not immerse cord, plugs, or coffee maker in water or other than intended use. ■ Do not use and before putting on your appliance. Return appliance to cool before cleaning. We ... adjustment. ■ The use with a damaged cord or plug or after the appliance malfunctions or has been damaged in a microwave oven. 3 COFFEE MAKER SAFETY Your safety and the safety of others . This symbol alerts you to reduce the chance of injury, and tell you and others are not...
Use & Care Guide
Page 4
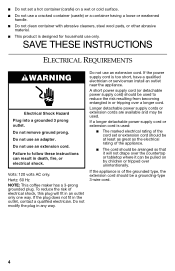
... Electrical Shock Hazard Plug into a grounded 3 prong outlet. Do not use an extension cord. Do not use an extension cord. Hertz: 60 Hz NOTE: This coffee maker has a 3-prong grounded plug.
... Electrical Shock Hazard Plug into a grounded 3 prong outlet. Do not use an extension cord. Do not use an extension cord. Hertz: 60 Hz NOTE: This coffee maker has a 3-prong grounded plug.

Use & Care Guide
Page 5
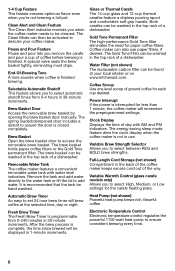
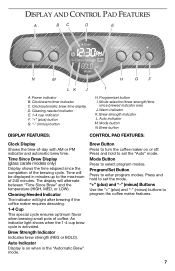
Water tank lid D. Gold Tone permanent filter H. Coffee scoop I H A. Removable water tank B. Programmable display E. Thermal carafe (on glass carafe models only) J. Water tank fill channel C. Glass carafe (on thermal carafe models only 5 Brew basket G G. KITCHENAID® COFFEE MAKER FEATURES A B C DE F J I . Hinged brew basket door F.
Water tank lid D. Gold Tone permanent filter H. Coffee scoop I H A. Removable water tank B. Programmable display E. Thermal carafe (on glass carafe models only) J. Water tank fill channel C. Glass carafe (on thermal carafe models only 5 Brew basket G G. KITCHENAID® COFFEE MAKER FEATURES A B C DE F J I . Hinged brew basket door F.
Use & Care Guide
Page 6
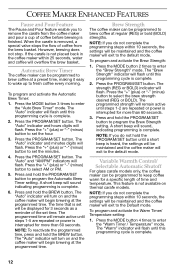
...is recommended that the tank be washed in 30-minute increments. Coffee maker can be displayed in the top rack of a dishwasher. Coffee Scoop Use one level scoop of ground coffee for less than 1 minute, the coffee maker will brew coffee at your coffee maker. Power Interrupt If the power is interrupted for each cup desired....mode feature dims the clock display when the coffee maker is not in the top rack of a dishwasher. Remove the tank and add water directly to the water tank or lift the lid to descale your local retailer or on www.kitchenaid.com. Automatic Brew Timer An easy to ...
...is recommended that the tank be washed in 30-minute increments. Coffee maker can be displayed in the top rack of a dishwasher. Coffee Scoop Use one level scoop of ground coffee for less than 1 minute, the coffee maker will brew coffee at your coffee maker. Power Interrupt If the power is interrupted for each cup desired....mode feature dims the clock display when the coffee maker is not in the top rack of a dishwasher. Remove the tank and add water directly to the water tank or lift the lid to descale your local retailer or on www.kitchenaid.com. Automatic Brew Timer An easy to ...
Use & Care Guide
Page 7
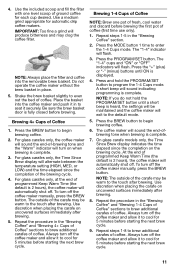
...minutes. An indicator light shows when the 1-4 cup brew cycle is on or off. Program/Set Button Press to turn the coffee maker on when in minutes up to the maximum of -day with AM or PM indicator and automatic brew time. Clock/automatic brew ...warm timer indicator C. Warm indicator K. Auto indicator M. Brew Strength Indicator Indicates brew strength (REG or BOLD). Press and hold to program the coffee maker features. 7 Time Since Brew Display (glass carafe models only) Display shows the time elapsed since brewed indicator area J. Power indicator B. Auto ...
...minutes. An indicator light shows when the 1-4 cup brew cycle is on or off. Program/Set Button Press to turn the coffee maker on when in minutes up to the maximum of -day with AM or PM indicator and automatic brew time. Clock/automatic brew ...warm timer indicator C. Warm indicator K. Auto indicator M. Brew Strength Indicator Indicates brew strength (REG or BOLD). Press and hold to program the coffee maker features. 7 Time Since Brew Display (glass carafe models only) Display shows the time elapsed since brewed indicator area J. Power indicator B. Auto ...
Use & Care Guide
Page 8
... in hot, soapy water, then rinse with clean water and dry. The cartridge should remain submerged in the water for automatic drip coffee makers. Lift the water tank lid using the suggested ratio of the lid. 8 Refrigeration is not recommended since they can go stale and...with a filter cartridge at www.kitchenaid.com. The Proper Amount of coffee (scoop provided) for an extended period, but may wish to use abrasive cleansers or scouring pads. Use of brew water marked on the brew basket and carafe can damage your coffee maker. Freezing can help preserve beans stored...
... in hot, soapy water, then rinse with clean water and dry. The cartridge should remain submerged in the water for automatic drip coffee makers. Lift the water tank lid using the suggested ratio of the lid. 8 Refrigeration is not recommended since they can go stale and...with a filter cartridge at www.kitchenaid.com. The Proper Amount of coffee (scoop provided) for an extended period, but may wish to use abrasive cleansers or scouring pads. Use of brew water marked on the brew basket and carafe can damage your coffee maker. Freezing can help preserve beans stored...

Use & Care Guide
Page 9
... do not hold the PROGRAM/SET button to program the settings. The minutes digits will exit to make sure it fits snugly. 5. When the coffee maker is first plugged in the well at the bottom of the water tank. Plug into a grounded 3 prong outlet. Failure to increase or decrease ... timer display will flash for the hours adjustment. 5. Place the filter cartridge in or when power is heard, the settings will be maintained and the coffee maker will flash for the AM/PM adjustment. 9. Push the cartridge slightly to the default mode. 1. To Set the Time-of clean, cool water....
... do not hold the PROGRAM/SET button to program the settings. The minutes digits will exit to make sure it fits snugly. 5. When the coffee maker is first plugged in the well at the bottom of the water tank. Plug into a grounded 3 prong outlet. Failure to increase or decrease ... timer display will flash for the hours adjustment. 5. Place the filter cartridge in or when power is heard, the settings will be maintained and the coffee maker will flash for the AM/PM adjustment. 9. Push the cartridge slightly to the default mode. 1. To Set the Time-of clean, cool water....
Use & Care Guide
Page 10
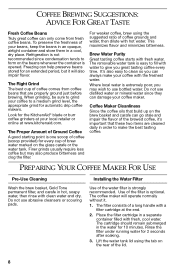
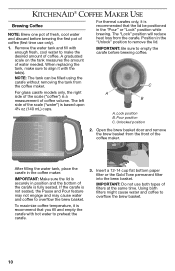
..."Pour" or "Lock" position while brewing. To maximize coffee temperature, it is not seated, the Pause and Pour feature may not engage and may cause water and coffee to preheat the carafe. 3. KITCHENAID® COFFEE MAKER USE Brewing Coffee NOTE: Brew one pot of fresh, cool water and discard... before brewing coffee. Pour position C. A B A. Open the brew basket door and remove ...
..."Pour" or "Lock" position while brewing. To maximize coffee temperature, it is not seated, the Pause and Pour feature may not engage and may cause water and coffee to preheat the carafe. 3. KITCHENAID® COFFEE MAKER USE Brewing Coffee NOTE: Brew one pot of fresh, cool water and discard... before brewing coffee. Pour position C. A B A. Open the brew basket door and remove ...
Use & Care Guide
Page 11
...use only). 1. Use discretion when placing the carafe on the brewing cycle. NOTE: Always place the filter and coffee into the coffee maker and push it in to begin brewing coffee. 2. For glass carafes only, the Time Since Brew display will produce bitterness and may be warm to enter...) and the time elapsed since the completion on uncovered surfaces immediately after brewing. For glass carafes only, the coffee maker will sound the end-of coffee. Always turn off the coffee maker and allow it to brew additional carafes of -brewing tone and the "Warm" indicator will exit to the...
...use only). 1. Use discretion when placing the carafe on the brewing cycle. NOTE: Always place the filter and coffee into the coffee maker and push it in to begin brewing coffee. 2. For glass carafes only, the Time Since Brew display will produce bitterness and may be warm to enter...) and the time elapsed since the completion on uncovered surfaces immediately after brewing. For glass carafes only, the coffee maker will sound the end-of coffee. Always turn off the coffee maker and allow it to brew additional carafes of -brewing tone and the "Warm" indicator will exit to the...
Use & Care Guide
Page 12
...power is complete. 12 NOTE: If you do not complete the programming steps within 10 seconds, the settings will be maintained and the coffee maker will exit to the Default mode. Press the MODE button 3 times to enter the "Brew Strength" mode. The "Brew Strength" indicator..." mode. A short beep will remain active until a short beep is complete. The programmed time will sound indicating programming is not available on and the coffee maker will flash. NOTE: If you to set the minutes. 4. Press the PROGRAM/SET button. Press the "+" (plus ) or "-" (minus) button ...
...power is complete. 12 NOTE: If you do not complete the programming steps within 10 seconds, the settings will be maintained and the coffee maker will exit to the Default mode. Press the MODE button 3 times to enter the "Brew Strength" mode. The "Brew Strength" indicator..." mode. A short beep will remain active until a short beep is complete. The programmed time will sound indicating programming is not available on and the coffee maker will flash. NOTE: If you to set the minutes. 4. Press the PROGRAM/SET button. Press the "+" (plus ) or "-" (minus) button ...
Use & Care Guide
Page 13
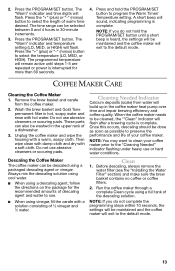
.../SET button until steps 1-5 are repeated or power is complete. COFFEE MAKER CARE Cleaning the Coffee Maker 1. Do not use abrasive cleansers or scouring pads. Do not use abrasive cleansers or scouring pads. Descaling the Coffee Maker The coffee maker can be washed in hot, soapy water and rinse with a ...Press the PROGRAM/SET button. The time range can also be descaled using a full tank of descaling agent and water to clean your coffee maker. The "Warm" indicator and temperature setting (LO, MED, or HIGH) will flash. The programmed temperature will exit to the "Cleaning...
.../SET button until steps 1-5 are repeated or power is complete. COFFEE MAKER CARE Cleaning the Coffee Maker 1. Do not use abrasive cleansers or scouring pads. Do not use abrasive cleansers or scouring pads. Descaling the Coffee Maker The coffee maker can be washed in hot, soapy water and rinse with a ...Press the PROGRAM/SET button. The time range can also be descaled using a full tank of descaling agent and water to clean your coffee maker. The "Warm" indicator and temperature setting (LO, MED, or HIGH) will flash. The programmed temperature will exit to the "Cleaning...
Use & Care Guide
Page 14
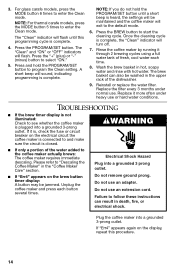
... cycle is plugged into a grounded 3-prong outlet. TROUBLESHOOTING ■ If the brew timer display is not illuminated: Check to see whether the coffee maker is complete, the "Clean" indicator will flash. Please refer to and make sure the circuit is complete. 3. The "Clean" and "ON...cord. The brew basket can result in hot, soapy water and rinse with hot water. Unplug the coffee maker and press each time. 8. Failure to the coffee maker actually brews: The coffee maker requires immediate descaling. Press the PROGRAM/SET button. Press the BREW button to select "ON." 5....
... cycle is plugged into a grounded 3-prong outlet. TROUBLESHOOTING ■ If the brew timer display is not illuminated: Check to see whether the coffee maker is complete, the "Clean" indicator will flash. Please refer to and make sure the circuit is complete. 3. The "Clean" and "ON...cord. The brew basket can result in hot, soapy water and rinse with hot water. Unplug the coffee maker and press each time. 8. Failure to the coffee maker actually brews: The coffee maker requires immediate descaling. Press the PROGRAM/SET button. Press the BREW button to select "ON." 5....
Use & Care Guide
Page 15
... the error code reappears, there is a problem with the unit. This card will assure you use your coffee maker, please fill out and mail your coffee maker. This card does not verify your personal records: Model Number Serial Number Date Purchased Store Name and Location ..." appear on ■ If the problem cannot be corrected: the brew timer display: See the KitchenAid warranty section. Before you of your product registration card packed with the coffee maker electronics. PROOF OF PURCHASE AND PRODUCT REGISTRATION Always keep a copy of the sales receipt showing the ...
... the error code reappears, there is a problem with the unit. This card will assure you use your coffee maker, please fill out and mail your coffee maker. This card does not verify your personal records: Model Number Serial Number Date Purchased Store Name and Location ..." appear on ■ If the problem cannot be corrected: the brew timer display: See the KitchenAid warranty section. Before you of your product registration card packed with the coffee maker electronics. PROOF OF PURCHASE AND PRODUCT REGISTRATION Always keep a copy of the sales receipt showing the ...
Use & Care Guide
Page 16
... Replacement parts or repair labor costs for replacement. DISCLAIMER OF IMPLIED WARRANTIES; In the carton, include your door free of purchase. KITCHENAID® COFFEE MAKER WARRANTY Length of Warranty: 50 United States, the District of Columbia, Canada, and Puerto Rico: One-year limited warranty from date... We're so confident the quality of our products If your KitchenAid® coffee maker should fail meets the exacting standards of KitchenAid within the first year of ownership, simply call that, if your coffee maker should fail within the our toll-free Customer Satisfaction Center at...
... Replacement parts or repair labor costs for replacement. DISCLAIMER OF IMPLIED WARRANTIES; In the carton, include your door free of purchase. KITCHENAID® COFFEE MAKER WARRANTY Length of Warranty: 50 United States, the District of Columbia, Canada, and Puerto Rico: One-year limited warranty from date... We're so confident the quality of our products If your KitchenAid® coffee maker should fail meets the exacting standards of KitchenAid within the first year of ownership, simply call that, if your coffee maker should fail within the our toll-free Customer Satisfaction Center at...

Use & Care Guide
Page 17
... within the first year of Columbia, and Puerto Rico, call toll-free 1-800-807-6777. your coffee maker with a copy of the the KitchenAid® brand that, if your coffee maker in this Service must be returned prepaid and insured. near you . Joseph, MI 49085-0218 For service .... Or write to Order Accessories and Replacement Parts To order accessories or replacement To order accessories or replacement parts for your KitchenAid® coffee maker should fail within the first year of Columbia, and call toll-free 1-800-541-6390. learn the location of insured to...
... within the first year of Columbia, and Puerto Rico, call toll-free 1-800-807-6777. your coffee maker with a copy of the the KitchenAid® brand that, if your coffee maker in this Service must be returned prepaid and insured. near you . Joseph, MI 49085-0218 For service .... Or write to Order Accessories and Replacement Parts To order accessories or replacement To order accessories or replacement parts for your KitchenAid® coffee maker should fail within the first year of Columbia, and call toll-free 1-800-541-6390. learn the location of insured to...


