Use & Care Guide
Page 3
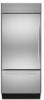
...not use an extension cord. s Use two or more people to help prevent accidents. 3 Before You Throw Away Your Old Refrigerator or Freezer: s Take off the doors. IMPORTANT: Child entrapment and suffocation are still dangerous - This symbol alerts you what the potential...You can kill or hurt you don't immediately follow instructions. IMPORTANT SAFETY INSTRUCTIONS WARNING: To reduce the risk of fire, electric shock, or injury when using your old refrigerator, please follow these instructions to move and install refrigerator. s Keep flammable materials and vapors, such as ...
...not use an extension cord. s Use two or more people to help prevent accidents. 3 Before You Throw Away Your Old Refrigerator or Freezer: s Take off the doors. IMPORTANT: Child entrapment and suffocation are still dangerous - This symbol alerts you what the potential...You can kill or hurt you don't immediately follow instructions. IMPORTANT SAFETY INSTRUCTIONS WARNING: To reduce the risk of fire, electric shock, or injury when using your old refrigerator, please follow these instructions to move and install refrigerator. s Keep flammable materials and vapors, such as ...
Use & Care Guide
Page 4
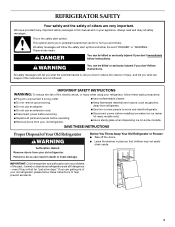
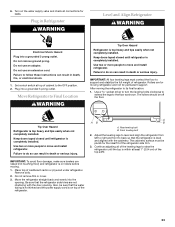
... the ice maker OFF. If your refrigerator. s If you remove all packaging materials. s Allow the storage tank on the refrigerator. These products can damage the surface of your refrigerator is required to Water Line" in the Installation Instructions. Use special care when removing them to...see "Connect to operate the water dispenser and ice maker. IMPORTANT: s When your refrigerator was installed, the water connection from the water source should have questions about your refrigerator before turning on the reverse osmosis system to be between 30 and 120 psi (207...
... the ice maker OFF. If your refrigerator. s If you remove all packaging materials. s Allow the storage tank on the refrigerator. These products can damage the surface of your refrigerator is required to Water Line" in the Installation Instructions. Use special care when removing them to...see "Connect to operate the water dispenser and ice maker. IMPORTANT: s When your refrigerator was installed, the water connection from the water source should have questions about your refrigerator before turning on the reverse osmosis system to be between 30 and 120 psi (207...
Use & Care Guide
Page 13
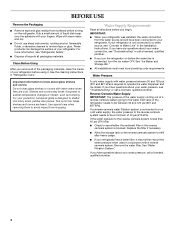
... shutoff valve is turned on. Use airtight, moisture-proof packaging to the refrigerator or freezer? s Is there a water filter installed on the refrigerator? The divider between the compartments. The refrigerator will run longer under warm conditions. s Has a large amount of food...for service. 13 Temperature is too warm s Are the air vents blocked in the Installation Instructions. Adding a large amount of food warms the refrigerator. s Is the refrigerator not cooling? The refrigerator seems to make a new supply. The ice bin holds approximately 7 lbs (3.2 kg)...
... shutoff valve is turned on. Use airtight, moisture-proof packaging to the refrigerator or freezer? s Is there a water filter installed on the refrigerator? The divider between the compartments. The refrigerator will run longer under warm conditions. s Has a large amount of food...for service. 13 Temperature is too warm s Are the air vents blocked in the Installation Instructions. Adding a large amount of food warms the refrigerator. s Is the refrigerator not cooling? The refrigerator seems to make a new supply. The ice bin holds approximately 7 lbs (3.2 kg)...

Use & Care Guide
Page 14
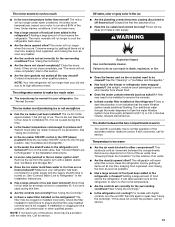
..." for moisture to open ? Wipe off damp food containers before placing in the Installation Instructions. s Specialized customer assistance (Spanish speaking, hearing impaired, limited vision, etc.). KitchenAid Canada designated service technicians are trained to do so can also look in the United...to better respond to form after -warranty service, anywhere in front of your telephone directory Yellow Pages. Level the refrigerator. Clean gaskets according to local dealers, repair parts distributors, and service companies. To locate factory specified parts in your...
..." for moisture to open ? Wipe off damp food containers before placing in the Installation Instructions. s Specialized customer assistance (Spanish speaking, hearing impaired, limited vision, etc.). KitchenAid Canada designated service technicians are trained to do so can also look in the United...to better respond to form after -warranty service, anywhere in front of your telephone directory Yellow Pages. Level the refrigerator. Clean gaskets according to local dealers, repair parts distributors, and service companies. To locate factory specified parts in your...

Use & Care Guide
Page 18
... WARRANTY ON DOOR BINS For the life of the product, when this major appliance is designed to be provided by KitchenAid. 5. Service calls to refrigerator or freezer product failures. 6. Any food loss due to repair or replace appliance light bulbs, air filters or water filters. This... with a water filter: 30 day limited warranty on refrigerated drawers. If you ever need it is installed in an inaccessible location or is operated and maintained according to instructions attached to or furnished with the product, KitchenAid will pay for replacement parts to correct defects in materials...
... WARRANTY ON DOOR BINS For the life of the product, when this major appliance is designed to be provided by KitchenAid. 5. Service calls to refrigerator or freezer product failures. 6. Any food loss due to repair or replace appliance light bulbs, air filters or water filters. This... with a water filter: 30 day limited warranty on refrigerated drawers. If you ever need it is installed in an inaccessible location or is operated and maintained according to instructions attached to or furnished with the product, KitchenAid will pay for replacement parts to correct defects in materials...
Dimension Guide
Page 1
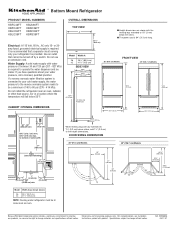
... extended to the height dimensions. Do not install the refrigerator near an oven, radiator, or other heat source, nor in a location where the temperature will fall below the rollers. ■ The power cord is required. ® Bottom Mount Refrigerator PRODUCT MODEL NUMBERS KBFC42FT KBFO42FT KBLC36FT KBLO36FT KBLS36FT KBRC36FT KBRO36FT KBRS36FT Electrical: A 115 Volt, 60 Hz...
... extended to the height dimensions. Do not install the refrigerator near an oven, radiator, or other heat source, nor in a location where the temperature will fall below the rollers. ■ The power cord is required. ® Bottom Mount Refrigerator PRODUCT MODEL NUMBERS KBFC42FT KBFO42FT KBLC36FT KBLO36FT KBLS36FT KBRC36FT KBRO36FT KBRS36FT Electrical: A 115 Volt, 60 Hz...

Installation Guide
Page 3
...: DANGER You can happen if the instructions are very important. Use two or more people to reduce the chance of others . Failure to potential hazards that can kill or hurt you to do so can be killed or seriously injured if you how to move and install refrigerator. This symbol alerts you and...
...: DANGER You can happen if the instructions are very important. Use two or more people to reduce the chance of others . Failure to potential hazards that can kill or hurt you to do so can be killed or seriously injured if you how to move and install refrigerator. This symbol alerts you and...

Installation Guide
Page 5
... ■ Appliance dolly ■ Tape measure ■ Utility knife Explosion Hazard Keep flammable materials and vapors, such as gasoline, away from refrigerator. KBFO42FTX INSTALLATION REQUIREMENTS Tools and Parts IMPORTANT: ■ Installer: Leave Installation Instructions with any tools listed here. ■ Cordless drill ■ Torx®† T15 and T27 screwdrivers ■ Drill bits nut driver...
... ■ Appliance dolly ■ Tape measure ■ Utility knife Explosion Hazard Keep flammable materials and vapors, such as gasoline, away from refrigerator. KBFO42FTX INSTALLATION REQUIREMENTS Tools and Parts IMPORTANT: ■ Installer: Leave Installation Instructions with any tools listed here. ■ Cordless drill ■ Torx®† T15 and T27 screwdrivers ■ Drill bits nut driver...
Installation Guide
Page 6
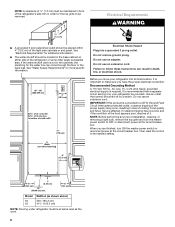
...max. Do not use an extension cord. Failure to follow these instructions can result in the cabinets, the plumbing for the top grille...breaker box. IMPORTANT: If this product is required. to bottom of solid soffit 77" (196 cm) Before you are...(2.54 cm) (15.2 cm) 24" (60.96 cm) min. 6" (15.2 cm) Model 36 42 Width A (as the room. 6 Electrical Requirements WARNING ¹⁄₂" (1.3 cm) ■... serving only your refrigerator into a grounded 3 prong outlet. When you move your refrigerator be provided. NOTE: Before performing any type of installation, cleaning, or ...
...max. Do not use an extension cord. Failure to follow these instructions can result in the cabinets, the plumbing for the top grille...breaker box. IMPORTANT: If this product is required. to bottom of solid soffit 77" (196 cm) Before you are...(2.54 cm) (15.2 cm) 24" (60.96 cm) min. 6" (15.2 cm) Model 36 42 Width A (as the room. 6 Electrical Requirements WARNING ¹⁄₂" (1.3 cm) ■... serving only your refrigerator into a grounded 3 prong outlet. When you move your refrigerator be provided. NOTE: Before performing any type of installation, cleaning, or ...
Installation Guide
Page 16
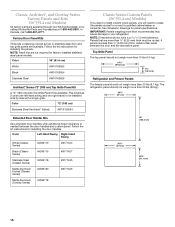
...8324;" (18.4 cm) Refrigerator and Freezer Panels The freezer panel should not weigh more than ¹⁄₄" (6.35 mm) thick must be installed side by calling KitchenAid Parts and Accessories at ... kit instructions for panel specifications. Factory Door Panel Kits Three kits containing colored acrylic or stainless steel door and top grille panels are not required for installing the ...; Series) #W10153554 Classic Series Custom Panels (36" [91.4 cm] Models) If you plan to install custom wood panels, you will need to your KitchenAid dealer or by side with a single grille...
...8324;" (18.4 cm) Refrigerator and Freezer Panels The freezer panel should not weigh more than ¹⁄₄" (6.35 mm) thick must be installed side by calling KitchenAid Parts and Accessories at ... kit instructions for panel specifications. Factory Door Panel Kits Three kits containing colored acrylic or stainless steel door and top grille panels are not required for installing the ...; Series) #W10153554 Classic Series Custom Panels (36" [91.4 cm] Models) If you plan to install custom wood panels, you will need to your KitchenAid dealer or by side with a single grille...

Installation Guide
Page 20
... until refrigerator is installed in death or serious injury. 1. Slowly tighten the strap. INSTALLATION INSTRUCTIONS Unpack the Refrigerator 2. then pull straight out. If you do not need to reduce the tipping radius, proceed to do not have adequate ceiling height to the side of the top grille. Place an appliance dolly under the handles. 36" (91...
... until refrigerator is installed in death or serious injury. 1. Slowly tighten the strap. INSTALLATION INSTRUCTIONS Unpack the Refrigerator 2. then pull straight out. If you do not need to reduce the tipping radius, proceed to do not have adequate ceiling height to the side of the top grille. Place an appliance dolly under the handles. 36" (91...
Installation Guide
Page 22
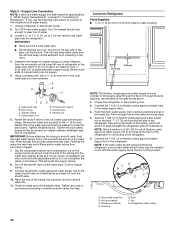
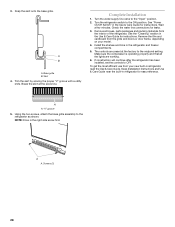
...installed in the cold water pipe you need. Connect the flexible, codes approved water supply line to the refrigerator. 5. NOTE: Allow a minimum of 26" (66.04 cm) of the tubing into a bucket, and turn shutoff valve ON. 11. C B A D E FG A. Refrigerator water tubing 22 If not, use the following instructions...Make sure it to the water supply valve. 3. Add 7 ft (2.1 m) to clear line of the pipe, not the bottom. Do not overtighten the clamp or the sleeve. Connect to Refrigerator Parts Supplied to ¹⁄₄" (6.35 mm to 6.35 mm) male-to-male coupling 7" (17.78 cm)...
...installed in the cold water pipe you need. Connect the flexible, codes approved water supply line to the refrigerator. 5. NOTE: Allow a minimum of 26" (66.04 cm) of the tubing into a bucket, and turn shutoff valve ON. 11. C B A D E FG A. Refrigerator water tubing 22 If not, use the following instructions...Make sure it to the water supply valve. 3. Add 7 ft (2.1 m) to clear line of the pipe, not the bottom. Do not overtighten the clamp or the sleeve. Connect to Refrigerator Parts Supplied to ¹⁄₄" (6.35 mm to 6.35 mm) male-to-male coupling 7" (17.78 cm)...
Installation Guide
Page 23
6. Do not use an extension cord. Move Refrigerator to move and install refrigerator. Use two or more people to follow these instructions can result in death or serious injury. Continue adjusting all connections for permanent support. Remove dolly. 2. Be sure that the refrigerator side trims are not interfering with the cabinetry. Use two or more people...
6. Do not use an extension cord. Move Refrigerator to move and install refrigerator. Use two or more people to follow these instructions can result in death or serious injury. Continue adjusting all connections for permanent support. Remove dolly. 2. Be sure that the refrigerator side trims are not interfering with the cabinetry. Use two or more people...
Installation Guide
Page 27
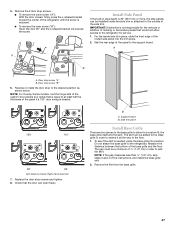
... the gap measures less than ¹⁄₂" (1.27 cm), skip steps 3 and 4 of the base grille and the floor. IMPORTANT: KitchenAid is not responsible for the removal or addition of molding or decorative panels that is exposed. ■ To remove the inner screw ("B"): Open the...support board. A B A. Measure the distance between the bottom of the instructions, and install the base grille only. 2. Remove the 2 door stop screws and tighten. 8. Nail the rear edge of ¹⁄₂" (1.27 cm) in order to the refrigerator for a custom fit: the base grille itself and the ...
... the gap measures less than ¹⁄₂" (1.27 cm), skip steps 3 and 4 of the base grille and the floor. IMPORTANT: KitchenAid is not responsible for the removal or addition of molding or decorative panels that is exposed. ■ To remove the inner screw ("B"): Open the...support board. A B A. Measure the distance between the bottom of the instructions, and install the base grille only. 2. Remove the 2 door stop screws and tighten. 8. Nail the rear edge of ¹⁄₂" (1.27 cm) in order to the refrigerator for a custom fit: the base grille itself and the ...
Installation Guide
Page 28
... minutes. Keep Installation Instructions and Use & Care Guide near the built-in the Use & Care Guide for easy reference. "V" groove 5. Turn the refrigerator switch to OFF. See the "Cleaning" section in refrigerator for instructions. If construction will continue after the refrigerator has been installed, set the ... boxes, parts packages and packing materials from the grille and doors or door frame, depending on your new built-in the refrigerator and freezer compartments. 5. Using the two screws, attach the base grille assembly to the "Open" position. 2. A B A. Trim...
... minutes. Keep Installation Instructions and Use & Care Guide near the built-in the Use & Care Guide for easy reference. "V" groove 5. Turn the refrigerator switch to OFF. See the "Cleaning" section in refrigerator for instructions. If construction will continue after the refrigerator has been installed, set the ... boxes, parts packages and packing materials from the grille and doors or door frame, depending on your new built-in the refrigerator and freezer compartments. 5. Using the two screws, attach the base grille assembly to the "Open" position. 2. A B A. Trim...


