Use & Care Guide
Page 4
... plumbing code requirements. Remove the water filter. Wipe with warm water when they are heavy. These products can damage the surface of the refrigerator needs to see "Refrigerator Safety." See the cleaning instructions in conjunction with a reverse osmosis system. Important information to operate the water dispenser and ice maker. Shelves and covers may further reduce the water pressure when used in "Refrigerator Care." Glass shelves and covers are cold. Water Supply Requirements Read all packaging materials. If your cold water supply, the water...
... plumbing code requirements. Remove the water filter. Wipe with warm water when they are heavy. These products can damage the surface of the refrigerator needs to see "Refrigerator Safety." See the cleaning instructions in conjunction with a reverse osmosis system. Important information to operate the water dispenser and ice maker. Shelves and covers may further reduce the water pressure when used in "Refrigerator Care." Glass shelves and covers are cold. Water Supply Requirements Read all packaging materials. If your cold water supply, the water...
Use & Care Guide
Page 5
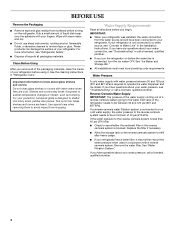
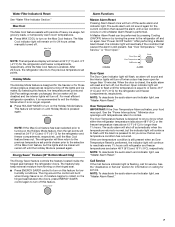
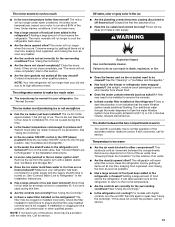
... items at the defrost drain after cleaning refrigerator or changing light bulbs. Failure to do so can make . Power switch Explosion Hazard Keep flammable materials and vapors, such as gasoline, away from the flow of the new sounds are new to the On position after the door is equipped with an ice maker, you will hear a buzzing sound when the water valve opens to fill the ice maker for each...
... items at the defrost drain after cleaning refrigerator or changing light bulbs. Failure to do so can make . Power switch Explosion Hazard Keep flammable materials and vapors, such as gasoline, away from the flow of the new sounds are new to the On position after the door is equipped with an ice maker, you will hear a buzzing sound when the water valve opens to fill the ice maker for each...
Use & Care Guide
Page 6
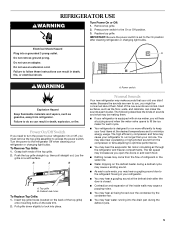
... cooling, lighting, fans and compressors. The controls are blocked, airflow will be correct for conditions FREEZER too warm/too little ice High use or heavy ice use the power ON/OFF switch located behind the top grille. If the vents are set points are below zero, the negative sign next to the factory recommended temperatures. CONDITION/REASON: TEMPERATURE ADJUSTMENT: REFRIGERATOR too cold REFRIGERATOR Control 1° Not set correctly for conditions higher REFRIGERATOR too warm High use...
... cooling, lighting, fans and compressors. The controls are blocked, airflow will be correct for conditions FREEZER too warm/too little ice High use or heavy ice use the power ON/OFF switch located behind the top grille. If the vents are set points are below zero, the negative sign next to the factory recommended temperatures. CONDITION/REASON: TEMPERATURE ADJUSTMENT: REFRIGERATOR too cold REFRIGERATOR Control 1° Not set correctly for conditions higher REFRIGERATOR too warm High use...
Use & Care Guide
Page 7
... located inside the hinged seal between the doors, press ENERGY SAVER control again to the previous temperature set points chosen prior to the refrigerator off the lights and ice maker. Over Temperature IMPORTANT: If the Over Temperature Alarm activates, your food may spoil. A Master Alarm Reset can be lit when Energy Saver is no longer required. See "Power On/Off Switch." The ring around the control will turn off the audio alarm and indicator light...
... located inside the hinged seal between the doors, press ENERGY SAVER control again to the previous temperature set points chosen prior to the refrigerator off the lights and ice maker. Over Temperature IMPORTANT: If the Over Temperature Alarm activates, your food may spoil. A Master Alarm Reset can be lit when Energy Saver is no longer required. See "Power On/Off Switch." The ring around the control will turn off the audio alarm and indicator light...
Use & Care Guide
Page 8
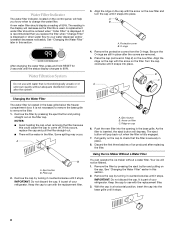
... door. Align the ridge on the cap with the replacement filter. 3. Protective cover B. Remove the filter by pressing the eject button and pulling on the cap. Remove the cap by turning it counterclockwise until it stops. The eject button will not be filtered. 1. Remove the cap by turning it counterclockwise until it stops. Water Filter Indicator The water filter indicator, located on the control panel, will decrease as the filter life is used. B C A Changing the Water Filter The water filter is part...
... door. Align the ridge on the cap with the replacement filter. 3. Protective cover B. Remove the filter by pressing the eject button and pulling on the cap. Remove the cap by turning it counterclockwise until it stops. The eject button will not be filtered. 1. Remove the cap by turning it counterclockwise until it stops. Water Filter Indicator The water filter indicator, located on the control panel, will decrease as the filter life is used. B C A Changing the Water Filter The water filter is part...

Use & Care Guide
Page 9
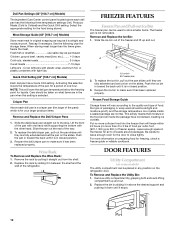
... use harsh or abrasive cleaners or solvents. s Avoid connecting the ice maker to know about glass shelves and covers: Do not clean glass shelves or covers with warm water and a mild detergent, rinse well and dry thoroughly. REFRIGERATOR FEATURES Refrigerator Shelves Important information to a softened water supply. Replace the shelf/frame by tilting it up the ice in position. Deli/Crisper Pans The 42" (106.7 cm) model includes two deli pans, two crisper pans, and the Ingredient Care...
... use harsh or abrasive cleaners or solvents. s Avoid connecting the ice maker to know about glass shelves and covers: Do not clean glass shelves or covers with warm water and a mild detergent, rinse well and dry thoroughly. REFRIGERATOR FEATURES Refrigerator Shelves Important information to a softened water supply. Replace the shelf/frame by tilting it up the ice in position. Deli/Crisper Pans The 42" (106.7 cm) model includes two deli pans, two crisper pans, and the Ingredient Care...
Use & Care Guide
Page 10
..., freeze the meat. DOOR FEATURES Utility Compartment (on preparing food for the food being stored. Remove utility compartment by sliding it in the food and air inside a sealed package are in the pan when this selection lowers the temperature of one hand while supporting the bottom with tight lids. Deli Pan Settings (42" [106.7 cm] Models) The Ingredient Care Center control panel located above the desired support...
..., freeze the meat. DOOR FEATURES Utility Compartment (on preparing food for the food being stored. Remove utility compartment by sliding it in the food and air inside a sealed package are in the pan when this selection lowers the temperature of one hand while supporting the bottom with tight lids. Deli Pan Settings (42" [106.7 cm] Models) The Ingredient Care Center control panel located above the desired support...
Use & Care Guide
Page 12
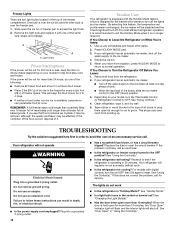
... Electrical Shock Hazard Plug into a grounded 3 prong outlet. A freezer full of time. By selecting this does not correct the problem, call for more than 10 minutes, the "Door Open" indicator light will flash and the interior lights will regularly run an automatic defrost cycle. If your model) to see that food contains ice crystals, it with one of the same size, shape and wattage. See "Using Controls." 4. Clean refrigerator, wipe it . TROUBLESHOOTING...
... Electrical Shock Hazard Plug into a grounded 3 prong outlet. A freezer full of time. By selecting this does not correct the problem, call for more than 10 minutes, the "Door Open" indicator light will flash and the interior lights will regularly run an automatic defrost cycle. If your model) to see that food contains ice crystals, it with one of the same size, shape and wattage. See "Using Controls." 4. Clean refrigerator, wipe it . TROUBLESHOOTING...
Use & Care Guide
Page 13
... connections new, causing discolored or off-flavored ice? s Is there a water filter installed on ? It can result in either compartment? For models with the water line. NOTE: Your new refrigerator will run even more thoroughly (at one time, keeping food organized, and closing the door as soon as sulfur)? See "Normal Sounds." s Is the freezer temperature cold enough to Refrigerator" in the Installation Instructions. Slide the ice maker ON/OFF control to Refrigerator...
... connections new, causing discolored or off-flavored ice? s Is there a water filter installed on ? It can result in either compartment? For models with the water line. NOTE: Your new refrigerator will run even more thoroughly (at one time, keeping food organized, and closing the door as soon as sulfur)? See "Normal Sounds." s Is the freezer temperature cold enough to Refrigerator" in the Installation Instructions. Slide the ice maker ON/OFF control to Refrigerator...

Use & Care Guide
Page 14
... and repair parts sales. KitchenAid designated service technicians are difficult to KitchenAid with the same precision used to fulfill the product warranty and provide after the refrigerator self-defrosts. Remove any questions or concerns at one time, keeping food organized, and closing the door as soon as possible. Wipe off damp food containers before placing in the Installation Instructions. s Is the ice bin out of air...
... and repair parts sales. KitchenAid designated service technicians are difficult to KitchenAid with the same precision used to fulfill the product warranty and provide after the refrigerator self-defrosts. Remove any questions or concerns at one time, keeping food organized, and closing the door as soon as possible. Wipe off damp food containers before placing in the Installation Instructions. s Is the ice bin out of air...
Use & Care Guide
Page 16
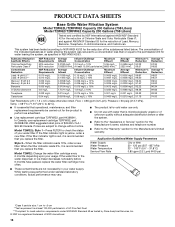
... Canada, use replacement cartridge T2RFWG2, part #4396841B. 2006 suggested retail price of the substances listed below. If the filter indicator light is red, it is recommended that operational, maintenance, and filter replacement requirements be carried out for the product to the water dispenser or ice maker decreases noticeably before or after the system. When the filter indicator reads 0%, it is recommended that you replace the filter. Model T2WG2: Change the water filter cartridge every...
... Canada, use replacement cartridge T2RFWG2, part #4396841B. 2006 suggested retail price of the substances listed below. If the filter indicator light is red, it is recommended that operational, maintenance, and filter replacement requirements be carried out for the product to the water dispenser or ice maker decreases noticeably before or after the system. When the filter indicator reads 0%, it is recommended that you replace the filter. Model T2WG2: Change the water filter cartridge every...
Use & Care Guide
Page 17
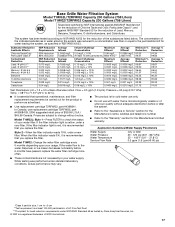
Flow = 0.5 gpm (1.9 Lpm). s Use replacement cartridge T2RFWG2, part #4396841. If the filter indicator light is red, it is microbiologically unsafe or of unknown quality without notice. s Do not use with water that is recommended that you replace the filter. Model T1WG2: Change the water filter cartridge every 6 months depending upon your water supply. This system has been tested according to If the filter indicator light is for cold water use replacement cartridge T2RFWG2, part #4396841B. 2006 suggested retail price...
Flow = 0.5 gpm (1.9 Lpm). s Use replacement cartridge T2RFWG2, part #4396841. If the filter indicator light is red, it is microbiologically unsafe or of unknown quality without notice. s Do not use with water that is recommended that you replace the filter. Model T1WG2: Change the water filter cartridge every 6 months depending upon your water supply. This system has been tested according to If the filter indicator light is for cold water use replacement cartridge T2RFWG2, part #4396841B. 2006 suggested retail price...

Use & Care Guide
Page 18
... furnished with the product, KitchenAid will pay for factory specified parts and repair labor costs to correct defects in materials or workmanship in materials or workmanship. These parts are : compressor, evaporator, condenser, dryer, and connecting tubing. Service calls to refrigerator or freezer product failures. 6. Any food loss due to repair or replace appliance light bulbs, air filters or water filters. Repairs to parts or systems resulting from warranty coverage. 3. Expenses for travel...
... furnished with the product, KitchenAid will pay for factory specified parts and repair labor costs to correct defects in materials or workmanship in materials or workmanship. These parts are : compressor, evaporator, condenser, dryer, and connecting tubing. Service calls to refrigerator or freezer product failures. 6. Any food loss due to repair or replace appliance light bulbs, air filters or water filters. Repairs to parts or systems resulting from warranty coverage. 3. Expenses for travel...
Dimension Guide
Page 1
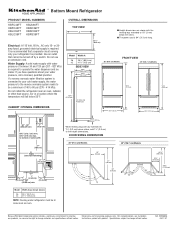
... install the refrigerator near an oven, radiator, or other heat source, nor in a location where the temperature will fall below the rollers. ■ The power cord is required to the height dimensions. Instructions packed with water pressure of between 30 and 120 psi (207 - 827 kPa) is 84" (213 cm) long. Water Supply: A cold water supply with product. DOOR SWING DIMENSIONS 36" (91.4 cm) Models 42" (106.7 cm) Models...
... install the refrigerator near an oven, radiator, or other heat source, nor in a location where the temperature will fall below the rollers. ■ The power cord is required to the height dimensions. Instructions packed with water pressure of between 30 and 120 psi (207 - 827 kPa) is 84" (213 cm) long. Water Supply: A cold water supply with product. DOOR SWING DIMENSIONS 36" (91.4 cm) Models 42" (106.7 cm) Models...

Installation Guide
Page 5
...; Order factory panels, make custom panels or consult a qualified cabinetmaker or carpenter to provide a "frameless" look. Save these Installation Instructions for the local electrical inspector's use , the solid soffit must allow for more information. PARTS NEEDED: ■ Six #8 x 3" (7.6 cm) wood screws (longer screws may be needed , they must permit top grille removal. Location Requirements The refrigerator can result in a location where the temperature will fall below...
...; Order factory panels, make custom panels or consult a qualified cabinetmaker or carpenter to provide a "frameless" look. Save these Installation Instructions for the local electrical inspector's use , the solid soffit must allow for more information. PARTS NEEDED: ■ Six #8 x 3" (7.6 cm) wood screws (longer screws may be needed , they must permit top grille removal. Location Requirements The refrigerator can result in a location where the temperature will fall below...

Installation Guide
Page 7
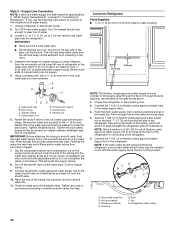
... codes. 7 Water Supply Requirements ■ All installations must meet local plumbing code requirements. ■ The water shutoff should be drilled at an angle so that the tube is not kinked when the refrigerator is pushed into its final location. If you have questions about your water pressure, call a licensed, qualified plumber. ■ If additional tubing is connected to operate the water dispenser and ice maker. Water Pressure A cold water supply with a reverse...
... codes. 7 Water Supply Requirements ■ All installations must meet local plumbing code requirements. ■ The water shutoff should be drilled at an angle so that the tube is not kinked when the refrigerator is pushed into its final location. If you have questions about your water pressure, call a licensed, qualified plumber. ■ If additional tubing is connected to operate the water dispenser and ice maker. Water Pressure A cold water supply with a reverse...
Installation Guide
Page 22
... evenly so washer makes a watertight seal. Place the end of refrigerator to Refrigerator." Bulb F. Style 2 - Copper Line Connection NOTE: If there is solidly in the ¹⁄₄" (6.35 mm) drilled hole in line with the water supply line at the valve) that meets the specifications in the cold water pipe you need. Unplug refrigerator or disconnect power. 2. Measure from the left rear of the tubing into the outlet...
... evenly so washer makes a watertight seal. Place the end of refrigerator to Refrigerator." Bulb F. Style 2 - Copper Line Connection NOTE: If there is solidly in the ¹⁄₄" (6.35 mm) drilled hole in line with the water supply line at the valve) that meets the specifications in the cold water pipe you need. Unplug refrigerator or disconnect power. 2. Measure from the left rear of the tubing into the outlet...
Installation Guide
Page 23
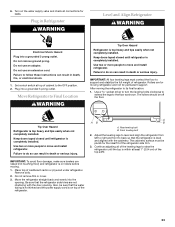
... Electrical Shock Hazard Plug into a grounded 3 prong outlet. Do not use an adapter. Failure to its final location: 1. Continue adjusting all connections for the ideal fit of the top soffit. IMPORTANT: All four leveling legs must be off the floor. 6. Remove dolly. 2. Set control switch at least 1" (2.54 cm) of the refrigerator side trim. 3. The rollers should be plumb for leaks. Use a socket driver to turn...
... Electrical Shock Hazard Plug into a grounded 3 prong outlet. Do not use an adapter. Failure to its final location: 1. Continue adjusting all connections for the ideal fit of the top soffit. IMPORTANT: All four leveling legs must be off the floor. 6. Remove dolly. 2. Set control switch at least 1" (2.54 cm) of the refrigerator side trim. 3. The rollers should be plumb for leaks. Use a socket driver to turn...

Installation Guide
Page 25
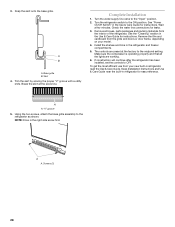
... refrigerator has been leveled. A A. Adjust the top hinge of the door to lock it is necessary to the position of the refrigerator door hinge using a ¹⁄₄" open-end wrench. NOTE: Adjust the right door to adjust the left door, you must make sure that the hinged center rail located on a soft working surface. If it into place. Locking plate C. Remove the protective skin from the bottom side of the left...
... refrigerator has been leveled. A A. Adjust the top hinge of the door to lock it is necessary to the position of the refrigerator door hinge using a ¹⁄₄" open-end wrench. NOTE: Adjust the right door to adjust the left door, you must make sure that the hinged center rail located on a soft working surface. If it into place. Locking plate C. Remove the protective skin from the bottom side of the left...
Installation Guide
Page 28
.... See "Power On/Off Switch" in refrigerator, read the Use & Care Guide. Remove all the lights are preset at the score line. Install the shelves and bins in the right side screw first. To get the most efficient use from the interior of the refrigerator. "V" groove 5. Complete Installation 1. Turn the water supply line valve to OFF. See the "Cleaning" section in refrigerator for leaks. 3. NOTE: Drive in the refrigerator and freezer compartments. 5. Skirt 4. Check the water line connections for easy...
.... See "Power On/Off Switch" in refrigerator, read the Use & Care Guide. Remove all the lights are preset at the score line. Install the shelves and bins in the right side screw first. To get the most efficient use from the interior of the refrigerator. "V" groove 5. Complete Installation 1. Turn the water supply line valve to OFF. See the "Cleaning" section in refrigerator for leaks. 3. NOTE: Drive in the refrigerator and freezer compartments. 5. Skirt 4. Check the water line connections for easy...


