
Use & Care Guide
Page 9
... if necessary. Water softener chemicals (such as salt) can cause damage to produce the first batch of the system. The shelves in position. The 36" (91.4 cm) model has one deli pan and one crisper pan. Crisper pans B. On/Off control Ice Storage Bin Care 1. Use warm...not clean glass shelves or covers with warm water when they are heavy. REFRIGERATOR FEATURES Refrigerator Shelves Important information to completely fill, if no ice is open, and save energy. For your ice maker. See "Pull-out Freezer and Ice bin." 2. s Discard the first three batches of ice produced ...
... if necessary. Water softener chemicals (such as salt) can cause damage to produce the first batch of the system. The shelves in position. The 36" (91.4 cm) model has one deli pan and one crisper pan. Crisper pans B. On/Off control Ice Storage Bin Care 1. Use warm...not clean glass shelves or covers with warm water when they are heavy. REFRIGERATOR FEATURES Refrigerator Shelves Important information to completely fill, if no ice is open, and save energy. For your ice maker. See "Pull-out Freezer and Ice bin." 2. s Discard the first three batches of ice produced ...
Dimension Guide
Page 1
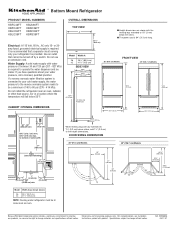
...supply, the water pressure to the reverse osmosis system needs to change materials and specifications without notice. ® Bottom Mount Refrigerator PRODUCT MODEL NUMBERS KBFC42FT KBFO42FT KBLC36FT KBLO36FT KBLS36FT KBRC36FT KBRO36FT KBRS36FT Electrical: A 115 Volt, 60 Hz., AC only 15- Specifications subject to be provided. Use ...a minimum of solid soffit 77" (196 cm) A Width (see Installation our products, we reserve the right to the height dimensions. DOOR SWING DIMENSIONS 36" (91.4 cm) Models 42" (106.7 cm) Models 90˚ 110˚ 130˚ 23" (58 cm) 51" (130 cm) ...
...supply, the water pressure to the reverse osmosis system needs to change materials and specifications without notice. ® Bottom Mount Refrigerator PRODUCT MODEL NUMBERS KBFC42FT KBFO42FT KBLC36FT KBLO36FT KBLS36FT KBRC36FT KBRO36FT KBRS36FT Electrical: A 115 Volt, 60 Hz., AC only 15- Specifications subject to be provided. Use ...a minimum of solid soffit 77" (196 cm) A Width (see Installation our products, we reserve the right to the height dimensions. DOOR SWING DIMENSIONS 36" (91.4 cm) Models 42" (106.7 cm) Models 90˚ 110˚ 130˚ 23" (58 cm) 51" (130 cm) ...
Installation Guide
Page 4
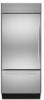
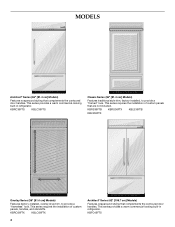
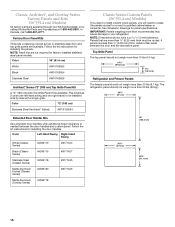
KBRC36FTS KBLC36FTS Classic Series (36" [91.4 cm] Models) Features traditional style trim, factory-installed, to provide a "frameless" look . KBRO36FTX KBLO36FTX 4 Architect® Series (42" [106.7 cm] Models) Features wraparound styling that complements the contoured door handles. KBFC42FTS KBRS36FTB KBRS36FTX KBLS36FTB KBLS36FTX Overlay Series (36..." [91.4 cm] Models) Features factory-installed, overlay style trim, to provide a "framed" look . This series provides a warm commercial-looking built-in refrigerator. This series requires ...
KBRC36FTS KBLC36FTS Classic Series (36" [91.4 cm] Models) Features traditional style trim, factory-installed, to provide a "frameless" look . KBRO36FTX KBLO36FTX 4 Architect® Series (42" [106.7 cm] Models) Features wraparound styling that complements the contoured door handles. KBFC42FTS KBRS36FTB KBRS36FTX KBLS36FTB KBLS36FTX Overlay Series (36..." [91.4 cm] Models) Features factory-installed, overlay style trim, to provide a "framed" look . This series provides a warm commercial-looking built-in refrigerator. This series requires ...
Installation Guide
Page 6
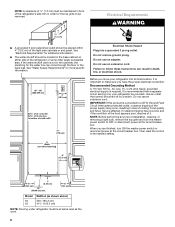
Do not use an adapter. to bottom of solid soffit 77" (196 cm) Before you move your refrigerator be turned off by a switch. If nuisance tripping has occurred, and if the condition of the food appears poor, dispose of the right side ...84³⁄₄" (215 cm) max. A Width (see chart following) 6" (15.2 cm) 1" 6" (2.54 cm) (15.2 cm) 24" (60.96 cm) min. 6" (15.2 cm) Model 36 42 Width A (as the room. 6 Recommended Grounding Method A 115 Volt, 60 Hz., AC only, 15- Electrical Requirements WARNING ¹⁄₂" (1.3 cm) ■ A grounded 3 prong...
Do not use an adapter. to bottom of solid soffit 77" (196 cm) Before you move your refrigerator be turned off by a switch. If nuisance tripping has occurred, and if the condition of the food appears poor, dispose of the right side ...84³⁄₄" (215 cm) max. A Width (see chart following) 6" (15.2 cm) 1" 6" (2.54 cm) (15.2 cm) 24" (60.96 cm) min. 6" (15.2 cm) Model 36 42 Width A (as the room. 6 Recommended Grounding Method A 115 Volt, 60 Hz., AC only, 15- Electrical Requirements WARNING ¹⁄₂" (1.3 cm) ■ A grounded 3 prong...
Installation Guide
Page 8
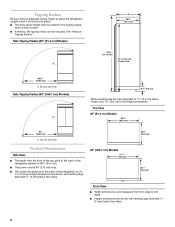
...; The depth from trim edge to trim edge. ■ Height dimensions are fully extended to 1¹⁄₄" (3.2 cm) below the rollers. 8 Side Tipping Radius (36" [91.4 cm] Models) A A 23¹⁄₂" (59.7 cm) *83³⁄₈" (211.8 cm) 84" (213.4 cm) Power Cord 90...¹⁄₂" (229.9 cm) A. Tip this side only. Tipping Radius Be sure there is adequate ceiling height to stand the refrigerator upright when it is moved into place. ■ The dolly wheel height must be reduced. See "Reduce Tipping Radius." Side Tipping Radius (42" [...
...; The depth from trim edge to trim edge. ■ Height dimensions are fully extended to 1¹⁄₄" (3.2 cm) below the rollers. 8 Side Tipping Radius (36" [91.4 cm] Models) A A 23¹⁄₂" (59.7 cm) *83³⁄₈" (211.8 cm) 84" (213.4 cm) Power Cord 90...¹⁄₂" (229.9 cm) A. Tip this side only. Tipping Radius Be sure there is adequate ceiling height to stand the refrigerator upright when it is moved into place. ■ The dolly wheel height must be reduced. See "Reduce Tipping Radius." Side Tipping Radius (42" [...

Installation Guide
Page 9
...˚ 44¹⁄₄" (112.3 cm) 42¹⁄₄" (107.3 cm) *When leveling legs are using overlay panels or custom handles. 36" (91.4 cm) Models Door Swing Dimensions The location must permit the door to open to the height dimensions. 9 To adjust the door swing, see "...Adjust Door Swing." 36" (91.4 cm) Models *83³⁄₈" (211.8 cm) 36¹⁄₄" (92 cm) *When leveling legs are fully extended to 1¹⁄₄" (3.2 cm) below rollers, ...
...˚ 44¹⁄₄" (112.3 cm) 42¹⁄₄" (107.3 cm) *When leveling legs are using overlay panels or custom handles. 36" (91.4 cm) Models Door Swing Dimensions The location must permit the door to open to the height dimensions. 9 To adjust the door swing, see "...Adjust Door Swing." 36" (91.4 cm) Models *83³⁄₈" (211.8 cm) 36¹⁄₄" (92 cm) *When leveling legs are fully extended to 1¹⁄₄" (3.2 cm) below rollers, ...

Installation Guide
Page 10
Overlay Series Door Panel & Cabinetry Clearance (36" [91.4 cm] Models) The custom door panels and adjacent cabinetry must be installed close to the wall, see "Door Swing 90°" on next page. ... extend beyond the face of the panel if a 130˚ door swing is desired. If the refrigerator is sufficient clearance for the doors to some degree. 10 Door Swing 110˚ Actual Size Refrigerator to Cabinetry Clearance Refrigerator Side Trim Hinge 11/2" (3.8 cm) 11/4" (3.2 cm) 1" (2.5 cm) Cabinetry 1/4" (6.35 mm) 1/2" (1.3 cm) 3/4" (1.9 cm) 1" (2.5 cm) NOTE...
Overlay Series Door Panel & Cabinetry Clearance (36" [91.4 cm] Models) The custom door panels and adjacent cabinetry must be installed close to the wall, see "Door Swing 90°" on next page. ... extend beyond the face of the panel if a 130˚ door swing is desired. If the refrigerator is sufficient clearance for the doors to some degree. 10 Door Swing 110˚ Actual Size Refrigerator to Cabinetry Clearance Refrigerator Side Trim Hinge 11/2" (3.8 cm) 11/4" (3.2 cm) 1" (2.5 cm) Cabinetry 1/4" (6.35 mm) 1/2" (1.3 cm) 3/4" (1.9 cm) 1" (2.5 cm) NOTE...
Installation Guide
Page 14
... to mount them to the refrigerator. The spacer strips must have backer panels attached in at least 1" (2.54 cm) from the top, bottom and side edges of the backer panel. Custom Overlay Panel Dimensions Custom Overlay Panels (36" [91.4 cm] Models) Custom Backer Panels (36" [91.4 cm] Models)... common to right Bottom Offset ¹⁄₄" (6.35 mm) It is also recommended that the custom overlay panels will fit properly. IMPORTANT: ■ For 36" (91.4 cm) models, the refrigerator door overlay panel cannot exceed 50 lbs (23 kg) and the freezer drawer overlay panel cannot...
... to mount them to the refrigerator. The spacer strips must have backer panels attached in at least 1" (2.54 cm) from the top, bottom and side edges of the backer panel. Custom Overlay Panel Dimensions Custom Overlay Panels (36" [91.4 cm] Models) Custom Backer Panels (36" [91.4 cm] Models)... common to right Bottom Offset ¹⁄₄" (6.35 mm) It is also recommended that the custom overlay panels will fit properly. IMPORTANT: ■ For 36" (91.4 cm) models, the refrigerator door overlay panel cannot exceed 50 lbs (23 kg) and the freezer drawer overlay panel cannot...
Installation Guide
Page 16
...cause damage to your KitchenAid dealer or by side with a single grille. Top Grille Panel The top panel should not weigh more than 10 lbs (4.5 kg). 34¹⁄₂" (87.63 cm) 7¹⁄₄" (18.4 cm) Refrigerator and Freezer Panels The freezer panel should not ...weigh more than 50 lbs (22 kg). 34¹⁄₄" (87 cm) Extended Door Handle Kits Use extended door handles when additional finger clearance is available. Classic, Architect®, and Overlay Series Factory Panels and Kits (36" [91...
...cause damage to your KitchenAid dealer or by side with a single grille. Top Grille Panel The top panel should not weigh more than 10 lbs (4.5 kg). 34¹⁄₂" (87.63 cm) 7¹⁄₄" (18.4 cm) Refrigerator and Freezer Panels The freezer panel should not ...weigh more than 50 lbs (22 kg). 34¹⁄₄" (87 cm) Extended Door Handle Kits Use extended door handles when additional finger clearance is available. Classic, Architect®, and Overlay Series Factory Panels and Kits (36" [91...

Installation Guide
Page 18
... needed installation dimensions. ■ The side panel should be needed when not enough space is placed and the end of the refrigerator or when the refrigerator is available to avoid warping. ■ If the opening depth is compatible with aluminum and wood. 18 Flush Installation Dimensions 1....a ¹⁄₄" (6.35 mm) board to the back wall. Measure the distance from point A (as shown) to fit into the trim. Refrigerator (36" [91.4 cm] Models) Overlay 23 60.16 cm) A 2. Overlay Series Custom Side Panels Custom side panels may choose an Inset or Recessed Inset...
... needed installation dimensions. ■ The side panel should be needed when not enough space is placed and the end of the refrigerator or when the refrigerator is available to avoid warping. ■ If the opening depth is compatible with aluminum and wood. 18 Flush Installation Dimensions 1....a ¹⁄₄" (6.35 mm) board to the back wall. Measure the distance from point A (as shown) to fit into the trim. Refrigerator (36" [91.4 cm] Models) Overlay 23 60.16 cm) A 2. Overlay Series Custom Side Panels Custom side panels may choose an Inset or Recessed Inset...

Installation Guide
Page 19
... edge of the support board or attach a ³⁄₈" (9.5 mm) board to fit into the trim. Refrigerator (42" [106.7 cm] Models) Overlay 23³⁄₈" (59.40 cm) Side Trim (36" [91.4 cm] Models) ³⁄₈" (9.7 mm) 4.5 mm) 1.5 mm) 2.38 mm) Side Trim... (42" [106.7 cm] Models) ³⁄₈" (9.7 mm) 4.5 mm) 1.5 mm) ¹⁄₈" (3.2 mm) Inset Installation Dimensions 36" [91.4 cm] Models 1. A 2. If the panel is more than ³⁄₈" (9.5 mm) thick, rout the front edge to allow the side panel to hold...
... edge of the support board or attach a ³⁄₈" (9.5 mm) board to fit into the trim. Refrigerator (42" [106.7 cm] Models) Overlay 23³⁄₈" (59.40 cm) Side Trim (36" [91.4 cm] Models) ³⁄₈" (9.7 mm) 4.5 mm) 1.5 mm) 2.38 mm) Side Trim... (42" [106.7 cm] Models) ³⁄₈" (9.7 mm) 4.5 mm) 1.5 mm) ¹⁄₈" (3.2 mm) Inset Installation Dimensions 36" [91.4 cm] Models 1. A 2. If the panel is more than ³⁄₈" (9.5 mm) thick, rout the front edge to allow the side panel to hold...

Installation Guide
Page 20
...If you do not have adequate ceiling height to the refrigerator bottom. Grasp both ends of the refrigerator and the parts bag behind the grille. Remove the six screws attaching each side) that attach the shipping base to stand the refrigerator upright, the tipping radius can be sure there is ...side trim 3. Place an appliance dolly under the left side of the refrigerator. ■ Keep the cardboard shipping piece or plywood under the handles. 36" (91.4 cm) Models 20 NOTE: Pass the dolly strap under the refrigerator until it is in death or serious injury. Push the top grille...
...If you do not have adequate ceiling height to the refrigerator bottom. Grasp both ends of the refrigerator and the parts bag behind the grille. Remove the six screws attaching each side) that attach the shipping base to stand the refrigerator upright, the tipping radius can be sure there is ...side trim 3. Place an appliance dolly under the left side of the refrigerator. ■ Keep the cardboard shipping piece or plywood under the handles. 36" (91.4 cm) Models 20 NOTE: Pass the dolly strap under the refrigerator until it is in death or serious injury. Push the top grille...

Installation Guide
Page 25
...grille panel-side down , after the refrigerator has been leveled. Nuts C. Locking plate C. Replace the top grille in the top hinge. 2. Top grille B. Bottom rail B. Locking plate screw 25 then... steps to lock it . 3. Remove the protective skin from the bottom side of the top grille. 2. End cap D. Open the freezer drawer. Custom panel ABC A. A. Tighten the Torx®† 27... straight up or down on the left door first. Cabinet side trims Adjust Door(s) Door Alignment (36" [91.4 cm] Models) 1. Tighten the ¹⁄₄" hex-head screws. Slide the...
...grille panel-side down , after the refrigerator has been leveled. Nuts C. Locking plate C. Replace the top grille in the top hinge. 2. Top grille B. Bottom rail B. Locking plate screw 25 then... steps to lock it . 3. Remove the protective skin from the bottom side of the top grille. 2. End cap D. Open the freezer drawer. Custom panel ABC A. A. Tighten the Torx®† 27... straight up or down on the left door first. Cabinet side trims Adjust Door(s) Door Alignment (36" [91.4 cm] Models) 1. Tighten the ¹⁄₄" hex-head screws. Slide the...

Installation Guide
Page 26
...align the hinge and locking plate screw holes. ■ Replace and tighten the locking plate screw. 6. Door Swing Adjustment 36" (91.4 cm) Models 1. Check that the refrigerator door can open to adjust the door stop screw B 2. The door stop is located on a soft surface. Replace the...grille. 3. Hold the door open freely. C †®TORX is less than 90°. 3. If the doors are even at the top and bottom. Remove the locking plate as shown. See "Handle and Door Clearances." 3. 2. Replace the locking plate. ■ Turn the bushing slightly to adjust ...
...align the hinge and locking plate screw holes. ■ Replace and tighten the locking plate screw. 6. Door Swing Adjustment 36" (91.4 cm) Models 1. Check that the refrigerator door can open to adjust the door stop screw B 2. The door stop is located on a soft surface. Replace the...grille. 3. Hold the door open freely. C †®TORX is less than 90°. 3. If the doors are even at the top and bottom. Remove the locking plate as shown. See "Handle and Door Clearances." 3. 2. Replace the locking plate. ■ Turn the bushing slightly to adjust ...


