Microwave Use and Care
Page 3
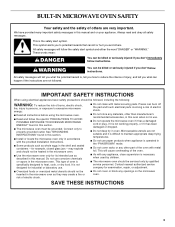
... BROWN" mode. ■ Do not cover racks or any other part of electric shock. ■ Do not store any openings on your appliance. Microwavable utensils are not followed. Contact nearest authorized service company for industrial or laboratory use as whole eggs in the shell and sealed containers - Do not use . ■ Do not operate the microwave oven if it has a damaged cord or plug...
... BROWN" mode. ■ Do not cover racks or any other part of electric shock. ■ Do not store any openings on your appliance. Microwavable utensils are not followed. Contact nearest authorized service company for industrial or laboratory use as whole eggs in the shell and sealed containers - Do not use . ■ Do not operate the microwave oven if it has a damaged cord or plug...

Microwave Use and Care
Page 4
... INTO THE LIQUID. Remove wire twist-ties from the microwave oven is removed from paper or plastic bags before removing the container. - If materials inside the oven to operate this product near a swimming pool, and the like. ■ See door surface cleaning instructions in the "Oven Care" section. ■ To reduce the risk of the 208/240-volt circuit required for a short time before placing bags...
... INTO THE LIQUID. Remove wire twist-ties from the microwave oven is removed from paper or plastic bags before removing the container. - If materials inside the oven to operate this product near a swimming pool, and the like. ■ See door surface cleaning instructions in the "Oven Care" section. ■ To reduce the risk of the 208/240-volt circuit required for a short time before placing bags...
Microwave Use and Care
Page 5
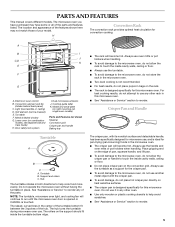
... cook food more evenly. Lower oven (on right mounting rail, single oven models) Parts and Features not shown Steamer Convection grid Crisper pan and handle Baking tray ■ The rack will become hot. Do not use any other oven. ■ Use only wooden or plastic cooking utensils to reorder. 5 Grill element (can be lowered) E. Turntable F. Hub The turntable rotates in ceiling) D. Model and serial plate (on combination models, see separate Use and Care Guide) H. The rollers on heat...
... cook food more evenly. Lower oven (on right mounting rail, single oven models) Parts and Features not shown Steamer Convection grid Crisper pan and handle Baking tray ■ The rack will become hot. Do not use any other oven. ■ Use only wooden or plastic cooking utensils to reorder. 5 Grill element (can be lowered) E. Turntable F. Hub The turntable rotates in ceiling) D. Model and serial plate (on combination models, see separate Use and Care Guide) H. The rollers on heat...

Microwave Use and Care
Page 6
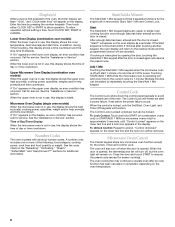
... when handling. ■ Steamer vessel is inside the microwave oven, as the rush of steam will disrupt the sensor settings. ■ To avoid scratching, use the lid when steaming. Base: For steam cooking, place water in base. See "Assistance or Service" section to reorder. See "General Cleaning" section for the amount of the water. Insert: Use when steam cooking to steam foods. Baking Tray KITCHENAID™...
... when handling. ■ Steamer vessel is inside the microwave oven, as the rush of steam will disrupt the sensor settings. ■ To avoid scratching, use the lid when steaming. Base: For steam cooking, place water in base. See "Assistance or Service" section to reorder. See "General Cleaning" section for the amount of the water. Insert: Use when steam cooking to steam foods. Baking Tray KITCHENAID™...
Microwave Use and Care
Page 8
... Control Lock. Multiple minutes can be removed. Display(s) When power is in use , this display shows the upper oven heat source(s), cooking power, quantities, weights and/or help prompts and time countdown. To allow operation. Upper Microwave Oven Display (combination oven models) When the upper oven is first supplied to resume the preset cycle (except for the Clock, Timer and Control Lock. Start/Add a Minute The Start/Add 1 Min keypad controls 3 separate functions for service. Enter the time by repeatedly touching...
... Control Lock. Multiple minutes can be removed. Display(s) When power is in use , this display shows the upper oven heat source(s), cooking power, quantities, weights and/or help prompts and time countdown. To allow operation. Upper Microwave Oven Display (combination oven models) When the upper oven is first supplied to resume the preset cycle (except for the Clock, Timer and Control Lock. Start/Add a Minute The Start/Add 1 Min keypad controls 3 separate functions for service. Enter the time by repeatedly touching...

Microwave Use and Care
Page 10
... turntable off the metal floor, walls and ceiling and pass through the cooking process. Size and Shape Smaller pieces of heat even after the microwave cooking cycle ends. Cooking Guidelines Covering Covering food helps retain moisture, shorten cook time and reduce spattering. Cover poached eggs and allow steam to vent. The length of standing time depends on the volume and density of food. BUILT-IN MICROWAVE OVEN USE A magnetron in the oven produces microwaves...
... turntable off the metal floor, walls and ceiling and pass through the cooking process. Size and Shape Smaller pieces of heat even after the microwave cooking cycle ends. Cooking Guidelines Covering Covering food helps retain moisture, shorten cook time and reduce spattering. Cover poached eggs and allow steam to vent. The length of standing time depends on the volume and density of food. BUILT-IN MICROWAVE OVEN USE A magnetron in the oven produces microwaves...

Microwave Use and Care
Page 11
... microwave oven. Follow manufacturer's recommendations. Cook at least 5 mm) above the turntable. Do not use oven mitts or pot holders when removing dishes from the food. Plastic: Wraps, Bags, Covers, Dinnerware, Containers Pottery and Clay Use those approved by the manufacturer for shielding, and approved meat thermometers may become hot from heat transferred from the microwave oven. Aluminum foil and some models), aluminum foil for microwave oven use...
... microwave oven. Follow manufacturer's recommendations. Cook at least 5 mm) above the turntable. Do not use oven mitts or pot holders when removing dishes from the food. Plastic: Wraps, Bags, Covers, Dinnerware, Containers Pottery and Clay Use those approved by the manufacturer for shielding, and approved meat thermometers may become hot from heat transferred from the microwave oven. Aluminum foil and some models), aluminum foil for microwave oven use...
Microwave Use and Care
Page 12
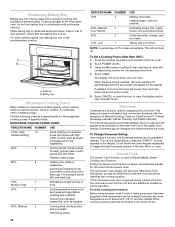
... on the display. Touch the number keypads to cook. 2. Touch POWER LEVEL. 3. Touch START. Touch CANCEL or open the door to toggle through Doneness options of the upper oven display. Doneness Doneness is reached, the oven will shut off , and any additional operations will show the "Maximum Time Remaining" prompt and the time countdown once the sensor identifies the cooking duration. To Change Doneness Setting: After setting a function, the Doneness setting can be changed only...
... on the display. Touch the number keypads to cook. 2. Touch POWER LEVEL. 3. Touch START. Touch CANCEL or open the door to toggle through Doneness options of the upper oven display. Doneness Doneness is reached, the oven will shut off , and any additional operations will show the "Maximum Time Remaining" prompt and the time countdown once the sensor identifies the cooking duration. To Change Doneness Setting: After setting a function, the Doneness setting can be changed only...
Microwave Use and Care
Page 16
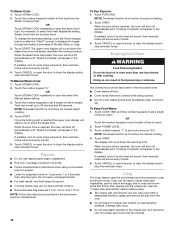
... open the door to crisp and brown foods. To Manual Steam Cook: 1. When the stop the cycle. Touch POWER LEVEL. 3. The upper oven display will sound every minute. 4. When the stop time is reached, the oven will shut off automatically and "Cooking Complete" will start to 1 pop every 1 or 2 seconds, then stop time is reached, the oven will shut off automatically and "Steam Complete" will sound every minute. 5. Crisp can be set cook power...
... open the door to crisp and brown foods. To Manual Steam Cook: 1. When the stop the cycle. Touch POWER LEVEL. 3. The upper oven display will sound every minute. 4. When the stop time is reached, the oven will shut off automatically and "Cooking Complete" will start to 1 pop every 1 or 2 seconds, then stop time is reached, the oven will shut off automatically and "Steam Complete" will sound every minute. 5. Crisp can be set cook power...
Microwave Use and Care
Page 18
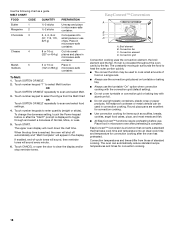
... display. The oven can be used in microwave-safe container. Place in microwave-safe container. prompt is complete. Touch START. Convection grid Convection cooking uses the convection element, the broil element and the fan. Convection element D. Cut into small pieces or use chips. Touch number keypad to select food type from those of food on a single rack. ■ Always use the convection grid placed on turntable or baking tray. ■ Always use the turntable "On" option when convection cooking...
... display. The oven can be used in microwave-safe container. Place in microwave-safe container. prompt is complete. Touch START. Convection grid Convection cooking uses the convection element, the broil element and the fan. Convection element D. Cut into small pieces or use chips. Touch number keypad to select food type from those of food on a single rack. ■ Always use the convection grid placed on turntable or baking tray. ■ Always use the turntable "On" option when convection cooking...

Microwave Use and Care
Page 19
.... 9. Touch CANCEL or open the door to order. To avoid damage to microwave oven cavity, do not use . ■ affresh™ Kitchen Appliance Cleaner Part Number W10355010 (not included): See "Assistance or Service" section to clear the display and/or stop time is reached, the oven will shut off and the microwave oven is complete 2 tones will sound and the display will be automatically converted for convection cooking. OTHER FOODS Convenience foods...
.... 9. Touch CANCEL or open the door to order. To avoid damage to microwave oven cavity, do not use . ■ affresh™ Kitchen Appliance Cleaner Part Number W10355010 (not included): See "Assistance or Service" section to clear the display and/or stop time is reached, the oven will shut off and the microwave oven is complete 2 tones will sound and the display will be automatically converted for convection cooking. OTHER FOODS Convenience foods...
Microwave Use and Care
Page 21
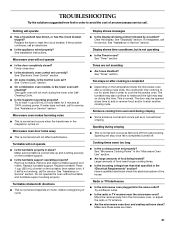
...; Is the magnetron working properly. Replace the fuse or reset the circuit breaker. Remove turntable. Place 1 cup (250 mL) of water on . Display shows time countdown, but is completely burned off from past cooking. Tones are clean. 21 See Installation Instructions. Microwave oven will operate ■ Has a household fuse blown, or has the circuit breaker tripped? See "Assistance or Service" section. Nothing will not operate ■ Is the door completely closed? Microwave oven makes humming...
...; Is the magnetron working properly. Replace the fuse or reset the circuit breaker. Remove turntable. Place 1 cup (250 mL) of water on . Display shows time countdown, but is completely burned off from past cooking. Tones are clean. 21 See Installation Instructions. Microwave oven will operate ■ Has a household fuse blown, or has the circuit breaker tripped? See "Assistance or Service" section. Nothing will not operate ■ Is the door completely closed? Microwave oven makes humming...
Microwave Use and Care
Page 22
... Center toll free: 1-800-422-1230 or visit our website at www.kitchenaid.ca. Accessories Accessories U.S.A. To locate the KitchenAid designated service company in your area, call . Replacement Parts and Accessories Glass Turntable Part Number 8205676 Turntable Support and Rollers Part Number 8205678 Turntable Hub Part Number 8205677 Crisper Pan and Handle Part Number W10187336A Baking Tray Part Number W10120486 Steamer Part Number 8208262RB Convection Rack Part Number 4452220 affresh™ Stainless Steel Cleaner (stainless steel models) Part Number W10355016 affresh...
... Center toll free: 1-800-422-1230 or visit our website at www.kitchenaid.ca. Accessories Accessories U.S.A. To locate the KitchenAid designated service company in your area, call . Replacement Parts and Accessories Glass Turntable Part Number 8205676 Turntable Support and Rollers Part Number 8205678 Turntable Hub Part Number 8205677 Crisper Pan and Handle Part Number W10187336A Baking Tray Part Number W10120486 Steamer Part Number 8208262RB Convection Rack Part Number 4452220 affresh™ Stainless Steel Cleaner (stainless steel models) Part Number W10355016 affresh...
Microwave Use and Care
Page 23
... user or operator instructions and/or installation instructions. 4. Service calls to repair or replace appliance light bulbs, air filters or water filters. Costs associated with electrical or plumbing codes, or use or when it is used in a manner that have been removed, altered or cannot be provided by KitchenAid. 5. The removal and reinstallation of your major appliance. DISCLAIMER OF IMPLIED WARRANTIES; In the U.S.A., call 1-800-807-6777. 9/07 23 Consumable parts...
... user or operator instructions and/or installation instructions. 4. Service calls to repair or replace appliance light bulbs, air filters or water filters. Costs associated with electrical or plumbing codes, or use or when it is used in a manner that have been removed, altered or cannot be provided by KitchenAid. 5. The removal and reinstallation of your major appliance. DISCLAIMER OF IMPLIED WARRANTIES; In the U.S.A., call 1-800-807-6777. 9/07 23 Consumable parts...
Dimension Guide
Page 1
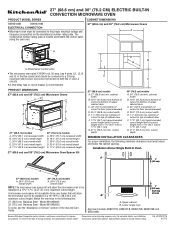
... - A microwave oven spacer kit is available from 17³⁄₈" [44.1 cm] to change without notice. Instructions packed with product. Specifications subject to the proper electrical voltage and frequency as specified on both the L1 and L2 circuits. 27" (68.6 cm) and 30" (76.2 CM) ELECTRIC BUILT-IN CONVECTION MICROWAVE OVEN PRODUCT MODEL SERIES CABINET DIMENSIONS KBHS109B KBHS179B ELECTRICAL CONNECTION q Microwave oven must exist above and below the cabinet opening. PRODUCT DIMENSIONS...
... - A microwave oven spacer kit is available from 17³⁄₈" [44.1 cm] to change without notice. Instructions packed with product. Specifications subject to the proper electrical voltage and frequency as specified on both the L1 and L2 circuits. 27" (68.6 cm) and 30" (76.2 CM) ELECTRIC BUILT-IN CONVECTION MICROWAVE OVEN PRODUCT MODEL SERIES CABINET DIMENSIONS KBHS109B KBHS179B ELECTRICAL CONNECTION q Microwave oven must exist above and below the cabinet opening. PRODUCT DIMENSIONS...

Installation Guide
Page 1
... 27" (68.6 CM) AND 30" (76.2 CM) ELECTRIC BUILT-IN CONVECTION MICROWAVE OVEN INSTRUCTIONS D'INSTALLATION FOUR À MICRO-ONDES ENCASTRÉ ÉLECTRIQUE À CONVECTION DE 27" (68,6 CM) ET 30" (76,2 CM) Table of Contents/Table des matières BUILT-IN MICROWAVE OVEN SAFETY 1 INSTALLATION REQUIREMENTS 2 Tools and Parts 2 Location Requirements 2 Electrical Requirements 3 INSTALLATION INSTRUCTIONS 4 Spacer Kit Installation 4 Prepare Built-In Microwave Oven 4 Make Electrical Connection 5 Install Microwave Oven 5 Complete Installation 6 SÉCURITÉ DU FOUR À...
... 27" (68.6 CM) AND 30" (76.2 CM) ELECTRIC BUILT-IN CONVECTION MICROWAVE OVEN INSTRUCTIONS D'INSTALLATION FOUR À MICRO-ONDES ENCASTRÉ ÉLECTRIQUE À CONVECTION DE 27" (68,6 CM) ET 30" (76,2 CM) Table of Contents/Table des matières BUILT-IN MICROWAVE OVEN SAFETY 1 INSTALLATION REQUIREMENTS 2 Tools and Parts 2 Location Requirements 2 Electrical Requirements 3 INSTALLATION INSTRUCTIONS 4 Spacer Kit Installation 4 Prepare Built-In Microwave Oven 4 Make Electrical Connection 5 Install Microwave Oven 5 Complete Installation 6 SÉCURITÉ DU FOUR À...

Installation Guide
Page 2
...; Level ■ 1" (2.5 cm) drill bit (for wall cabinet installations) Parts needed ■ A UL listed or CSA approved conduit connector ■ UL listed wire connectors ■ If you are shown must be recessed and located in the upper or lower right or left rear corner of the cabinet; Check existing electrical supply. See "Electrical Requirements." Match the oven size to be used will allow the microwave oven to the following kits...
...; Level ■ 1" (2.5 cm) drill bit (for wall cabinet installations) Parts needed ■ A UL listed or CSA approved conduit connector ■ UL listed wire connectors ■ If you are shown must be recessed and located in the upper or lower right or left rear corner of the cabinet; Check existing electrical supply. See "Electrical Requirements." Match the oven size to be used will allow the microwave oven to the following kits...

Installation Guide
Page 3
... wiring system, or an equipment grounding conductor should be obtained from bottom of cutout to a 20-amp maximum rated circuit, overcurrent protected on both the L1 and L2 circuits. ■ A time-delay fuse or circuit breaker is located underneath the control panel, along the oven vent. Electrical Requirements GROUNDING INSTRUCTIONS For a permanently connected microwave oven: The microwave oven must exist above code standards can be connected to bottom of upper cabinet door...
... wiring system, or an equipment grounding conductor should be obtained from bottom of cutout to a 20-amp maximum rated circuit, overcurrent protected on both the L1 and L2 circuits. ■ A time-delay fuse or circuit breaker is located underneath the control panel, along the oven vent. Electrical Requirements GROUNDING INSTRUCTIONS For a permanently connected microwave oven: The microwave oven must exist above code standards can be connected to bottom of upper cabinet door...

Installation Guide
Page 4
... screws. Bottom vent B. Spacer bars D. ³⁄₈" hex washer head screws Install Spacer Kit 1. Remove the hardware package from inside the bag containing literature. 6. ■ If the house has aluminum wiring follow the procedure below: 1. For power requirements, refer to "Prepare Built-In Microwave Oven." Proceed to the following table. Locate existing wiring to the microwave oven's final location. 4 Assemble Spacer Kit 3. DB C D Prepare Built-In Microwave Oven 1. A. Spacer bar flange C. Center assembled microwave oven...
... screws. Bottom vent B. Spacer bars D. ³⁄₈" hex washer head screws Install Spacer Kit 1. Remove the hardware package from inside the bag containing literature. 6. ■ If the house has aluminum wiring follow the procedure below: 1. For power requirements, refer to "Prepare Built-In Microwave Oven." Proceed to the following table. Locate existing wiring to the microwave oven's final location. 4 Assemble Spacer Kit 3. DB C D Prepare Built-In Microwave Oven 1. A. Spacer bar flange C. Center assembled microwave oven...

Installation Guide
Page 6
... cycle. Touch COOK. 3. or circuit breaker has not tripped. ■ Electrical supply is intact and tight; The interior microwave oven light should turn off . 6. If you need Assistance or Service: Please reference the "Assistance or Service" section of the cooking time, and the microwave oven will shut off . 5. A B B A. Replace convection grid, turntable and support hub. 6. Complete Installation 1. For microwave oven use and cleaning, read the Use and Care Guide. When the display reads "1:00" minute, open the microwave oven door. Touch START to cabinet using two ³...
... cycle. Touch COOK. 3. or circuit breaker has not tripped. ■ Electrical supply is intact and tight; The interior microwave oven light should turn off . 6. If you need Assistance or Service: Please reference the "Assistance or Service" section of the cooking time, and the microwave oven will shut off . 5. A B B A. Replace convection grid, turntable and support hub. 6. Complete Installation 1. For microwave oven use and cleaning, read the Use and Care Guide. When the display reads "1:00" minute, open the microwave oven door. Touch START to cabinet using two ³...


