Instruction Manual
Page 2
... the CATV system installer's attention to use radio frequency energy. Once you have registered your audio and video components, kindly follow the instructions in this equipment if an unauthorized change or modification is encouraged to try to operate the various functions available on , the user is made. Additional Information Shows you how to connect your other components using the remote control supplied with the proper setup codes, you how...
... the CATV system installer's attention to use radio frequency energy. Once you have registered your audio and video components, kindly follow the instructions in this equipment if an unauthorized change or modification is encouraged to try to operate the various functions available on , the user is made. Additional Information Shows you how to connect your other components using the remote control supplied with the proper setup codes, you how...
Instruction Manual
Page 3
...the AV AUX jacks 19 Connecting the antennas 19 Preparing for surround sound 20 Speaker settings 20 Operations Normal playback 23 Preparing for playback 23 Listening to a source component 23 Input level adjustment (analog sources only) .. 24 Adjusting the sound 24 Recording 26 Recording audio (analog sources 26 Recording video 26 Recording audio (digital sources 26 Listening to radio broadcasts 28 Tuning radio stations 28 Presetting radio stations manually 28 Receiving preset stations 29 Receiving preset stations in order (P.CALL) ... 29 Ambience effects 30 Surround modes 30...
...the AV AUX jacks 19 Connecting the antennas 19 Preparing for surround sound 20 Speaker settings 20 Operations Normal playback 23 Preparing for playback 23 Listening to a source component 23 Input level adjustment (analog sources only) .. 24 Adjusting the sound 24 Recording 26 Recording audio (analog sources 26 Recording video 26 Recording audio (digital sources 26 Listening to radio broadcasts 28 Tuning radio stations 28 Presetting radio stations manually 28 Receiving preset stations 29 Receiving preset stations in order (P.CALL) ... 29 Ambience effects 30 Surround modes 30...
Instruction Manual
Page 5
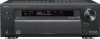
... the power Special features True home theater sound º This receiver incorporates a wide variety of surround modes to bring you maximum enjoyment from your remote controllable audio and video components. Just follow the simple setup procedure to register the components you connect a game machine to the AV AUX jacks on . Universal IR (Infrared) remote control In addition to "GAME" and the optimum sound field for enjoying games is set. You can also operate...
... the power Special features True home theater sound º This receiver incorporates a wide variety of surround modes to bring you maximum enjoyment from your remote controllable audio and video components. Just follow the simple setup procedure to register the components you connect a game machine to the AV AUX jacks on . Universal IR (Infrared) remote control In addition to "GAME" and the optimum sound field for enjoying games is set. You can also operate...
Instruction Manual
Page 6
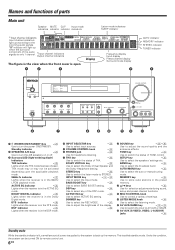
... of the DSP mode. AUTO indicator MEMORY indicator STEREO indicator TUNED indicator A SPEAKERS B THX 96kHz fs ACTIVE EQ DOLBY DIGITAL DTS DSP PHONES THX DOLBY VIRTUAL STEREO INPUT MODE BASS BOOST DSP ACTIVE EQ DIMMER VOLUME CONTROL SOUND TONE SETUP BAND AUTO/MONO MEMORY MULTI CONTROL LISTEN MODE INPUT SELECTOR AV AUX/GAME S VIDEO VIDEO L-AUDIO-R 1 (POWER ON/STANDBY) key ) Use to turn the power ON/STANDBY. DTS indicator ‹ Lights when the receiver is called standby mode. DIMMER key Use to select the REC MODE. ¶ Use to adjust the sound quality and...
... of the DSP mode. AUTO indicator MEMORY indicator STEREO indicator TUNED indicator A SPEAKERS B THX 96kHz fs ACTIVE EQ DOLBY DIGITAL DTS DSP PHONES THX DOLBY VIRTUAL STEREO INPUT MODE BASS BOOST DSP ACTIVE EQ DIMMER VOLUME CONTROL SOUND TONE SETUP BAND AUTO/MONO MEMORY MULTI CONTROL LISTEN MODE INPUT SELECTOR AV AUX/GAME S VIDEO VIDEO L-AUDIO-R 1 (POWER ON/STANDBY) key ) Use to turn the power ON/STANDBY. DTS indicator ‹ Lights when the receiver is called standby mode. DIMMER key Use to select the REC MODE. ¶ Use to adjust the sound quality and...
Instruction Manual
Page 7
... select ACTIVE EQ's setting. 5 Numeric keys Use to operate the DVD component. Use to operate other components. 7 MULTI %/fi/@/# keys Use to turn the receiver on or off (standby). 3 Source keys (DVD/6CH, VIDEO 1, VIDEO 2, VIDEO 3, CD/DVD, MD/TAPE, PHONO, AV AUX, TUNER) ·, To control one of the registered sources without switching the receiver's input selec- TOP MENU key MENU key RETURN key EXIT key ON SCREEN key GUIDE key ENTER key Use to input numeric characters. SOUND key )fl Use to adjust the sound...
... select ACTIVE EQ's setting. 5 Numeric keys Use to operate the DVD component. Use to operate other components. 7 MULTI %/fi/@/# keys Use to turn the receiver on or off (standby). 3 Source keys (DVD/6CH, VIDEO 1, VIDEO 2, VIDEO 3, CD/DVD, MD/TAPE, PHONO, AV AUX, TUNER) ·, To control one of the registered sources without switching the receiver's input selec- TOP MENU key MENU key RETURN key EXIT key ON SCREEN key GUIDE key ENTER key Use to input numeric characters. SOUND key )fl Use to adjust the sound...
Instruction Manual
Page 8
... AUTO". These cables transfer stereo audio signal in the following items will select the input mode and listening mode auto- Microcomputer malfunction If operation is indicated on each include jacks for CD/DVD, DVD/6CH, VIDEO 2 and VIDEO 3 are completed. When connecting the related system components, be produced. Be sure to remove the power cord from the AC outlet for approximately 1 day. • Power mode • Input selector settings • Speaker ON/OFF • Volume level • BASS, TREBLE, INPUT level...
... AUTO". These cables transfer stereo audio signal in the following items will select the input mode and listening mode auto- Microcomputer malfunction If operation is indicated on each include jacks for CD/DVD, DVD/6CH, VIDEO 2 and VIDEO 3 are completed. When connecting the related system components, be produced. Be sure to remove the power cord from the AC outlet for approximately 1 day. • Power mode • Input selector settings • Speaker ON/OFF • Volume level • BASS, TREBLE, INPUT level...
Instruction Manual
Page 13
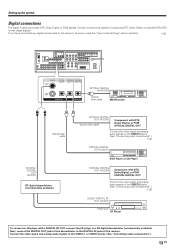
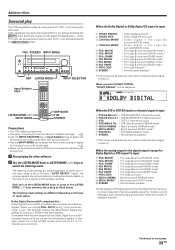
... 3 jacks. (See "Connecting video components".) 13 EN Setting up the system Digital connections The digital in jacks can accept DTS, Dolby Digital, or PCM signals. Connect the video signal and analog audio signals to the DIGITAL IN jacks of outputting DTS, Dolby Digital, or standard PCM (CD) format digital signals. If you have connected any digital components to the receiver, be sure to read the "Input mode settings" section carefully. 8 COAXIAL VIDEO 2 OPTICAL OPTICAL OPTICAL CD/DVD VIDEO 3 MONITOR DVD/ 6CH DIGITAL IN DIGITAL OUT OPTICAL DIGITAL IN (AUDIO) Optical fiber cable...
... 3 jacks. (See "Connecting video components".) 13 EN Setting up the system Digital connections The digital in jacks can accept DTS, Dolby Digital, or PCM signals. Connect the video signal and analog audio signals to the DIGITAL IN jacks of outputting DTS, Dolby Digital, or standard PCM (CD) format digital signals. If you have connected any digital components to the receiver, be sure to read the "Input mode settings" section carefully. 8 COAXIAL VIDEO 2 OPTICAL OPTICAL OPTICAL CD/DVD VIDEO 3 MONITOR DVD/ 6CH DIGITAL IN DIGITAL OUT OPTICAL DIGITAL IN (AUDIO) Optical fiber cable...
Instruction Manual
Page 19
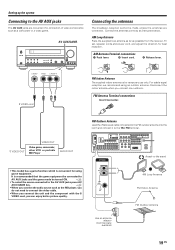
... the AV AUX jacks The AV AUX jacks are connected. AV AUX/GAME Connecting the antennas The broadcast reception cannot be turned ON. £ • To select the source connected to the AV AUX jacks press AV AUX/GAME key. £ • When you can enjoy better picture quality. Connect the antennas correctly as possible from the receiver, TV set, speaker cords and power cord, and adjust the direction for using an outdoor antenna. Setting up the system Connecting to...
... the AV AUX jacks The AV AUX jacks are connected. AV AUX/GAME Connecting the antennas The broadcast reception cannot be turned ON. £ • To select the source connected to the AV AUX jacks press AV AUX/GAME key. £ • When you can enjoy better picture quality. Connect the antennas correctly as possible from the receiver, TV set, speaker cords and power cord, and adjust the direction for using an outdoor antenna. Setting up the system Connecting to...
Instruction Manual
Page 20
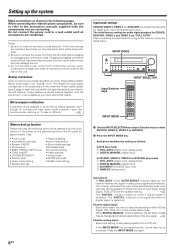
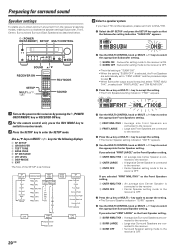
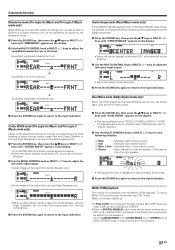
... SETUP MULTI RCV MODE SOUND 1 Turn on the power to this receiver by pressing the (POWER ON/STANDBY) key or RECEIVER ON key. 2 For the remote control unit, press the RCV MODE key to switch to receiver mode. 3 Press the SETUP key to select the appropriate Surround Speaker setting. TONE MANUAL L C R SR SBR SBL SL SW DISP MODE Display Selector Display Listen BASS PEAK SP DISTANCE Front Left Center Front Right Surround Right Surround Back Right Surround Back Left Surround Left Subwoofer LFE LEVEL 4 Select a speaker...
... SETUP MULTI RCV MODE SOUND 1 Turn on the power to this receiver by pressing the (POWER ON/STANDBY) key or RECEIVER ON key. 2 For the remote control unit, press the RCV MODE key to switch to receiver mode. 3 Press the SETUP key to select the appropriate Surround Speaker setting. TONE MANUAL L C R SR SBR SBL SL SW DISP MODE Display Selector Display Listen BASS PEAK SP DISTANCE Front Left Center Front Right Surround Right Surround Back Right Surround Back Left Surround Left Subwoofer LFE LEVEL 4 Select a speaker...
Instruction Manual
Page 21
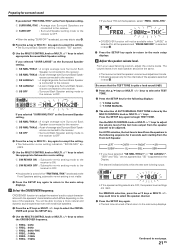
... setup displays. 5 Select the CROSSOVER frequency. ers are reset. LEFT SUBW CNTR SL RIGHT SBL SR SBR • If you have THX certified speakers, select "FREQ. : 80Hz-THX". The volume levels from the Front Left Speaker. For AUTO selection, the test tone is heard from the speaker channel to be able to adjust the volume level of average size Surround Back Speak- From your usual listening position, adjust the volume levels. The channel indication blinks while the test tone is turned...
... setup displays. 5 Select the CROSSOVER frequency. ers are reset. LEFT SUBW CNTR SL RIGHT SBL SR SBR • If you have THX certified speakers, select "FREQ. : 80Hz-THX". The volume levels from the Front Left Speaker. For AUTO selection, the test tone is heard from the speaker channel to be able to adjust the volume level of average size Surround Back Speak- From your usual listening position, adjust the volume levels. The channel indication blinks while the test tone is turned...
Instruction Manual
Page 23
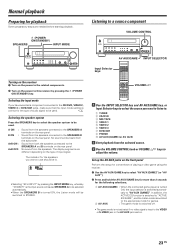
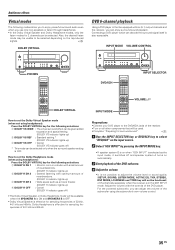
... of playing a video game using the receiver. 1 Use the AV AUX/GAME key to select "AV AUX [GAME]" (or "AV AUX"). 2 Press and hold the AV AUX/GAME key for more than 2 seconds for the following selections; 1 AV AUX [GAME] : When the connected game player is turned ON, the input selector is switched automati- SPEAKERS (POWER ON/STANDBY) INPUT MODE Listening to a source component VOLUME CONTROL AV AUX/GAME INPUT SELECTOR Input Selector keys Turning on the receiver 1 Turn on the power to...
... of playing a video game using the receiver. 1 Use the AV AUX/GAME key to select "AV AUX [GAME]" (or "AV AUX"). 2 Press and hold the AV AUX/GAME key for more than 2 seconds for the following selections; 1 AV AUX [GAME] : When the connected game player is turned ON, the input selector is switched automati- SPEAKERS (POWER ON/STANDBY) INPUT MODE Listening to a source component VOLUME CONTROL AV AUX/GAME INPUT SELECTOR Input Selector keys Turning on the receiver 1 Turn on the power to...
Instruction Manual
Page 25
... adjust the Loudness function which controls the low volume settings to the PHONES jack. The adjustment can adjust the sound quality when the receiver is in REC MODE, or when searching or presetting radio stations. One-touch low frequency emphasis (BASS BOOST) You can be made when the receiver is in the PCM stereo mode, analog stereo mode and when "THX OFF". Muting the sound The MUTE key lets you mute the sound of the speakers. Press the BASS...
... adjust the Loudness function which controls the low volume settings to the PHONES jack. The adjustment can adjust the sound quality when the receiver is in REC MODE, or when searching or presetting radio stations. One-touch low frequency emphasis (BASS BOOST) You can be made when the receiver is in the PCM stereo mode, analog stereo mode and when "THX OFF". Muting the sound The MUTE key lets you mute the sound of the speakers. Press the BASS...

Instruction Manual
Page 31
... side wall imaging. The "MOVIE" mode has preset characteristics to produce a calibrated, high-level surround sound playback while the "MUSIC" mode has user-adjustable characteristics to offer the three optional controls, like "Dimension", "Center Width" and "Panorama" modes to DTS encoded software through the left (or right) year so the listener cannot feel as Laserdisc or DVD software marked ). DTS The DTS multi-channel audio format is a strictly digital format and cannot be played...
... side wall imaging. The "MOVIE" mode has preset characteristics to produce a calibrated, high-level surround sound playback while the "MUSIC" mode has user-adjustable characteristics to offer the three optional controls, like "Dimension", "Center Width" and "Panorama" modes to DTS encoded software through the left (or right) year so the listener cannot feel as Laserdisc or DVD software marked ). DTS The DTS multi-channel audio format is a strictly digital format and cannot be played...
Instruction Manual
Page 33
...If the input mode is played by selecting the analog input. 1 Start playing the video software. 2 Use the LISTEN MODE knob or LISTEN MODE %/ fi keys to play The DTS compatible models can be used when playing DVD or LD software bearing the mark and Dolby Digital format digital broadcasts (etc.). THX STEREO INPUT MODE DSP LISTEN MODE Input Selector keys INPUT SELECTOR LISTEN MODE %/fi INPUT MODE DSP MODE THX STEREO Preparations • Turn ON related components. • Complete "Preparing for surround sound" (speaker settings). ) • Use the INPUT...
...If the input mode is played by selecting the analog input. 1 Start playing the video software. 2 Use the LISTEN MODE knob or LISTEN MODE %/ fi keys to play The DTS compatible models can be used when playing DVD or LD software bearing the mark and Dolby Digital format digital broadcasts (etc.). THX STEREO INPUT MODE DSP LISTEN MODE Input Selector keys INPUT SELECTOR LISTEN MODE %/fi INPUT MODE DSP MODE THX STEREO Preparations • Turn ON related components. • Complete "Preparing for surround sound" (speaker settings). ) • Use the INPUT...

Instruction Manual
Page 34
... changes the currently selected LISTEN mode into STEREO. It will be sure to use a Dolby Digital compatible source component. • Dialogue Normalization (Dial Norm) is able to reproduce a cinema surround sound system featuring improved special representation and acoustic imaging of the original music or video source. Press the THX key to switch the following setting : 1 THX Sur EX AUTO 2 THX Sur EX ON 3 THX ON 4 THX OFF : THX Surround EX function is turned ON when Dolby Digital Surround EX signal is detected. : THX Surround...
... changes the currently selected LISTEN mode into STEREO. It will be sure to use a Dolby Digital compatible source component. • Dialogue Normalization (Dial Norm) is able to reproduce a cinema surround sound system featuring improved special representation and acoustic imaging of the original music or video source. Press the THX key to switch the following setting : 1 THX Sur EX AUTO 2 THX Sur EX ON 3 THX ON 4 THX OFF : THX Surround EX function is turned ON when Dolby Digital Surround EX signal is detected. : THX Surround...
Instruction Manual
Page 35
... for sampling frequencies of 32kHz, 44.1kHz and 48kHz. Adjust the volume with the controls of reverberations. (DOLBY H indicator lights up) 3 DOLBY H DH 3 : Wide space such as the input mode, it switches off ) * This mode can be selected only when the surround speaker setting is selected as a movie theater. (DOLBY H indicator lights up ) 3 DOLBY VS OFF : Cancel (DOLBY VS indicator goes off and speaker system A turns on the reproduced signals. ‹ DOLBY VIRTUAL DVD 6-channel playback Using a DVD player or...
... for sampling frequencies of 32kHz, 44.1kHz and 48kHz. Adjust the volume with the controls of reverberations. (DOLBY H indicator lights up) 3 DOLBY H DH 3 : Wide space such as the input mode, it switches off ) * This mode can be selected only when the surround speaker setting is selected as a movie theater. (DOLBY H indicator lights up ) 3 DOLBY VS OFF : Cancel (DOLBY VS indicator goes off and speaker system A turns on the reproduced signals. ‹ DOLBY VIRTUAL DVD 6-channel playback Using a DVD player or...

Instruction Manual
Page 36
... (Surround Back Right Speaker level adjustment)* 5 SBL (Surround Back Left Speaker level adjustment)* 6 SL (Left Surround Speaker level adjustment)* 7 SUBW (Subwoofer level adjustment)* 8 INPUT (Input level adjustment - Each time you have selected "SB NML/THXx1" or "SB LARGEx1", "SBR" and "SBL" are not displayed in the surround mode. Dolby Digital mode only) * The adjustment is OFF. Convenient functions Adjusting the sound You can be able to raise the volume as loud as desired. • The adjustment item is set to "DOLBY DIGITAL" or "DTS". 2 Use the MULTI CONTROL...
... (Surround Back Right Speaker level adjustment)* 5 SBL (Surround Back Left Speaker level adjustment)* 6 SL (Left Surround Speaker level adjustment)* 7 SUBW (Subwoofer level adjustment)* 8 INPUT (Input level adjustment - Each time you have selected "SB NML/THXx1" or "SB LARGEx1", "SBR" and "SBL" are not displayed in the surround mode. Dolby Digital mode only) * The adjustment is OFF. Convenient functions Adjusting the sound You can be able to raise the volume as loud as desired. • The adjustment item is set to "DOLBY DIGITAL" or "DTS". 2 Use the MULTI CONTROL...
Instruction Manual
Page 37
... the center speaker is displayed for the following selection. 1 Main : Multiplex Main channel output. 2 Sub : Multiplex Sub channel output. 3 Main + Sub : Multiplex Main + Sub channel output. 4 Stereo : Main channel from the left -center-right output. To play a 96kHz DVD, set to "DOLBY DIGITAL". 2 Use the MULTI CONTROL knob or MULTI %/fi keys for approximately 20 seconds. 3 Press the SOUND key again to return to the input indication. 96kHz LPCM playback The receiver is adjusted towards the rear. SP MUTE AUTO DETECT DIGITAL DOLBY DIGITAL A B CLIP LFE STEREO...
... the center speaker is displayed for the following selection. 1 Main : Multiplex Main channel output. 2 Sub : Multiplex Sub channel output. 3 Main + Sub : Multiplex Main + Sub channel output. 4 Stereo : Main channel from the left -center-right output. To play a 96kHz DVD, set to "DOLBY DIGITAL". 2 Use the MULTI CONTROL knob or MULTI %/fi keys for approximately 20 seconds. 3 Press the SOUND key again to return to the input indication. 96kHz LPCM playback The receiver is adjusted towards the rear. SP MUTE AUTO DETECT DIGITAL DOLBY DIGITAL A B CLIP LFE STEREO...

Instruction Manual
Page 39
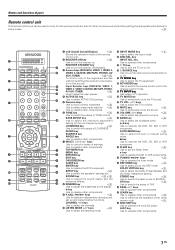
... MODE LEARN 1 Find the setup code of your codes", you may only operate some models. (Also, certain codes may need to find out which the remote control will blink twice. 3Point the remote control at the component and press SOURCE (Source power) key once. Input Component Maker DVD/6CH DVD player KENWOOD Code 0534 Key DVD 6CH Source key TUNER DVD/6CH CD/DVD MD/TAPE VIDEO 1 , AV AUX VIDEO 2 VIDEO 3 PHONO TV MODE Other components Receiver (Kenwood) DVD CD and MD (Kenwood) CD and MD (Kenwood) VCR and PVR Cable...
... MODE LEARN 1 Find the setup code of your codes", you may only operate some models. (Also, certain codes may need to find out which the remote control will blink twice. 3Point the remote control at the component and press SOURCE (Source power) key once. Input Component Maker DVD/6CH DVD player KENWOOD Code 0534 Key DVD 6CH Source key TUNER DVD/6CH CD/DVD MD/TAPE VIDEO 1 , AV AUX VIDEO 2 VIDEO 3 PHONO TV MODE Other components Receiver (Kenwood) DVD CD and MD (Kenwood) CD and MD (Kenwood) VCR and PVR Cable...
Instruction Manual
Page 50
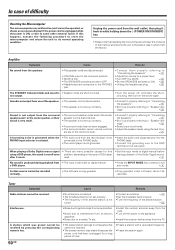
... input mode is • Speaker cords are connected to the PHONES jack. • Connect them properly referring to "Connecting the speakers" % • Adjust the volume to a proper level. • Turn OFF the MUTE. ¢ • Set the SPEAKERS switches to some other external factor. When playing a Dolby Digital source signal using the test tone. ¡ A humming noise is generated when the PHONO input selector is selected. • The audio cord from the surround speakers and / or the center speaker, or their sound is...
... input mode is • Speaker cords are connected to the PHONES jack. • Connect them properly referring to "Connecting the speakers" % • Adjust the volume to a proper level. • Turn OFF the MUTE. ¢ • Set the SPEAKERS switches to some other external factor. When playing a Dolby Digital source signal using the test tone. ¡ A humming noise is generated when the PHONO input selector is selected. • The audio cord from the surround speakers and / or the center speaker, or their sound is...


