
User Manual
Page 3
... Connecting a DVD player (6-channel input) ..... 11 Connecting the speakers 12 Connecting the terminals 13 Connecting the antennas 13 Connecting the system control 14 Preparing the remote control 14 Preparing for surround sound 15 Speaker settings 15 Operations Normal playback 17 Preparing for playback 17 Listening to a source component 17 Adjusting the sound 18 Recording 19 Recording audio (analog sources 19 Recording video 19 Recording audio (digital sources 19 Listening to radio broadcasts 20 Tuning radio stations 20 Presetting radio stations manually 20 Receiving preset...
... Connecting a DVD player (6-channel input) ..... 11 Connecting the speakers 12 Connecting the terminals 13 Connecting the antennas 13 Connecting the system control 14 Preparing the remote control 14 Preparing for surround sound 15 Speaker settings 15 Operations Normal playback 17 Preparing for playback 17 Listening to a source component 17 Adjusting the sound 18 Recording 19 Recording audio (analog sources 19 Recording video 19 Recording audio (digital sources 19 Listening to radio broadcasts 20 Tuning radio stations 20 Presetting radio stations manually 20 Receiving preset...
User Manual
Page 4
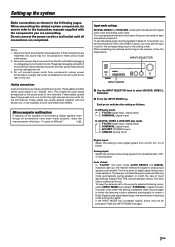
... user to operate other AV components (TV, VCR, DVD player, CD player, etc.) using the remote control, as well as a detailed explanation of all of DVD source material featuring multi-channel encoding. Just follow the simple setup procedure to register the components you have registered your audio and video components to connect your components with the proper setup codes, you how to enjoy the conventional stereo or Dolby Surround with conventional surround sound systems. CINEMA EQ Cinema EQ mode...
... user to operate other AV components (TV, VCR, DVD player, CD player, etc.) using the remote control, as well as a detailed explanation of all of DVD source material featuring multi-channel encoding. Just follow the simple setup procedure to register the components you have registered your audio and video components to connect your components with the proper setup codes, you how to enjoy the conventional stereo or Dolby Surround with conventional surround sound systems. CINEMA EQ Cinema EQ mode...
User Manual
Page 5
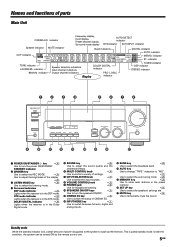
... Use to change "TAPE" indication to "MD". & Use to select the auto tuning mode. ) % MEMORY key ) Use to store radio stations in the Dolby Digital mode. 5 SOUND key ∞ Use to adjust the sound quality and the ambience effects. 6 MULTI CONTROL knob % Use to control a variety of power is in the DTS mode. indicator TONE indicator LOUDNESS indicator 96kHzfs indicator Speaker selection indicators Input channel indicators Output channel indicators Display DOLBY DIGITAL indicator PRO LOGIC indicator TUNED indicator DSP indicator STEREO indicator POWER STANDBY...
... Use to change "TAPE" indication to "MD". & Use to select the auto tuning mode. ) % MEMORY key ) Use to store radio stations in the Dolby Digital mode. 5 SOUND key ∞ Use to adjust the sound quality and the ambience effects. 6 MULTI CONTROL knob % Use to control a variety of power is in the DTS mode. indicator TONE indicator LOUDNESS indicator 96kHzfs indicator Speaker selection indicators Input channel indicators Output channel indicators Display DOLBY DIGITAL indicator PRO LOGIC indicator TUNED indicator DSP indicator STEREO indicator POWER STANDBY...
User Manual
Page 6
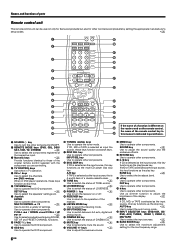
... non-Kenwood products by setting the appropriate manufacturer's setup codes. º 1 2 3 4 5 6 7 8 9 0 ! @ # $ SOURCE POWER DVD CBL DSS/SAT REMOTE MODE VCR TV OTHERS RECEIVER LISTEN MODE 1 2 3 INPUT MODE 4 5 6 CINEMA EQ 7 8 9 MUTE +10 0 +100 ¢+ DVD 4- Names and functions of parts Remote control unit This remote control unit can be use not only for Kenwood products but also for other components. keys & Use to adjust the receiver volume. ™ MENU key Use to operate other components. @ DISC SKIP key If CD is selected as input the source, these...
... non-Kenwood products by setting the appropriate manufacturer's setup codes. º 1 2 3 4 5 6 7 8 9 0 ! @ # $ SOURCE POWER DVD CBL DSS/SAT REMOTE MODE VCR TV OTHERS RECEIVER LISTEN MODE 1 2 3 INPUT MODE 4 5 6 CINEMA EQ 7 8 9 MUTE +10 0 +100 ¢+ DVD 4- Names and functions of parts Remote control unit This remote control unit can be use not only for Kenwood products but also for other components. keys & Use to adjust the receiver volume. ™ MENU key Use to operate other components. @ DISC SKIP key If CD is selected as input the source, these...
User Manual
Page 7
... INPUT MODE key to remove the power cord from a DVD, CD, or LD player. After completing connections and turning on the AC outlet at your local electronics retailer. Auto detect: In "F-AUTO" (full auto) mode (AUTO DETECT and DIGITAL indicators light up the system Make connections as follows: In DTS play mode 1 F-AUTO (digital input, analog input) 2 D-MANUAL (digital input) In CD/DVD, VIDEO 2, DVD/6CH play mode 1 F-AUTO (digital input, analog input) 2 D-MANUAL (digital input) 3 6CH INPT (DVD/6CH input) 4 ANALOG (analog input) Digital input: Select this unit. The initial factory setting...
... INPUT MODE key to remove the power cord from a DVD, CD, or LD player. After completing connections and turning on the AC outlet at your local electronics retailer. Auto detect: In "F-AUTO" (full auto) mode (AUTO DETECT and DIGITAL indicators light up the system Make connections as follows: In DTS play mode 1 F-AUTO (digital input, analog input) 2 D-MANUAL (digital input) In CD/DVD, VIDEO 2, DVD/6CH play mode 1 F-AUTO (digital input, analog input) 2 D-MANUAL (digital input) 3 6CH INPT (DVD/6CH input) 4 ANALOG (analog input) Digital input: Select this unit. The initial factory setting...

User Manual
Page 8
...~ 50 / 60Hz SWITCHED TOTAL 90W MAX. Setting up the system Connecting audio components SYSTEM CONTROL jacks $ GND SYSTEM CONTROL VIDEO DVD IN VIDEO 2 IN FM 75Ω AM ANTENNA MONITOR OUT L AUDIO R VIDEO 1 IN VIDEO 1 OUT PHONO CD / DVD REC OUT PLAY IN REC OUT PLAY IN PLAY IN MD / TAPE VIDEO1 VIDEO 2 S VIDEO DVD CD / DVD OPTICAL VIDEO 2 COAXIAL DIGITAL IN DVD / 6CH INPUT CENTER MONITOR DVD VIDEO 2 OUT IN IN FRONT SPEAKERS (8-16Ω) CENTER SPEAKER (8-16Ω) + SURROUND SPEAKERS (8-16Ω) + FRONT SURROUND SUB WOOFER R SUB WOOFER RED PRE OUT -
...~ 50 / 60Hz SWITCHED TOTAL 90W MAX. Setting up the system Connecting audio components SYSTEM CONTROL jacks $ GND SYSTEM CONTROL VIDEO DVD IN VIDEO 2 IN FM 75Ω AM ANTENNA MONITOR OUT L AUDIO R VIDEO 1 IN VIDEO 1 OUT PHONO CD / DVD REC OUT PLAY IN REC OUT PLAY IN PLAY IN MD / TAPE VIDEO1 VIDEO 2 S VIDEO DVD CD / DVD OPTICAL VIDEO 2 COAXIAL DIGITAL IN DVD / 6CH INPUT CENTER MONITOR DVD VIDEO 2 OUT IN IN FRONT SPEAKERS (8-16Ω) CENTER SPEAKER (8-16Ω) + SURROUND SPEAKERS (8-16Ω) + FRONT SURROUND SUB WOOFER R SUB WOOFER RED PRE OUT -

User Manual
Page 9
... / TAPE VIDEO1 VIDEO 2 S VIDEO DVD CD / DVD OPTICAL VIDEO 2 COAXIAL DIGITAL IN DVD / 6CH INPUT CENTER MONITOR DVD VIDEO 2 OUT IN IN FRONT SPEAKERS (8-16Ω) CENTER SPEAKER (8-16Ω) + SURROUND SPEAKERS (8-16Ω) + FRONT SURROUND SUB WOOFER R SUB WOOFER RED PRE OUT - Video IN/OUT VIDEO IN Monitor TV IN IN Video inputs (Yellow RCA pin cords) Video deck OUT Video inputs and outputs (Yellow RCA pin cords) OUT Audio inputs and outputs OUT DVD player or LD player OUT Audio IN/OUT A video component with S VIDEO IN/OUT jacks. • If you use...
... / TAPE VIDEO1 VIDEO 2 S VIDEO DVD CD / DVD OPTICAL VIDEO 2 COAXIAL DIGITAL IN DVD / 6CH INPUT CENTER MONITOR DVD VIDEO 2 OUT IN IN FRONT SPEAKERS (8-16Ω) CENTER SPEAKER (8-16Ω) + SURROUND SPEAKERS (8-16Ω) + FRONT SURROUND SUB WOOFER R SUB WOOFER RED PRE OUT - Video IN/OUT VIDEO IN Monitor TV IN IN Video inputs (Yellow RCA pin cords) Video deck OUT Video inputs and outputs (Yellow RCA pin cords) OUT Audio inputs and outputs OUT DVD player or LD player OUT Audio IN/OUT A video component with S VIDEO IN/OUT jacks. • If you use...

User Manual
Page 10
... to the VIDEO 2 jacks. (See "Connecting video components".) 9 DOLBY DIGITAL RF OUT (AUDIO) PCM OUT LD player Optical fiber cable OPTICAL DIGITAL OUT (AUDIO) CD or DVD player To connect an LD player with a DIGITAL RF OUT, connect the LD player to read the "Input mode settings" section carefully. 7 GND SYSTEM CONTROL VIDEO DVD IN VIDEO 2 IN FM 75Ω AM ANTENNA MONITOR OUT L AUDIO R VIDEO 1 IN VIDEO 1 OUT PHONO CD / DVD REC OUT PLAY IN REC OUT PLAY IN PLAY IN MD / TAPE VIDEO1 VIDEO 2 S VIDEO DVD CD / DVD OPTICAL VIDEO 2 COAXIAL DIGITAL IN DVD / 6CH INPUT CENTER...
... to the VIDEO 2 jacks. (See "Connecting video components".) 9 DOLBY DIGITAL RF OUT (AUDIO) PCM OUT LD player Optical fiber cable OPTICAL DIGITAL OUT (AUDIO) CD or DVD player To connect an LD player with a DIGITAL RF OUT, connect the LD player to read the "Input mode settings" section carefully. 7 GND SYSTEM CONTROL VIDEO DVD IN VIDEO 2 IN FM 75Ω AM ANTENNA MONITOR OUT L AUDIO R VIDEO 1 IN VIDEO 1 OUT PHONO CD / DVD REC OUT PLAY IN REC OUT PLAY IN PLAY IN MD / TAPE VIDEO1 VIDEO 2 S VIDEO DVD CD / DVD OPTICAL VIDEO 2 COAXIAL DIGITAL IN DVD / 6CH INPUT CENTER...

User Manual
Page 11
... the system Connecting a DVD player (6-channel input) If you have connected a DVD player to read the "Input mode settings" section carefully. 7 DVD IN GND SYSTEM CONTROL VIDEO DVD IN VIDEO 2 IN FM 75Ω AM ANTENNA MONITOR OUT L AUDIO R VIDEO 1 IN VIDEO 1 OUT PHONO CD / DVD REC OUT PLAY IN REC OUT PLAY IN PLAY IN MD / TAPE VIDEO1 VIDEO 2 S VIDEO DVD CD / DVD OPTICAL VIDEO 2 COAXIAL DIGITAL IN DVD / 6CH INPUT CENTER MONITOR DVD VIDEO 2 OUT IN IN FRONT SPEAKERS (8-16Ω) CENTER SPEAKER (8-16Ω) + SURROUND SPEAKERS (8-16Ω) + FRONT SURROUND SUB...
... the system Connecting a DVD player (6-channel input) If you have connected a DVD player to read the "Input mode settings" section carefully. 7 DVD IN GND SYSTEM CONTROL VIDEO DVD IN VIDEO 2 IN FM 75Ω AM ANTENNA MONITOR OUT L AUDIO R VIDEO 1 IN VIDEO 1 OUT PHONO CD / DVD REC OUT PLAY IN REC OUT PLAY IN PLAY IN MD / TAPE VIDEO1 VIDEO 2 S VIDEO DVD CD / DVD OPTICAL VIDEO 2 COAXIAL DIGITAL IN DVD / 6CH INPUT CENTER MONITOR DVD VIDEO 2 OUT IN IN FRONT SPEAKERS (8-16Ω) CENTER SPEAKER (8-16Ω) + SURROUND SPEAKERS (8-16Ω) + FRONT SURROUND SUB...

User Manual
Page 13
... connect the speakers correctly. Required for best reception. For stable signal reception we recommend using an outdoor antenna. GND SYSTEM CONTROL VIDEO DVD IN VIDEO 2 IN FM 75Ω AM ANTENNA MONITOR OUT L AUDIO R VIDEO 1 IN VIDEO 1 OUT PHONO CD / DVD REC OUT PLAY IN REC OUT PLAY IN PLAY IN MD / TAPE VIDEO1 VIDEO 2 S VIDEO DVD CD / DVD OPTICAL VIDEO 2 COAXIAL DIGITAL IN DVD / 6CH INPUT CENTER MONITOR DVD VIDEO 2 OUT IN IN FRONT SPEAKERS (8-16Ω) CENTER SPEAKER (8-16Ω) + SURROUND SPEAKERS (8-16Ω) + FRONT SURROUND SUB WOOFER R SUB...
... connect the speakers correctly. Required for best reception. For stable signal reception we recommend using an outdoor antenna. GND SYSTEM CONTROL VIDEO DVD IN VIDEO 2 IN FM 75Ω AM ANTENNA MONITOR OUT L AUDIO R VIDEO 1 IN VIDEO 1 OUT PHONO CD / DVD REC OUT PLAY IN REC OUT PLAY IN PLAY IN MD / TAPE VIDEO1 VIDEO 2 S VIDEO DVD CD / DVD OPTICAL VIDEO 2 COAXIAL DIGITAL IN DVD / 6CH INPUT CENTER MONITOR DVD VIDEO 2 OUT IN IN FRONT SPEAKERS (8-16Ω) CENTER SPEAKER (8-16Ω) + SURROUND SPEAKERS (8-16Ω) + FRONT SURROUND SUB WOOFER R SUB...

User Manual
Page 14
... CD player it must be connected to use a cassette deck (or MD recorder) it must be connected to operate. To use during operation checks. 2. The supplied batteries may be connected for system operations. When using more than before, replace both batteries with the [SL16] system control mode. Be sure the system control plugs are not system control compatible. In such a case, change the location of the system installation to either the up the system Connecting the system control Connecting system control cords after connecting a KENWOOD audio component...
... CD player it must be connected to use a cassette deck (or MD recorder) it must be connected to operate. To use during operation checks. 2. The supplied batteries may be connected for system operations. When using more than before, replace both batteries with the [SL16] system control mode. Be sure the system control plugs are not system control compatible. In such a case, change the location of the system installation to either the up the system Connecting the system control Connecting system control cords after connecting a KENWOOD audio component...
User Manual
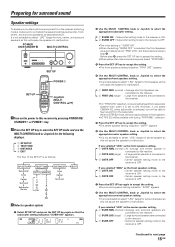
Page 15
... the subwoofer. When in STEREO mode, the sound goes directly to malfunction. SP SETUP Subwoofer Front Center Surround Subwoofer Re-mix TESTTONE DISTANCE AUTO MANUAL L L C R C SR R SL SW SR SL Front Center Surround SW EXIT 3Select a speaker system. 1 Select SP SETUP and press the SET UP key again so that the subwoofer setting indication "SUBW ON" appears. 2 Use the MULTI CONTROL knob or Joystick to select the appropriate subwoofer setting. 1 SUBW ON : Subwoofer setting mode to the receiver...
... the subwoofer. When in STEREO mode, the sound goes directly to malfunction. SP SETUP Subwoofer Front Center Surround Subwoofer Re-mix TESTTONE DISTANCE AUTO MANUAL L L C R C SR R SL SW SR SL Front Center Surround SW EXIT 3Select a speaker system. 1 Select SP SETUP and press the SET UP key again so that the subwoofer setting indication "SUBW ON" appears. 2 Use the MULTI CONTROL knob or Joystick to select the appropriate subwoofer setting. 1 SUBW ON : Subwoofer setting mode to the receiver...

User Manual
Page 16
... each input source. 2 Press the SOUND key repeatedly until the "INPUT" indication appears. 3 Use the MULTI CONTROL knob or Joystick to adjust the input level. • The adjustment mode is displayed for each of the speakers. 6 Setup is complete when the input indication appears. • The speakers you have selected other than "LRG" as the center speaker setting, 1 SURR ON : Surround speaker setting mode to the receiver is ON. 2 SURR OFF : Surround speaker setting mode to the receiver...
... each input source. 2 Press the SOUND key repeatedly until the "INPUT" indication appears. 3 Use the MULTI CONTROL knob or Joystick to adjust the input level. • The adjustment mode is displayed for each of the speakers. 6 Setup is complete when the input indication appears. • The speakers you have selected other than "LRG" as the center speaker setting, 1 SURR ON : Surround speaker setting mode to the receiver is ON. 2 SURR OFF : Surround speaker setting mode to the receiver...

User Manual
Page 18
... adjustable from -10 to adjust the volume. BASS BOOST Adjusting the TONE (remote control only) You can also be made . Switching back the previous setting Press the BASS BOOST key again. 18 EN Adjusting the LOUDNESS mode (remote control only) You can adjust the Loudness function which controls the low volume settings to turn off . • MUTE ON can adjust the sound quality when the receiver is in the PCM stereo and analog stereo mode...
... adjustable from -10 to adjust the volume. BASS BOOST Adjusting the TONE (remote control only) You can also be made . Switching back the previous setting Press the BASS BOOST key again. 18 EN Adjusting the LOUDNESS mode (remote control only) You can adjust the Loudness function which controls the low volume settings to turn off . • MUTE ON can adjust the sound quality when the receiver is in the PCM stereo and analog stereo mode...

User Manual
Page 22
... loud if the analog output is connected directly to input the proper speaker settings beforehand. % Surround modes DTS The DTS multi-channel audio format is available on CD, LD and DVD software. Manufactured under license from the surround modes, make sure to a high power amplification system. The PRO LOGIC II modes programmed into this situation. Dolby Digital The Dolby Digital surround format lets you will also improve deep bass performance in DTS Digital Surround decoder must be...
... loud if the analog output is connected directly to input the proper speaker settings beforehand. % Surround modes DTS The DTS multi-channel audio format is available on CD, LD and DVD software. Manufactured under license from the surround modes, make sure to a high power amplification system. The PRO LOGIC II modes programmed into this situation. Dolby Digital The Dolby Digital surround format lets you will also improve deep bass performance in DTS Digital Surround decoder must be...

User Manual
Page 23
... multi-channel encoded DVD source material in various places). Center speaker DVD 6-channel mode Using a DVD player or the like CD, television, and FM radio. Center speaker Subwoofer (SW) Front speaker (L, R) Surround speaker (L, R) What's DSP? Ambience effects DSP mode The DSP mode lets you add the atmosphere of a live concert or hall to almost any type of the original signal. DSP stands for more dynamic deep bass sound effects. 23 EN Subwoofer (SW)* Front speaker (L, R) Surround speaker (L, R) *LFE...
... multi-channel encoded DVD source material in various places). Center speaker DVD 6-channel mode Using a DVD player or the like CD, television, and FM radio. Center speaker Subwoofer (SW) Front speaker (L, R) Surround speaker (L, R) What's DSP? Ambience effects DSP mode The DSP mode lets you add the atmosphere of a live concert or hall to almost any type of the original signal. DSP stands for more dynamic deep bass sound effects. 23 EN Subwoofer (SW)* Front speaker (L, R) Surround speaker (L, R) *LFE...

User Manual
Page 24
... : DSP Surround ARENA mode. 5 JAZZ CLUB : DSP Surround JAZZ CLUB mode. 6 THEATER : DSP Surround THEATER mode. 7 STADIUM : DSP Surround STADIUM mode. 8 DISCO : DSP Surround DISCO mode. 9 STEREO : Normal stereo playback. Sound is performed to left. DOLBY DIGITAL can be used when playing video, DVD, or LD software bearing the mark. Each press of input signal. The listening mode settings are stored separately for each input. When the DTS signal is set to full auto ("AUTO DETECT" lights), the receiver selects...
... : DSP Surround ARENA mode. 5 JAZZ CLUB : DSP Surround JAZZ CLUB mode. 6 THEATER : DSP Surround THEATER mode. 7 STADIUM : DSP Surround STADIUM mode. 8 DISCO : DSP Surround DISCO mode. 9 STEREO : Normal stereo playback. Sound is performed to left. DOLBY DIGITAL can be used when playing video, DVD, or LD software bearing the mark. Each press of input signal. The listening mode settings are stored separately for each input. When the DTS signal is set to full auto ("AUTO DETECT" lights), the receiver selects...

User Manual
Page 25
... surround sound". % 1Select "DVD/6CH" as the input source. 2Select "6CH INPT" by pressing the INPUT MODE key. 3Start playback of the receiver. • Turn on /off or when the input selection is changed. ** Pro Logic II Music mode only. 2 Use the MULTI CONTROL knob or Joystick to adjust the setting as desired. • The adjustment item is in certain modes. 1 C (center speaker level adjustment)* 2 SR (right surround speaker level adjustment)* 3 SL (left surround speaker level adjustment)* 4 SW (subwoofer...
... surround sound". % 1Select "DVD/6CH" as the input source. 2Select "6CH INPT" by pressing the INPUT MODE key. 3Start playback of the receiver. • Turn on /off or when the input selection is changed. ** Pro Logic II Music mode only. 2 Use the MULTI CONTROL knob or Joystick to adjust the setting as desired. • The adjustment item is in certain modes. 1 C (center speaker level adjustment)* 2 SR (right surround speaker level adjustment)* 3 SL (left surround speaker level adjustment)* 4 SW (subwoofer...

User Manual
Page 34
... the center speaker cord is disconnected. • A surround mode has not been engaged. • The surround and/or center volume controls are set to OFF. • Connect them properly referring to "Connecting the speakers" @ • Adjust the volume to a proper level. • Turn OFF the MUTE. * • Set the SPEAKERS switch to ON. & The standby indicator blinks and sound is ON, or due to digital manual. used. • Set the input mode to digital manual before starting playback of the Dolby Digital source. 7 No sound...
... the center speaker cord is disconnected. • A surround mode has not been engaged. • The surround and/or center volume controls are set to OFF. • Connect them properly referring to "Connecting the speakers" @ • Adjust the volume to a proper level. • Turn OFF the MUTE. * • Set the SPEAKERS switch to ON. & The standby indicator blinks and sound is ON, or due to digital manual. used. • Set the input mode to digital manual before starting playback of the Dolby Digital source. 7 No sound...

User Manual
Page 35
... made to play a tape which is not possible. In case of the remote mode keys or SOURCE key to activate the operation mode for the component you wish to control. • Press the any of the REMOTE MODE or INPUT SELECTOR keys to select the appropriate operation mode. • Replace with new batteries. • Operate the remote control unit within the controllable range. • Connect properly referring to "Setting up the system". • Place...
... made to play a tape which is not possible. In case of the remote mode keys or SOURCE key to activate the operation mode for the component you wish to control. • Press the any of the REMOTE MODE or INPUT SELECTOR keys to select the appropriate operation mode. • Replace with new batteries. • Operate the remote control unit within the controllable range. • Connect properly referring to "Setting up the system". • Place...


