

User Manual 1
Page 2
... for JVC KENWOOD Corporation. replace only with metal objects, as household waste. you use of radio devices, including but not limited to medical facilities. ◆◆ Near persons using an earphone accessory in such conditions, it is detected coming from the transceiver, switch the transceiver power off before installing optional accessories. • The charger is the device that disconnects the unit from...
... for JVC KENWOOD Corporation. replace only with metal objects, as household waste. you use of radio devices, including but not limited to medical facilities. ◆◆ Near persons using an earphone accessory in such conditions, it is detected coming from the transceiver, switch the transceiver power off before installing optional accessories. • The charger is the device that disconnects the unit from...

User Manual
Page 2
... This Manual This manual describes using mainly the Portable transceiver display as and when needed. Depending on basic settings. CONTENTS BASIC OPERATIONS ...3 SWITCHING POWER ON/ OFF 3 ADJUSTING THE VOLUME ...4 SELECTING A ZONE AND CHANNEL 4 TRANSMITTING ...5 RECEIVING ...8 PROGRAMMABLE FUNCTIONS 9 FUNCTIONS OVERVIEW ...21 FUNCTION DETAILS ...33 SCAN ...33 DTMF (DUAL TONE MULTI FREQUENCY) CALLS 36 TRUNKING CALLS ...37 EMERGENCY CALLS ...39 SCRAMBLER (ANALOG/ LTR)/ ENCRYPTION (NXDN/ DMR 40 SIGNALING...
... This Manual This manual describes using mainly the Portable transceiver display as and when needed. Depending on basic settings. CONTENTS BASIC OPERATIONS ...3 SWITCHING POWER ON/ OFF 3 ADJUSTING THE VOLUME ...4 SELECTING A ZONE AND CHANNEL 4 TRANSMITTING ...5 RECEIVING ...8 PROGRAMMABLE FUNCTIONS 9 FUNCTIONS OVERVIEW ...21 FUNCTION DETAILS ...33 SCAN ...33 DTMF (DUAL TONE MULTI FREQUENCY) CALLS 36 TRUNKING CALLS ...37 EMERGENCY CALLS ...39 SCRAMBLER (ANALOG/ LTR)/ ENCRYPTION (NXDN/ DMR 40 SIGNALING...
User Manual
Page 3
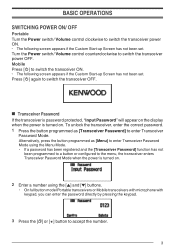
... button programmed as [Transceiver Password] to accept the number. 3 To unlock the transceiver, enter the correct password. 1 Press the button programmed as [Menu] to enter Transceiver Password Mode using the [J] and [K] buttons. ● On full button model Portable transceivers or Mobile transceivers with microphone with keypad, you can enter the password directly by pressing the keypad. 3 Press the [ ] or [ ] button to enter Transceiver Password Mode. BASIC OPERATIONS SWITCHING POWER ON/ OFF Portable Turn the Power switch/ Volume control...
... button programmed as [Transceiver Password] to accept the number. 3 To unlock the transceiver, enter the correct password. 1 Press the button programmed as [Menu] to enter Transceiver Password Mode using the [J] and [K] buttons. ● On full button model Portable transceivers or Mobile transceivers with microphone with keypad, you can enter the password directly by pressing the keypad. 3 Press the [ ] or [ ] button to enter Transceiver Password Mode. BASIC OPERATIONS SWITCHING POWER ON/ OFF Portable Turn the Power switch/ Volume control...
User Manual
Page 21
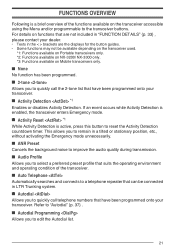
o Auto Telephone Automatically searches and connects to a telephone repeater that suits the operating environment and operating condition of the functions available on the transceiver accessible using the Menu and/or programmable to the transceiver buttons. o Activity Reset *1 While Activity Detection is a brief overview of the transceiver. o ANR Preset Cancels the background noise to "Autodial" {p. 37} . o Autodial Allows you to quickly call...
o Auto Telephone Automatically searches and connects to a telephone repeater that suits the operating environment and operating condition of the functions available on the transceiver accessible using the Menu and/or programmable to the transceiver buttons. o Activity Reset *1 While Activity Detection is a brief overview of the transceiver. o ANR Preset Cancels the background noise to "Autodial" {p. 37} . o Autodial Allows you to quickly call...

User Manual
Page 25
... Programming Unit) software or a computer is not available. o Display Type *1 Refer to "EMERGENCY CALLS" {p. 39} . o GPS/ Bluetooth Reset Activates GPS/ Bluetooth Reset mode. o GPS Position Display Allows you to change the frequency and other data of the tone. o Group Activates Group Call Mode. o Group + Short Message Allows you to set the currently selected zone and channel as the Direct Channel 1 ~ 5. o GPS Enables or disables the GPS function. o External Speaker Switches the speaker from the transceiver's built-in speaker...
... Programming Unit) software or a computer is not available. o Display Type *1 Refer to "EMERGENCY CALLS" {p. 39} . o GPS/ Bluetooth Reset Activates GPS/ Bluetooth Reset mode. o GPS Position Display Allows you to change the frequency and other data of the tone. o Group Activates Group Call Mode. o Group + Short Message Allows you to set the currently selected zone and channel as the Direct Channel 1 ~ 5. o GPS Enables or disables the GPS function. o External Speaker Switches the speaker from the transceiver's built-in speaker...

User Manual
Page 29
... connect a KRA-40 GPS antenna. ● When using the NX-3720, NX-3720H, NX-3820, NX-3820H, you must connect an external GPS unit. ● When the power is turned ON and/or the reception condition of this allows you to the base station. o RX Auto Gain Control Allows you to set the transceiver to automatically adjust the volume of the receiving sound to complete. ● When using your positioning data to save the operation...
... connect a KRA-40 GPS antenna. ● When using the NX-3720, NX-3720H, NX-3820, NX-3820H, you must connect an external GPS unit. ● When the power is turned ON and/or the reception condition of this allows you to the base station. o RX Auto Gain Control Allows you to set the transceiver to automatically adjust the volume of the receiving sound to complete. ● When using your positioning data to save the operation...

User Manual
Page 31
... view the current Trunking site. The transceiver begins searching for a new site and "Search" appears on the display. o Transfer *3 Allows the transceiver to transfer a specific code when a 5-tone code is found, searching ends and the transceiver switches to the task administrator. The task administrator sends the operator a Task Request message of the operator. With the site displayed, press and hold the button programmed as task started...
... view the current Trunking site. The transceiver begins searching for a new site and "Search" appears on the display. o Transfer *3 Allows the transceiver to transfer a specific code when a 5-tone code is found, searching ends and the transceiver switches to the task administrator. The task administrator sends the operator a Task Request message of the operator. With the site displayed, press and hold the button programmed as task started...
User Manual
Page 40
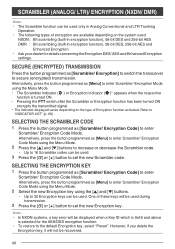
... systems, a key error will be displayed when a Key ID which is 0x40 and above is turned ON. ● Pressing the PTT switch after the Scrambler or Encryption function has been turned ON encrypts the transmitted signal. * The indicator displayed varies depending on the system used. SELECTING THE SCRAMBLER CODE 1 Press the button programmed as [Menu] to enter Scrambler/ Encryption Code Mode using the Menu Mode. 2 Press the [J] and [K] buttons to...
... systems, a key error will be displayed when a Key ID which is 0x40 and above is turned ON. ● Pressing the PTT switch after the Scrambler or Encryption function has been turned ON encrypts the transmitted signal. * The indicator displayed varies depending on the system used. SELECTING THE SCRAMBLER CODE 1 Press the button programmed as [Menu] to enter Scrambler/ Encryption Code Mode using the Menu Mode. 2 Press the [J] and [K] buttons to...
User Manual
Page 42
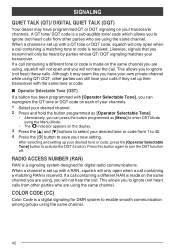
... same channel you are using the same channel. When a channel is set up with a QT tone or DQT code, squelch will only open when a call containing a different tone or code is a sub-audible tone/ code which allows you have programmed QT or DQT signaling on the display. 3 Press the [J] and [K] buttons to select your desired tone or code from other parties who are using the Menu Mode...
... same channel you are using the same channel. When a channel is set up with a QT tone or DQT code, squelch will only open when a call containing a different tone or code is a sub-audible tone/ code which allows you have programmed QT or DQT signaling on the display. 3 Press the [J] and [K] buttons to select your desired tone or code from other parties who are using the Menu Mode...

User Manual
Page 56
... connect to a Bluetooth-enabled PC without using a programming cable to communicate with the Field Programming Unit (FPU) or to make hands-free calls. However, operations are as follows. If the Bluetooth Data setting is not operationally tested, please consult your dealer, you can use the Serial Port Profile, Heart Rate Service, Automatic Injury Detection Service, Battery Service and Device Information Service. Version : Version 4.0 Power class : Class 2 (2.5 mW, up to 10 m) Profile : Headset Profile (HSP), Serial Port...
... connect to a Bluetooth-enabled PC without using a programming cable to communicate with the Field Programming Unit (FPU) or to make hands-free calls. However, operations are as follows. If the Bluetooth Data setting is not operationally tested, please consult your dealer, you can use the Serial Port Profile, Heart Rate Service, Automatic Injury Detection Service, Battery Service and Device Information Service. Version : Version 4.0 Power class : Class 2 (2.5 mW, up to 10 m) Profile : Headset Profile (HSP), Serial Port...

User Manual
Page 59
Up to 16 devices can pressed the button programmed as [Bluetooth Connect/ Disconnect]. ● The LED indicator blinks in blue. ● For Bluetooth devices that does not support Simple Secure Pairing, you can be found and listed on the display. ● The search will end after approximately 30 or 40 seconds (depending on whether or not the Bluetooth Data setting is enabled by the dealer), or...
Up to 16 devices can pressed the button programmed as [Bluetooth Connect/ Disconnect]. ● The LED indicator blinks in blue. ● For Bluetooth devices that does not support Simple Secure Pairing, you can be found and listed on the display. ● The search will end after approximately 30 or 40 seconds (depending on whether or not the Bluetooth Data setting is enabled by the dealer), or...

User Manual
Page 60
... pressing of the button programmed as Bluetooth Connect/ Disconnect does not affect the status of the transceiver. (Some headset models cannot be used automatically with the Field Programming Unit (FPU) or you can only be used automatically, connect manually using the Serial Port Profile, you can be used automatically.) ● Up to 10 Bluetooth devices can be set using the External Mic Sense function. Note: ● The volume level can use the PC...
... pressing of the button programmed as Bluetooth Connect/ Disconnect does not affect the status of the transceiver. (Some headset models cannot be used automatically with the Field Programming Unit (FPU) or you can only be used automatically, connect manually using the Serial Port Profile, you can be used automatically.) ● Up to 10 Bluetooth devices can be set using the External Mic Sense function. Note: ● The volume level can use the PC...

User Manual
Page 64
... [Menu] to the Serial Port Profile connection. Off : Audio is output from the built-in speaker of the transceiver and speaker of the Bluetooth device. Press the [J] and [K] buttons to enter Bluetooth Speaker Mode using the Menu Mode. Press the [ ] button to confirm your selection. 64 Press the [ ] button to select "Off" or "Only". Portable Press the button programmed as [Bluetooth Speaker] repeatedly to change the setting ("Off", "Only" or "Both(BT+Radio)"). Both(BT+Radio) : Audio...
... [Menu] to the Serial Port Profile connection. Off : Audio is output from the built-in speaker of the transceiver and speaker of the Bluetooth device. Press the [J] and [K] buttons to enter Bluetooth Speaker Mode using the Menu Mode. Press the [ ] button to confirm your selection. 64 Press the [ ] button to select "Off" or "Only". Portable Press the button programmed as [Bluetooth Speaker] repeatedly to change the setting ("Off", "Only" or "Both(BT+Radio)"). Both(BT+Radio) : Audio...
User Manual
Page 69
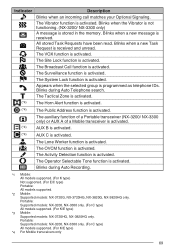
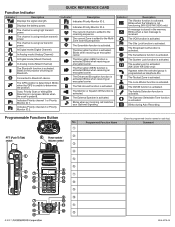
Blinks when a new message is activated. The VOX function is received. The Site Lock function is activated. The Surveillance function is activated. Blinks during Auto Recording. *1 Mobile: All models supported. (For K type) Not supported. (For E/C type) Portable: All models supported. *2 Mobile: Supported models: NX-3720G, NX-3720HG, NX-3820G, NX-3820HG only. The OVCM function is activated. The Activity Detection function is activated. The Tactical Zone is activated. (*4) The...
Blinks when a new message is activated. The VOX function is received. The Site Lock function is activated. The Surveillance function is activated. Blinks during Auto Recording. *1 Mobile: All models supported. (For K type) Not supported. (For E/C type) Portable: All models supported. *2 Mobile: Supported models: NX-3720G, NX-3720HG, NX-3820G, NX-3820HG only. The OVCM function is activated. The Activity Detection function is activated. The Tactical Zone is activated. (*4) The...
User Manual 1
Page 1
.... The External Speaker is programmed as telephone IDs. The auxiliary port is activated. (NX-3200/ NX-3300 only) Appears when the selected group is activated. In Digital mode (Digital Channel) In Analog mode (Analog Channel) Indicator Description Indicates Priority Monitor ID 3. Indicator Description The Vibrator function is activated. The Monitor or Squelch Off function is activated. Blinks in the memory. Connected to the scanning sequence. Blinks during Auto Recording...
.... The External Speaker is programmed as telephone IDs. The auxiliary port is activated. (NX-3200/ NX-3300 only) Appears when the selected group is activated. In Digital mode (Digital Channel) In Analog mode (Analog Channel) Indicator Description Indicates Priority Monitor ID 3. Indicator Description The Vibrator function is activated. The Monitor or Squelch Off function is activated. Blinks in the memory. Connected to the scanning sequence. Blinks during Auto Recording...
User Manual 1
Page 2
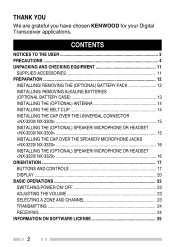
THANK YOU We are grateful you have chosen KENWOOD for your Digital Transceiver applications. CONTENTS NOTICES TO THE USER 3 PRECAUTIONS ...4 UNPACKING AND CHECKING EQUIPMENT 11 SUPPLIED ACCESSORIES 11 PREPARATION ...12 INSTALLING/ REMOVING THE (OPTIONAL) BATTERY PACK 12 INSTALLING/ REMOVING ALKALINE BATTERIES (OPTIONAL BATTERY CASE 13 INSTALLING THE (OPTIONAL) ANTENNA 14 INSTALLING THE BELT CLIP 14 INSTALLING THE CAP OVER THE UNIVERSAL CONNECTOR
THANK YOU We are grateful you have chosen KENWOOD for your Digital Transceiver applications. CONTENTS NOTICES TO THE USER 3 PRECAUTIONS ...4 UNPACKING AND CHECKING EQUIPMENT 11 SUPPLIED ACCESSORIES 11 PREPARATION ...12 INSTALLING/ REMOVING THE (OPTIONAL) BATTERY PACK 12 INSTALLING/ REMOVING ALKALINE BATTERIES (OPTIONAL BATTERY CASE 13 INSTALLING THE (OPTIONAL) ANTENNA 14 INSTALLING THE BELT CLIP 14 INSTALLING THE CAP OVER THE UNIVERSAL CONNECTOR

User Manual 1
Page 4
.... Pay attention to the volume level when turning the squelch off before operating the transceiver. ● The charger is the device that the end of batteries, be sure to comply with the laws and regulations in your eyes. ● When the transceiver is connected to remove the water from the speaker and/or microphone before installing optional accessories. ● When water...
.... Pay attention to the volume level when turning the squelch off before operating the transceiver. ● The charger is the device that the end of batteries, be sure to comply with the laws and regulations in your eyes. ● When the transceiver is connected to remove the water from the speaker and/or microphone before installing optional accessories. ● When water...

User Manual 4
Page 6
... the AC mains line. Lightly shake the transceiver to the volume level when turning the squelch off before operating the transceiver. ● The charger is the device that disconnects the unit from the speaker and/or microphone before installing optional accessories. ● When water gets into the microphone opening or the speaker grill, the voice level may catch the cable. ● Do not place...
... the AC mains line. Lightly shake the transceiver to the volume level when turning the squelch off before operating the transceiver. ● The charger is the device that disconnects the unit from the speaker and/or microphone before installing optional accessories. ● When water gets into the microphone opening or the speaker grill, the voice level may catch the cable. ● Do not place...

User Manual 5
Page 7
... the microphone cable around your neck while near machinery that may become hot. Lightly shake the transceiver to remove the water from the AC mains line. The AC plug should be sure to comply with the laws and regulations in your eyes. ● When the transceiver is connected to the volume level when turning the squelch off before operating...
... the microphone cable around your neck while near machinery that may become hot. Lightly shake the transceiver to remove the water from the AC mains line. The AC plug should be sure to comply with the laws and regulations in your eyes. ● When the transceiver is connected to the volume level when turning the squelch off before operating...

User Manual 7
Page 1
... received signal matches your convenience. Peter Deutsch [email protected] DIGITAL TRANSCEIVER USER GUIDE This User guide covers only the basic operations of the transceiver, then firmly press the battery pack in posizione. 2 Bloccare il fermo di sicurezza per spegnere il ricetrasmettitore. Belt clip 1 Screws for transmitting and receiving. Turn the Power switch/ Volume control counterclockwise fully to switch the transceiver ON. Select the desired channel using...
... received signal matches your convenience. Peter Deutsch [email protected] DIGITAL TRANSCEIVER USER GUIDE This User guide covers only the basic operations of the transceiver, then firmly press the battery pack in posizione. 2 Bloccare il fermo di sicurezza per spegnere il ricetrasmettitore. Belt clip 1 Screws for transmitting and receiving. Turn the Power switch/ Volume control counterclockwise fully to switch the transceiver ON. Select the desired channel using...


