Instruction Manual
Page 2
... Adjustment Theft Deterrent Faceplate TEL Mute Tuner features Tuning Mode Tuning Direct Access Tuning Station Preset Memory Auto Memory Entry Preset Tuning CD/MP3/WMA/ External disc control features Playing CD & MP3/WMA Playing External Disc Fast Forwarding and Reversing Track... | English 3 HD Radio control features 24 4 Tuning Menu system 25 6 Menu System 7 Security Code Touch Sensor Tone 8 Manual Clock Adjustment DSI (Disabled System Indicator) 10 Selectable Illumination Dimmer System Q Setting Switching preout Built-in Auxiliary input Setting CD Read Setting AMP Control...
... Adjustment Theft Deterrent Faceplate TEL Mute Tuner features Tuning Mode Tuning Direct Access Tuning Station Preset Memory Auto Memory Entry Preset Tuning CD/MP3/WMA/ External disc control features Playing CD & MP3/WMA Playing External Disc Fast Forwarding and Reversing Track... | English 3 HD Radio control features 24 4 Tuning Menu system 25 6 Menu System 7 Security Code Touch Sensor Tone 8 Manual Clock Adjustment DSI (Disabled System Indicator) 10 Selectable Illumination Dimmer System Q Setting Switching preout Built-in Auxiliary input Setting CD Read Setting AMP Control...
Instruction Manual
Page 4
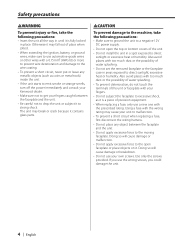
... your fingers. • Do not subject the faceplate to excessive shock, as coins or metal tools) inside the unit. • If the unit starts to emit smoke or strange smells, turn off the power immediately and consult your Kenwood dealer. • Make sure not to get your own screws. Doing ...injury or fire, take the following precautions: • Make sure to ground the unit to a negative 12V DC power supply. • Do not open faceplate or place objects on it contains glass parts. 2CAUTION To prevent damage to the machine, take the following precautions: • Insert the unit all the...
... your fingers. • Do not subject the faceplate to excessive shock, as coins or metal tools) inside the unit. • If the unit starts to emit smoke or strange smells, turn off the power immediately and consult your Kenwood dealer. • Make sure not to get your own screws. Doing ...injury or fire, take the following precautions: • Make sure to ground the unit to a negative 12V DC power supply. • Do not open faceplate or place objects on it contains glass parts. 2CAUTION To prevent damage to the machine, take the following precautions: • Insert the unit all the...
Instruction Manual
Page 6
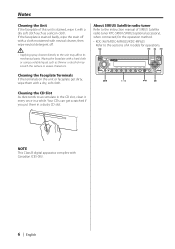
...CDs can get dirty, wipe them in a while. Wiping the faceplate with a hard cloth or using a volatile liquid such as a silicon cloth. About SIRIUS Satellite radio tuner Refer to the instruction manual of SIRIUS Satellite radio... tuner KTC-SR901/SR902 (optional accessory), when connected, for operations. Notes Cleaning the Unit If the faceplate ...surface or erases characters. If the faceplate is stained, wipe it every once in a dusty CD slot. AUTO 1 - 6 38 AM Cleaning the CD Slot As dust tends to the ...
...CDs can get dirty, wipe them in a while. Wiping the faceplate with a hard cloth or using a volatile liquid such as a silicon cloth. About SIRIUS Satellite radio tuner Refer to the instruction manual of SIRIUS Satellite radio... tuner KTC-SR901/SR902 (optional accessory), when connected, for operations. Notes Cleaning the Unit If the faceplate ...surface or erases characters. If the faceplate is stained, wipe it every once in a dusty CD slot. AUTO 1 - 6 38 AM Cleaning the CD Slot As dust tends to the ...
Instruction Manual
Page 16
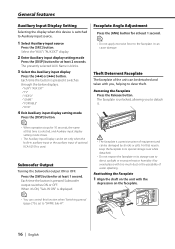
... input display Press the [4] or [¢] button. The presently selected AUX Name is switched to "SWPRE Sub-W". 16 | English The faceplate is selected, and Auxiliary input display setting mode closes. • The Auxiliary Input Display can cause damage. For that time is unlocked..., allowing you , helping to the faceplate. General features Auxiliary Input Display Setting Selecting the display when this function when 'Switching preout' (page 27) is pressed Subwoofer output ...
... input display Press the [4] or [¢] button. The presently selected AUX Name is switched to "SWPRE Sub-W". 16 | English The faceplate is selected, and Auxiliary input display setting mode closes. • The Auxiliary Input Display can cause damage. For that time is unlocked..., allowing you , helping to the faceplate. General features Auxiliary Input Display Setting Selecting the display when this function when 'Switching preout' (page 27) is pressed Subwoofer output ...

Instruction Manual
Page 17
2 Push the faceplate in place, allowing you to the audio during a call ends Hang up the phone. The faceplate is displayed. The audio system pauses. English | 17 When a call comes in "CALL" is locked in until it clicks. When the call Press the [SRC] button. The "CALL" display disappears and the audio system comes back ON. The "CALL" display disappears and the audio system comes back ON. Listening to use the unit. TEL Mute The audio system automatically mutes when a call comes in .
2 Push the faceplate in place, allowing you to the audio during a call ends Hang up the phone. The faceplate is displayed. The audio system pauses. English | 17 When a call comes in "CALL" is locked in until it clicks. When the call Press the [SRC] button. The "CALL" display disappears and the audio system comes back ON. The "CALL" display disappears and the audio system comes back ON. Listening to use the unit. TEL Mute The audio system automatically mutes when a call comes in .

Instruction Manual
Page 20
... covered in 'Notes on playing MP3/WMA' (page 8). The methods and precautions to insert disc Press the [0] button. 2 Insert a disc. • When the faceplate has been slid open, it might interfere with the shift lever or something else. Eject the disc 1 Eject the disc Press the [0] button. 2 Return the...SRC 4 FM 0 SCAN RDM REP F.SEL M.RDM /3 38 DISP AM ¢ Playing CD & MP3/WMA When there is no disc inserted 1 Open the panel to be followed for writing MP3/WMA data are CDROM, CD-R, and CD-RW. Check that this happens, pay attention to the original position Press the [0] button...
... covered in 'Notes on playing MP3/WMA' (page 8). The methods and precautions to insert disc Press the [0] button. 2 Insert a disc. • When the faceplate has been slid open, it might interfere with the shift lever or something else. Eject the disc 1 Eject the disc Press the [0] button. 2 Return the...SRC 4 FM 0 SCAN RDM REP F.SEL M.RDM /3 38 DISP AM ¢ Playing CD & MP3/WMA When there is no disc inserted 1 Open the panel to be followed for writing MP3/WMA data are CDROM, CD-R, and CD-RW. Check that this happens, pay attention to the original position Press the [0] button...
Instruction Manual
Page 26
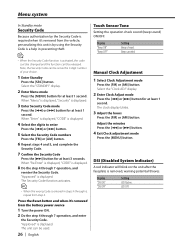
... check sound (beep sound) ON/OFF. "Approved" is removed, warning potential thieves. DSI (Disabled System Indicator) A red indicator will blink on the unit after the faceplate is displayed. When "Re-Enter" is displayed, "CODE" is displayed. 3 Enter Security Code mode Press the [4] or [¢] button for at least 1 second. Adjust the...
... check sound (beep sound) ON/OFF. "Approved" is removed, warning potential thieves. DSI (Disabled System Indicator) A red indicator will blink on the unit after the faceplate is displayed. When "Re-Enter" is displayed, "CODE" is displayed. 3 Enter Security Code mode Press the [4] or [¢] button for at least 1 second. Adjust the...
Instruction Manual
Page 30
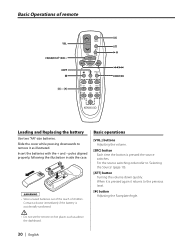
... of the reach of remote VOL. Contact a doctor immediately if the battery is pressed again it returns to the previous level. [✱] button Adjusting the Faceplate Angle. • Do not set the remote on hot places such as illustrated. Slide the cover while pressing downwards to 'Selecting the Source' (page 10...
... of the reach of remote VOL. Contact a doctor immediately if the battery is pressed again it returns to the previous level. [✱] button Adjusting the Faceplate Angle. • Do not set the remote on hot places such as illustrated. Slide the cover while pressing downwards to 'Selecting the Source' (page 10...

Instruction Manual
Page 32
... connections for each unit. 3. Install the unit in the car. • When only two speakers are working properly. • Mount the unit so that the faceplate will not hit the lid when closing and opening. • If the fuse blows, first make sure to cause a short circuit, then replace the old...
... connections for each unit. 3. Install the unit in the car. • When only two speakers are working properly. • Mount the unit so that the faceplate will not hit the lid when closing and opening. • If the fuse blows, first make sure to cause a short circuit, then replace the old...

Instruction Manual
Page 35
English | 35 Screwing the Faceplate on the Unit If you screw them in another hole, it does not fall off, screw in the provided screws in any other screw hole than the one specified. If you want to fasten the faceplate to the main unit so that it will contact and may cause damage to the mechanical parts inside the unit. Bottom panel Accessory5 • Never insert the screw in the holes shown below.
English | 35 Screwing the Faceplate on the Unit If you screw them in another hole, it does not fall off, screw in the provided screws in any other screw hole than the one specified. If you want to fasten the faceplate to the main unit so that it will contact and may cause damage to the mechanical parts inside the unit. Bottom panel Accessory5 • Never insert the screw in the holes shown below.
Instruction Manual
Page 39
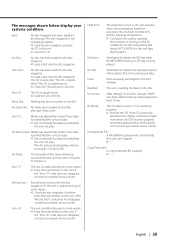
...inside the automatic disc changer exceeds 60°C (140°F), stopping all operation. ➪ Cool down . ➪ Load the CD correctly. No Panel: The faceplate of the slave unit being connected to display text during reception of the station that the unit can play . Or the unit ...; Replace it correctly. Reading: The unit is quite dirty. Eject: No disc magazine has been loaded in the unit. ➪ Insert the CD. The CD is reading the data on the unit. Hold Error: The protective circuit in the disc magazine. ➪ Load a disc into the disc magazine...
...inside the automatic disc changer exceeds 60°C (140°F), stopping all operation. ➪ Cool down . ➪ Load the CD correctly. No Panel: The faceplate of the slave unit being connected to display text during reception of the station that the unit can play . Or the unit ...; Replace it correctly. Reading: The unit is quite dirty. Eject: No disc magazine has been loaded in the unit. ➪ Insert the CD. The CD is reading the data on the unit. Hold Error: The protective circuit in the disc magazine. ➪ Load a disc into the disc magazine...

