

Instruction Manual
Page 2
... Display (during MP3/WMA play) Disc Select (during play by disc changer) Direct Search Tuner Control 32 Displaying the Easy Control Panel Displaying the Tuner Control screen Displaying the Tuner Menu screen Seek Mode Auto Memory Manual Memory Preset Select Set Station Name Direct Search Traffic Information Search for Program Type Radio Text TV/ VIDEO Control 38 Displaying the TV Picture screen Displaying the Easy Control Panel Displaying the TV Control screen Displaying the TV Menu screen Seek Mode Auto Memory Manual Memory Preset Select Set Station Name Direct Search SIRIUS Tuner Control
... Display (during MP3/WMA play) Disc Select (during play by disc changer) Direct Search Tuner Control 32 Displaying the Easy Control Panel Displaying the Tuner Control screen Displaying the Tuner Menu screen Seek Mode Auto Memory Manual Memory Preset Select Set Station Name Direct Search Traffic Information Search for Program Type Radio Text TV/ VIDEO Control 38 Displaying the TV Picture screen Displaying the Easy Control Panel Displaying the TV Control screen Displaying the TV Menu screen Seek Mode Auto Memory Manual Memory Preset Select Set Station Name Direct Search SIRIUS Tuner Control

Instruction Manual
Page 3
... the User I/F 2 screen Touch Panel Adjustment Clock Security Code Setup Set Up Memory SIRIUS Setup .....75 Displaying the SIRIUS Set Up screen DAB Set Up 76 Displaying the DAB Set Up screen Announcement Selection Sound Effects Menu 78 Sound Effects Menu 78 Displaying the Control screen Displaying the Sound Effects Menu screen Audio Control 79 Displaying the Audio Control 1 screen Displaying the Audio Control 2 screen Equalizer 80 Displaying the Equalizer screen Tone curve setup Zone Control 82 Displaying the Zone Control screen Muting Audio Volume upon Reception of Phone call 83 Muting...
... the User I/F 2 screen Touch Panel Adjustment Clock Security Code Setup Set Up Memory SIRIUS Setup .....75 Displaying the SIRIUS Set Up screen DAB Set Up 76 Displaying the DAB Set Up screen Announcement Selection Sound Effects Menu 78 Sound Effects Menu 78 Displaying the Control screen Displaying the Sound Effects Menu screen Audio Control 79 Displaying the Audio Control 1 screen Displaying the Audio Control 2 screen Equalizer 80 Displaying the Equalizer screen Tone curve setup Zone Control 82 Displaying the Zone Control screen Muting Audio Volume upon Reception of Phone call 83 Muting...
Instruction Manual
Page 4
... use a new fuse with the prescribed rating. Your discs can get scratched if you experience problems during winter, the liquid crystal panel's screen will return after a whilst, consult your own screws. In such a situation, remove the disc and wait for a while. 4 | English Audio units you can accumulate in areas exposed to "N" position if provided.) Navigation units you can control from the KVT-617DVD/647DVD Receiver...
... use a new fuse with the prescribed rating. Your discs can get scratched if you experience problems during winter, the liquid crystal panel's screen will return after a whilst, consult your own screws. In such a situation, remove the disc and wait for a while. 4 | English Audio units you can accumulate in areas exposed to "N" position if provided.) Navigation units you can control from the KVT-617DVD/647DVD Receiver...

Instruction Manual
Page 5
.... Indicates the button you cannot play back any of the 24-hour display type are used on this manual are examples used . Time is displayed on each setup is shown. The number in the DVD-Video format. In this instruction manual, screens of the following map. 1 5 2 1 6 2 3 4 1 5 2 4 Icons on the left, the 16:9 video can be converted into letter box video. Region codes in the world The DVD players are given...
.... Indicates the button you cannot play back any of the 24-hour display type are used on this manual are examples used . Time is displayed on each setup is shown. The number in the DVD-Video format. In this instruction manual, screens of the following map. 1 5 2 1 6 2 3 4 1 5 2 4 Icons on the left, the 16:9 video can be converted into letter box video. Region codes in the world The DVD players are given...

Instruction Manual
Page 6
..., see the instruction manual of a DVD writer to "Disc at Once. • Play mode may not play a medium containing non MP3/WMA/ JPEG/MPEG. 6 | English Entering ID3 tag The Displayable ID3 tag is loaded, the unit checks all the data on the code list may not be possible when portions of the functions of Windows Media Player 9 or higher are used . They may...
..., see the instruction manual of a DVD writer to "Disc at Once. • Play mode may not play a medium containing non MP3/WMA/ JPEG/MPEG. 6 | English Entering ID3 tag The Displayable ID3 tag is loaded, the unit checks all the data on the code list may not be possible when portions of the functions of Windows Media Player 9 or higher are used . They may...

Instruction Manual
Page 11
... than 1 second. q Screen Setup [SCREEN] key Displays the Screen Setup or Angle Setup screen. (page 59) w Function/AV OUT SEL [FNC] key The video source function changes in the following order each time you press the key again,the power turns on. 8 Volume Controls [5]/[∞] key Adjusts the volume. 9 Joystick Track/Station Selectors [4]/[¢] key Selects a music or chapter, track, or frequency. Press it is shown. e Switch Screen Mode/M.CTRL [MODE] key Switches the screen mode. (page 17) The DVD Disc Menu screen appears when...
... than 1 second. q Screen Setup [SCREEN] key Displays the Screen Setup or Angle Setup screen. (page 59) w Function/AV OUT SEL [FNC] key The video source function changes in the following order each time you press the key again,the power turns on. 8 Volume Controls [5]/[∞] key Adjusts the volume. 9 Joystick Track/Station Selectors [4]/[¢] key Selects a music or chapter, track, or frequency. Press it is shown. e Switch Screen Mode/M.CTRL [MODE] key Switches the screen mode. (page 17) The DVD Disc Menu screen appears when...

Instruction Manual
Page 13
... remote control modes. VCD (When 1 is set to "DVD") Switches the view angle. e [ANGLE] key DVD (When 1 is set to "DVD") Turns the PBC (Playback Control) function On or Off. t [DVD SETUP] key Not used. TV (When 1 is set to "TV" or "AUD") FM+: Switches to "DVD") Stops playing the built-in DVD/VCD/CD/MP3/WMA/JPEG/MPEG player source TV: TV source 2 [SRC] key Audio source changes each time you press the key. 3 [ ] / [ ] key DISC TV TUNER Adjusts the volume...
... remote control modes. VCD (When 1 is set to "DVD") Switches the view angle. e [ANGLE] key DVD (When 1 is set to "DVD") Turns the PBC (Playback Control) function On or Off. t [DVD SETUP] key Not used. TV (When 1 is set to "TV" or "AUD") FM+: Switches to "DVD") Stops playing the built-in DVD/VCD/CD/MP3/WMA/JPEG/MPEG player source TV: TV source 2 [SRC] key Audio source changes each time you press the key. 3 [ ] / [ ] key DISC TV TUNER Adjusts the volume...

Instruction Manual
Page 27
... Disc Changer) H Switches the button display. L Switches the play by the disc changer/CD player U Calls the Disc Changer/ CD player Menu. I Selects a track. A Starts or stops Scan Play (that can be used and the information that plays the beginning of Disc Changer) Track Number Display Play Time Display Function Indicator • The functions that can be displayed will differ depending on the models being connected. K Scrolls the display text. Disc Number Display (Function of each song one after the other). F Repeats playing disc (the present disc). (Function of Disc Changer...
... Disc Changer) H Switches the button display. L Switches the play by the disc changer/CD player U Calls the Disc Changer/ CD player Menu. I Selects a track. A Starts or stops Scan Play (that can be used and the information that plays the beginning of Disc Changer) Track Number Display Play Time Display Function Indicator • The functions that can be displayed will differ depending on the models being connected. K Scrolls the display text. Disc Number Display (Function of each song one after the other). F Repeats playing disc (the present disc). (Function of Disc Changer...

Instruction Manual
Page 32
... for the ) i Switches the Seek mode. (see page 34 for the ) o Selects the Program Service Name, Station Name, or Radio Text mode for the ) • For receiver key operations, see (page 10). • The Easy Control Panel is displayed in a station. F Displaying the Easy Control Panel 1 MODE:FULL AV-OUT:DVD 2 SRC TUNER 3 3 4 AM FM FM1 Preset 1 4 5 1 SEEK 98.1 MHz 1 Adjusts the volume. 2 Switches the source. 3 Switches the band (to AM or FM1/2/3). 4 Tunes in a station using various functions. F Tuner Control screen 6 T U N 7E...
... for the ) i Switches the Seek mode. (see page 34 for the ) o Selects the Program Service Name, Station Name, or Radio Text mode for the ) • For receiver key operations, see (page 10). • The Easy Control Panel is displayed in a station. F Displaying the Easy Control Panel 1 MODE:FULL AV-OUT:DVD 2 SRC TUNER 3 3 4 AM FM FM1 Preset 1 4 5 1 SEEK 98.1 MHz 1 Adjusts the volume. 2 Switches the source. 3 Switches the band (to AM or FM1/2/3). 4 Tunes in a station using various functions. F Tuner Control screen 6 T U N 7E...
Instruction Manual
Page 38
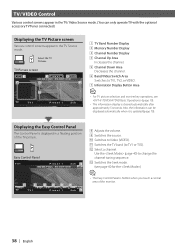
.... TV Picture screen TV1 1 5 2 Preset 1 3 2ch MODE:FULL AV-OUT:DVD 6 4 7 TV TV1 Preset 1 2ch 1 TV Band Number Display 2 Memory Number Display 3 Channel Number Display 4 Channel Up Area Increases the channel. 5 Channel Down Area Decreases the channel. 6 Band/Video Switch Area Switches to change the channel tuning sequence. Displaying the Easy Control Panel The Control Panel is cleared automatically after approximately 5 seconds. Use the (page 40) to TV1, TV2, or VIDEO. 7 Information Display Button Area • For TV picture selection and receiver key operations, see...
.... TV Picture screen TV1 1 5 2 Preset 1 3 2ch MODE:FULL AV-OUT:DVD 6 4 7 TV TV1 Preset 1 2ch 1 TV Band Number Display 2 Memory Number Display 3 Channel Number Display 4 Channel Up Area Increases the channel. 5 Channel Down Area Decreases the channel. 6 Band/Video Switch Area Switches to change the channel tuning sequence. Displaying the Easy Control Panel The Control Panel is cleared automatically after approximately 5 seconds. Use the (page 40) to TV1, TV2, or VIDEO. 7 Information Display Button Area • For TV picture selection and receiver key operations, see...

Instruction Manual
Page 52
... the next channel manually. Service Preset Memory The current receiving service is stored in memory. 1 Select a service you touch the button. Tunes in service in . 52 | English Continue to 6 are tuned in memory one after another. Auto Ensemble Memory An ensemble with good reception automatically. Auto Memory terminates when 6 stations are stored or when all stations are not shown, touch . Switches to store in memory 2sec. 2sec. 1 - 6 If 1 to touch until the memory number appears...
... the next channel manually. Service Preset Memory The current receiving service is stored in memory. 1 Select a service you touch the button. Tunes in service in . 52 | English Continue to 6 are tuned in memory one after another. Auto Ensemble Memory An ensemble with good reception automatically. Auto Memory terminates when 6 stations are stored or when all stations are not shown, touch . Switches to store in memory 2sec. 2sec. 1 - 6 If 1 to touch until the memory number appears...

Instruction Manual
Page 66
... lock level. 5 Determines the code number and displays the Parental Level Setup screen. 2 Enter the code number 3 Display the Parental Level Setup screen Enter Parental Level Level 5 1 1 Return 2 1 Sets a parental level. 2 Returns to the DVD SETUP 2 screen. 4 Set a parental level 5 Complete the parental level setup Return 0 -9 • The number you enter first is set as your code number. • You can clear the code number by pressing the Reset button. • If a disc has a higher parental lock level, the audience needs to enter the code number. •...
... lock level. 5 Determines the code number and displays the Parental Level Setup screen. 2 Enter the code number 3 Display the Parental Level Setup screen Enter Parental Level Level 5 1 1 Return 2 1 Sets a parental level. 2 Returns to the DVD SETUP 2 screen. 4 Set a parental level 5 Complete the parental level setup Return 0 -9 • The number you enter first is set as your code number. • You can clear the code number by pressing the Reset button. • If a disc has a higher parental lock level, the audience needs to enter the code number. •...
Instruction Manual
Page 67
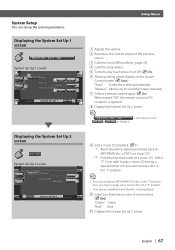
p Selects an illumination color of text display on the Source Control screen. ( Auto) "Auto": Scrolls the screen automatically. "Manual": Allows you to scroll the screen manually. 7 Selects a remote control signal. ( On) When turned "Off", the remote control of TV reception is rejected. 8 Displays the System Set Up 2 screen. • If or is being played. Select "2" if you wish to play a music CD having a special format or if you may not play an MP3/WMA/VCD disc in the...
p Selects an illumination color of text display on the Source Control screen. ( Auto) "Auto": Scrolls the screen automatically. "Manual": Allows you to scroll the screen manually. 7 Selects a remote control signal. ( On) When turned "Off", the remote control of TV reception is rejected. 8 Displays the System Set Up 2 screen. • If or is being played. Select "2" if you wish to play a music CD having a special format or if you may not play an MP3/WMA/VCD disc in the...

Instruction Manual
Page 72
..., your security code. 3 Enter a security code 0 -9 Security 1 1 1 Adjusts the volume. 2 Returns to the Control screen of the previous source. 3 Calls the Sound Effects Menu. (page 78) 4 Calls the Setup Menu. 5 Allows you disconnect your receiver system against theft. 2 Start the security code registration Set • When the Security Code function is registered. If turned "On", the burglar alarm lamp flashes when the protection panel is removed. ( On) Input a four-digit number. 4 Register your...
..., your security code. 3 Enter a security code 0 -9 Security 1 1 1 Adjusts the volume. 2 Returns to the Control screen of the previous source. 3 Calls the Sound Effects Menu. (page 78) 4 Calls the Setup Menu. 5 Allows you disconnect your receiver system against theft. 2 Start the security code registration Set • When the Security Code function is registered. If turned "On", the burglar alarm lamp flashes when the protection panel is removed. ( On) Input a four-digit number. 4 Register your...

Instruction Manual
Page 79
... the Control screen of the previous source. 3 Calls the Setup Menu. (page 60) 4 Calls the Sound Effects Menu. 5 Adjusts the right and left audio balance. w Sets the center frequency of power amplifier. English | 79 If turned "On", high and low tones are automatically enhanced during low volume. ( On) p Displays the Audio Control 2 screen. See the catalog or instruction manual of bass boost you have set for "AMP Bass". (optional accessory) If you set some models of original volume. •...
... the Control screen of the previous source. 3 Calls the Setup Menu. (page 60) 4 Calls the Sound Effects Menu. 5 Adjusts the right and left audio balance. w Sets the center frequency of power amplifier. English | 79 If turned "On", high and low tones are automatically enhanced during low volume. ( On) p Displays the Audio Control 2 screen. See the catalog or instruction manual of bass boost you have set for "AMP Bass". (optional accessory) If you set some models of original volume. •...

Instruction Manual
Page 82
....) Use "Reverse" to the same source. There is also switched to change over the front and rear audio sources. 8 Adjusts the volume of the previous source. 3 Calls the Setup Menu. (page 60) 4 Calls the Sound Effects Menu. 5 Turns the Zone Function (that is output at the AV OUTPUT terminal is no output from the subwoofer or center. - However, if you have set the "Area" to "On". - Sound Effects Menu Displaying the Zone Control screen Zone Control screen 1 4 7 3 2 6 1 5 8 6 1 Adjusts the volume...
....) Use "Reverse" to the same source. There is also switched to change over the front and rear audio sources. 8 Adjusts the volume of the previous source. 3 Calls the Setup Menu. (page 60) 4 Calls the Sound Effects Menu. 5 Turns the Zone Function (that is output at the AV OUTPUT terminal is no output from the subwoofer or center. - However, if you have set the "Area" to "On". - Sound Effects Menu Displaying the Zone Control screen Zone Control screen 1 4 7 3 2 6 1 5 8 6 1 Adjusts the volume...
Instruction Manual
Page 85
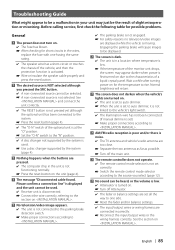
... problems. General ? Wait a while after turning power on the unit (page 4). ? When the unit is set to auto dimmer, it is not linked to . ? Separate the two antennas as far as possible. The remote controller does not operate. ✔ The remote control mode selector is not functioning normally. Reset the fader and/or balance settings. ✔ The input/output wires or wiring harness are pressed. ✔ The computer chip in the unit is not set ) Make proper connections...
... problems. General ? Wait a while after turning power on the unit (page 4). ? When the unit is set to auto dimmer, it is not linked to . ? Separate the two antennas as far as possible. The remote controller does not operate. ✔ The remote control mode selector is not functioning normally. Reset the fader and/or balance settings. ✔ The input/output wires or wiring harness are pressed. ✔ The computer chip in the unit is not set ) Make proper connections...

Instruction Manual
Page 86
... a title is turned off random play has been selected. The subtitle is not extended. Check the viewing restriction level (RATING) setting. ? Disc source ? Connect the wire to the proper terminal. ? The sound quality is poor or distorted. ✔ One of the speaker wires is being played does not contain the recording of subtitles. Radio reception is poor. ✔ The car antenna is not displayed. ✔ The DVD disc being pinched...
... a title is turned off random play has been selected. The subtitle is not extended. Check the viewing restriction level (RATING) setting. ? Disc source ? Connect the wire to the proper terminal. ? The sound quality is poor or distorted. ✔ One of the speaker wires is being played does not contain the recording of subtitles. Radio reception is poor. ✔ The car antenna is not displayed. ✔ The DVD disc being pinched...
User Manual 1
Page 3
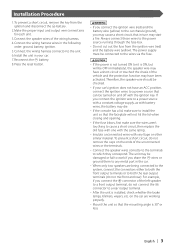
... - If you share the - battery. 2.Make the proper input and output wire connections for each unit. 3.Connect the speaker wires of the left speaker to a front output terminal, do not mix front and rear). Installation Procedure 1.To prevent a short circuit, remove the key from the ignition wire (red) and the battery wire (yellow). For example, if you connect the + connector of the wiring harness. 4.Connect the wiring harness wires in your car's ignition does not have a short...
... - If you share the - battery. 2.Make the proper input and output wire connections for each unit. 3.Connect the speaker wires of the left speaker to a front output terminal, do not mix front and rear). Installation Procedure 1.To prevent a short circuit, remove the key from the ignition wire (red) and the battery wire (yellow). For example, if you connect the + connector of the wiring harness. 4.Connect the wiring harness wires in your car's ignition does not have a short...
User Manual 1
Page 5
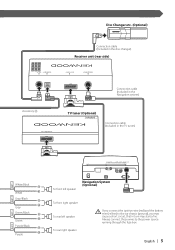
Disc Changer etc. (Optional) Connection cable (Included in the disc changer) Receiver unit (rear side) TO NAVIGATION I/F TO TV TUNER I/F TO MONITOR I/F TO 5L I/F Accessory 2 Connection cable (Included in the Navigation system) TV tuner (Optional) TV ANTENNA INPUT Connection cable (Included in the TV tuner) TO MONITOR UNIT FRONT L FRONT R REAR L White/Black White + Gray/Black + Gray Green/Black + Green Purple/Black + Purple To front left speaker Navigation System (Optional) To front...
Disc Changer etc. (Optional) Connection cable (Included in the disc changer) Receiver unit (rear side) TO NAVIGATION I/F TO TV TUNER I/F TO MONITOR I/F TO 5L I/F Accessory 2 Connection cable (Included in the Navigation system) TV tuner (Optional) TV ANTENNA INPUT Connection cable (Included in the TV tuner) TO MONITOR UNIT FRONT L FRONT R REAR L White/Black White + Gray/Black + Gray Green/Black + Green Purple/Black + Purple To front left speaker Navigation System (Optional) To front...


