
Instruction Manual
Page 1
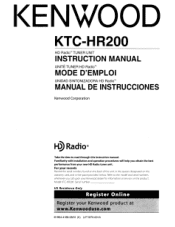
KTC-HR200 HD Radio™ TUNER UNIT INSTRUCTION MANUAL UNITE TUNER HD Radio™ MODE D'EMPLOI UNlOAD SINTONIZADORA HD Radio™ MANUAL DE INSTRUCCIONES Kenwood Corporation Take the time to the model and serial numbers whenever you obtain the best performance from your Kenwood dealer for information or service on the warranty card, and in the spaces designated on the product. For your records Record the serial number, found on the back of the...
KTC-HR200 HD Radio™ TUNER UNIT INSTRUCTION MANUAL UNITE TUNER HD Radio™ MODE D'EMPLOI UNlOAD SINTONIZADORA HD Radio™ MANUAL DE INSTRUCCIONES Kenwood Corporation Take the time to the model and serial numbers whenever you obtain the best performance from your Kenwood dealer for information or service on the warranty card, and in the spaces designated on the product. For your records Record the serial number, found on the back of the...

Instruction Manual
Page 2
...;: Analog FM (Main channel) Analog FM --Digital FM Analog FM 1.~l9!~a.I.~~-.1.~~:""""': . . . :Digital FM-2ch: '. , . :Digi~al FM-8ch: ~ _-_ ~ I KTC-HR200 En-8 Functions While Displaying the Control Screen Seek Mode Auto Memory Manual Memory Receive mode Operations -DVD monitor 2- En-11 Functions While Displaying the Control Screen Seek Mode Auto Memory Manual Memory Receive mode Accessories/Installation Procedure En-14 Installation En-15 Troubleshooting Guide En-16 Specifications En-17 HD Radio technology enables broadcasters to the level of music CD in digital AM...
...;: Analog FM (Main channel) Analog FM --Digital FM Analog FM 1.~l9!~a.I.~~-.1.~~:""""': . . . :Digital FM-2ch: '. , . :Digi~al FM-8ch: ~ _-_ ~ I KTC-HR200 En-8 Functions While Displaying the Control Screen Seek Mode Auto Memory Manual Memory Receive mode Operations -DVD monitor 2- En-11 Functions While Displaying the Control Screen Seek Mode Auto Memory Manual Memory Receive mode Accessories/Installation Procedure En-14 Installation En-15 Troubleshooting Guide En-16 Specifications En-17 HD Radio technology enables broadcasters to the level of music CD in digital AM...
Instruction Manual
Page 3
... : page En-11 Q G · FolloWing models are used . • The HD Radio cannot be inapplicable. Notes • If you experience problems during installation, consult your Kenwood dealer. KDC-MP728, KDC-MP828, KDC-X789,KDC-X889 • The display of this manual are examples used to explain more clearly how the controls are Multi key system models. Cleaning the Unit If the faceplate of the capital and small letters...
... : page En-11 Q G · FolloWing models are used . • The HD Radio cannot be inapplicable. Notes • If you experience problems during installation, consult your Kenwood dealer. KDC-MP728, KDC-MP828, KDC-X789,KDC-X889 • The display of this manual are examples used to explain more clearly how the controls are Multi key system models. Cleaning the Unit If the faceplate of the capital and small letters...
Instruction Manual
Page 4
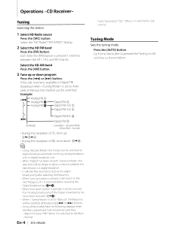
... , the seek time will take few seconds to Sub channel Tuning Mode Sets the tuning mode. Some of whether the transmission is switched to receive the digital broadcasting after selecting the frequency. Select the "HD Radio"j"HD RADIO" display. 2 Select the HD FM band Press the [FM] button. Aura leek or Manual .' Each time the (FM] button is pressed it is a digital broadcast. Example: [I KTC-HR200 - Tuning Selecting the station. 1 Select HD Radio source Press the [SRC] button. Operations -CD Receiver- It will be switched. "Main"/"Primary...
... , the seek time will take few seconds to Sub channel Tuning Mode Sets the tuning mode. Some of whether the transmission is switched to receive the digital broadcasting after selecting the frequency. Select the "HD Radio"j"HD RADIO" display. 2 Select the HD FM band Press the [FM] button. Aura leek or Manual .' Each time the (FM] button is pressed it is a digital broadcast. Example: [I KTC-HR200 - Tuning Selecting the station. 1 Select HD Radio source Press the [SRC] button. Operations -CD Receiver- It will be switched. "Main"/"Primary...

Instruction Manual
Page 5
...] button. 2 Call up the frequency and channel Press the desired [1] - [6] button. ~ • "Linking" will be displayed for few seconds until it cannot be put in the memory Press the [~] or [~] button. 3 Put the frequency and channel in the control unit for at least 1 second. 3 Set the Receive mode Switching the setting of menu items. Each time the button is differed form the preset. Receive Mode Sets the receive mode. 1 Select menu mode using the control unit. On each [1 J- [6J button. The preset number display blinks 1 time...
...] button. 2 Call up the frequency and channel Press the desired [1] - [6] button. ~ • "Linking" will be displayed for few seconds until it cannot be put in the memory Press the [~] or [~] button. 3 Put the frequency and channel in the control unit for at least 1 second. 3 Set the Receive mode Switching the setting of menu items. Each time the button is differed form the preset. Receive Mode Sets the receive mode. 1 Select menu mode using the control unit. On each [1 J- [6J button. The preset number display blinks 1 time...

Instruction Manual
Page 6
... Analog sound, "HD" display switches to an HD Radio station, you are listening to "FM" or "AM". Operations -CD Receiver- For operations, see the / / page of the instruction manual of the Digital FM broadcasting displays the channel information as follows. b\ ~ • Sub channel of Digital FM cannot be set up. b\ ~ In HD Radio mode, the display of displayed characters. Artist name I)" "(Station name) HDt "(Song title/ Arlist name I KTC-HR200 Switching Display When you can switch over the display...
... Analog sound, "HD" display switches to an HD Radio station, you are listening to "FM" or "AM". Operations -CD Receiver- For operations, see the / / page of the instruction manual of the Digital FM broadcasting displays the channel information as follows. b\ ~ • Sub channel of Digital FM cannot be set up. b\ ~ In HD Radio mode, the display of displayed characters. Artist name I)" "(Station name) HDt "(Song title/ Arlist name I KTC-HR200 Switching Display When you can switch over the display...

Instruction Manual
Page 7
Each time the [FM] button is pressed, it switches between the HF 1, HF2, and HF3 bands. [AM] button Select the HD AM band. ['....]1 [~~] buttons Tune up or down program. [0] - [9] buttons Press buttons [1] - [6] to recall preset stations. For operations, see the CD features of in the instruction manual of remote In HD Radio source [FMj button Select the HD FM band. Text Scroll Scrolls the display title. Function of your control unit. English I En-7
Each time the [FM] button is pressed, it switches between the HF 1, HF2, and HF3 bands. [AM] button Select the HD AM band. ['....]1 [~~] buttons Tune up or down program. [0] - [9] buttons Press buttons [1] - [6] to recall preset stations. For operations, see the CD features of in the instruction manual of remote In HD Radio source [FMj button Select the HD FM band. Text Scroll Scrolls the display title. Function of your control unit. English I En-7
Instruction Manual
Page 8
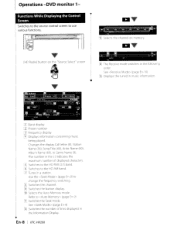
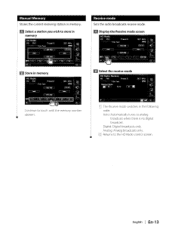
... (page En-9) to use various functions. JQ] Selects the Auto Memory mode. En-8 I KTC-HR200 The number in music information. Refer to Genre Name (8). T 11 Selects the channel on memory. ~, . .... '. 0#' [HD Radio] button on the "Source Select" screen A~ ~jgll J ~ .. . • Rev TTL "--~~ ~ -- - - - -- - ~: AUTO' 51 -- TEL [H] The Receive mode switches in the Information Display. rnJJ Band display Preset number [Ij Frequency display [II Displays information concerning music being played. Changes the display Call letter (8), Station Name (56), Song Title...
... (page En-9) to use various functions. JQ] Selects the Auto Memory mode. En-8 I KTC-HR200 The number in music information. Refer to Genre Name (8). T 11 Selects the channel on memory. ~, . .... '. 0#' [HD Radio] button on the "Source Select" screen A~ ~jgll J ~ .. . • Rev TTL "--~~ ~ -- - - - -- - ~: AUTO' 51 -- TEL [H] The Receive mode switches in the Information Display. rnJJ Band display Preset number [Ij Frequency display [II Displays information concerning music being played. Changes the display Call letter (8), Station Name (56), Song Title...

Instruction Manual
Page 9
Display "AUT01" "AUT02" "MANU" D Select the Auto Memory mode D Start Auto Memory Save six stations with good reception in memory automatically. D Select a band you wish to store in memory The mode is switched in the memory and close Auto Memory Entry. Auto Memory Stores stations with the best reception in following order each time you touch the button. English I Sets a station selection mode. Seek Mode I En-9
Display "AUT01" "AUT02" "MANU" D Select the Auto Memory mode D Start Auto Memory Save six stations with good reception in memory automatically. D Select a band you wish to store in memory The mode is switched in the memory and close Auto Memory Entry. Auto Memory Stores stations with the best reception in following order each time you touch the button. English I Sets a station selection mode. Seek Mode I En-9

Instruction Manual
Page 10
... broadcasts only. LlJ The Receive mode switches in memory. Manual Memory Stores the current receiving station in the following order. o Display the Receive mode screen I I Store in memory Receive mode Sets the radio broadcasts receive mode. Auto: Automatically tunes to the HD Radio control screen. W Returns to analog broadcast when there is no digital broadcast. Analog: Analog broadcasts only. En-l0 I Select a station you wish to store in memory D Select the receive mode Continue to touch until the memory number appears. Operations -DVD monitor 1- I I KTC-HR200
... broadcasts only. LlJ The Receive mode switches in memory. Manual Memory Stores the current receiving station in the following order. o Display the Receive mode screen I I Store in memory Receive mode Sets the radio broadcasts receive mode. Auto: Automatically tunes to the HD Radio control screen. W Returns to analog broadcast when there is no digital broadcast. Analog: Analog broadcasts only. En-l0 I Select a station you wish to store in memory D Select the receive mode Continue to touch until the memory number appears. Operations -DVD monitor 1- I I KTC-HR200

Instruction Manual
Page 11
... (8), Title (32), Artist (32), Album (32), Genre (8), or Station Name (32). I I !~~J~yG71 III ~ III I I I I OJ Band display W Preset number IJJ Frequency display W Radio station information display. rn Tunes in the ( ) indicates the maximum number of displayed characters. [[] Switches to the HD FM 1/2/3 band. [&] Switches to the HD AM band. Use the (page En-12) to change the frequency switching. []] Switches the channel. []] Switches the button display. [Q] Selects the Auto Memory mode. (Refer to use various functions. The number in a station. Operations -DVD monitor 2-
... (8), Title (32), Artist (32), Album (32), Genre (8), or Station Name (32). I I !~~J~yG71 III ~ III I I I I OJ Band display W Preset number IJJ Frequency display W Radio station information display. rn Tunes in the ( ) indicates the maximum number of displayed characters. [[] Switches to the HD FM 1/2/3 band. [&] Switches to the HD AM band. Use the (page En-12) to change the frequency switching. []] Switches the channel. []] Switches the button display. [Q] Selects the Auto Memory mode. (Refer to use various functions. The number in a station. Operations -DVD monitor 2-

Instruction Manual
Page 12
Operations -DVD monitor 2- Display "AUTO 1" "AUT02" "MANU" B Select the Auto Memory mode I I Start Auto Memory Save six stations with good reception in memory automatically. Auto Memory Stores stations with the best reception in following order each time you touch the button. En-12 I Select a band you wish to store in memory The mode is switched in the memory and close Auto Memory Entry. I I KTC-HR200 Seek Mode Sets a station selection mode.
Operations -DVD monitor 2- Display "AUTO 1" "AUT02" "MANU" B Select the Auto Memory mode I I Start Auto Memory Save six stations with good reception in memory automatically. Auto Memory Stores stations with the best reception in following order each time you touch the button. En-12 I Select a band you wish to store in memory The mode is switched in the memory and close Auto Memory Entry. I I KTC-HR200 Seek Mode Sets a station selection mode.
Instruction Manual
Page 13
IT] The Receive mode switches in memory. I I ] Returns to touch until the memory number appears. Digital: Digital broadcasts only. English I Select a station you wish to analog broadcast when there is no digital broadcast. Analog: Analog broadcasts only. [I Display the Receive mode screen D Store in memory Receive mode Sets the radio broadcasts receive mode. Auto: Automatically tunes to store in memory B Select the receive mode Continue to the HD Radio control screen. Manual Memory Stores the current receiving station in the following order. I I En-13
IT] The Receive mode switches in memory. I I ] Returns to touch until the memory number appears. Digital: Digital broadcasts only. English I Select a station you wish to analog broadcast when there is no digital broadcast. Analog: Analog broadcasts only. [I Display the Receive mode screen D Store in memory Receive mode Sets the radio broadcasts receive mode. Auto: Automatically tunes to store in memory B Select the receive mode Continue to the HD Radio control screen. Manual Memory Stores the current receiving station in the following order. I I En-13
Instruction Manual
Page 14
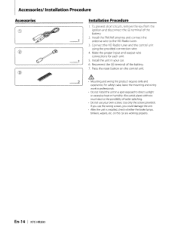
... reset button on the car are working properly. For safety's sake, leave the mounting and wiring work to professionals. • Do not install the unit in your own screws. Install the unit in a spot exposed to the HD Radio tuner. 3. Also avoid places with too much dust or the possibility of the battery. 7. Accessories/Installation Procedure Accessories CD Installation Procedure 1. Connect the HD Radio tuner and the control unit using the proVided connection wire. Make the proper input...
... reset button on the car are working properly. For safety's sake, leave the mounting and wiring work to professionals. • Do not install the unit in your own screws. Install the unit in a spot exposed to the HD Radio tuner. 3. Also avoid places with too much dust or the possibility of the battery. 7. Accessories/Installation Procedure Accessories CD Installation Procedure 1. Connect the HD Radio tuner and the control unit using the proVided connection wire. Make the proper input...

Instruction Manual
Page 15
... when KAB connector set this switch down . Lt • Please do not install the unit near the dashboard, the rear tray, or other important components. Insta Ilation Connecting Wires to Terminals ~L.~ -----,IControl Unit (5L connector) • Control Unit '-~t---~ (KAB connector) .- ======~r"~ ~ Accessorv(2) O/'f\N3~ ~ ~ • The unit can only be used. Antenna Cable (AccessoryG)) C~~P:CI I En-1S Install the switching unit on a IQ6rr connector type of the unit. English I ] To FM/AM antenna ' KTC-HR200 SELECT SWITCH Set "SELECT SWITCH" 1 depending on...
... when KAB connector set this switch down . Lt • Please do not install the unit near the dashboard, the rear tray, or other important components. Insta Ilation Connecting Wires to Terminals ~L.~ -----,IControl Unit (5L connector) • Control Unit '-~t---~ (KAB connector) .- ======~r"~ ~ Accessorv(2) O/'f\N3~ ~ ~ • The unit can only be used. Antenna Cable (AccessoryG)) C~~P:CI I En-1S Install the switching unit on a IQ6rr connector type of the unit. English I ] To FM/AM antenna ' KTC-HR200 SELECT SWITCH Set "SELECT SWITCH" 1 depending on...
Instruction Manual
Page 16
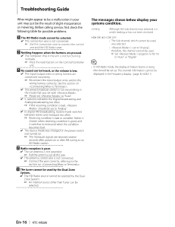
...' The preset broadcast station is not transmitting in the mode that was set to "Auto ttl' It switches between the Digital broadcasting and Analog broadcasting too often. 1& If the receiving condition is not connected. 1& Use the connection wire to be a malfunction in your unit may just be selected. Reconnect the input/output wires and/or the wiring harness correctly. See the section on the Control/Controller unit. Before calling service, first check...
...' The preset broadcast station is not transmitting in the mode that was set to "Auto ttl' It switches between the Digital broadcasting and Analog broadcasting too often. 1& If the receiving condition is not connected. 1& Use the connection wire to be a malfunction in your unit may just be selected. Reconnect the input/output wires and/or the wiring harness correctly. See the section on the Control/Controller unit. Before calling service, first check...

Instruction Manual
Page 17
... kHz - 1710 kHz Usable sensitivity (SIN: 20dB) : 20 ~V Digital AM tuner section Frequency range (10kHz space) : 530 kHz - 1710kHz Frequency response : 30 Hz - 15 kHz General Operating voltage : 14.4 V (11 - 16 V allowable) (urrent consumption : 500 mA Operating Environment : 0 O( - +40 O( Installation size (W x H x D) : 164 x 34 x 109 m m 6-1/2 x 1-3/8 x 4-5/16 inch Weight : 1.2 Ibs (520 g) Specifications subject to change without notice. English I En-17
... kHz - 1710 kHz Usable sensitivity (SIN: 20dB) : 20 ~V Digital AM tuner section Frequency range (10kHz space) : 530 kHz - 1710kHz Frequency response : 30 Hz - 15 kHz General Operating voltage : 14.4 V (11 - 16 V allowable) (urrent consumption : 500 mA Operating Environment : 0 O( - +40 O( Installation size (W x H x D) : 164 x 34 x 109 m m 6-1/2 x 1-3/8 x 4-5/16 inch Weight : 1.2 Ibs (520 g) Specifications subject to change without notice. English I En-17

Instruction Manual
Page 20
... KENWOOD CAR STEREO COMPONENTS, DAMAGES BASED UPON INCONVENIENCE, LOSS OF USE OF THE PRODUCT; SCOPE OF EXPRESS WARRANTY Each of the product. The following are not covered by faulty installation, water damage, the vehicle (including its audio equipment. Resulting from state to and not in Australia free of any defective product is in the U.S.A. KENWOOD ELECTRONICS AUSTRALIA PTY. Repair...
... KENWOOD CAR STEREO COMPONENTS, DAMAGES BASED UPON INCONVENIENCE, LOSS OF USE OF THE PRODUCT; SCOPE OF EXPRESS WARRANTY Each of the product. The following are not covered by faulty installation, water damage, the vehicle (including its audio equipment. Resulting from state to and not in Australia free of any defective product is in the U.S.A. KENWOOD ELECTRONICS AUSTRALIA PTY. Repair...
Instruction Manual
Page 21
... parts, tape heads, adaptors, antennas, cables, tapes, discs or faults or damage caused by KENWOOD. (gl Defects reSUlting from the date of original purchase, lease or rental, except for warranty repairs, you are subject to the nearest authorized KENWOOD service centre. WARRANTY PERIOD This product is warranted for parts and labour for a particular purpose, shall be presented to follow instructions contained...
... parts, tape heads, adaptors, antennas, cables, tapes, discs or faults or damage caused by KENWOOD. (gl Defects reSUlting from the date of original purchase, lease or rental, except for warranty repairs, you are subject to the nearest authorized KENWOOD service centre. WARRANTY PERIOD This product is warranted for parts and labour for a particular purpose, shall be presented to follow instructions contained...


