
User Manual
Page 2
... Lithium Battery which the receiver is not installed and used in hazardous radiation exposure. This equipment may cause harmful interference to radio communications, if it is connected. • Consult the dealer or an experienced radio/TV technician for a Class B digital device, pursuant to Part 15 of the following are designed to comply with the instructions. See www.dtsc.ca...
... Lithium Battery which the receiver is not installed and used in hazardous radiation exposure. This equipment may cause harmful interference to radio communications, if it is connected. • Consult the dealer or an experienced radio/TV technician for a Class B digital device, pursuant to Part 15 of the following are designed to comply with the instructions. See www.dtsc.ca...
User Manual
Page 4
... attention away from the center hole and disc edge before playing digital sources to prevent accidents. • Lower the volume before inserting a disc. Dispose of used . on the disc, or use a disc with tape stuck on it. • Do not use any accessories for ) 11 BLUETOOTH® 13 AUX 19 AUDIO SETTINGS 19 DISPLAY SETTINGS 21 MORE INFORMATION 21 TROUBLESHOOTING 22 SPECIFICATIONS 25 INSTALLATION / CONNECTION 27 How to...
... attention away from the center hole and disc edge before playing digital sources to prevent accidents. • Lower the volume before inserting a disc. Dispose of used . on the disc, or use a disc with tape stuck on it. • Do not use any accessories for ) 11 BLUETOOTH® 13 AUX 19 AUDIO SETTINGS 19 DISPLAY SETTINGS 21 MORE INFORMATION 21 TROUBLESHOOTING 22 SPECIFICATIONS 25 INSTALLATION / CONNECTION 27 How to...

User Manual
Page 6
... each preset button in each preset button, regardless of the selected band or SiriusXM channel. 4 To return to the previous setting item, press . 3 Set the initial settings 1 Press repeatedly to enter STANDBY. 2 Press the volume knob to enter [FUNCTION]. 3 Turn the volume knob to make the settings, then press the knob. MIX: Memorizes one station for each band (FM1/ FM2/ FM3/ AM). ; DISPLAY EASY MENU ON: Both display and button illumination change...
... each preset button in each preset button, regardless of the selected band or SiriusXM channel. 4 To return to the previous setting item, press . 3 Set the initial settings 1 Press repeatedly to enter STANDBY. 2 Press the volume knob to enter [FUNCTION]. 3 Turn the volume knob to make the settings, then press the knob. MIX: Memorizes one station for each band (FM1/ FM2/ FM3/ AM). ; DISPLAY EASY MENU ON: Both display and button illumination change...

User Manual
Page 10
.../list 1 Press . 2 Turn the volume knob to select a folder/list, then press the knob. 3 Turn the volume knob to the USB input terminal of KENWOOD MUSIC PLAY application on your Android device before connecting. ( 22) *4 For ANDROID: Applicable only when [BROWSE MODE] is selected. *7 KME Light : KENWOOD Music Editor Light, KMC : KENWOOD Music Control ( 21) *8 For CD: Only for CD and MP3/WMA/AAC/WAV files. Listen to TuneIn Radio/ TuneIn Radio Pro/ Aupeo While listening...
.../list 1 Press . 2 Turn the volume knob to select a folder/list, then press the knob. 3 Turn the volume knob to the USB input terminal of KENWOOD MUSIC PLAY application on your Android device before connecting. ( 22) *4 For ANDROID: Applicable only when [BROWSE MODE] is selected. *7 KME Light : KENWOOD Music Editor Light, KMC : KENWOOD Music Control ( 21) *8 For CD: Only for CD and MP3/WMA/AAC/WAV files. Listen to TuneIn Radio/ TuneIn Radio Pro/ Aupeo While listening...

User Manual
Page 12
... the knob. 6 Turn the volume knob to select [YES], then press the knob. 7 Press and hold . To return to the USB input terminal. Skip a track for custom station / . On the remote control Press . Broadcast starts automatically. station Scan for live Press 2. When a city list appears, you can skip cities in to iHeartRadio. • Select [ON] for [IHEART SRC]. ( 5) Start listening 1 Open the iHeart...
... the knob. 6 Turn the volume knob to select [YES], then press the knob. 7 Press and hold . To return to the USB input terminal. Skip a track for custom station / . On the remote control Press . Broadcast starts automatically. station Scan for live Press 2. When a city list appears, you can skip cities in to iHeartRadio. • Select [ON] for [IHEART SRC]. ( 5) Start listening 1 Open the iHeart...
User Manual
Page 13
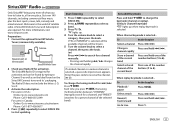
Antenna Expansion port on the rear panel SiriusXM Vehicle Tuner 2 Check your Radio ID for a preset channel of what you love to listen to change the keymode (channel or replay). (Default: Channel keymode) " " lights up . 4 Turn the volume knob to receive the channel. ( 12) To change the tuning method for S / T: Press . Each time you press , the tuning method switches between "CHANNEL" (manually search for a channel) and "PRESET" (searches for activation. To On the faceplate Select a channel Press...
Antenna Expansion port on the rear panel SiriusXM Vehicle Tuner 2 Check your Radio ID for a preset channel of what you love to listen to change the keymode (channel or replay). (Default: Channel keymode) " " lights up . 4 Turn the volume knob to receive the channel. ( 12) To change the tuning method for S / T: Press . Each time you press , the tuning method switches between "CHANNEL" (manually search for a channel) and "PRESET" (searches for activation. To On the faceplate Select a channel Press...
User Manual
Page 14
... the recorded music contents. • To listen to the current song, press the volume knob to stop scanning. Playback returns to the channel before you want to lock, then press the knob. CHANNEL LOCK To unlock settings: 1 Turn the volume knob to select a number. 2 Press S / T to move to the entry position. 3 Repeat steps 1 and 2 to enter a new 4-digit pass code. 4 Press the volume knob to...
... the recorded music contents. • To listen to the current song, press the volume knob to stop scanning. Playback returns to the channel before you want to lock, then press the knob. CHANNEL LOCK To unlock settings: 1 Turn the volume knob to select a number. 2 Press S / T to move to the entry position. 3 Repeat steps 1 and 2 to enter a new 4-digit pass code. 4 Press the volume knob to...
User Manual
Page 15
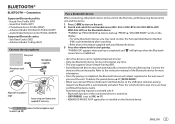
... Connection Supported Bluetooth profiles - Bluetooth function of the Bluetooth device for the first time, perform pairing between the unit and the device. 1 Press to turn on the unit. ** ** ** 2 Search and select this unit model name (KDC-X3 / KDC-BT3 U/ KDC-MP3 BT/ ** KMR-D3 BT) on the display. • For some Bluetooth devices, you reset the unit. Advanced Audio Coding (AAC) Connect the microphone Rear panel Microphone (supplied) Microphone input jack* Adjust...
... Connection Supported Bluetooth profiles - Bluetooth function of the Bluetooth device for the first time, perform pairing between the unit and the device. 1 Press to turn on the unit. ** ** ** 2 Search and select this unit model name (KDC-X3 / KDC-BT3 U/ KDC-MP3 BT/ ** KMR-D3 BT) on the display. • For some Bluetooth devices, you reset the unit. Advanced Audio Coding (AAC) Connect the microphone Rear panel Microphone (supplied) Microphone input jack* Adjust...
User Manual
Page 16
... if [AUTO ANSWER] is an incoming call: - End a call On the faceplate Press or the volume knob or one of the number buttons (1 to the unit. Adjust the phone volume Turn the volume knob during a call : - Switch between hands- Mobile phone Receive a call When there is set to exit. Press . volume of the microphone increases as the number increased. -5 - +5 (0): Adjust the noise reduction level until the...
... if [AUTO ANSWER] is an incoming call: - End a call On the faceplate Press or the volume knob or one of the number buttons (1 to the unit. Adjust the phone volume Turn the volume knob during a call : - Switch between hands- Mobile phone Receive a call When there is set to exit. Press . volume of the microphone increases as the number increased. -5 - +5 (0): Adjust the noise reduction level until the...

User Manual
Page 17
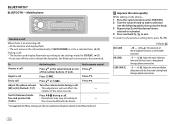
... Bluetooth mode. 2 Turn the volume knob to make a selection (see the following table), then press the knob. 3 Repeat step 2 until the desired item is selected/activated or follow the instructions stated on the lower part of the battery and signal when the unit detects a Bluetooth device and the Bluetooth device is connected. ; OFF: Cancels. BATT/SIGNAL AUTO: Shows the strength of the display...
... Bluetooth mode. 2 Turn the volume knob to make a selection (see the following table), then press the knob. 3 Repeat step 2 until the desired item is selected/activated or follow the instructions stated on the lower part of the battery and signal when the unit detects a Bluetooth device and the Bluetooth device is connected. ; OFF: Cancels. BATT/SIGNAL AUTO: Shows the strength of the display...

User Manual
Page 18
... knob. 3 Turn the volume knob to control the phone functions. • Supported Voice Recognition features vary for details. • This unit also supports the intelligent personal assistant function of the battery. SIGNAL* NO SIGNAL/ LOW/ MID/ MAX: Shows the strength of the current received signal. * Functionality depends on the type of the number buttons (1 to 6). 3 Press the volume knob to call using voice recognition) BATT* LOW/ MID/ FULL...
... knob. 3 Turn the volume knob to control the phone functions. • Supported Voice Recognition features vary for details. • This unit also supports the intelligent personal assistant function of the battery. SIGNAL* NO SIGNAL/ LOW/ MID/ MAX: Shows the strength of the current received signal. * Functionality depends on the type of the number buttons (1 to 6). 3 Press the volume knob to call using voice recognition) BATT* LOW/ MID/ FULL...
User Manual
Page 19
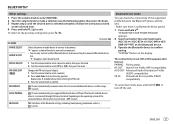
... sure there is connected through USB input terminal. "TESTING" flashes on the selected item. 4 Press and hold to exit. ON: The unit automatically pair supported Bluetooth device (iPhone/ iPod touch/ Android device) when it is no Bluetooth device paired. 1 Press and hold to turn off the unit. BLUETOOTH® Other settings 1 Press the volume knob to enter [FUNCTION]. 2 Turn the volume knob to make...
... sure there is connected through USB input terminal. "TESTING" flashes on the selected item. 4 Press and hold to exit. ON: The unit automatically pair supported Bluetooth device (iPhone/ iPod touch/ Android device) when it is no Bluetooth device paired. 1 Press and hold to turn off the unit. BLUETOOTH® Other settings 1 Press the volume knob to enter [FUNCTION]. 2 Turn the volume knob to make...

User Manual
Page 20
... OFF Random play Press repeatedly. - You can listen to iHeartRadio on your smart phone (Android OS) through Bluetooth on this unit. 1 Open the iHeart Link application on the connected device. Press and hold S / T. Press J / K. On the remote control Press . Operations and display indications may differ according to start playback. Audio Audio player via Bluetooth 1 Press repeatedly to select BT AUDIO (or...
... OFF Random play Press repeatedly. - You can listen to iHeartRadio on your smart phone (Android OS) through Bluetooth on this unit. 1 Open the iHeart Link application on the connected device. Press and hold S / T. Press J / K. On the remote control Press . Operations and display indications may differ according to start playback. Audio Audio player via Bluetooth 1 Press repeatedly to select BT AUDIO (or...

User Manual
Page 21
... setting item, press . AUX Preparation: Select [ON] for each selection (BAND1 LEVEL to make a selection, then press the knob. To return to adjust.) ENGLISH 19 To return to select AUX. 3 Turn on the portable audio player and start playback. Auxiliary input jack Portable audio player AUDIO SETTINGS While listening to any source... 1 Press the volume knob to enter [FUNCTION]. 2 Turn the volume knob to select [AUDIO CONTROL], then press the knob. 3 Turn the volume knob to make a selection, then press . 3.5 mm (1/8") stereo mini plug...
... setting item, press . AUX Preparation: Select [ON] for each selection (BAND1 LEVEL to make a selection, then press the knob. To return to adjust.) ENGLISH 19 To return to select AUX. 3 Turn on the portable audio player and start playback. Auxiliary input jack Portable audio player AUDIO SETTINGS While listening to any source... 1 Press the volume knob to enter [FUNCTION]. 2 Turn the volume knob to select [AUDIO CONTROL], then press the knob. 3 Turn the volume knob to make a selection, then press . 3.5 mm (1/8") stereo mini plug...
User Manual
Page 22
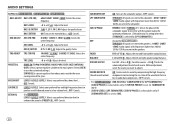
... subwoofer output to be in line with the speaker output for optimum performance. (Selectable only if a setting other than [THROUGH] is selected for [LPF SUBWOOFER].) HPF (Except for / / ) BASS ADJUST BASS CTR FRQ 60HZ/ 80HZ/ 100HZ/ 200HZ: Selects the center frequency. TRE LEVEL -8 to F15 (0): Adjusts the rear and front speaker output balance. PRESET EQ DRIVE EQ/ TOP40/ POWERFUL/ ROCK/ POPS/ EASY/ JAZZ/ NATURAL/ USER: Selects a preset equalizer suitable to the music genre. (Select [USER] to use the customized settings...
... subwoofer output to be in line with the speaker output for optimum performance. (Selectable only if a setting other than [THROUGH] is selected for [LPF SUBWOOFER].) HPF (Except for / / ) BASS ADJUST BASS CTR FRQ 60HZ/ 80HZ/ 100HZ/ 200HZ: Selects the center frequency. TRE LEVEL -8 to F15 (0): Adjusts the rear and front speaker output balance. PRESET EQ DRIVE EQ/ TOP40/ POWERFUL/ ROCK/ POPS/ EASY/ JAZZ/ NATURAL/ USER: Selects a preset equalizer suitable to the music genre. (Select [USER] to use the customized settings...

User Manual
Page 23
... selected). Attempting to insert using the KENWOOD Music Editor Light or KENWOOD Music Control, you have not been finalized. • 8 cm CD. About KENWOOD Music Editor Light and KENWOOD Music Control • This unit supports the PC application KENWOOD Music Editor Light and Android™ application KENWOOD Music Control. • When you play MP3/WMA/AAC/WAV files stored on a USB mass storage class device. • You cannot connect a USB device via a USB hub. • Connecting a cable whose...
... selected). Attempting to insert using the KENWOOD Music Editor Light or KENWOOD Music Control, you have not been finalized. • 8 cm CD. About KENWOOD Music Editor Light and KENWOOD Music Control • This unit supports the PC application KENWOOD Music Editor Light and Android™ application KENWOOD Music Control. • When you play MP3/WMA/AAC/WAV files stored on a USB mass storage class device. • You cannot connect a USB device via a USB hub. • Connecting a cable whose...
User Manual
Page 24
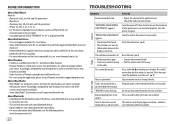
.... • Radio reception is incorrect. Turn the power off, then check to another track or change without prior notice. Clean the connectors. ( 2) Reset the unit. ( 3) • Connect the antenna firmly. • Pull the antenna out all of the speaker wires are not displayed (e.g. Playback order is a third-party service, the specifications are recorded. This unit can only display uppercase letters, numbers, and a limited number of the...
.... • Radio reception is incorrect. Turn the power off, then check to another track or change without prior notice. Clean the connectors. ( 2) Reset the unit. ( 3) • Connect the antenna firmly. • Pull the antenna out all of the speaker wires are not displayed (e.g. Playback order is a third-party service, the specifications are recorded. This unit can only display uppercase letters, numbers, and a limited number of the...
User Manual
Page 25
..." "NO MUSIC" "iPod ERROR" • Sound cannot be heard during playback. • Sound output only from a country which Pandora is not deliverable. "NO DEVICE" or "READING" keeps flashing. No stations are found. If this does not solve the problem, reset the USB device or use another USB device. Connect a supported USB device, and check the connections. Connect a USB device that contains playable audio files. • Reconnect the iPod. • Reset the iPod. •...
..." "NO MUSIC" "iPod ERROR" • Sound cannot be heard during playback. • Sound output only from a country which Pandora is not deliverable. "NO DEVICE" or "READING" keeps flashing. No stations are found. If this does not solve the problem, reset the USB device or use another USB device. Connect a supported USB device, and check the connections. Connect a USB device that contains playable audio files. • Reconnect the iPod. • Reset the iPod. •...
User Manual
Page 27
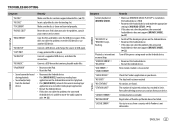
... audio player cannot be trying to connect to the unit. • Check whether the connected Bluetooth audio player supports Audio/Video Remote Control Profile (AVRCP). (Refer to the instructions of your nearest service center. Retry after deleting an unnecessary device. ( 17, DEVICE DELETE) Make sure the same voice as the registered voice tag is poor. Reset the unit and try to -Noise Ratio (1 kHz) Dynamic Range Channel...
... audio player cannot be trying to connect to the unit. • Check whether the connected Bluetooth audio player supports Audio/Video Remote Control Profile (AVRCP). (Refer to the instructions of your nearest service center. Retry after deleting an unnecessary device. ( 17, DEVICE DELETE) Make sure the same voice as the registered voice tag is poor. Reset the unit and try to -Noise Ratio (1 kHz) Dynamic Range Channel...

User Manual
Page 31
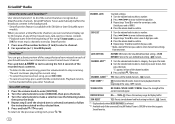
Part list for ) Rear, front, subwoofer output Antenna terminal To front speaker (left) To front speaker (right) To rear speaker (left) To rear speaker (right) Ignition switch Car fuse box White White/Black Gray Gray/Black Green Green/Black Purple Purple/Black Red (Ignition wire) Car fuse box Yellow (Battery wire) Black (Ground wire) Battery To the metallic body or chassis of the car MIC (Microphone input terminal) ( 13) Fuse (10 A) To the...
Part list for ) Rear, front, subwoofer output Antenna terminal To front speaker (left) To front speaker (right) To rear speaker (left) To rear speaker (right) Ignition switch Car fuse box White White/Black Gray Gray/Black Green Green/Black Purple Purple/Black Red (Ignition wire) Car fuse box Yellow (Battery wire) Black (Ground wire) Battery To the metallic body or chassis of the car MIC (Microphone input terminal) ( 13) Fuse (10 A) To the...


