Instruction Manuals
Page 2
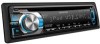
... Basic operations 5 Getting started 7 Canceling the display demonstration (except for ) Setting the demonstration mode Adjusting the clock Initial settings before operations Listening to the radio 9 Adjust [SETTINGS] mode settings Functions of with remote controller (RC-405) Direct Access Tuning Listening to ... Selecting Random Play Selecting a folder/track/file Functions of with iPod Selecting a song by alphabet Selecting App & iPod Control Mode Adjust [SETTINGS] mode settings When a call comes in, "CALL" appears. The audio system pauses. To continue listen to your telephone...
... Basic operations 5 Getting started 7 Canceling the display demonstration (except for ) Setting the demonstration mode Adjusting the clock Initial settings before operations Listening to the radio 9 Adjust [SETTINGS] mode settings Functions of with remote controller (RC-405) Direct Access Tuning Listening to ... Selecting Random Play Selecting a folder/track/file Functions of with iPod Selecting a song by alphabet Selecting App & iPod Control Mode Adjust [SETTINGS] mode settings When a call comes in, "CALL" appears. The audio system pauses. To continue listen to your telephone...
Instruction Manuals
Page 3
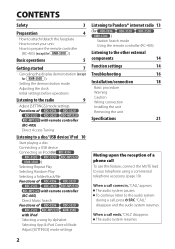
... during installation, consult your area. Maintenance Cleaning the unit: Wipe off the dirt on the following site: www.kenwood.com/cs/ce/audiofile/ CAUTION Use of controls or adjustments or performance of procedures other than those specified herein may collect on it. Do not stick tape etc. Do... not use any accessories for the moisture to this manual are examples used . Caution: Adjust the volume so that they work with a connection cable, KCA-iP102 (optional accessory). A USB connection cable, CA-U1EX (max.: 500 mA) (...
... during installation, consult your area. Maintenance Cleaning the unit: Wipe off the dirt on the following site: www.kenwood.com/cs/ce/audiofile/ CAUTION Use of controls or adjustments or performance of procedures other than those specified herein may collect on it. Do not stick tape etc. Do... not use any accessories for the moisture to this manual are examples used . Caution: Adjust the volume so that they work with a connection cable, KCA-iP102 (optional accessory). A USB connection cable, CA-U1EX (max.: 500 mA) (...
Instruction Manuals
Page 6
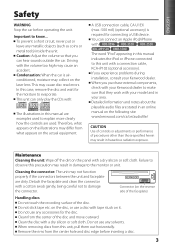
...; + 4 / ¢ + ¢ Searches for radio station. Selects thumbs down/up (for Pandora). 6( ) ENT Pauses/resumes playback of (unless mentioned otherwise). Volume knob (turn) VOL 5 / ∞ Adjusts the volume level. Main unit Remote controller General operation Turns on . • If the source is turned on . - Enters [FUNCTION] settings. 5 / ∞ Enters Music Search...
...; + 4 / ¢ + ¢ Searches for radio station. Selects thumbs down/up (for Pandora). 6( ) ENT Pauses/resumes playback of (unless mentioned otherwise). Volume knob (turn) VOL 5 / ∞ Adjusts the volume level. Main unit Remote controller General operation Turns on . • If the source is turned on . - Enters [FUNCTION] settings. 5 / ∞ Enters Music Search...
Instruction Manuals
Page 7
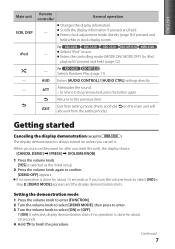
Enters clock adjustment mode directly (page 8) if pressed and held while in step 2, [DEMO MODE] appears and the display demonstration starts. For : iPod - Enters the controlling mode (MODE ...
Enters clock adjustment mode directly (page 8) if pressed and held while in step 2, [DEMO MODE] appears and the display demonstration starts. For : iPod - Enters the controlling mode (MODE ...
Instruction Manuals
Page 8
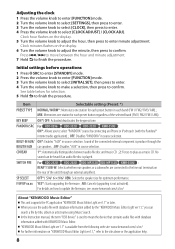
...the site above or the application help. 8 MIX: Memorizes one station for optimum performance. Clock hour flashes on "KENWOOD Music Editor Light ver1.1," refer to enter minute adjustment. Initial settings before operations 1 Press SRC to enter [STANDBY] mode. 2 Press the volume knob to enter [...procedure. OFF: Disables "PANDORA" in source selection. No sound can search a file by connecting an iPhone or iPod touch (with KENWOOD Music Editor. Adjusting the clock 1 Press the volume knob to enter [FUNCTION] mode. 2 Turn the volume knob to select [SETTINGS], then press to...
...the site above or the application help. 8 MIX: Memorizes one station for optimum performance. Clock hour flashes on "KENWOOD Music Editor Light ver1.1," refer to enter minute adjustment. Initial settings before operations 1 Press SRC to enter [STANDBY] mode. 2 Press the volume knob to enter [...procedure. OFF: Disables "PANDORA" in source selection. No sound can search a file by connecting an iPhone or iPod touch (with KENWOOD Music Editor. Adjusting the clock 1 Press the volume knob to enter [FUNCTION] mode. 2 Turn the volume knob to select [SETTINGS], then press to...
Instruction Manuals
Page 9
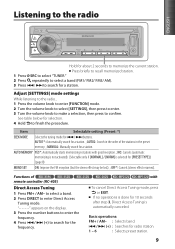
Adjust [SETTINGS] mode settings While listening to the radio... 1 Press the volume knob to enter [FUNCTION] mode. 2 Turn the volume knob to select [SETTINGS], then press ...
Adjust [SETTINGS] mode settings While listening to the radio... 1 Press the volume knob to enter [FUNCTION] mode. 2 Turn the volume knob to select [SETTINGS], then press ...
Instruction Manuals
Page 12
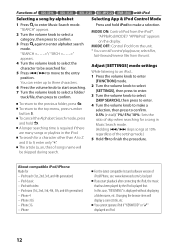
... and 0 to the previous folder, press . iPod classic - To cancel the Alphabet Search mode, press and hold iPod to enter alphabet search mode. Adjust [SETTINGS] mode settings While listening to an iPod... 1 Press the volume knob to enter [FUNCTION] mode. 2 Turn the volume knob to select [SETTINGS... Press to finish the procedure. In this case, "RESUMING" is played first. MODE OFF: Control iPod from the iPod*. You cannot operate iPod if "KENWOOD" or "✓" displayed on the display. "APP&iPod MODE"/ "APP&iPod" appears on iPod. 12 iPod touch (1st, 2nd, 3rd, and 4th...
... and 0 to the previous folder, press . iPod classic - To cancel the Alphabet Search mode, press and hold iPod to enter alphabet search mode. Adjust [SETTINGS] mode settings While listening to an iPod... 1 Press the volume knob to enter [FUNCTION] mode. 2 Turn the volume knob to select [SETTINGS... Press to finish the procedure. In this case, "RESUMING" is played first. MODE OFF: Control iPod from the iPod*. You cannot operate iPod if "KENWOOD" or "✓" displayed on the display. "APP&iPod MODE"/ "APP&iPod" appears on iPod. 12 iPod touch (1st, 2nd, 3rd, and 4th...
Instruction Manuals
Page 14
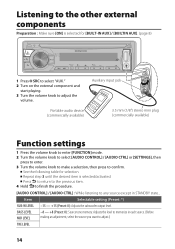
...state... Press to return to the previous item. 4 Hold to finish the procedure. [AUDIO CONTROL] / [AUDIO CTRL] : While listening to adjust.) TRE LEVEL 14 Repeat step 3 until the desired item is selected for selection. See the following table for [BUILT-IN AUX] / [...to select "AUX." 2 Turn on the external component and start playing. 3 Turn the volume knob to adjust the volume. Item Selectable setting (Preset: *) SUB-W LEVEL -15 - +15 (Preset: 0): Adjusts the subwoofer output level. Portable audio device (commercially available) Auxiliary input jack 3.5 mm (1/8") stereo mini ...
...state... Press to return to the previous item. 4 Hold to finish the procedure. [AUDIO CONTROL] / [AUDIO CTRL] : While listening to adjust.) TRE LEVEL 14 Repeat step 3 until the desired item is selected for selection. See the following table for [BUILT-IN AUX] / [...to select "AUX." 2 Turn on the external component and start playing. 3 Turn the volume knob to adjust the volume. Item Selectable setting (Preset: *) SUB-W LEVEL -15 - +15 (Preset: 0): Adjusts the subwoofer output level. Portable audio device (commercially available) Auxiliary input jack 3.5 mm (1/8") stereo mini ...
Instruction Manuals
Page 15
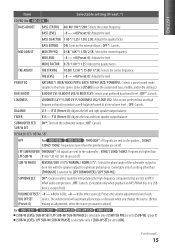
... [LPF SUB-W].) SUPREME SET ON*: Creates realistic sound by interpolating the high-frequency components that are lost in MP3/ WMA audio compression. ; TRE ADJUST TRE CTR FRQ 10.0K/ 12.5K */ 15.0K/ 17.5K: Selects the center frequency. LPF SUBWOOFER/ THROUGH*: All signals are sent to...are cut off . OFF: Cancels. The volume level will automatically increase or decrease when you change the source. (Before (Preset: 0) making an adjustment, select the source you want to adjust.) For : [SUB-W LEVEL/ SUB-W SET/ LPF SUB-W/ SUB-W PHASE] is selectable only if [SWITCH PRE] is set to [ON]....
... [LPF SUB-W].) SUPREME SET ON*: Creates realistic sound by interpolating the high-frequency components that are lost in MP3/ WMA audio compression. ; TRE ADJUST TRE CTR FRQ 10.0K/ 12.5K */ 15.0K/ 17.5K: Selects the center frequency. LPF SUBWOOFER/ THROUGH*: All signals are sent to...are cut off . OFF: Cancels. The volume level will automatically increase or decrease when you change the source. (Before (Preset: 0) making an adjustment, select the source you want to adjust.) For : [SUB-W LEVEL/ SUB-W SET/ LPF SUB-W/ SUB-W PHASE] is selectable only if [SWITCH PRE] is set to [ON]....
Instruction Manuals
Page 16
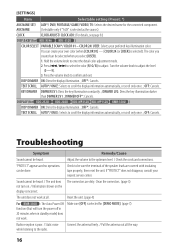
... volume knob to be sure the terminals of the speaker leads are dirty. DIMMER OFF*: Cancels. Check to enter the detail color adjustment mode. 2. The unit does not work . The color you created can be heard. / The unit does The connectors are covered...¢ to select the color (R/ G/ B) to scroll the display information automatically, or scroll only once. ; TEXT SCROLL AUTO*/ ONCE: Selects to adjust. You can create your preferred key illumination color. Turn the volume knob to scroll the display information automatically, or scroll only once. ; OFF*: Cancels. ...
... volume knob to be sure the terminals of the speaker leads are dirty. DIMMER OFF*: Cancels. Check to enter the detail color adjustment mode. 2. The unit does not work . The color you created can be heard. / The unit does The connectors are covered...¢ to select the color (R/ G/ B) to scroll the display information automatically, or scroll only once. ; TEXT SCROLL AUTO*/ ONCE: Selects to adjust. You can create your preferred key illumination color. Turn the volume knob to scroll the display information automatically, or scroll only once. ; OFF*: Cancels. ...


