Instruction Manuals
Page 2
... To use this feature, connect the MUTE lead to the audio system during a call ends, "CALL" disappear. CONTENTS Safety 3 Preparation 4 How to attach/detach the faceplate How to reset your unit How to prepare the remote controller (RC-405) (except for ) Basic operations 5 Getting started 7 Canceling the display demonstration (except for...
... To use this feature, connect the MUTE lead to the audio system during a call ends, "CALL" disappear. CONTENTS Safety 3 Preparation 4 How to attach/detach the faceplate How to reset your unit How to prepare the remote controller (RC-405) (except for ) Basic operations 5 Getting started 7 Canceling the display demonstration (except for...
Instruction Manuals
Page 3
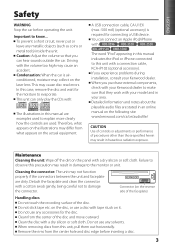
...damage the connector. To prevent a short circuit, never put or leave any solvents. In this precaution may differ from this unit with your Kenwood dealer. Clean the disc with a cotton swab gently, being careful not to this unit, pull them out horizontally. When you can connect... Cleaning the unit: Wipe off the dirt on it. Connector (on the actual equipment. Therefore, what appears on the reverse side of the faceplate) Handling discs Do not touch the recording surface of the disc and move outward. ENGLISH Safety WARNING Stop the car before inserting a disc. ...
...damage the connector. To prevent a short circuit, never put or leave any solvents. In this precaution may differ from this unit with your Kenwood dealer. Clean the disc with a cotton swab gently, being careful not to this unit, pull them out horizontally. When you can connect... Cleaning the unit: Wipe off the dirt on it. Connector (on the actual equipment. Therefore, what appears on the reverse side of the faceplate) Handling discs Do not touch the recording surface of the disc and move outward. ENGLISH Safety WARNING Stop the car before inserting a disc. ...
Instruction Manuals
Page 4
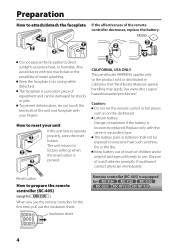
...physician immediately. How to reset your fingers. The battery pack or batteries shall not be damaged by shocks or jolts. Keep the faceplate in original package until ready to use the remote controller for the first time, pull out the insulation sheet. Replace only with too... unit 1 2 3 If this unit fails to operate properly, press the reset button. Preparation How to attach/detach the faceplate If the effectiveness of used batteries promptly. The faceplate is pressed. 3 2 4 1 CALIFORNIA, USA ONLY This perchlorate WARNING applies only to the product sold or distributed in ...
...physician immediately. How to reset your fingers. The battery pack or batteries shall not be damaged by shocks or jolts. Keep the faceplate in original package until ready to use the remote controller for the first time, pull out the insulation sheet. Replace only with too... unit 1 2 3 If this unit fails to operate properly, press the reset button. Preparation How to attach/detach the faceplate If the effectiveness of used batteries promptly. The faceplate is pressed. 3 2 4 1 CALIFORNIA, USA ONLY This perchlorate WARNING applies only to the product sold or distributed in ...

Instruction Manuals
Page 5
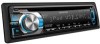
... an EQ mode other than [NATURAL]. (page 15) B.BOOST : [BASS BOOST] is set to bright sunlight. Loading slot Ejects the disc Volume knob Detaches the faceplate USB terminal (Not used.) Auxiliary input jack The following indicator lights up when... Continued... 5 IN: A disc is received (FM). ENGLISH Basic operations Display window Remote...
... an EQ mode other than [NATURAL]. (page 15) B.BOOST : [BASS BOOST] is set to bright sunlight. Loading slot Ejects the disc Volume knob Detaches the faceplate USB terminal (Not used.) Auxiliary input jack The following indicator lights up when... Continued... 5 IN: A disc is received (FM). ENGLISH Basic operations Display window Remote...
Instruction Manuals
Page 18
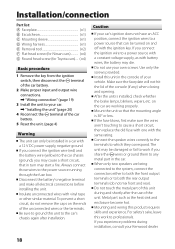
... power source running through the fuse box. Do not touch the metal part of this unit to the car's chassis again after the use your Kenwood dealer. 18 Always connect those wires to which they correspond. Be sure to ground this unit during installation, consult your own screws. Use only the... battery wire (yellow) to the car chassis (ground), you share the · wires or ground them to any ) when closing and opening. Make sure the faceplate will not hit the lid of your vehicle. The unit may be damaged or fail to work to professionals. Installation/connection Part list...
... power source running through the fuse box. Do not touch the metal part of this unit to the car's chassis again after the use your Kenwood dealer. 18 Always connect those wires to which they correspond. Be sure to ground this unit during installation, consult your own screws. Use only the... battery wire (yellow) to the car chassis (ground), you share the · wires or ground them to any ) when closing and opening. Make sure the faceplate will not hit the lid of your vehicle. The unit may be damaged or fail to work to professionals. Installation/connection Part list...
Instruction Manuals
Page 20
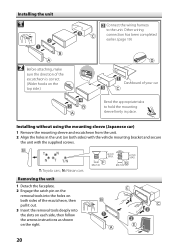
... mounting sleeve (Japanese car) 1 Remove the mounting sleeve and escutcheon from the unit. 2 Align the holes in place. N: Nissan cars Removing the unit 1 Detach the faceplate. 2 Engage the catch pin on the removal tools into the holes on both sides of your car Bend the appropriate tabs to the unit. Other...
... mounting sleeve (Japanese car) 1 Remove the mounting sleeve and escutcheon from the unit. 2 Align the holes in place. N: Nissan cars Removing the unit 1 Detach the faceplate. 2 Engage the catch pin on the removal tools into the holes on both sides of your car Bend the appropriate tabs to the unit. Other...

