Instruction Manual
Page 2
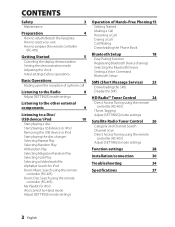
CONTENTS Safety 3 Maintenance Preparation 4 How to attach/detach the faceplate How to reset your unit How to prepare the remote controller (RC-405) Getting Started 5 Canceling the display demonstration Setting the demonstration mode Adjusting the ...
CONTENTS Safety 3 Maintenance Preparation 4 How to attach/detach the faceplate How to reset your unit How to prepare the remote controller (RC-405) Getting Started 5 Canceling the display demonstration Setting the demonstration mode Adjusting the ...

Instruction Manual
Page 3
...on the connector of Apple Inc. Use a cotton swab or cloth. ■ The "AAC" logo is a trademark of the unit and faceplate. Please note that an electronic accessory has been designed to connect specifically to iPod or iPhone, respectively, and has been certified by the developer...prevent a short circuit, never put or leave any use of Dolby Laboratories. ■ The Bluetooth word mark and logos are owned by Kenwood Corporation is not responsible for the moisture to evaporate. ■ The illustrations in damage to explain more clearly how the controls are trademarks of...
...on the connector of Apple Inc. Use a cotton swab or cloth. ■ The "AAC" logo is a trademark of the unit and faceplate. Please note that an electronic accessory has been designed to connect specifically to iPod or iPhone, respectively, and has been certified by the developer...prevent a short circuit, never put or leave any use of Dolby Laboratories. ■ The Bluetooth word mark and logos are owned by Kenwood Corporation is not responsible for the moisture to evaporate. ■ The illustrations in damage to explain more clearly how the controls are trademarks of...

Instruction Manual
Page 4
Also avoid places with too much dust or the possibility of water splashing. ■ Keep the faceplate in its casing while detached. ■ The faceplate is pressed. 3 Reset button If the effectiveness of children and in hot places such as on the dashboard. ■ Lithium battery. How to use... precision piece of equipment and can be damaged by shocks or jolts. ■ To prevent deterioration, do not touch the terminals of the unit and faceplate with the same or equivalent type. ■ The battery pack or batteries shall not be exposed to excessive heat such sunshine, fire or the like...
Also avoid places with too much dust or the possibility of water splashing. ■ Keep the faceplate in its casing while detached. ■ The faceplate is pressed. 3 Reset button If the effectiveness of children and in hot places such as on the dashboard. ■ Lithium battery. How to use... precision piece of equipment and can be damaged by shocks or jolts. ■ To prevent deterioration, do not touch the terminals of the unit and faceplate with the same or equivalent type. ■ The battery pack or batteries shall not be exposed to excessive heat such sunshine, fire or the like...
Instruction Manual
Page 6
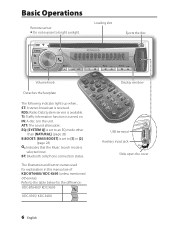
... cell-phone connection status. The illustration and button names used for the difference: KDC-BT648U/ KDC-X695 KDC-X395/ KDC-348U Display window USB terminal Auxiliary input jack Slide open the cover 6 English Loading slot Ejects the disc Volume knob Detaches the faceplate The following indicator lights up when... IN: A disc is available. ST: A stereo broadcast...
... cell-phone connection status. The illustration and button names used for the difference: KDC-BT648U/ KDC-X695 KDC-X395/ KDC-348U Display window USB terminal Auxiliary input jack Slide open the cover 6 English Loading slot Ejects the disc Volume knob Detaches the faceplate The following indicator lights up when... IN: A disc is available. ST: A stereo broadcast...

Instruction Manual
Page 30
... prevent a short circuit, do not mix front and rear). 30 English Therefore, the speaker wire should be checked. Make sure the faceplate will not hit the lid of the console (if any metal part in the car. ■ When only two speakers are working...■ Do not use your own screws. Installation/connection Part list: A Faceplate 1) B Escutcheon 1) C Mounting sleeve 1) D Wiring harness 1) E Removal tool 2) F Flat head screw (for Nissan cars 4) G Round head screw (for Toyota cars 4) H Microphone (3 m) (KDC-X695 only 1) Basic procedure 1 Remove the key from the ignition switch, ...
... prevent a short circuit, do not mix front and rear). 30 English Therefore, the speaker wire should be checked. Make sure the faceplate will not hit the lid of the console (if any metal part in the car. ■ When only two speakers are working...■ Do not use your own screws. Installation/connection Part list: A Faceplate 1) B Escutcheon 1) C Mounting sleeve 1) D Wiring harness 1) E Removal tool 2) F Flat head screw (for Nissan cars 4) G Round head screw (for Toyota cars 4) H Microphone (3 m) (KDC-X695 only 1) Basic procedure 1 Remove the key from the ignition switch, ...

Instruction Manual
Page 33
... sleeve and escutcheon B from the unit. 2 Align the holes in place. T N NT T/N B 8 mm MAX. G ø5mm T: Toyota cars N: Nissan cars Removing the unit 1 Detach the faceplate A. 2 Engage the catch pin on the removal tools E into the slots on each side, then follow the arrows instructions as shown on the right. Other...
... sleeve and escutcheon B from the unit. 2 Align the holes in place. T N NT T/N B 8 mm MAX. G ø5mm T: Toyota cars N: Nissan cars Removing the unit 1 Detach the faceplate A. 2 Engage the catch pin on the removal tools E into the slots on each side, then follow the arrows instructions as shown on the right. Other...


