

Operation Manual 1
Page 6
... 8 AUX 10 CD / USB / iPod / ANDROID 10 BLUETOOTH® 13 AUDIO SETTINGS 19 DISPLAY SETTINGS 21 TROUBLESHOOTING 22 REFERENCES 25 Maintenance More information SPECIFICATIONS 26 INSTALLATION / CONNECTION 28 BEFORE USE IMPORTANT • To ensure proper use, please read and observe Warning and Caution in this manual. • Please keep the manual...
... 8 AUX 10 CD / USB / iPod / ANDROID 10 BLUETOOTH® 13 AUDIO SETTINGS 19 DISPLAY SETTINGS 21 TROUBLESHOOTING 22 REFERENCES 25 Maintenance More information SPECIFICATIONS 26 INSTALLATION / CONNECTION 28 BEFORE USE IMPORTANT • To ensure proper use, please read and observe Warning and Caution in this manual. • Please keep the manual...

Operation Manual 1
Page 14
...available) 2 Press repeatedly to install KENWOOD MUSIC PLAY APP" is shown. Label side M Eject disc USB input terminal USB CA-U1EX (max.: 500 mA) (optional accessory) iPod/iPhone KCA-iP102 / KCA-iP103 (optional accessory)*1 or accessory cable of KENWOOD MUSIC PLAY application on the ...portable audio player and start playback. You can also install the latest version of the iPod/iPhone*2 ANDROID*3 Micro USB 2.0 cable*2 (commercially available) *1 ...
...available) 2 Press repeatedly to install KENWOOD MUSIC PLAY APP" is shown. Label side M Eject disc USB input terminal USB CA-U1EX (max.: 500 mA) (optional accessory) iPod/iPhone KCA-iP102 / KCA-iP103 (optional accessory)*1 or accessory cable of KENWOOD MUSIC PLAY application on the ...portable audio player and start playback. You can also install the latest version of the iPod/iPhone*2 ANDROID*3 Micro USB 2.0 cable*2 (commercially available) *1 ...

Operation Manual 1
Page 15
...and hold S / T. While in IPOD source, press 5 repeatedly. HAND MODE : Control Android device using the iPod itself via KENWOOD MUSIC PLAY application installed in the Android device. ENGLISH 11 Select music drive Press 5 repeatedly. MODE ON : Control iPod using the Android device itself .... Class). • Selected drive of the unit. • The unit will output the sound from this unit via other media player applications installed in the Android device. This does not work for iPod/ ANDROID. *6 For iPod/ ANDROID: Applicable only when [MODE OFF]/ [BROWSE MODE...
...and hold S / T. While in IPOD source, press 5 repeatedly. HAND MODE : Control Android device using the iPod itself via KENWOOD MUSIC PLAY application installed in the Android device. ENGLISH 11 Select music drive Press 5 repeatedly. MODE ON : Control iPod using the Android device itself .... Class). • Selected drive of the unit. • The unit will output the sound from this unit via other media player applications installed in the Android device. This does not work for iPod/ ANDROID. *6 For iPod/ ANDROID: Applicable only when [MODE OFF]/ [BROWSE MODE...
Operation Manual 1
Page 17
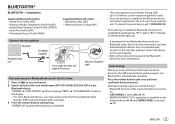
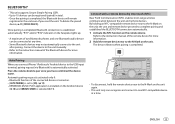
... supplied) if necessary. Once pairing is completed, Bluetooth connection is activated only if: - Automatic pairing request is established automatically. KENWOOD MUSIC PLAY application is installed on . - [AUTO PAIRING] is automatically activated. Adjust the microphone angle Pair and connect a Bluetooth device for more information.... set to start pairing. Press the volume knob to turn on the unit. ** ** 2 Search and select this unit model name (DPX-70 DAB/ DPX-50 BT) on the faceplate lights up. • A maximum of the connected device is turned on the Android device ( 10)...
... supplied) if necessary. Once pairing is completed, Bluetooth connection is activated only if: - Automatic pairing request is established automatically. KENWOOD MUSIC PLAY application is installed on . - [AUTO PAIRING] is automatically activated. Adjust the microphone angle Pair and connect a Bluetooth device for more information.... set to start pairing. Press the volume knob to turn on the unit. ** ** 2 Search and select this unit model name (DPX-70 DAB/ DPX-50 BT) on the faceplate lights up. • A maximum of the connected device is turned on the Android device ( 10)...
Operation Manual 1
Page 27
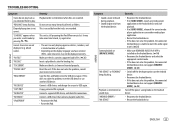
.... Make sure the disc is not correct. Connect a supported USB device, and check the connections. Elapsed playing time is clean and inserted properly. This is installed on the Android device. ( 10) • Reconnect the Android device and select the appropriate control mode. • If this does not solve the problem, the.... • If this does not solve the problem, the connected Android device is unable to route the audio signal to unit. ( 25) • Make sure KENWOOD MUSIC PLAY APP is caused by pressing . album name).
.... Make sure the disc is not correct. Connect a supported USB device, and check the connections. Elapsed playing time is clean and inserted properly. This is installed on the Android device. ( 10) • Reconnect the Android device and select the appropriate control mode. • If this does not solve the problem, the.... • If this does not solve the problem, the connected Android device is unable to route the audio signal to unit. ( 25) • Make sure KENWOOD MUSIC PLAY APP is caused by pressing . album name).

Operation Manual 1
Page 32
...by the ignition key. • Keep all cables away from the ignition switch, then disconnect the [ terminal of the unit. See Installing the DAB antenna. ( 32) 3 Connect the wires properly. SPECIFICATIONS Auxiliary Frequency Response (±3 dB) Input Maximum Voltage Input Impedance ...20 Hz - 20 kHz 1 000 mV 30 kΩ General Operating Voltage Maximum Current Consumption Operational Temperature Range Installation Size (W × H × D) Weight 14.4 V (10.5 V - 16 V allowable) 10 A -10°C - +60°C 182 mm × ...
...by the ignition key. • Keep all cables away from the ignition switch, then disconnect the [ terminal of the unit. See Installing the DAB antenna. ( 32) 3 Connect the wires properly. SPECIFICATIONS Auxiliary Frequency Response (±3 dB) Input Maximum Voltage Input Impedance ...20 Hz - 20 kHz 1 000 mV 30 kΩ General Operating Voltage Maximum Current Consumption Operational Temperature Range Installation Size (W × H × D) Weight 14.4 V (10.5 V - 16 V allowable) 10 A -10°C - +60°C 182 mm × ...

Operation Manual 1
Page 33
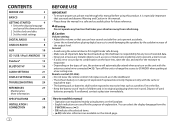
... Using wrong screws might damage the unit. How to hold the mounting sleeve firmly in place. (C) Wiring harness (D) Extraction key When installing without the mounting sleeve 1 Remove the mounting sleeve and trim plate from the unit. 2 Align the holes in the unit (on both ...the slots on both sides) with the vehicle mounting bracket and secure the unit with screws (commercially available). ENGLISH 29 INSTALLATION / CONNECTION Part list for installation (A) Mounting sleeve Installing the unit (in-dash mounting) Do the required wiring. ( 31) (B) Trim plate Dashboard of your car Bend ...
... Using wrong screws might damage the unit. How to hold the mounting sleeve firmly in place. (C) Wiring harness (D) Extraction key When installing without the mounting sleeve 1 Remove the mounting sleeve and trim plate from the unit. 2 Align the holes in the unit (on both ...the slots on both sides) with the vehicle mounting bracket and secure the unit with screws (commercially available). ENGLISH 29 INSTALLATION / CONNECTION Part list for installation (A) Mounting sleeve Installing the unit (in-dash mounting) Do the required wiring. ( 31) (B) Trim plate Dashboard of your car Bend ...

Operation Manual 1
Page 34
...speaker (right) : Front speaker (left) For 3-way crossover: Mid range speaker (left) : Rear speaker (left) For 3-way crossover: Tweeter (left) 30 INSTALLATION / CONNECTION Wiring connection When connecting to an external amplifier, connect its ground wire to the car's chassis to modify the wiring of the supplied wiring...You may need to avoid damaging the unit. ISO connectors If your car does not have an ISO terminal : We recommend installing the unit with a commercially available custom wiring harness specific for your car and leave this job to professionals for your car audio dealer....
...speaker (right) : Front speaker (left) For 3-way crossover: Mid range speaker (left) : Rear speaker (left) For 3-way crossover: Tweeter (left) 30 INSTALLATION / CONNECTION Wiring connection When connecting to an external amplifier, connect its ground wire to the car's chassis to modify the wiring of the supplied wiring...You may need to avoid damaging the unit. ISO connectors If your car does not have an ISO terminal : We recommend installing the unit with a commercially available custom wiring harness specific for your car and leave this job to professionals for your car audio dealer....
Operation Manual 1
Page 35
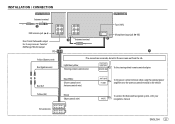
... control wire) STEERING WHEEL REMOTE INPUT REMOTE CONT To the steering wheel remote control adapter Blue/White (Power control wire/ Antenna control wire) ANT CONT P. INSTALLATION / CONNECTION Antenna terminal DAB antenna jack ( 6) Rear/ Front/ Subwoofer output For 3-way crossover: Tweeter/ Mid Range/ Woofer output Antenna terminal Fuse (10 A) Microphone input ... control terminal when using the optional power amplifier or to the antenna control terminal in the vehicle Brown (Mute control wire) To connect the Kenwood navigation system, refer your MUTE navigations manual ENGLISH 31
... control wire) STEERING WHEEL REMOTE INPUT REMOTE CONT To the steering wheel remote control adapter Blue/White (Power control wire/ Antenna control wire) ANT CONT P. INSTALLATION / CONNECTION Antenna terminal DAB antenna jack ( 6) Rear/ Front/ Subwoofer output For 3-way crossover: Tweeter/ Mid Range/ Woofer output Antenna terminal Fuse (10 A) Microphone input ... control terminal when using the optional power amplifier or to the antenna control terminal in the vehicle Brown (Mute control wire) To connect the Kenwood navigation system, refer your MUTE navigations manual ENGLISH 31

Operation Manual 1
Page 36
... the film antenna (F). • It may obstruct the operation of safety devices such as the rear hatch. - due to check the installation location of film antenna (F) before pasting. • Do not apply any glass cleaner after pasting the film antenna (F). where it overlaps ... with respect to the vehicle (antenna). • Thoroughly wipe oil and dirt from other antennas by at the following locations: - Part list for installation (H) Cable clamper (F) Film antenna (G) Amplifier unit (cable with mirror type glass film. - on movable glass surfaces such as air bags. - on...
... the film antenna (F). • It may obstruct the operation of safety devices such as the rear hatch. - due to check the installation location of film antenna (F) before pasting. • Do not apply any glass cleaner after pasting the film antenna (F). where it overlaps ... with respect to the vehicle (antenna). • Thoroughly wipe oil and dirt from other antennas by at the following locations: - Part list for installation (H) Cable clamper (F) Film antenna (G) Amplifier unit (cable with mirror type glass film. - on movable glass surfaces such as air bags. - on...

Operation Manual 1
Page 37
... paste the antenna on removing the front pillar cover and availability of replacement parts. ENGLISH 33 Clip Front pillar • Install the amplifier unit (G) above the air bag so that it is removed. Warm the surface of the windscreen with the supplied cleaner (I). ...(I) - Antenna installation 1 Remove the front pillar cover of your vehicle dealer for safety. INSTALLATION / CONNECTION Caution When installing the antenna cable inside the front pillar with the air bag installed • The front pillar cover is secured with a special...
... paste the antenna on removing the front pillar cover and availability of replacement parts. ENGLISH 33 Clip Front pillar • Install the amplifier unit (G) above the air bag so that it is removed. Warm the surface of the windscreen with the supplied cleaner (I). ...(I) - Antenna installation 1 Remove the front pillar cover of your vehicle dealer for safety. INSTALLATION / CONNECTION Caution When installing the antenna cable inside the front pillar with the air bag installed • The front pillar cover is secured with a special...

Operation Manual 1
Page 38
...Connect the amplifier unit (G) to the DAB input terminal on the rear of the unit. 11 Set [DAB ANT POWER] to its original position. INSTALLATION / CONNECTION 4 Rub the film antenna gently onto the windscreen in the direction of the arrow shown to allow it does not interfere with the interior... protrusion of the amplifier unit (G) with K mark Lead terminal of the film antenna (F) Lead contact of the amplifier unit (metal part) • When installing the antenna on the left side 7 Remove the film covering the earth sheet and paste the earth sheet on the film antenna (F) and paste. Also...
...Connect the amplifier unit (G) to the DAB input terminal on the rear of the unit. 11 Set [DAB ANT POWER] to its original position. INSTALLATION / CONNECTION 4 Rub the film antenna gently onto the windscreen in the direction of the arrow shown to allow it does not interfere with the interior... protrusion of the amplifier unit (G) with K mark Lead terminal of the film antenna (F) Lead contact of the amplifier unit (metal part) • When installing the antenna on the left side 7 Remove the film covering the earth sheet and paste the earth sheet on the film antenna (F) and paste. Also...
Operation Manual
Page 2
... / USB / iPod / ANDROID 10 Pandora® 13 BLUETOOTH® 14 AUDIO SETTINGS 21 DISPLAY SETTINGS 23 TROUBLESHOOTING 24 REFERENCES 27 Maintenance More information SPECIFICATIONS 28 INSTALLATION / CONNECTION 30 2 BEFORE USE IMPORTANT • To ensure proper use, please read through this manual before playing digital sources to STANDBY when parking at a low...
... / USB / iPod / ANDROID 10 Pandora® 13 BLUETOOTH® 14 AUDIO SETTINGS 21 DISPLAY SETTINGS 23 TROUBLESHOOTING 24 REFERENCES 27 Maintenance More information SPECIFICATIONS 28 INSTALLATION / CONNECTION 30 2 BEFORE USE IMPORTANT • To ensure proper use, please read through this manual before playing digital sources to STANDBY when parking at a low...

Operation Manual
Page 10
...item, press . 10 KCA-iP102 / KCA-iP103 (optional accessory)*1 or accessory cable of KENWOOD MUSIC PLAY application on the portable audio player and start playback. You can also install the latest version of the iPod/iPhone*2 ANDROID*3 Micro USB 2.0 cable*2 (commercially available... available). Auxiliary input jack Portable audio player 3.5 mm stereo mini plug with "L" shaped connector (commercially available) 2 Press repeatedly to install KENWOOD MUSIC PLAY APP" is shown. Label side M Eject disc USB input terminal USB CA-U1EX (max.: 500 mA) (optional accessory...
...item, press . 10 KCA-iP102 / KCA-iP103 (optional accessory)*1 or accessory cable of KENWOOD MUSIC PLAY application on the portable audio player and start playback. You can also install the latest version of the iPod/iPhone*2 ANDROID*3 Micro USB 2.0 cable*2 (commercially available... available). Auxiliary input jack Portable audio player 3.5 mm stereo mini plug with "L" shaped connector (commercially available) 2 Press repeatedly to install KENWOOD MUSIC PLAY APP" is shown. Label side M Eject disc USB input terminal USB CA-U1EX (max.: 500 mA) (optional accessory...

Operation Manual
Page 11
...REPEAT OFF : iPod or ANDROID Random play *6 Press repeatedly. HAND MODE : Control Android device using the iPod itself via KENWOOD MUSIC PLAY application installed in the Android device. Select a track/file Press . Repeat play *6 Press repeatedly. MODE OFF : Control iPod from this... unit via other media player applications installed in the Android device. Press . Select control mode While in ANDROID source, press 5 repeatedly. ENGLISH 11 Reverse / Fast-forward*4 ...
...REPEAT OFF : iPod or ANDROID Random play *6 Press repeatedly. HAND MODE : Control Android device using the iPod itself via KENWOOD MUSIC PLAY application installed in the Android device. Select a track/file Press . Repeat play *6 Press repeatedly. MODE OFF : Control iPod from this... unit via other media player applications installed in the Android device. Press . Select control mode While in ANDROID source, press 5 repeatedly. ENGLISH 11 Reverse / Fast-forward*4 ...

Operation Manual
Page 13
... . 2 Turn the volume knob to select [NEW STATION], then press the knob. 3 Turn the volume knob to search for a station, then press . Pandora® Preparation: Install the latest version of the Pandora application on your device to the USB input terminal. On the remote control Press . To cancel, press and hold...
... . 2 Turn the volume knob to select [NEW STATION], then press the knob. 3 Turn the volume knob to search for a station, then press . Pandora® Preparation: Install the latest version of the Pandora application on your device to the USB input terminal. On the remote control Press . To cancel, press and hold...
Operation Manual
Page 15
... automatically connect to the unit after pairing. Once pairing is completed, Bluetooth connection is activated only if: - Automatic pairing request is established automatically. KENWOOD MUSIC PLAY application is installed on the remote device. Press the volume knob to pair once you connect iPhone/ iPod touch/ Android device to the USB input terminal...
... automatically connect to the unit after pairing. Once pairing is completed, Bluetooth connection is activated only if: - Automatic pairing request is established automatically. KENWOOD MUSIC PLAY application is installed on the remote device. Press the volume knob to pair once you connect iPhone/ iPod touch/ Android device to the USB input terminal...

Operation Manual
Page 25
This is installed on the Android device. ( 10) • Reconnect the Android device and select the appropriate control mode. • If this does not solve the problem, the .... • If this does not solve the problem, the connected Android device is unable to route the audio signal to unit. ( 27) • Make sure KENWOOD MUSIC PLAY APP is caused by may not be heard during playback. • Sound output only from the Android device. New station creation is intermittent...
This is installed on the Android device. ( 10) • Reconnect the Android device and select the appropriate control mode. • If this does not solve the problem, the .... • If this does not solve the problem, the connected Android device is unable to route the audio signal to unit. ( 27) • Make sure KENWOOD MUSIC PLAY APP is caused by may not be heard during playback. • Sound output only from the Android device. New station creation is intermittent...

Operation Manual
Page 30
... Response (±3 dB) Input Maximum Voltage Input Impedance 20 Hz - 20 kHz 1 000 mV 30 kΩ General Operating Voltage Maximum Current Consumption Operational Temperature Range Installation Size (W × H × D) Weight 14.4 V (10.5 V - 16 V allowable) 10 A -10°C - +60°C 180 mm &#...215; 100 mm × 158 mm 1.4 kg Subject to change without notice. 30 INSTALLATION / CONNECTION Warning • The unit can only be used with a 12 V DC power supply, negative ground. • Disconnect the battery's negative terminal before ...
... Response (±3 dB) Input Maximum Voltage Input Impedance 20 Hz - 20 kHz 1 000 mV 30 kΩ General Operating Voltage Maximum Current Consumption Operational Temperature Range Installation Size (W × H × D) Weight 14.4 V (10.5 V - 16 V allowable) 10 A -10°C - +60°C 180 mm &#...215; 100 mm × 158 mm 1.4 kg Subject to change without notice. 30 INSTALLATION / CONNECTION Warning • The unit can only be used with a 12 V DC power supply, negative ground. • Disconnect the battery's negative terminal before ...

Operation Manual
Page 31
... (D). Do the required wiring. ( 32) Car bracket Part list for installation (A) Trim plate (only for Toyota car) Dashboard of your car (D) Flat head screws (M5 × 8 mm) Use only the specified screws. Then, install the supplied trim plate (A). The screw holes differ depending on the model... of your car Installing in -dash mounting) Install onto the car brackets using the supplied screws (C) or (D). Do the required wiring. ( 32...
... (D). Do the required wiring. ( 32) Car bracket Part list for installation (A) Trim plate (only for Toyota car) Dashboard of your car (D) Flat head screws (M5 × 8 mm) Use only the specified screws. Then, install the supplied trim plate (A). The screw holes differ depending on the model... of your car Installing in -dash mounting) Install onto the car brackets using the supplied screws (C) or (D). Do the required wiring. ( 32...


