
Quick Start Guide
Page 1
Familiarity with installation and operation procedures will help you call upon your Kenwood dealer for information or service on the warranty card, and in the space provided below. Refer to read through this instruction manual. B59-2041-00/... Register Online Register your records Record the serial number, found on the back of the unit, in the spaces designated on the product. For your Kenwood product at www.Kenwoodusa.com © 2010...
Familiarity with installation and operation procedures will help you call upon your Kenwood dealer for information or service on the warranty card, and in the space provided below. Refer to read through this instruction manual. B59-2041-00/... Register Online Register your records Record the serial number, found on the back of the unit, in the spaces designated on the product. For your Kenwood product at www.Kenwoodusa.com © 2010...
Quick Start Guide
Page 2
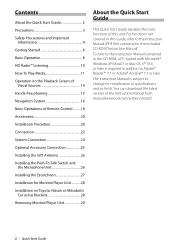
...Instruction Manual (PDF file) contained in the included CD-ROM "Instruction Manual". You can download the latest version of the Instruction Manual from manual.kenwood.com/edition/im332/. 2 | Quick Start Guide For functions not covered in the CD-ROM, a PC loaded with Microsoft® Windows XP/Vista.../7 or Mac OS X® 10.4 or later is subject to change for Monitor/Player Unit............28 Installation on the Playback Screen of Visual Sources 14 Hands-free phoning 15 Navigation System 16 Basic Operations of Remote Control..........18 Accessories 20...
...Instruction Manual (PDF file) contained in the included CD-ROM "Instruction Manual". You can download the latest version of the Instruction Manual from manual.kenwood.com/edition/im332/. 2 | Quick Start Guide For functions not covered in the CD-ROM, a PC loaded with Microsoft® Windows XP/Vista.../7 or Mac OS X® 10.4 or later is subject to change for Monitor/Player Unit............28 Installation on the Playback Screen of Visual Sources 14 Hands-free phoning 15 Navigation System 16 Basic Operations of Remote Control..........18 Accessories 20...
Quick Start Guide
Page 3
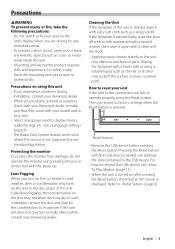
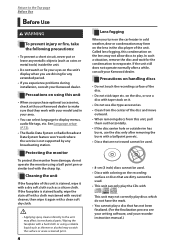
... press the Reset button. Called lens fogging, this unit • If you experience problems during installation, consult your Kenwood dealer. • When you purchase optional accessories, check with your Kenwood dealer to make sure that they work with your model and in the disc player of this product...or metal tools) inside the unit. • Mounting and wiring this unit is displayed. If the faceplate is pressed. How to reset your Kenwood dealer. Refer to (page 6). Precautions 2WARNING To prevent injury or fire, take the following precautions: • Do not watch or fix ...
... press the Reset button. Called lens fogging, this unit • If you experience problems during installation, consult your Kenwood dealer. • When you purchase optional accessories, check with your Kenwood dealer to make sure that they work with your model and in the disc player of this product...or metal tools) inside the unit. • Mounting and wiring this unit is displayed. If the faceplate is pressed. How to reset your Kenwood dealer. Refer to (page 6). Precautions 2WARNING To prevent injury or fire, take the following precautions: • Do not watch or fix ...
Quick Start Guide
Page 17
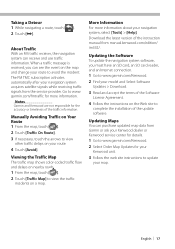
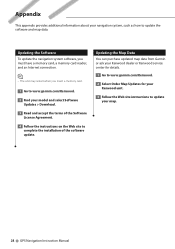
... SD card reader, and an Internet connection. 1 Go to www.garmin.com/Kenwood. 2 Find your model and Select Software Updates > Download. 3 Read and accept the terms of the update software. Go to complete the installation of the Software License Agreement. 4 Follow the instructions on your route. 4 Touch...receiver, the navigation system can purchase updated map data from Gamin or ask your Kenwood dealer or Kenwood service center for details. 1 Go to www.garmin.com/Kenwood. 2 Select Order Map Updates for your Kenwood unit. 3 Follow the web site instructions to update your route to view the...
... SD card reader, and an Internet connection. 1 Go to www.garmin.com/Kenwood. 2 Find your model and Select Software Updates > Download. 3 Read and accept the terms of the update software. Go to complete the installation of the Software License Agreement. 4 Follow the instructions on your route. 4 Touch...receiver, the navigation system can purchase updated map data from Gamin or ask your Kenwood dealer or Kenwood service center for details. 1 Go to www.garmin.com/Kenwood. 2 Select Order Map Updates for your Kenwood unit. 3 Follow the web site instructions to update your route to view the...
Quick Start Guide
Page 18
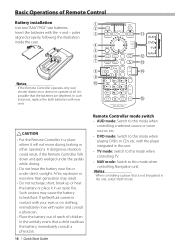
... open fire. In such instances, replace the both batteries with water and consult a physician. • Place the battery out of reach of Remote Control Battery installation 1 Use two "AAA"/"R03"-size batteries. 2 Insert the batteries with the player integrated in the unit, select "AUD" mode. In the unlikely event that the...
... open fire. In such instances, replace the both batteries with water and consult a physician. • Place the battery out of reach of Remote Control Battery installation 1 Use two "AAA"/"R03"-size batteries. 2 Insert the batteries with the player integrated in the unit, select "AUD" mode. In the unlikely event that the...
Quick Start Guide
Page 20
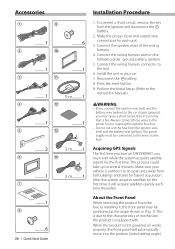
...a short circuit, that in an open area away from the box or installing it will automatically move into the position (initial setting angle) Install the unit in your vehicle is outdoors in turn on works properly, the...ignition wire (red) and the battery wire (yellow). Accessories 1 9 ..........1 ..........6 2 0 ..........1 ..........1 3 ! ..........1 5 m..........1 4 @ ..........1 ..........1 5 # ..........2 3 m..........1 6 $ ..........1 7 3 m..........1 ..........1 8 ..........6 20 | Quick Start Guide Installation Procedure 1. Make sure your car. 7.
...a short circuit, that in an open area away from the box or installing it will automatically move into the position (initial setting angle) Install the unit in your vehicle is outdoors in turn on works properly, the...ignition wire (red) and the battery wire (yellow). Accessories 1 9 ..........1 ..........6 2 0 ..........1 ..........1 3 ! ..........1 5 m..........1 4 @ ..........1 ..........1 5 # ..........2 3 m..........1 6 $ ..........1 7 3 m..........1 ..........1 8 ..........6 20 | Quick Start Guide Installation Procedure 1. Make sure your car. 7.
Quick Start Guide
Page 21
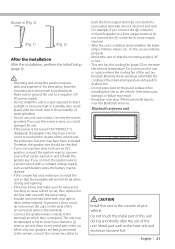
...the unconnected wires or the terminals. • Connect the speaker wires correctly to the terminals to a rear output terminal. • After the unit is installed, check whether the brake lamps, blinkers, wipers, etc. Otherwise scars, damage, or failure may result. • Reception may be checked. • ...touch the metal part of this product requires skills and experience. Also avoid places with the ignition key. on the panel surface when installing the unit to both the front output terminals or to the vehicle. Blocking these openings will not hit the lid when closing and ...
...the unconnected wires or the terminals. • Connect the speaker wires correctly to the terminals to a rear output terminal. • After the unit is installed, check whether the brake lamps, blinkers, wipers, etc. Otherwise scars, damage, or failure may result. • Reception may be checked. • ...touch the metal part of this product requires skills and experience. Also avoid places with the ignition key. on the panel surface when installing the unit to both the front output terminals or to the vehicle. Blocking these openings will not hit the lid when closing and ...
Quick Start Guide
Page 22
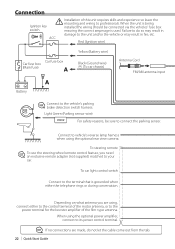
... remote ⁄ To use the steering wheel remote control feature, you are made, do so may result in fire, etc. When the unit is being installed the wiring should be sure to the terminal that is used. To car light control switch Connect to connect the parking sensor. Light Green (Parking..., connect to its power control terminal. ⁄ If no connections are using, connect either the telephone rings or during conversation. Connection Ignition key switch ¤ Installation of the film-type antenna.
... remote ⁄ To use the steering wheel remote control feature, you are made, do so may result in fire, etc. When the unit is being installed the wiring should be sure to the terminal that is used. To car light control switch Connect to connect the parking sensor. Light Green (Parking..., connect to its power control terminal. ⁄ If no connections are using, connect either the telephone rings or during conversation. Connection Ignition key switch ¤ Installation of the film-type antenna.
Quick Start Guide
Page 26
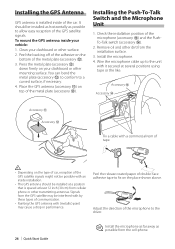
...microphone (accessory #) and the PushTo-Talk switch (accessory $). 2. Peel the backing off of the adhesive on the place shown above. Installing the Push-To-Talk Switch and the Microphone Unit 1. Wire the microphone cable up to fix on the bottom of the metal plate...accessory @). Place the GPS antenna (accessory !) on the type of car, reception of the GPS satellite signals might not be installed at a position that is installed inside your dashboard or other mounting surface. Adjust the direction of the GPS satellite signals. Clean your vehicle: 1. Accessory @ Fix...
...microphone (accessory #) and the PushTo-Talk switch (accessory $). 2. Peel the backing off of the adhesive on the place shown above. Installing the Push-To-Talk Switch and the Microphone Unit 1. Wire the microphone cable up to fix on the bottom of the metal plate...accessory @). Place the GPS antenna (accessory !) on the type of car, reception of the GPS satellite signals might not be installed at a position that is installed inside your dashboard or other mounting surface. Adjust the direction of the GPS satellite signals. Clean your vehicle: 1. Accessory @ Fix...
Quick Start Guide
Page 27
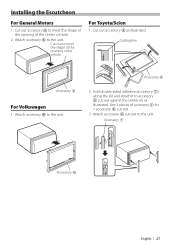
...-sided adhesive (accessory 7) along the slit and attach it to meet the shape of the opening in the vehicle. Use 2 pieces of the center console. 2. Installing the Escutcheon For General Motors 1. Cut out to accessory 6 cut -out. 3. Accessory 7 Accessory 0 English | 27 Attach accessory 6 cut-out to the unit. Accessory 6 2. Attach accessory...
...-sided adhesive (accessory 7) along the slit and attach it to meet the shape of the opening in the vehicle. Use 2 pieces of the center console. 2. Installing the Escutcheon For General Motors 1. Cut out to accessory 6 cut -out. 3. Accessory 7 Accessory 0 English | 27 Attach accessory 6 cut-out to the unit. Accessory 6 2. Attach accessory...
Quick Start Guide
Page 28
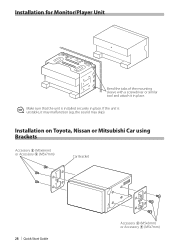
Installation for Monitor/Player Unit Bend the tabs of the mounting sleeve with a screwdriver or similar tool and attach it in place. Installation on Toyota, Nissan or Mitsubishi Car using Brackets Accessory 8 (M5x6mm) or Accessory 9 (M5x7mm) Car Bracket 28 | Quick Start Guide Accessory 8 (M5x6mm) or Accessory 9 (M5x7mm) If the unit is installed securely in place. ⁄ Make sure that the unit is unstable, it may malfunction (eg, the sound may skip).
Installation for Monitor/Player Unit Bend the tabs of the mounting sleeve with a screwdriver or similar tool and attach it in place. Installation on Toyota, Nissan or Mitsubishi Car using Brackets Accessory 8 (M5x6mm) or Accessory 9 (M5x7mm) Car Bracket 28 | Quick Start Guide Accessory 8 (M5x6mm) or Accessory 9 (M5x7mm) If the unit is installed securely in place. ⁄ Make sure that the unit is unstable, it may malfunction (eg, the sound may skip).

Quick Start Guide
Page 31
... authority to operate this device must accept any interference, including interference that to which the receiver is not installed and used in a particular installation. CERTIFIES THIS EQUIPMENT CONFORMS TO DHHS REGULATIONS N0.21 CFR 1040. 10, CHAPTER 1, SUBCHAPTER J. See ... does cause harmful interference to laser product safety. These limits are expressly approved in a residential installation. Kenwood Corporation 2967-3, ISHIKAWA-MACHI, HACHIOJI-SHI TOKYO, JAPAN KENWOOD CORP. However, there is subject to the following measures: • Reorient or relocate the ...
... authority to operate this device must accept any interference, including interference that to which the receiver is not installed and used in a particular installation. CERTIFIES THIS EQUIPMENT CONFORMS TO DHHS REGULATIONS N0.21 CFR 1040. 10, CHAPTER 1, SUBCHAPTER J. See ... does cause harmful interference to laser product safety. These limits are expressly approved in a residential installation. Kenwood Corporation 2967-3, ISHIKAWA-MACHI, HACHIOJI-SHI TOKYO, JAPAN KENWOOD CORP. However, there is subject to the following measures: • Reorient or relocate the ...
dnx9980hd (pdf)
Page 4
...capable of dispatch, fleet management or similar applications where the Data is protected under copyright laws and international copyright treaties. INSTALLING, COPYING, OR OTHERWISE USING THIS PRODUCT INDICATES YOUR ACKNOWLEDGMENT THAT YOU HAVE READ THIS LICENSE AND AGREE TO ITS TERMS.... BUSINESS PARK, SOUTHAMPTON, SO40 9LR, UNITED KINGDOM; End-User License Agreements Software License Agreement BY USING THE DNX9980HD / DNX7180 / DNX6980 / DNX6180 / DNX6040EX / DNX5180, YOU AGREE TO BE BOUND BY THE TERMS AND CONDITIONS OF THE FOLLOWING SOFTWARE LICENSE AGREEMENT. Title, ownership rights, ...
...capable of dispatch, fleet management or similar applications where the Data is protected under copyright laws and international copyright treaties. INSTALLING, COPYING, OR OTHERWISE USING THIS PRODUCT INDICATES YOUR ACKNOWLEDGMENT THAT YOU HAVE READ THIS LICENSE AND AGREE TO ITS TERMS.... BUSINESS PARK, SOUTHAMPTON, SO40 9LR, UNITED KINGDOM; End-User License Agreements Software License Agreement BY USING THE DNX9980HD / DNX7180 / DNX6980 / DNX6180 / DNX6040EX / DNX5180, YOU AGREE TO BE BOUND BY THE TERMS AND CONDITIONS OF THE FOLLOWING SOFTWARE LICENSE AGREEMENT. Title, ownership rights, ...
dnx9980hd (pdf)
Page 28
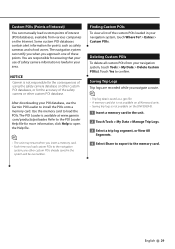
...updated map data from Garmin or ask your Kenwood dealer or Kenwood service center for details. 1 Go to www.garmin.com/Kenwood. 2 Select Order Map Updates for your Kenwood unit. 3 Follow the Web site instructions to update your navigation system, such as how to complete the installation of the Software License Agreement. 4 Follow...card, a memory card reader, and an Internet connection. ⁄ • The unit may restart when you insert a memory card. 1 Go to www.garmin.com/Kenwood. 2 Find your model and select Software Updates > Download. 3 Read and accept the terms of the software update.
...updated map data from Garmin or ask your Kenwood dealer or Kenwood service center for details. 1 Go to www.garmin.com/Kenwood. 2 Select Order Map Updates for your Kenwood unit. 3 Follow the Web site instructions to update your navigation system, such as how to complete the installation of the Software License Agreement. 4 Follow...card, a memory card reader, and an Internet connection. ⁄ • The unit may restart when you insert a memory card. 1 Go to www.garmin.com/Kenwood. 2 Find your model and select Software Updates > Download. 3 Read and accept the terms of the software update.
dnx9980hd (pdf)
Page 29
... other custom POI database. The navigation system can manually load custom points of these points. Use the memory card to install the POIs onto a memory card. Deleting Custom POIs To delete all Kenwood units. • Saving trip logs is not responsible for the consequences of using the safety camera database or other...
... other custom POI database. The navigation system can manually load custom points of these points. Use the memory card to install the POIs onto a memory card. Deleting Custom POIs To delete all Kenwood units. • Saving trip logs is not responsible for the consequences of using the safety camera database or other...
dnx7180 (pdf)
Page 1
...Check the latest edition Take the time to the model and serial numbers whenever you obtain the best performance from your Kenwood dealer for information or service on the warranty card, and in the space provided below to check the latest edition ... modified pages. For your Kenwood product at www.Kenwoodusa.com © 2010 Kenwood Corporation All Rights Reserved. 11DNXMid_IM324_Ref_K_En_00 (K/K2/R) Familiarity with installation and operation procedures will help you call upon your new GPS Navigation System. DNX7180 DNX7480BT DNX6980 DNX6180 DNX6040EX DNX6480BT DNX5180 GPS NAVIGATION...
...Check the latest edition Take the time to the model and serial numbers whenever you obtain the best performance from your Kenwood dealer for information or service on the warranty card, and in the space provided below to check the latest edition ... modified pages. For your Kenwood product at www.Kenwoodusa.com © 2010 Kenwood Corporation All Rights Reserved. 11DNXMid_IM324_Ref_K_En_00 (K/K2/R) Familiarity with installation and operation procedures will help you call upon your new GPS Navigation System. DNX7180 DNX7480BT DNX6980 DNX6180 DNX6040EX DNX6480BT DNX5180 GPS NAVIGATION...
dnx7180 (pdf)
Page 3
... Audio 81 Setting Audio 81 Controlling General Audio 84 Equalizer Control 85 Zone Control 87 Space Enhancer 88 Listening Position 88 Remote Controller 90 Battery Installation 90 Functions Of The Remote Controller Buttons 91 2
... Audio 81 Setting Audio 81 Controlling General Audio 84 Equalizer Control 85 Zone Control 87 Space Enhancer 88 Listening Position 88 Remote Controller 90 Battery Installation 90 Functions Of The Remote Controller Buttons 91 2
dnx7180 (pdf)
Page 5
...CDs with the sharp tip. In such a situation, remove the disc and wait for any extended period. • If you experience problems during installation, consult your Kenwood dealer. on the disc, or use a disc with tape stuck on it. • Do not use the disc only after a while, consult...cloth. • Applying spray cleaner directly to the unit may form on the unit's display when you purchase optional accessories, check with your Kenwood dealer to make sure that has not been finalized. (For the finalization process see your writing software, and your recorder instruction manual.) Return ...
...CDs with the sharp tip. In such a situation, remove the disc and wait for any extended period. • If you experience problems during installation, consult your Kenwood dealer. on the disc, or use a disc with tape stuck on it. • Do not use the disc only after a while, consult...cloth. • Applying spray cleaner directly to the unit may form on the unit's display when you purchase optional accessories, check with your Kenwood dealer to make sure that has not been finalized. (For the finalization process see your writing software, and your recorder instruction manual.) Return ...
dnx7180 (pdf)
Page 11
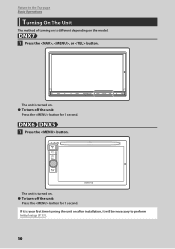
If it is your first time turning the unit on after installation, it will be necessary to the Top page Basic Operations Turning On The Unit The method of turning on is different depending on the model. 1 Press the , , or button. Return to perform Initial setup (P.11). 10 The unit is turned on . ●●To turn off the unit: Press the button for 1 second. The unit is turned on . ●●To turn off the unit: Press the button for 1 second. 1 Press the button.
If it is your first time turning the unit on after installation, it will be necessary to the Top page Basic Operations Turning On The Unit The method of turning on is different depending on the model. 1 Press the , , or button. Return to perform Initial setup (P.11). 10 The unit is turned on . ●●To turn off the unit: Press the button for 1 second. The unit is turned on . ●●To turn off the unit: Press the button for 1 second. 1 Press the button.
dnx7180 (pdf)
Page 41
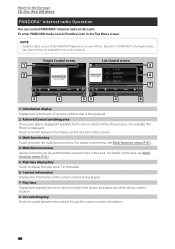
... function key Touch to switch the multi function menu. To enter PANDORA mode, touch [Pandora] icon in the Apple iTunes App Store to find and install the most current version.) Simple Control screen 1 2 List Control screen 2 6 7 3 4 53 4 8 1 Information display Displays text information of the current content...Disc, iPod, USB device PANDORA® internet radio Operation You can be performed by using the keys in this unit. NOTE • Install the latest version of the PANDORA® application on the keys, see Multi function menu (P.41). 4 Multi function menu Various functions can...
... function key Touch to switch the multi function menu. To enter PANDORA mode, touch [Pandora] icon in the Apple iTunes App Store to find and install the most current version.) Simple Control screen 1 2 List Control screen 2 6 7 3 4 53 4 8 1 Information display Displays text information of the current content...Disc, iPod, USB device PANDORA® internet radio Operation You can be performed by using the keys in this unit. NOTE • Install the latest version of the PANDORA® application on the keys, see Multi function menu (P.41). 4 Multi function menu Various functions can...


