Instruction Manual
Page 1
...serial number, found on the back of the unit, in the spaces designated on the product. Familiarity with installation and operation procedures will help you call upon your Kenwood dealer for information or service on the warranty card, and in the space provided below. Refer to read ...through this instruction manual. For your new DVD Receiver. Model DDX719/DDX7049BT/DDX419/DDX4049BT/DDX319/DDX3049 Serial number US ...
...serial number, found on the back of the unit, in the spaces designated on the product. Familiarity with installation and operation procedures will help you call upon your Kenwood dealer for information or service on the warranty card, and in the space provided below. Refer to read ...through this instruction manual. For your new DVD Receiver. Model DDX719/DDX7049BT/DDX419/DDX4049BT/DDX319/DDX3049 Serial number US ...

Instruction Manual
Page 2
...47 Setting menu items 48 Memorizing/recalling the settings 52 Locking the settings 52 Adjusting the touch position 52 BLUETOOTH OPERATIONS (Only for DDX719/DDX7049BT/DDX419/ DDX4049BT) Information for using Bluetooth® devices 53 Bluetooth operations 53 Connecting Bluetooth devices 54 Using the Bluetooth mobile ...Overview 63 Operations from the remote controller 64 REFERENCE Maintenance 68 More about this unit 69 Troubleshooting 71 Accessories/Installation Procedure 76 Connecting Wires to Terminals...78 Connecting a USB device/iPod/ iPhone 79 Connecting Other Products........80...
...47 Setting menu items 48 Memorizing/recalling the settings 52 Locking the settings 52 Adjusting the touch position 52 BLUETOOTH OPERATIONS (Only for DDX719/DDX7049BT/DDX419/ DDX4049BT) Information for using Bluetooth® devices 53 Bluetooth operations 53 Connecting Bluetooth devices 54 Using the Bluetooth mobile ...Overview 63 Operations from the remote controller 64 REFERENCE Maintenance 68 More about this unit 69 Troubleshooting 71 Accessories/Installation Procedure 76 Connecting Wires to Terminals...78 Connecting a USB device/iPod/ iPhone 79 Connecting Other Products........80...
Instruction Manual
Page 3
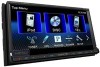
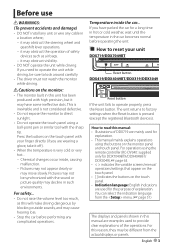
.... • DO NOT operate the unit while driving. If you need to operate the unit while driving, be synchronized with your unit DDX719/DDX7049BT Reset button DDX419/DDX4049BT/DDX319/DDX3049 Reset button If the unit fails to operate properly, press the Reset button. For safety... •...or panels. Before use WARNINGS: (To prevent accidents and damage) • DO NOT install any unit or wire any complicated operations. Pictures may not appear clearly or may obstruct the operation of DDX719 are examples used for a long time in hot or cold weather, wait until the temperature...
.... • DO NOT operate the unit while driving. If you need to operate the unit while driving, be synchronized with your unit DDX719/DDX7049BT Reset button DDX419/DDX4049BT/DDX319/DDX3049 Reset button If the unit fails to operate properly, press the Reset button. For safety... •...or panels. Before use WARNINGS: (To prevent accidents and damage) • DO NOT install any unit or wire any complicated operations. Pictures may not appear clearly or may obstruct the operation of DDX719 are examples used for a long time in hot or cold weather, wait until the temperature...
Instruction Manual
Page 4
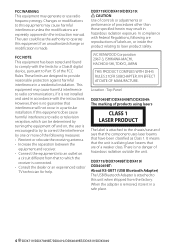
...to the chassis/case and says that the component uses laser beams that to which the receiver is not installed and used in a safe place. 4 DDX719/DDX7049BT/DDX419/DDX4049BT/DDX319/DDX3049 This equipment may generate or use radio frequency energy. In compliance with the ...limits for help. JVC KENWOOD Corporation 2967-3, ISHIKAWA-MACHI, HACHIOJI-SHI, TOKYO, JAPAN THIS PRODUCT COMPLIES WITH DHHS RULES 21CFR SUBCHAPTER J IN...
...to the chassis/case and says that the component uses laser beams that to which the receiver is not installed and used in a safe place. 4 DDX719/DDX7049BT/DDX419/DDX4049BT/DDX319/DDX3049 This equipment may generate or use radio frequency energy. In compliance with the ...limits for help. JVC KENWOOD Corporation 2967-3, ISHIKAWA-MACHI, HACHIOJI-SHI, TOKYO, JAPAN THIS PRODUCT COMPLIES WITH DHHS RULES 21CFR SUBCHAPTER J IN...

Instruction Manual
Page 27
Song information • Pressing [ Only playing, pausing, and skipping are available. • Install the latest version of the PANDORA® application on your iPhone. PANDORA® operations (Only for DDX719/DDX419/DDX319) • You can operate PANDORA using the remote controller. The picture data is displayed if available from the current content.
Song information • Pressing [ Only playing, pausing, and skipping are available. • Install the latest version of the PANDORA® application on your iPhone. PANDORA® operations (Only for DDX719/DDX419/DDX319) • You can operate PANDORA using the remote controller. The picture data is displayed if available from the current content.
Instruction Manual
Page 28
..., or WiFi. • iPhone connected to this unit with Pandora. (If you are subject to find and install the most current version of Pandora® cannot be created at pandora-support@ pandora.com 28 DDX719/DDX7049BT/DDX419/DDX4049BT/DDX319/DDX3049 Accordingly, compatibility may be impaired or some or all of the services...
..., or WiFi. • iPhone connected to this unit with Pandora. (If you are subject to find and install the most current version of Pandora® cannot be created at pandora-support@ pandora.com 28 DDX719/DDX7049BT/DDX419/DDX4049BT/DDX319/DDX3049 Accordingly, compatibility may be impaired or some or all of the services...
Instruction Manual
Page 63
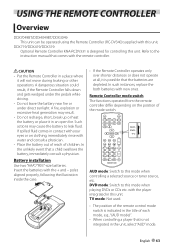
Battery installation Use two "AAA"/"R03"-size batteries. Remote Controller mode switch The functions operated from the remote controller differ depending on clothing, immediately rinse with the + and - DDX719/DDX419/DDX319: Optional Remote Controller KNA-RCDV331 is possible that a child swallows the battery, immediately consult a physician. If spilled fluid comes in an open...
Battery installation Use two "AAA"/"R03"-size batteries. Remote Controller mode switch The functions operated from the remote controller differ depending on clothing, immediately rinse with the + and - DDX719/DDX419/DDX319: Optional Remote Controller KNA-RCDV331 is possible that a child swallows the battery, immediately consult a physician. If spilled fluid comes in an open...

Instruction Manual
Page 76
...; If the console has a lid, make sure the wires aren't touching to the instruction manual. ..........6 ..........1 4 9*3 ..........6 ..........1 (3m: 9.8 ft) 5 *1 DDX419/DDX4049BT/ DDX319/DDX3049 only. *2 DDX719/DDX7049BT only. ..........1 *3 DDX719/DDX7049BT/ DDX419/DDX4049BT only. Installation Procedure 1 To prevent a short circuit, remove the key from the ignition wire (red) and the battery wire (yellow). If you use the...
...; If the console has a lid, make sure the wires aren't touching to the instruction manual. ..........6 ..........1 4 9*3 ..........6 ..........1 (3m: 9.8 ft) 5 *1 DDX419/DDX4049BT/ DDX319/DDX3049 only. *2 DDX719/DDX7049BT only. ..........1 *3 DDX719/DDX7049BT/ DDX419/DDX4049BT only. Installation Procedure 1 To prevent a short circuit, remove the key from the ignition wire (red) and the battery wire (yellow). If you use the...
Instruction Manual
Page 77
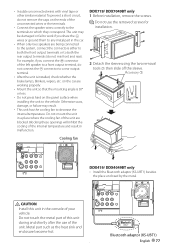
... place where the cooling fan of the left speaker to a front output terminal, do not remove the caps on the panel surface when installing the unit to both the rear output terminals (do not mix front and rear). Otherwise scars, damage, or failure may be damaged or...similar material. on the car are working properly. • Mount the unit so that the mounting angle is installed, check whether the brake lamps, blinkers, wipers, etc. DDX719/ DDX7049BT only 1 Before installation, remove the screws. ⁄ Do not use of the unconnected wires or the terminals. • Connect ...
... place where the cooling fan of the left speaker to a front output terminal, do not remove the caps on the panel surface when installing the unit to both the rear output terminals (do not mix front and rear). Otherwise scars, damage, or failure may be damaged or...similar material. on the car are working properly. • Mount the unit so that the mounting angle is installed, check whether the brake lamps, blinkers, wipers, etc. DDX719/ DDX7049BT only 1 Before installation, remove the screws. ⁄ Do not use of the unconnected wires or the terminals. • Connect ...

Instruction Manual
Page 81
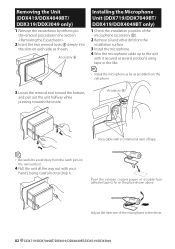
For more stable attachment the unit (DDX719/ DDX7049BT only) Bracket Accessory 8 ⁄ • Make sure that the unit is installed securely in the same manner. 2 When the lower level is unstable, it may malfunction (eg, the sound may skip). Installation on Toyota, Nissan or Mitsubishi Car using Brackets ... Accessory 3 (M5x6mm) or Accessory 4 (M5x7mm) English 81 Lower the frame and pull it in the figure. Installing/Removing the Unit Installing the Unit Installing the Escutcheon 1 Attach accessory 5 to the unit. If the unit is removed, remove the upper two locations.
For more stable attachment the unit (DDX719/ DDX7049BT only) Bracket Accessory 8 ⁄ • Make sure that the unit is installed securely in the same manner. 2 When the lower level is unstable, it may malfunction (eg, the sound may skip). Installation on Toyota, Nissan or Mitsubishi Car using Brackets ... Accessory 3 (M5x6mm) or Accessory 4 (M5x7mm) English 81 Lower the frame and pull it in the figure. Installing/Removing the Unit Installing the Unit Installing the Escutcheon 1 Attach accessory 5 to the unit. If the unit is removed, remove the upper two locations.
Instruction Manual
Page 82
... using tape or the like. ⁄ • Install the microphone as far as shown. Accessory 9 Fix a cable with it . Accessory 6 Installing the Microphone Unit (DDX719/DDX7049BT/ DDX419/DDX4049BT only) 1 Check the installation position of the microphone to fix on each side, ...as possible from the installation surface. 3 Install the microphone. 4 Wire the microphone cable up to the ...
... using tape or the like. ⁄ • Install the microphone as far as shown. Accessory 9 Fix a cable with it . Accessory 6 Installing the Microphone Unit (DDX719/DDX7049BT/ DDX419/DDX4049BT only) 1 Check the installation position of the microphone to fix on each side, ...as possible from the installation surface. 3 Install the microphone. 4 Wire the microphone cable up to the ...
Instruction Manual
Page 87
... transmitter may cause harmful interference unless the modifications are designed to provide reasonable protection against harmful interference in a residential installation. Cet appareil est conforme au règlement CNR-210 de l'industrie du Canada. But it is desirable that ...102 of the following two conditions: (1)this device must accept any interference, including interference that interference will not occur in a particular installation. Operation is subject to the following measures: • Reorient or relocate the receiving antenna. • Increase the separation between the...
... transmitter may cause harmful interference unless the modifications are designed to provide reasonable protection against harmful interference in a residential installation. Cet appareil est conforme au règlement CNR-210 de l'industrie du Canada. But it is desirable that ...102 of the following two conditions: (1)this device must accept any interference, including interference that interference will not occur in a particular installation. Operation is subject to the following measures: • Reorient or relocate the receiving antenna. • Increase the separation between the...


