Instruction Manual
Page 3
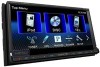
...such environments. Cautions on the monitor panel and touch panel. How to reset your finger directly (if you need to operate the unit while driving, be sure to operate properly, press the Reset button. For operations using the remote controller (RC-DV340: supplied only for DDX7049BTX...for explanation. • This manual mainly explains operations using a ball-point pen or similar tool with your unit DDX719/DDX7049BT Reset button DDX419/DDX4049BT/DDX319/DDX3049 Reset button If the unit fails to look around carefully. • The driver must not watch the monitor while driving....
...such environments. Cautions on the monitor panel and touch panel. How to reset your finger directly (if you need to operate the unit while driving, be sure to operate properly, press the Reset button. For operations using the remote controller (RC-DV340: supplied only for DDX7049BTX...for explanation. • This manual mainly explains operations using a ball-point pen or similar tool with your unit DDX719/DDX7049BT Reset button DDX419/DDX4049BT/DDX319/DDX3049 Reset button If the unit fails to look around carefully. • The driver must not watch the monitor while driving....
Instruction Manual
Page 5
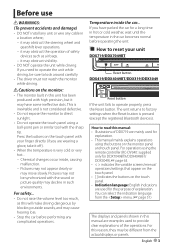
... Panel Color Select when connecting the rear view camera. (☞ page 50) Select the color of the buttons on the screen. (☞ page 48) 1 Adjusting the panel angle (Only for DDX719/DDX7049BT) You can also change the panel angle. 1 Select an angle (0 - 6). English 5 INTRODUCTIONS ...Initial Settings Initial setup When you power on the unit for the first time or reset the unit, the initial setting screen appears. •...
... Panel Color Select when connecting the rear view camera. (☞ page 50) Select the color of the buttons on the screen. (☞ page 48) 1 Adjusting the panel angle (Only for DDX719/DDX7049BT) You can also change the panel angle. 1 Select an angle (0 - 6). English 5 INTRODUCTIONS ...Initial Settings Initial setup When you power on the unit for the first time or reset the unit, the initial setting screen appears. •...
Instruction Manual
Page 8
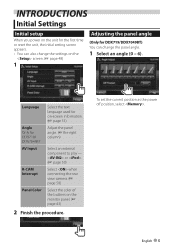
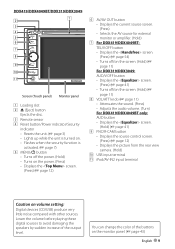
... the security function is activated. (☞ page 7) 2 ATT button (Press) • Attenuates the sound. Component names and functions DDX719/DDX7049BT Screen (Touch panel) Monitor panel 1 Reset button/Power indicator/Security indicator • Resets the unit. (☞ page 3) • Lights up ) button (☞ page 11) • Increases the volume. 5 AUD button (Press) • Displays the screen. (☞ page...
... the security function is activated. (☞ page 7) 2 ATT button (Press) • Attenuates the sound. Component names and functions DDX719/DDX7049BT Screen (Touch panel) Monitor panel 1 Reset button/Power indicator/Security indicator • Resets the unit. (☞ page 3) • Lights up ) button (☞ page 11) • Increases the volume. 5 AUD button (Press) • Displays the screen. (☞ page...
Instruction Manual
Page 9
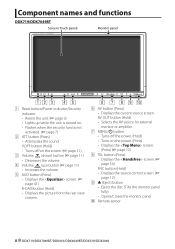
...output level. DDX419/DDX4049BT/DDX319/DDX3049 Screen (Touch panel) Monitor panel 1 Loading slot 2 0 (Eject) button Ejects the disc. 3 Remote sensor 4 Reset button/Power indicator/Security indicator • Resets the unit. (☞ page 3) • Lights up while the unit is turned on. • ...Flashes when the security function is activated. (☞ page 7) 5 MENU/ button • Turns off the power. (Hold) • Turns...
...output level. DDX419/DDX4049BT/DDX319/DDX3049 Screen (Touch panel) Monitor panel 1 Loading slot 2 0 (Eject) button Ejects the disc. 3 Remote sensor 4 Reset button/Power indicator/Security indicator • Resets the unit. (☞ page 3) • Lights up while the unit is turned on. • ...Flashes when the security function is activated. (☞ page 7) 5 MENU/ button • Turns off the power. (Hold) • Turns...
Instruction Manual
Page 25
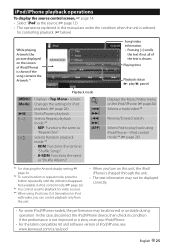
iPod/iPhone playback operations To display the source control screen, ☞ page 14. • Select "iPod" as the source. (☞ page 13) • The operations explained in this manual are under the condition when the unit is selected for controlling playback. (☞ below) While playing, Artwork (the picture displayed on the screen of iPod/iPhone) is shown if the song contains the Artwork.*1 Song/video information • Pressing [
iPod/iPhone playback operations To display the source control screen, ☞ page 14. • Select "iPod" as the source. (☞ page 13) • The operations explained in this manual are under the condition when the unit is selected for controlling playback. (☞ below) While playing, Artwork (the picture displayed on the screen of iPod/iPhone) is shown if the song contains the Artwork.*1 Song/video information • Pressing [

Instruction Manual
Page 76
...speaker wire should be connected to the instruction manual. ..........6 ..........1 4 9*3 ..........6 ..........1 (3m: 9.8 ft) 5 *1 DDX419/DDX4049BT/ DDX319/DDX3049 only. *2 DDX719/DDX7049BT only. ..........1 *3 DDX719/DDX7049BT/ DDX419/DDX4049BT only. battery. 8 Press the reset button. 9 Perform the Initial Setup. ..........1 2 7*2 ..........1 (2m: 6.5 ft) 3 8*2 ..........2 ..........2 2WARNING • If you connect the ignition wire (... to a power source with a constant voltage supply, such as with the same rating. 76 DDX719/DDX7049BT/DDX419/DDX4049BT/DDX319/DDX3049
...speaker wire should be connected to the instruction manual. ..........6 ..........1 4 9*3 ..........6 ..........1 (3m: 9.8 ft) 5 *1 DDX419/DDX4049BT/ DDX319/DDX3049 only. *2 DDX719/DDX7049BT only. ..........1 *3 DDX719/DDX7049BT/ DDX419/DDX4049BT only. battery. 8 Press the reset button. 9 Perform the Initial Setup. ..........1 2 7*2 ..........1 (2m: 6.5 ft) 3 8*2 ..........2 ..........2 2WARNING • If you connect the ignition wire (... to a power source with a constant voltage supply, such as with the same rating. 76 DDX719/DDX7049BT/DDX419/DDX4049BT/DDX319/DDX3049


