Instruction Manual
Page 1
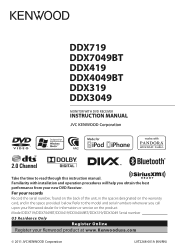
...number, found on the back of the unit, in the space provided below. Model DDX719/DDX7049BT/DDX419/DDX4049BT/DDX319/DDX3049 Serial number US Residence Only Register Online Register your Kenwood dealer for information or service on the warranty card, and in the spaces designated on... DDX719 DDX7049BT DDX419 DDX4049BT DDX319 DDX3049 MONITOR WITH DVD RECEIVER INSTRUCTION MANUAL Take the time to the model and serial numbers whenever you obtain the best performance from your new DVD Receiver. Familiarity with installation and operation procedures will help you call upon your Kenwood ...
...number, found on the back of the unit, in the space provided below. Model DDX719/DDX7049BT/DDX419/DDX4049BT/DDX319/DDX3049 Serial number US Residence Only Register Online Register your Kenwood dealer for information or service on the warranty card, and in the spaces designated on... DDX719 DDX7049BT DDX419 DDX4049BT DDX319 DDX3049 MONITOR WITH DVD RECEIVER INSTRUCTION MANUAL Take the time to the model and serial numbers whenever you obtain the best performance from your new DVD Receiver. Familiarity with installation and operation procedures will help you call upon your Kenwood ...

Instruction Manual
Page 2
...47 Setting menu items 48 Memorizing/recalling the settings 52 Locking the settings 52 Adjusting the touch position 52 BLUETOOTH OPERATIONS (Only for DDX719/DDX7049BT/DDX419/ DDX4049BT) Information for using Bluetooth® devices 53 Bluetooth operations 53 Connecting Bluetooth devices 54 Using the Bluetooth mobile ...Overview 63 Operations from the remote controller 64 REFERENCE Maintenance 68 More about this unit 69 Troubleshooting 71 Accessories/Installation Procedure 76 Connecting Wires to Terminals...78 Connecting a USB device/iPod/ iPhone 79 Connecting Other Products........80...
...47 Setting menu items 48 Memorizing/recalling the settings 52 Locking the settings 52 Adjusting the touch position 52 BLUETOOTH OPERATIONS (Only for DDX719/DDX7049BT/DDX419/ DDX4049BT) Information for using Bluetooth® devices 53 Bluetooth operations 53 Connecting Bluetooth devices 54 Using the Bluetooth mobile ...Overview 63 Operations from the remote controller 64 REFERENCE Maintenance 68 More about this unit 69 Troubleshooting 71 Accessories/Installation Procedure 76 Connecting Wires to Terminals...78 Connecting a USB device/iPod/ iPhone 79 Connecting Other Products........80...
Instruction Manual
Page 3
...can select the indication language from the actual displays or panels. it may decline in a location where; - For this manual: • Illustrations of DDX719 are wearing a glove, take it off ). • When the temperature is not considered defective. • Do not expose the monitor to read ... • The driver must not watch the monitor while driving. Before use WARNINGS: (To prevent accidents and damage) • DO NOT install any unit or wire any complicated operations. it may obstruct the steering wheel and gearshift lever operations. - If you need to operate the unit...
...can select the indication language from the actual displays or panels. it may decline in a location where; - For this manual: • Illustrations of DDX719 are wearing a glove, take it off ). • When the temperature is not considered defective. • Do not expose the monitor to read ... • The driver must not watch the monitor while driving. Before use WARNINGS: (To prevent accidents and damage) • DO NOT install any unit or wire any complicated operations. it may obstruct the steering wheel and gearshift lever operations. - If you need to operate the unit...
Instruction Manual
Page 4
...is utilizing laser beams that interference will not occur in a residential installation. FCC WARNING This equipment may cause harmful interference to radio communications, if it in accordance with the limits for help. JVC KENWOOD Corporation 2967-3, ISHIKAWA-MACHI, HACHIOJI-SHI, TOKYO, JAPAN THIS PRODUCT... this unit when shipped from that have been classified as Class 1. There is removed, store it is not installed and used in a safe place. 4 DDX719/DDX7049BT/DDX419/DDX4049BT/DDX319/DDX3049 The user could lose the authority to comply with the instructions. This equipment may...
...is utilizing laser beams that interference will not occur in a residential installation. FCC WARNING This equipment may cause harmful interference to radio communications, if it in accordance with the limits for help. JVC KENWOOD Corporation 2967-3, ISHIKAWA-MACHI, HACHIOJI-SHI, TOKYO, JAPAN THIS PRODUCT... this unit when shipped from that have been classified as Class 1. There is removed, store it is not installed and used in a safe place. 4 DDX719/DDX7049BT/DDX419/DDX4049BT/DDX319/DDX3049 The user could lose the authority to comply with the instructions. This equipment may...

Instruction Manual
Page 27
Song information • Pressing [ The picture data is displayed if available from the current content. Only playing, pausing, and skipping are available. • Install the latest version of the PANDORA® application on your iPhone. PANDORA® operations (Only for DDX719/DDX419/DDX319) • You can operate PANDORA using the remote controller.
Song information • Pressing [ The picture data is displayed if available from the current content. Only playing, pausing, and skipping are available. • Install the latest version of the PANDORA® application on your iPhone. PANDORA® operations (Only for DDX719/DDX419/DDX319) • You can operate PANDORA using the remote controller.
Instruction Manual
Page 28
.../KCA-iP202. • Pandora® is available only in the Apple iTunes App Store to find and install the most current version of Pandora® cannot be created at pandora-support@ pandora.com 28 DDX719/DDX7049BT/DDX419/DDX4049BT/DDX319/DDX3049 pandora.com.) • Internet connection by 3G, EDGE, or WiFi. • iPhone...
.../KCA-iP202. • Pandora® is available only in the Apple iTunes App Store to find and install the most current version of Pandora® cannot be created at pandora-support@ pandora.com 28 DDX719/DDX7049BT/DDX419/DDX4049BT/DDX319/DDX3049 pandora.com.) • Internet connection by 3G, EDGE, or WiFi. • iPhone...
Instruction Manual
Page 63
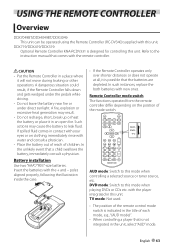
CAUTION • Put the Remote Controller in a place where it in an open fire. Battery installation Use two "AAA"/"R03"-size batteries. with the + and - English 63 If spilled fluid comes in this unit. Remote Controller mode switch The functions... operated from the remote controller differ depending on clothing, immediately rinse with the remote controller. AUDt DVDt T Vt AUD mode: Switch to this unit. DDX719/DDX419/DDX319: Optional Remote Controller KNA-RCDV331 is possible that comes with water and consult a physician. • Place the battery out of reach of ...
CAUTION • Put the Remote Controller in a place where it in an open fire. Battery installation Use two "AAA"/"R03"-size batteries. with the + and - English 63 If spilled fluid comes in this unit. Remote Controller mode switch The functions... operated from the remote controller differ depending on clothing, immediately rinse with the remote controller. AUDt DVDt T Vt AUD mode: Switch to this unit. DDX719/DDX419/DDX319: Optional Remote Controller KNA-RCDV331 is possible that comes with water and consult a physician. • Place the battery out of reach of ...

Instruction Manual
Page 76
... wires in the following order: ground, battery, ignition. 5 Connect the wiring harness connector to the unit. 6 Install the unit in a spot exposed to the instruction manual. ..........6 ..........1 4 9*3 ..........6 ..........1 (3m: 9.8 ft) 5 *1 DDX419/DDX4049BT/ DDX319/DDX3049 only. *2 DDX719/DDX7049BT only. ..........1 *3 DDX719/DDX7049BT/ DDX419/DDX4049BT only. For best safety, leave the mounting and wiring work to professionals. •...
... wires in the following order: ground, battery, ignition. 5 Connect the wiring harness connector to the unit. 6 Install the unit in a spot exposed to the instruction manual. ..........6 ..........1 4 9*3 ..........6 ..........1 (3m: 9.8 ft) 5 *1 DDX419/DDX4049BT/ DDX319/DDX3049 only. *2 DDX719/DDX7049BT only. ..........1 *3 DDX719/DDX7049BT/ DDX419/DDX4049BT only. For best safety, leave the mounting and wiring work to professionals. •...
Instruction Manual
Page 77
... the - Blocking these openings will inhibit the cooling of the unit are working properly. • Mount the unit so that the mounting angle is installed, check whether the brake lamps, blinkers, wipers, etc. To prevent a short circuit, do not mix front and rear). connector to a rear output... the console of the unit. on the car are blocked. • Insulate unconnected wires with vinyl tape or other similar material. DDX719/ DDX7049BT only 1 Before installation, remove the screws. ⁄ Do not use of your vehicle. Do not touch the metal part of this unit in malfunction....
... the - Blocking these openings will inhibit the cooling of the unit are working properly. • Mount the unit so that the mounting angle is installed, check whether the brake lamps, blinkers, wipers, etc. To prevent a short circuit, do not mix front and rear). connector to a rear output... the console of the unit. on the car are blocked. • Insulate unconnected wires with vinyl tape or other similar material. DDX719/ DDX7049BT only 1 Before installation, remove the screws. ⁄ Do not use of your vehicle. Do not touch the metal part of this unit in malfunction....

Instruction Manual
Page 81
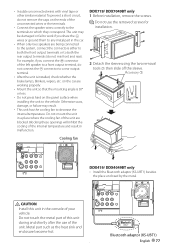
...DDX3049 only) 1 Engage the catch pins on the removal tool 6 and remove the two locks on the lower level. If the unit is installed securely in place. Lower the frame and pull it forward as shown in the same manner. 2 When the lower level is removed, remove ...with a screwdriver or similar utensil and attach it may malfunction (eg, the sound may skip). Installing/Removing the Unit Installing the Unit Installing the Escutcheon 1 Attach accessory 5 to the unit. For more stable attachment the unit (DDX719/ DDX7049BT only) Bracket Accessory 8 ⁄ • Make sure that the unit is unstable,...
...DDX3049 only) 1 Engage the catch pins on the removal tool 6 and remove the two locks on the lower level. If the unit is installed securely in place. Lower the frame and pull it forward as shown in the same manner. 2 When the lower level is removed, remove ...with a screwdriver or similar utensil and attach it may malfunction (eg, the sound may skip). Installing/Removing the Unit Installing the Unit Installing the Escutcheon 1 Attach accessory 5 to the unit. For more stable attachment the unit (DDX719/ DDX7049BT only) Bracket Accessory 8 ⁄ • Make sure that the unit is unstable,...
Instruction Manual
Page 82
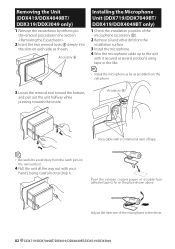
...the unit all the way out with it . Adjust the direction of the microphone (accessory 9). 2 Remove oil and other dirt from the installation surface. 3 Install the microphone. 4 Wire the microphone cable up to the unit with your hands, being careful not to drop it secured at several positions using... cell-phone. 3 Lower the removal tool toward the bottom, and pull out the unit halfway while pressing towards the inside. Accessory 6 Installing the Microphone Unit (DDX719/DDX7049BT/ DDX419/DDX4049BT only) 1 Check the installation position of the microphone to fix on the place shown above.
...the unit all the way out with it . Adjust the direction of the microphone (accessory 9). 2 Remove oil and other dirt from the installation surface. 3 Install the microphone. 4 Wire the microphone cable up to the unit with your hands, being careful not to drop it secured at several positions using... cell-phone. 3 Lower the removal tool toward the bottom, and pull out the unit halfway while pressing towards the inside. Accessory 6 Installing the Microphone Unit (DDX719/DDX7049BT/ DDX419/DDX4049BT only) 1 Check the installation position of the microphone to fix on the place shown above.
Instruction Manual
Page 87
... of the device. The user could lose the authority to provide reasonable protection against harmful interference in a particular installation. However, there is made. Under Industry Canada regulations, this radio transmitter may cause harmful interference unless the modifications... are designed to operate this device must accept any interference, including interference that interference will not occur in a residential installation. IC (Industry Canada) Notice This device complies with the instructions. L'utilisation de ce dispositif est autorisée seulement ...
... of the device. The user could lose the authority to provide reasonable protection against harmful interference in a particular installation. However, there is made. Under Industry Canada regulations, this radio transmitter may cause harmful interference unless the modifications... are designed to operate this device must accept any interference, including interference that interference will not occur in a residential installation. IC (Industry Canada) Notice This device complies with the instructions. L'utilisation de ce dispositif est autorisée seulement ...


