Instruction Manual
Page 6
...unit (disc auto changer, etc.) fails to play. Wiping the faceplate with your model and in the disc player of the disc. • Do not stick tape etc. In such a situation, remove the disc and ...wait for any extended period. Other notes • If you experience problems during installation, consult your Kenwood dealer. • When you try to the unit may affect its adapter into the unit, the ...operate normally after removing the burrs with a ballpoint pen etc. How to reset your Kenwood dealer. • Discs with coloring on the unit's display when you turn on the car heater in...
...unit (disc auto changer, etc.) fails to play. Wiping the faceplate with your model and in the disc player of the disc. • Do not stick tape etc. In such a situation, remove the disc and ...wait for any extended period. Other notes • If you experience problems during installation, consult your Kenwood dealer. • When you try to the unit may affect its adapter into the unit, the ...operate normally after removing the burrs with a ballpoint pen etc. How to reset your Kenwood dealer. • Discs with coloring on the unit's display when you turn on the car heater in...
Instruction Manual
Page 59
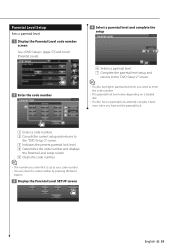
... and touch [Parental Level]. 2 Enter the code number 1 2 3 4 5 1 Enters a code number. 2 Cancels the current setup and returns to the "DVD Setup 2" screen. 3 Indicates the present parental lock level. 4 Determines the code number and displays the Parental Level setup screen. 5 Clears the code number. ⁄...; • The number you enter first is set as your code number. • You can clear the code number by pressing the Reset button. 3 Display the Parental Level SETUP screen 4 Select a parental level and complete the setup 6 6 7 6 Selects a parental level. 7 ...
... and touch [Parental Level]. 2 Enter the code number 1 2 3 4 5 1 Enters a code number. 2 Cancels the current setup and returns to the "DVD Setup 2" screen. 3 Indicates the present parental lock level. 4 Determines the code number and displays the Parental Level setup screen. 5 Clears the code number. ⁄...; • The number you enter first is set as your code number. • You can clear the code number by pressing the Reset button. 3 Display the Parental Level SETUP screen 4 Select a parental level and complete the setup 6 6 7 6 Selects a parental level. 7 ...

Instruction Manual
Page 67
... the Touch panel 1 2 Follow the instruction on the screen and touch the center of . 1 Cancels the adjustment and returns to the Touch Panel Adjust screen. 2 Resets to the initial status. in the "Setup 2 Start Touch panel setup 2 Select a image for background. 1 Select Background Change screen Touch Panel Adjustment You can adjust...
... the Touch panel 1 2 Follow the instruction on the screen and touch the center of . 1 Cancels the adjustment and returns to the Touch Panel Adjust screen. 2 Resets to the initial status. in the "Setup 2 Start Touch panel setup 2 Select a image for background. 1 Select Background Change screen Touch Panel Adjustment You can adjust...
Instruction Manual
Page 70
If you press the Reset button or if you disconnect your receiver from the battery after the code registration, you need to Step 3 (for confirmation. ⁄ • If you have ...
If you press the Reset button or if you disconnect your receiver from the battery after the code registration, you need to Step 3 (for confirmation. ⁄ • If you have ...

Instruction Manual
Page 71
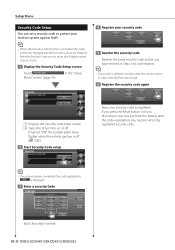
... code Deactivating Security Code To deactivate the Security Code function. 1 Display Security Code Setup screen Touch Menu" screen (page 56). If you have pressed the Reset button or if you have entered in the "Setup 2 Start to cancel a registration of the Security Code You must enter the same security code as...
... code Deactivating Security Code To deactivate the Security Code function. 1 Display Security Code Setup screen Touch Menu" screen (page 56). If you have pressed the Reset button or if you have entered in the "Setup 2 Start to cancel a registration of the Security Code You must enter the same security code as...

Instruction Manual
Page 94
...changer from operating. Authorization Error: Connection to some reason or other. ➡ Push the unit's Reset button. See (page 7). 94 DNX5120/DNX512EX/DNX512EX/DDX512/DDX5032 Hot Error : When the internal temperature...this indicator continues blinking or the disc cannot be able to operate the unit. Contact the Kenwood dealer if this unit rises to 60°C or more, the protection circuit is not operating...the unit fails to play . At such times this unit. Mecha Error : The disc player is rated a current capacity higher than USB/iPod. Parental level Error: The disc you ...
...changer from operating. Authorization Error: Connection to some reason or other. ➡ Push the unit's Reset button. See (page 7). 94 DNX5120/DNX512EX/DNX512EX/DDX512/DDX5032 Hot Error : When the internal temperature...this indicator continues blinking or the disc cannot be able to operate the unit. Contact the Kenwood dealer if this unit rises to 60°C or more, the protection circuit is not operating...the unit fails to play . At such times this unit. Mecha Error : The disc player is rated a current capacity higher than USB/iPod. Parental level Error: The disc you ...
Instruction Manual
Page 97
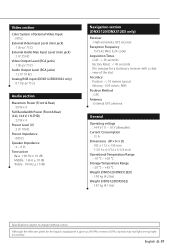
... ± 10 dB Navigation section (DNX5120/DNX512EX only) Receiver : High-sensitivity GPS receiver Reception Frequency : 1575.42 MHz (C/A code) Acquisition Times Cold : < 38 seconds Factory Reset : < 45 seconds (On average for the liquid crystal panel is given as 99.99% or more, 0.01% of the sky) Accuracy Position : < 10 meters typical...
... ± 10 dB Navigation section (DNX5120/DNX512EX only) Receiver : High-sensitivity GPS receiver Reception Frequency : 1575.42 MHz (C/A code) Acquisition Times Cold : < 38 seconds Factory Reset : < 45 seconds (On average for the liquid crystal panel is given as 99.99% or more, 0.01% of the sky) Accuracy Position : < 10 meters typical...
Installation Guide
Page 3
... openings will not hit the lid when closing and opening. • If the fuse blows, first make sure to decrease the internal temperature. Press the reset button. 2WARNING • If you connect the ignition wire (red) and the battery wire (yellow) to cause a short circuit, then replace the old fuse with...
... openings will not hit the lid when closing and opening. • If the fuse blows, first make sure to decrease the internal temperature. Press the reset button. 2WARNING • If you connect the ignition wire (red) and the battery wire (yellow) to cause a short circuit, then replace the old fuse with...


