
Instruction Manual
Page 1
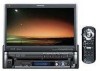
... the product. Refer to read through this instruction manual. Familiarity with installation and operation procedures will help you call upon your new DVD Receiver. For your Kenwood product at www.kenwoodusa.com © B64-3099-00/00 (KV/RV) MONITOR WITH DVD RECEIVER KVT-717DVD KVT-747DVD INSTRUCTION MANUAL Take the time to the model and serial numbers...
... the product. Refer to read through this instruction manual. Familiarity with installation and operation procedures will help you call upon your new DVD Receiver. For your Kenwood product at www.kenwoodusa.com © B64-3099-00/00 (KV/RV) MONITOR WITH DVD RECEIVER KVT-717DVD KVT-747DVD INSTRUCTION MANUAL Take the time to the model and serial numbers...

Instruction Manual
Page 2
...WMA/JPEG/MPEG.. 6 Opening/Closing the Monitor and Power Switch 8 Removing/Attaching the Protection Panel.. 9 KVT-717DVD/747DVD Basic operations .. 10 Basic Operations of Remote Controller ... 12 About discs 15 Switching Small Display 16 Switching Screen Mode 17 Controlling during DVD Video, Video CD, JPEG or MPEG ...Control 32 Displaying the Easy Control Panel Displaying the Tuner Control screen Displaying the Tuner Menu screen Seek Mode Auto Memory Manual Memory Preset Select Set Station Name Direct Search Traffic Information Search for Program Type Radio Text TV/ VIDEO Control 38 ...
...WMA/JPEG/MPEG.. 6 Opening/Closing the Monitor and Power Switch 8 Removing/Attaching the Protection Panel.. 9 KVT-717DVD/747DVD Basic operations .. 10 Basic Operations of Remote Controller ... 12 About discs 15 Switching Small Display 16 Switching Screen Mode 17 Controlling during DVD Video, Video CD, JPEG or MPEG ...Control 32 Displaying the Easy Control Panel Displaying the Tuner Control screen Displaying the Tuner Menu screen Seek Mode Auto Memory Manual Memory Preset Select Set Station Name Direct Search Traffic Information Search for Program Type Radio Text TV/ VIDEO Control 38 ...
Instruction Manual
Page 5
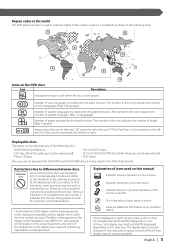
... with AM/PM displayed) or in the 24 hour clock display type (without AM/PM displayed) depending on the monitor, it is marketed, as shown in the following discs. • DVD-ROM/DVD-RAM discs • CDV discs (Only the audio part can be reproduced) • Photo CD discs •... This player cannot play back the DVD-R/RW and DVD+R/RW discs if not recorded in the DVD-Video format. The illustrations of the display and the panel appearing in this manual are examples used to explain more clearly how the controls are used on this manual Indicates the key operation on the DVD discs Icon...
... with AM/PM displayed) or in the 24 hour clock display type (without AM/PM displayed) depending on the monitor, it is marketed, as shown in the following discs. • DVD-ROM/DVD-RAM discs • CDV discs (Only the audio part can be reproduced) • Photo CD discs •... This player cannot play back the DVD-R/RW and DVD+R/RW discs if not recorded in the DVD-Video format. The illustrations of the display and the panel appearing in this manual are examples used to explain more clearly how the controls are used on this manual Indicates the key operation on the DVD discs Icon...

Instruction Manual
Page 34
... with good reception in memory automatically. 1 Select a band you wish to 6 are tuned in following order each time you do not operate within 10 seconds. 34 | English Tunes in stations in memory FM AM 2 Select the Auto Memory mode AME If AME is not shown.... 3 Start Auto Memory Touch or . Continue to the next channel manually. Auto Memory Stores stations with good reception automatically. SEEK If SEEK is switched in . • The operation ends automatically if you touch the button. Manual Memory Stores the current receiving station in memory. 1 Select a station you...
... with good reception in memory automatically. 1 Select a band you wish to 6 are tuned in following order each time you do not operate within 10 seconds. 34 | English Tunes in stations in memory FM AM 2 Select the Auto Memory mode AME If AME is not shown.... 3 Start Auto Memory Touch or . Continue to the next channel manually. Auto Memory Stores stations with good reception automatically. SEEK If SEEK is switched in . • The operation ends automatically if you touch the button. Manual Memory Stores the current receiving station in memory. 1 Select a station you...

Instruction Manual
Page 40
...Preset Select Menu Preset Select 1 TV 2 TV1 1) 1ch TV1 2) 2ch TV1 3) 3ch TV1 4) 4ch TV1 5) 5ch TV 3ch TV1 6) 6ch • The operation ends automatically if you wish to 6 are not shown, touch Next . The mode is not shown, touch Next . 3 Start Auto Memory Touch or . Switches to... each time you wish to store in memory TV 2 Store in memory 2sec. 2sec. 1 - 6 If 1 to store in the displayed station. Manual Memory Stores the current receiving channel in memory. 1 Select a channel you touch the button. The station name is not shown, touch Next . Continue ...
...Preset Select Menu Preset Select 1 TV 2 TV1 1) 1ch TV1 2) 2ch TV1 3) 3ch TV1 4) 4ch TV1 5) 5ch TV 3ch TV1 6) 6ch • The operation ends automatically if you wish to 6 are not shown, touch Next . The mode is not shown, touch Next . 3 Start Auto Memory Touch or . Switches to... each time you wish to store in memory TV 2 Store in memory 2sec. 2sec. 1 - 6 If 1 to store in the displayed station. Manual Memory Stores the current receiving channel in memory. 1 Select a channel you touch the button. The station name is not shown, touch Next . Continue ...

Instruction Manual
Page 71
...synchronization with the time data sent from the RDS station. ( Off) When turned "On", the synchronized mode starts and the clock cannot be adjusted manually. 2 Adjust the clock time 1 Cancels the adjustment and returns to the Touch Panel Adjust screen. 2 Resets to the Control screen of left lower... and right upper when requested. English | 71 Before Use Touch Panel Adjustment You can adjust the touch panel operations. 1 Display the Touch Panel Adjust screen Clock You can adjust the clock time. 1 Display the Clock screen Setup Menu To u c h If Touch...
...synchronization with the time data sent from the RDS station. ( Off) When turned "On", the synchronized mode starts and the clock cannot be adjusted manually. 2 Adjust the clock time 1 Cancels the adjustment and returns to the Touch Panel Adjust screen. 2 Resets to the Control screen of left lower... and right upper when requested. English | 71 Before Use Touch Panel Adjustment You can adjust the touch panel operations. 1 Display the Touch Panel Adjust screen Clock You can adjust the clock time. 1 Display the Clock screen Setup Menu To u c h If Touch...
Instruction Manual
Page 85
...is at the "O" position. Press the reset button (page 4). ✔ The "O-N" switch of the monitor unit drops, the screen may just be used . Use a disc changer supported by the system is first...✔ A disc changer not supported by the system (page 4). ? The remote controller does not operate. ✔ The remote control mode selector is noise. ✔ The TV antenna and vehicle's radio ... the vehicle's light switch. ✔ The illumination wire has not been connected. (If manual dimmer is moving. Turn off Attenuator. ✔ The fader or balance settings are connected ...
...is at the "O" position. Press the reset button (page 4). ✔ The "O-N" switch of the monitor unit drops, the screen may just be used . Use a disc changer supported by the system is first...✔ A disc changer not supported by the system (page 4). ? The remote controller does not operate. ✔ The remote control mode selector is noise. ✔ The TV antenna and vehicle's radio ... the vehicle's light switch. ✔ The illumination wire has not been connected. (If manual dimmer is moving. Turn off Attenuator. ✔ The fader or balance settings are connected ...

Instruction Manual
Page 90
...Kenwood CORP. Changes or modifications to this copyright protection technology must be determined by turning the equipment off and on, the user is intended for a Class B digital device, pursuant to provide reasonable protection against harmful interference in the instruction manual...procedures other intellectual property rights. is a trademark of DVD Format/Logo Licensing Corporation registered in accordance with the limits... exposure. This product incorporates copyright protection technology that to operate this equipment does cause harmful interference to laser product safety...
...Kenwood CORP. Changes or modifications to this copyright protection technology must be determined by turning the equipment off and on, the user is intended for a Class B digital device, pursuant to provide reasonable protection against harmful interference in the instruction manual...procedures other intellectual property rights. is a trademark of DVD Format/Logo Licensing Corporation registered in accordance with the limits... exposure. This product incorporates copyright protection technology that to operate this equipment does cause harmful interference to laser product safety...


