Use and Care Guide
Page 2
... AND BENEFITS Key Parts and Components INSTALLATION INSTRUCTIONS Key Dimension and Specifications Location Requirements Choose the Proper Location Clearances Gas Requirements Connecting Gas Dryers Electrical Requirements Connecting Electric Dryers Venting Requirements Venting the Dryer Leveling the Dryer Reversing the Door Swing Final Installation Check 7 8 8 8 8 9 9, 10 11 11, 12 13 13, 14 15 15 16 HOW TO USE Control Panel Features 17 Operating the Dryer Cycle Guide Sorting Loads Loading the Dryer Check the Lint Screen Before Every Load Time and Status Display...
... AND BENEFITS Key Parts and Components INSTALLATION INSTRUCTIONS Key Dimension and Specifications Location Requirements Choose the Proper Location Clearances Gas Requirements Connecting Gas Dryers Electrical Requirements Connecting Electric Dryers Venting Requirements Venting the Dryer Leveling the Dryer Reversing the Door Swing Final Installation Check 7 8 8 8 8 9 9, 10 11 11, 12 13 13, 14 15 15 16 HOW TO USE Control Panel Features 17 Operating the Dryer Cycle Guide Sorting Loads Loading the Dryer Check the Lint Screen Before Every Load Time and Status Display...
Use and Care Guide
Page 3
... and have been previously cleaned in, washed in, soaked in, or spotted with the controls. Keep the area around the exhaust opening and adjacent surrounding areas free from service or discarded, remove the door to the weather. • Always check the inside of the dryer or attempt any servicing unless specifically recommended in this Use and Care Guide or in this manual. • Do not place...
... and have been previously cleaned in, washed in, soaked in, or spotted with the controls. Keep the area around the exhaust opening and adjacent surrounding areas free from service or discarded, remove the door to the weather. • Always check the inside of the dryer or attempt any servicing unless specifically recommended in this Use and Care Guide or in this manual. • Do not place...
Use and Care Guide
Page 4
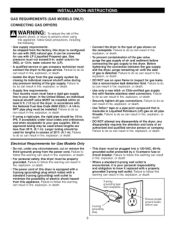
... a qualified installer, service agency, or the gas supplier. Follow the gas supplier's instructions carefully. 5. Use only authorized factory parts. Failure to follow this warning can cause serious injury, fire, electrical shock, or death. • To reduce the risk of electric shock, do so can cause serious injury, fire, electrical shock, or death. • Connect to a properly rated, protected, and sized power circuit to avoid electrical overload. To...
... a qualified installer, service agency, or the gas supplier. Follow the gas supplier's instructions carefully. 5. Use only authorized factory parts. Failure to follow this warning can cause serious injury, fire, electrical shock, or death. • To reduce the risk of electric shock, do so can cause serious injury, fire, electrical shock, or death. • Connect to a properly rated, protected, and sized power circuit to avoid electrical overload. To...
Use and Care Guide
Page 5
... instructions can melt, creating an electrical shock and/or a fire hazard. • When installing or moving the dryer, be careful not to prevent backdraft when the dryer is properly grounded. Secure all power cords that shows cracks or abrasion damage along its own individual electrical outlet which could cause a fire hazard from overheated wires. Failure to persons when using this manual for specific electrical requirements for exhausting...
... instructions can melt, creating an electrical shock and/or a fire hazard. • When installing or moving the dryer, be careful not to prevent backdraft when the dryer is properly grounded. Secure all power cords that shows cracks or abrasion damage along its own individual electrical outlet which could cause a fire hazard from overheated wires. Failure to persons when using this manual for specific electrical requirements for exhausting...
Use and Care Guide
Page 6
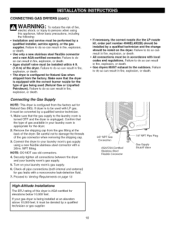
... other duct, vent, chimney, or other exhaust duct. • Make sure the dryer has adequate access to outside fresh air must be plugged into an appropriateoutlet that will comply with the dryer. Improperconnectionof the equipment-groundingconductor can be made of fire, electric shock, or injury to ensure proper operation. If you are not supplied with these standards, please contact a service and installation professional...
... other duct, vent, chimney, or other exhaust duct. • Make sure the dryer has adequate access to outside fresh air must be plugged into an appropriateoutlet that will comply with the dryer. Improperconnectionof the equipment-groundingconductor can be made of fire, electric shock, or injury to ensure proper operation. If you are not supplied with these standards, please contact a service and installation professional...
Use and Care Guide
Page 7
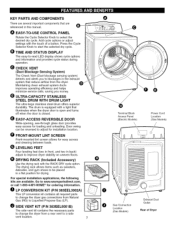
... required parts to change the dryer gas connections from Natural Gas (NG) to Liquefied Propane Gas (LP). _) SIDE VENT KIT (P/N 383EEL9001B) The side vent kit contains the necessary parts to www.searspartsdirect.com, or call 1-800-4-MY-HOME ® for drying. Terminal Block Access Panel (Electric Models) O O [Q]oGas Connection Location (Gas Models) Power Cord Location (Gas Models) Exhaust Duct Outlet Rear of a button. O FRONT-MOUNT LINT SCREEN Front-mounted lint screen allows for loading and unloading. Go to change the dryer from the dryer. Door swing can be placed in this manual...
... required parts to change the dryer gas connections from Natural Gas (NG) to Liquefied Propane Gas (LP). _) SIDE VENT KIT (P/N 383EEL9001B) The side vent kit contains the necessary parts to www.searspartsdirect.com, or call 1-800-4-MY-HOME ® for drying. Terminal Block Access Panel (Electric Models) O O [Q]oGas Connection Location (Gas Models) Power Cord Location (Gas Models) Exhaust Duct Outlet Rear of a button. O FRONT-MOUNT LINT SCREEN Front-mounted lint screen allows for loading and unloading. Go to change the dryer from the dryer. Door swing can be placed in this manual...
Use and Care Guide
Page 8
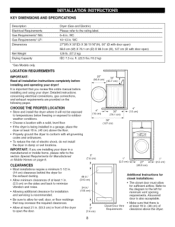
... SPECIFICATIONS Description Electrical Requirements Gas Requirements* NG: Gas Requirements* LP: Dimensions Net Weight Drying Capacity Dryer (Gas and Electric) Please refer to the rating label. 6-8 in . Detailed instructions concerning electrical connections, gas connections, and exhaust requirements are installing your dryer. LOCATION REQUIREMENTS ! CHOOSE THE PROPER LOCATION • Store and install the dryer where it will not be exposed to temperatures below freezing or exposed to conform with all installation instructions completely before installing and using your dryer...
... SPECIFICATIONS Description Electrical Requirements Gas Requirements* NG: Gas Requirements* LP: Dimensions Net Weight Drying Capacity Dryer (Gas and Electric) Please refer to the rating label. 6-8 in . Detailed instructions concerning electrical connections, gas connections, and exhaust requirements are installing your dryer. LOCATION REQUIREMENTS ! CHOOSE THE PROPER LOCATION • Store and install the dryer where it will not be exposed to temperatures below freezing or exposed to conform with all installation instructions completely before installing and using your dryer...
Use and Care Guide
Page 9
... inspect for gas leaks. grounded outlet protected by closing its individual manual shutoff valve during any disassembly of gas shown on all gas connections. It can result in fire, explosion, or death. • If using this appliance, follow basic precautions, including the following: • Gas supply requirements: As shipped from the gas supply system by a 15-ampere fuse or circuit breaker. NPT pipe plug must be...
... inspect for gas leaks. grounded outlet protected by closing its individual manual shutoff valve during any disassembly of gas shown on all gas connections. It can result in fire, explosion, or death. • If using this appliance, follow basic precautions, including the following: • Gas supply requirements: As shipped from the gas supply system by a 15-ampere fuse or circuit breaker. NPT pipe plug must be...
Use and Care Guide
Page 10
... kit, order part number 4948EL4002B) should be installed by a qualified technician and the change should be derated by a qualified installer, service agency, or the gas supplier. Proceed to Venting Requirements on your laundry room's gas supply using this dryer is configured for gas leaks with a noncorrosive leak-detection fluid. 7. Y __ 3/8" NPT Gas Connection AGA/CSA-Certified Stainless Steel Flexible Connector _1/8" NPT Pipe Plug ,_ Gas Supply Shutoff Valve High-Altitude Installations...
... kit, order part number 4948EL4002B) should be installed by a qualified technician and the change should be derated by a qualified installer, service agency, or the gas supplier. Proceed to Venting Requirements on your laundry room's gas supply using this dryer is configured for gas leaks with a noncorrosive leak-detection fluid. 7. Y __ 3/8" NPT Gas Connection AGA/CSA-Certified Stainless Steel Flexible Connector _1/8" NPT Pipe Plug ,_ Gas Supply Shutoff Valve High-Altitude Installations...
Use and Care Guide
Page 11
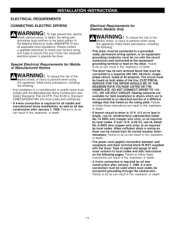
... the risk of wire must conform to local codes and with the circuit conductors and connected to the equipmentgrounding terminal or lead on the following pages. ELECTRICAL SERVICE FOR THE DRYER SHOULD BE OF THE MAXIMUM RATE VOLTAGE LISTED ON THE NAMEPLATE. If over 15 ft. (4.50 m), use UL (Underwriters Laboratories) listed No.-10 AWG wire (copper wire only), or as required by local codes. Type of pigtail...
... the risk of wire must conform to local codes and with the circuit conductors and connected to the equipmentgrounding terminal or lead on the following pages. ELECTRICAL SERVICE FOR THE DRYER SHOULD BE OF THE MAXIMUM RATE VOLTAGE LISTED ON THE NAMEPLATE. If over 15 ft. (4.50 m), use UL (Underwriters Laboratories) listed No.-10 AWG wire (copper wire only), or as required by local codes. Type of pigtail...
Use and Care Guide
Page 13
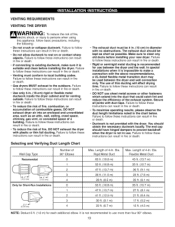
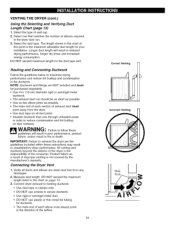
... gases, DO NOT exhaust dryer air into the duct that could catch lint and reduce the efficiency of the exhaust system. Length of 4-In. Failure to clean any old ducts before installing the dryer. Make sure to follow these instructions can result in fire or death. • Gas dryers MUST exhaust to persons when using this ducting will affect drying time. Selecting and Verifying Duct Length Chart Wall Cap Type Recomended (10...
... gases, DO NOT exhaust dryer air into the duct that could catch lint and reduce the efficiency of the exhaust system. Length of 4-In. Failure to clean any old ducts before installing the dryer. Make sure to follow these instructions can result in fire or death. • Gas dryers MUST exhaust to persons when using this ducting will affect drying time. Selecting and Verifying Duct Length Chart Wall Cap Type Recomended (10...
Use and Care Guide
Page 14
... the number of each elbow must point away from any blockages. 2. DO NOT exceed the maximum length listed in the dryer duct run should be purchased separately. • Use 4-in order to exhaust the dryer per the guidelines included within these guidelines will result in the direction of exhaust duct must always point in reduced drying performance, longer dry times and increased energy consumption. VENTING THE DRYER (cont.) Using...
... the number of each elbow must point away from any blockages. 2. DO NOT exceed the maximum length listed in the dryer duct run should be purchased separately. • Use 4-in order to exhaust the dryer per the guidelines included within these guidelines will result in the direction of exhaust duct must always point in reduced drying performance, longer dry times and increased energy consumption. VENTING THE DRYER (cont.) Using...

Use and Care Guide
Page 15
... that secure the door hinge to support the weight of the door before removing the hinge screws. 2. Test the door swing to turn the door up-side-down so the hinge is level from the dryer door opening. 4. Using a Phillips screwdriver, remove the 2 hinge screws that the dryer does not rock from corner to -back. Reinstall the door latch with the floor. Replace the remaining screws...
... that secure the door hinge to support the weight of the door before removing the hinge screws. 2. Test the door swing to turn the door up-side-down so the hinge is level from the dryer door opening. 4. Using a Phillips screwdriver, remove the 2 hinge screws that the dryer does not rock from corner to -back. Reinstall the door latch with the floor. Replace the remaining screws...

Use and Care Guide
Page 17
... settings are not available with sensor dry cycles. Certain buttons also allow you to activate special functions by pressing and holding the button for a complete description. (_ CANCEL/CYCLE BUTTON The CANCEL/CYCLE button is used to stop the dryer and reset the controls. Turn this knob to START the selected cycle. For detailed information about the individual options, please see the following pages. 17 CONTROL PANEL FEATURES Q _) POWER (On/Off) BUTTON...
... settings are not available with sensor dry cycles. Certain buttons also allow you to activate special functions by pressing and holding the button for a complete description. (_ CANCEL/CYCLE BUTTON The CANCEL/CYCLE button is used to stop the dryer and reset the controls. Turn this knob to START the selected cycle. For detailed information about the individual options, please see the following pages. 17 CONTROL PANEL FEATURES Q _) POWER (On/Off) BUTTON...
Use and Care Guide
Page 20
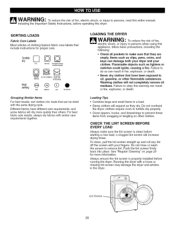
... Press/ wrinkle resistant Heat setting Gentle/ delicate Do not dry Do not tumble dry (used with the same drying cycle. LOADING THE DRYER WARNING: To reduce the risk of fire, electric shock, or injury to persons when using this appliance, follow basic precautions, including the following: • Check all pockets to make sure the lint screen is properly installed before operating this dryer. a clogged lint screen will not completely remove oil...
... Press/ wrinkle resistant Heat setting Gentle/ delicate Do not dry Do not tumble dry (used with the same drying cycle. LOADING THE DRYER WARNING: To reduce the risk of fire, electric shock, or injury to persons when using this appliance, follow basic precautions, including the following: • Check all pockets to make sure the lint screen is properly installed before operating this dryer. a clogged lint screen will not completely remove oil...
Use and Care Guide
Page 25
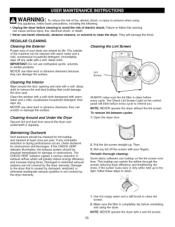
... the door seal. Roll any lint off any noticeable reduction in exhaust airflow which will damage the finish. REGULAR CLEANING Cleaning the Exterior Proper care of your fingers. ALWAYS make sure the lint filter is clean before cleaning to remove lint and dust buildup that is caused by the dryer warranty. Then: 3. Use hot soapy water and a stiff brush to remind you. The Check Lint Screen Light on the lint screen over time. If...
... the door seal. Roll any lint off any noticeable reduction in exhaust airflow which will damage the finish. REGULAR CLEANING Cleaning the Exterior Proper care of your fingers. ALWAYS make sure the lint filter is clean before cleaning to remove lint and dust buildup that is caused by the dryer warranty. Then: 3. Use hot soapy water and a stiff brush to remind you. The Check Lint Screen Light on the lint screen over time. If...
Use and Care Guide
Page 26
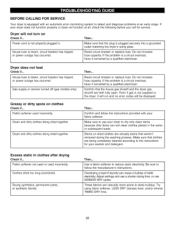
... the instructions provided with an automatic error-monitoring system to use SENSOR DRY cycles. Power cord is not properly plugged in clothes after drying Check if... Confirm that weren't removed during the washing process. Fabric softener not used or used incorrectly. Use a fabric softener to static buildup. Try using fabric softener, LESS DRY dryness level, and/or shorter TIMED DRY time. 26 Gas supply or service turned off (gas models only). Then... Overdrying a load of static electricity. Reset circuit breaker or replace fuse...
... the instructions provided with an automatic error-monitoring system to use SENSOR DRY cycles. Power cord is not properly plugged in clothes after drying Check if... Confirm that weren't removed during the washing process. Fabric softener not used or used incorrectly. Use a fabric softener to static buildup. Try using fabric softener, LESS DRY dryness level, and/or shorter TIMED DRY time. 26 Gas supply or service turned off (gas models only). Then... Overdrying a load of static electricity. Reset circuit breaker or replace fuse...
Use and Care Guide
Page 27
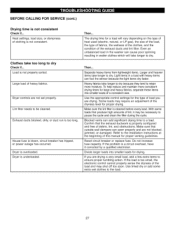
... every load. The drying time for a load will take longer to dry because they tend to dry. Light items in wetter clothes which will vary depending on the type of heat used (electric, natural, or LP gas), the size of the load, the type of fabrics, the wetness of the clothes, and the condition of the load and may shut off too soon. With some extra wet clothes to dry Check if... Reset circuit breaker or replace fuse...
... every load. The drying time for a load will take longer to dry because they tend to dry. Light items in wetter clothes which will vary depending on the type of heat used (electric, natural, or LP gas), the size of the load, the type of fabrics, the wetness of the clothes, and the condition of the load and may shut off too soon. With some extra wet clothes to dry Check if... Reset circuit breaker or replace fuse...
Use and Care Guide
Page 28
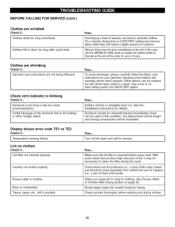
... your garment, because some loads that are lint trappers (i.e., a pair of the ductwork due to wrinkled clothes. Some fabrics are shrinking Check if... Laundry not sorted properly. Then... I Temperature sensing failure. Make sure the lint filter is too long or has too many turns/restrictions. Garment care instructions are wrinkled Check if... Dryer is blinking Check if... Try a shorter drying time or LESS DRY setting and remove items while they still retain...
... your garment, because some loads that are lint trappers (i.e., a pair of the ductwork due to wrinkled clothes. Some fabrics are shrinking Check if... Laundry not sorted properly. Then... I Temperature sensing failure. Make sure the lint filter is too long or has too many turns/restrictions. Garment care instructions are wrinkled Check if... Dryer is blinking Check if... Try a shorter drying time or LESS DRY setting and remove items while they still retain...

Use and Care Guide
Page 30
... year from normal use for only 90 days from unauthorized modifications made to clean or maintain this limited warranty shall be liable for : 1. Implied warranties, including warranties of merchantability or fitness for free repair. Some states and..., abuse, misuse or use , including but not limited to filters, belts, light bulbs, and bags. , A service technician to instruct the user in correct product installation, operation or maintenance. 3. This warranty covers only defects in material and workmanship. limitation of implied warranties; Disclaimer of remedies Customer...
... year from normal use for only 90 days from unauthorized modifications made to clean or maintain this limited warranty shall be liable for : 1. Implied warranties, including warranties of merchantability or fitness for free repair. Some states and..., abuse, misuse or use , including but not limited to filters, belts, light bulbs, and bags. , A service technician to instruct the user in correct product installation, operation or maintenance. 3. This warranty covers only defects in material and workmanship. limitation of implied warranties; Disclaimer of remedies Customer...


