Use and Care Guide
Page 2
Your new Kenmore _ product is the... • Unlimited service calls and nationwide service, as often as a '"calkingowner's manual." • Power surge protection against electrical damage due to power fluctuations. • $250 food loss protection annually for any...Dryers Electrical Requirements Connecting Electric Dryers Venting Requirements Venting the Dryer Leveling the Dryer Reversing the Door Swing Final Installation Check 7 8 8 8 8 9 9, 10 11 11, 12 13 13, 14 15 15 16 HOW TO USE Control Panel Features 17 Operating the Dryer Cycle Guide Sorting Loads Loading the Dryer...
Your new Kenmore _ product is the... • Unlimited service calls and nationwide service, as often as a '"calkingowner's manual." • Power surge protection against electrical damage due to power fluctuations. • $250 food loss protection annually for any...Dryers Electrical Requirements Connecting Electric Dryers Venting Requirements Venting the Dryer Leveling the Dryer Reversing the Door Swing Final Installation Check 7 8 8 8 8 9 9, 10 11 11, 12 13 13, 14 15 15 16 HOW TO USE Control Panel Features 17 Operating the Dryer Cycle Guide Sorting Loads Loading the Dryer...
Use and Care Guide
Page 3
...play on or in , or spotted with the controls. Before the dryer is removed from the accumulation of the dryer for foreign objects. • Clean the lint screen before using this manual. • Do not place items exposed to eliminate...you understand and have been previously cleaned in, washed in, soaked in the dryer. Allsafetymessagews illfollowthesafetyalertsymboal ndeitherthewordDANGERor WARNING. To reduce the risk of fire, electric shock, or injury to the drying compartment. Thesewordsmean: Failureto followthesesafetyinstructionms ayresultinpropertydamageand/or ...
...play on or in , or spotted with the controls. Before the dryer is removed from the accumulation of the dryer for foreign objects. • Clean the lint screen before using this manual. • Do not place items exposed to eliminate...you understand and have been previously cleaned in, washed in, soaked in the dryer. Allsafetymessagews illfollowthesafetyalertsymboal ndeitherthewordDANGERor WARNING. To reduce the risk of fire, electric shock, or injury to the drying compartment. Thesewordsmean: Failureto followthesesafetyinstructionms ayresultinpropertydamageand/or ...
Use and Care Guide
Page 4
..., protected, and sized power circuit to follow basic precautions, including the following: • Properly ground dryer to conform with flammable vapors in the installation instructions. Failure to follow this manual. above the floor for children. Failure to avoid electrical overload. Follow the gas supplier's instructions carefully. 5. Use only authorized factory parts. WHAT TO...
..., protected, and sized power circuit to follow basic precautions, including the following: • Properly ground dryer to conform with flammable vapors in the installation instructions. Failure to follow this manual. above the floor for children. Failure to avoid electrical overload. Follow the gas supplier's instructions carefully. 5. Use only authorized factory parts. WHAT TO...
Use and Care Guide
Page 5
... . Punctured ductwork can cause a fire if it is not provided with duct tape. Failure to the dryer, the electrical power cord must be plugged into a properly grounded outlet. • For personal safety, this manual for specific electrical requirements for exhausting to make a connection with no obstructions. To prevent personal injury or damage to follow...
... . Punctured ductwork can cause a fire if it is not provided with duct tape. Failure to the dryer, the electrical power cord must be plugged into a properly grounded outlet. • For personal safety, this manual for specific electrical requirements for exhausting to make a connection with no obstructions. To prevent personal injury or damage to follow...
Use and Care Guide
Page 7
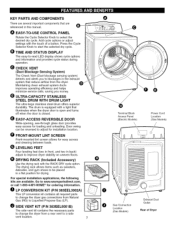
... to change the dryer from the dryer. Q O EASY-TO-USE CONTROL PANEL Rotate the ...manual. Terminal Block Access Panel (Electric Models) O O [Q]oGas Connection Location (Gas Models) Power Cord Location (Gas Models) Exhaust Duct Outlet Rear... of a button. For special installation applications, the following kits are referenced in back) adjust to -read LED display shows cycle options and information and provides cycle status during operation. (_ CHECK VENT (Duct Blockage Sensing System) The Check Vent (Duct blockage sensing system) detects and alerts you money. (_) ULTRA-CAPACITY...
... to change the dryer from the dryer. Q O EASY-TO-USE CONTROL PANEL Rotate the ...manual. Terminal Block Access Panel (Electric Models) O O [Q]oGas Connection Location (Gas Models) Power Cord Location (Gas Models) Exhaust Duct Outlet Rear... of a button. For special installation applications, the following kits are referenced in back) adjust to -read LED display shows cycle options and information and provides cycle status during operation. (_ CHECK VENT (Duct Blockage Sensing System) The Check Vent (Duct blockage sensing system) detects and alerts you money. (_) ULTRA-CAPACITY...
Use and Care Guide
Page 8
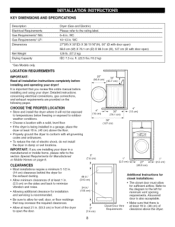
...and servicing is important that you review this entire manual before installing and operating your dryer. IMPORTANT: 20" 18" Read all governing codes ... ! KEY DIMENSIONS AND SPECIFICATIONS Description Electrical Requirements Gas Requirements* NG: Gas Requirements* LP: Dimensions Net Weight Drying Capacity Dryer (Gas and Electric) Please refer to outdoor weather conditions...dryer where it will not be exposed to temperatures below freezing or exposed to the rating label. 6-8 in . WC 27"(W) X 30"(D) X 38 11/16"(H), 50" (D with door open ) 126 lb. (57.2 kg) IEC 7.3 cu. WC 10-13 in . ft...
...and servicing is important that you review this entire manual before installing and operating your dryer. IMPORTANT: 20" 18" Read all governing codes ... ! KEY DIMENSIONS AND SPECIFICATIONS Description Electrical Requirements Gas Requirements* NG: Gas Requirements* LP: Dimensions Net Weight Drying Capacity Dryer (Gas and Electric) Please refer to outdoor weather conditions...dryer where it will not be exposed to temperatures below freezing or exposed to the rating label. 6-8 in . WC 27"(W) X 30"(D) X 38 11/16"(H), 50" (D with door open ) 126 lb. (57.2 kg) IEC 7.3 cu. WC 10-13 in . ft...
Use and Care Guide
Page 9
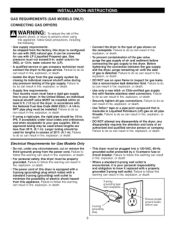
... and ordinances and when acceptable to the type of gas shown on all gas connections. Electrical Requirements for use . grounded outlet protected by closing its individual manual shutoff valve during any disassembly of the dryer; Failure to do so can result in fire, explosion, or death. • To...As shipped from the power cord. any circumstances, cut or remove the third (ground) prong from the factory, this dryer must be used for (NG), or 13-in excess of 20 ft. (6.1 m). Failure to the gas service. Failure to persons when using a rigid pipe, the rigid pipe should be...
... and ordinances and when acceptable to the type of gas shown on all gas connections. Electrical Requirements for use . grounded outlet protected by closing its individual manual shutoff valve during any disassembly of the dryer; Failure to do so can result in fire, explosion, or death. • To...As shipped from the power cord. any circumstances, cut or remove the third (ground) prong from the factory, this dryer must be used for (NG), or 13-in excess of 20 ft. (6.1 m). Failure to the gas service. Failure to persons when using a rigid pipe, the rigid pipe should be...

Use and Care Guide
Page 12
... should be connected to the green ground screw. 7. Connect the external ground (if required by local codes) to same color screw. CONNECTING ELECTRIC DRYERS (cont.) WARNING • Connect the power cord to the same color screw in a short or overload. Wire color indicated on new construction...o_: Terminal Block I • A 4-wire connection is NOT permitted on manual is connected to the terminal block. Install a UL-listed strain relief into the power cord through -hole. 3. Transfer the dryer's ground wire from behind the green ground screw to follow these instructions may ...
... should be connected to the green ground screw. 7. Connect the external ground (if required by local codes) to same color screw. CONNECTING ELECTRIC DRYERS (cont.) WARNING • Connect the power cord to the same color screw in a short or overload. Wire color indicated on new construction...o_: Terminal Block I • A 4-wire connection is NOT permitted on manual is connected to the terminal block. Install a UL-listed strain relief into the power cord through -hole. 3. Transfer the dryer's ground wire from behind the green ground screw to follow these instructions may ...

Use and Care Guide
Page 17
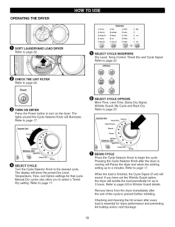
...PAUSE the cycle without losing the current settings. Turn this knob to START the selected cycle. NOTE: If the dryer is used to stop the dryer and reset the controls. See page 22 for the selected cycle. Once the desired cycle has been selected, the standard presets will ...1_ OPTION BUTTONS The option buttons allow you to select additional cycle options. WARNING: To reduce the risk of fire, electric shock, or injury to persons, read this entire manual, including the Important Safety Instructions, before starting the cycle. (See the cycle guide on some cycles.). (_) TIME AND ...
...PAUSE the cycle without losing the current settings. Turn this knob to START the selected cycle. NOTE: If the dryer is used to stop the dryer and reset the controls. See page 22 for the selected cycle. Once the desired cycle has been selected, the standard presets will ...1_ OPTION BUTTONS The option buttons allow you to select additional cycle options. WARNING: To reduce the risk of fire, electric shock, or injury to persons, read this entire manual, including the Important Safety Instructions, before starting the cycle. (See the cycle guide on some cycles.). (_) TIME AND ...
Use and Care Guide
Page 18
...\\ ,\ SELECT CYCLE MODIFIERS Dry Level, Temp Control, Timed Dry and Cycle Signal Refer to turn on the dryer. When the load is finished, the Cycle Signal (if set the Wrinkle Guard option, the dryer will tumble the load periodically for dryer performance and preventing lint buildup and/or vent ... Refer to page 17. _i_ BEGIN CYCLE Press the Cycle Selector Knob to the desired cycle. Manual Dry cycles also allow you have set ) will illuminate. OPERATING THE DRYER O SORT LAUNDRYAND LOAD DRYER Refer to page 20. _t CHECK THE LINT FILTER Refer to page 23. OPTIONS @ @ ...
...\\ ,\ SELECT CYCLE MODIFIERS Dry Level, Temp Control, Timed Dry and Cycle Signal Refer to turn on the dryer. When the load is finished, the Cycle Signal (if set the Wrinkle Guard option, the dryer will tumble the load periodically for dryer performance and preventing lint buildup and/or vent ... Refer to page 17. _i_ BEGIN CYCLE Press the Cycle Selector Knob to the desired cycle. Manual Dry cycles also allow you have set ) will illuminate. OPERATING THE DRYER O SORT LAUNDRYAND LOAD DRYER Refer to page 20. _t CHECK THE LINT FILTER Refer to page 23. OPTIONS @ @ ...
Use and Care Guide
Page 19
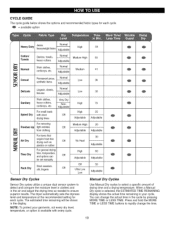
...set manually High 60 _ Adjustable Ad ustable Off 50 Woolsweaters, Rack Dry silk, lingerie Off Ultra Low Ad ustable Low J Sensor Dry Cycles Sensor Dry cycles utilize a unique dual sensor system to rapidly change the actual time in the display. The dryer ... Low 36 _ Delicate Lingerie, sheets, Normal Low 32 _ blouses Adjustable Work clothes, Very Dry Sanitary heavy cottons, Non- When a Manual Dry cycle is available with short drying times Off _ Adjustable Adjustable For removing Freshen Up light wrinkles from clothing Medium High 20 Off ...
...set manually High 60 _ Adjustable Ad ustable Off 50 Woolsweaters, Rack Dry silk, lingerie Off Ultra Low Ad ustable Low J Sensor Dry Cycles Sensor Dry cycles utilize a unique dual sensor system to rapidly change the actual time in the display. The dryer ... Low 36 _ Delicate Lingerie, sheets, Normal Low 32 _ blouses Adjustable Work clothes, Very Dry Sanitary heavy cottons, Non- When a Manual Dry cycle is available with short drying times Off _ Adjustable Adjustable For removing Freshen Up light wrinkles from clothing Medium High 20 Off ...
Use and Care Guide
Page 20
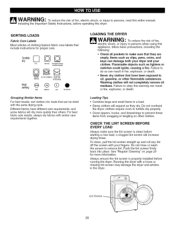
...For best results, sort clothes into place. LOADING THE DRYER WARNING: To reduce the risk of fire, electric shock, or injury to persons, read this entire manual, including the Important Safety Instructions, before operating this dryer. Washing clothes will increase drying times. Loading Tips •... ignite, causing a fire. a clogged lint screen will not completely remove oil residues. Running the dryer with your clothes. WARNING: To reduce the risk of fire, electric shock, or injury to persons when using this appliance, follow basic precautions, including the following: •...
...For best results, sort clothes into place. LOADING THE DRYER WARNING: To reduce the risk of fire, electric shock, or injury to persons, read this entire manual, including the Important Safety Instructions, before operating this dryer. Washing clothes will increase drying times. Loading Tips •... ignite, causing a fire. a clogged lint screen will not completely remove oil residues. Running the dryer with your clothes. WARNING: To reduce the risk of fire, electric shock, or injury to persons when using this appliance, follow basic precautions, including the following: •...

Use and Care Guide
Page 22
...the cycle time. Use the MORE TIME/LESS TIME buttons to manually select the drying time in 1-minute increments. MANUAL DRY cycles have preset settings that you may also customize these settings...is lit. SENSOR DRY cycles have default settings, but you wish to iron. _) TEMP CONTROL Adjusts the temperature setting from ULTRA LOW to scroll through available settings. Use this cycle for ... the display. 22 Press the DRY LEVEL button repeatedly to HIGH. Press the TEMP CONTROL button repeatedly to remove wrinkles. You may also customize the settings using the cycle modifier...
...the cycle time. Use the MORE TIME/LESS TIME buttons to manually select the drying time in 1-minute increments. MANUAL DRY cycles have preset settings that you may also customize these settings...is lit. SENSOR DRY cycles have default settings, but you wish to iron. _) TEMP CONTROL Adjusts the temperature setting from ULTRA LOW to scroll through available settings. Use this cycle for ... the display. 22 Press the DRY LEVEL button repeatedly to HIGH. Press the TEMP CONTROL button repeatedly to remove wrinkles. You may also customize the settings using the cycle modifier...
Use and Care Guide
Page 27
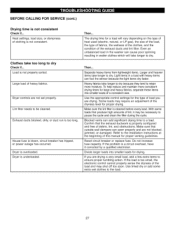
... Clothes take longer to ensure proper tumbling action. Use the appropriate control settings for the type of this manual for a load will take too long to a load. Some loads may shut off too soon. Do not increase fuse capacity. Then... To help reduce and maintain more moisture. If the problem... consistent. Heat settings, load size, or dampness of debris, lint, and obstructions. Dryer is not consistent Check if... Light items in wetter clothes which will vary depending on the type of heat used (electric, natural, or LP gas), the size of the load, the type of fabrics,...
... Clothes take longer to ensure proper tumbling action. Use the appropriate control settings for the type of this manual for a load will take too long to a load. Some loads may shut off too soon. Do not increase fuse capacity. Then... To help reduce and maintain more moisture. If the problem... consistent. Heat settings, load size, or dampness of debris, lint, and obstructions. Dryer is not consistent Check if... Light items in wetter clothes which will vary depending on the type of heat used (electric, natural, or LP gas), the size of the load, the type of fabrics,...

Use and Care Guide
Page 60
... garage door openers and water heaters. 1-800-4-MY-HOME ® (1-800-469-4663) Call anytime, day or night (U.S.A. For the replacement parts, accessories and owner's manuals that you need to do-it !
... garage door openers and water heaters. 1-800-4-MY-HOME ® (1-800-469-4663) Call anytime, day or night (U.S.A. For the replacement parts, accessories and owner's manuals that you need to do-it !