Use and Care Guide
Page 2
... • Expert service by phone--we will be fixed. • Annual Preventive Maintenance Check at 1-800-361-6665. Your new Kenmore _ product is the result of mechanical failure of any covered refrigerator or freezer. • Rental reimbursement if repair of your covered ... Connecting Electric Dryers Venting Requirements Venting the Dryer Leveling the Dryer Reversing the Door Swing Final Installation Check 7 8 8 8 8 9 9, 10 11 11, 12 13 13, 14 15 15 16 HOW TO USE Control Panel Features 17 Operating the Dryer Cycle Guide Sorting Loads Loading the Dryer Check the Lint ...
... • Expert service by phone--we will be fixed. • Annual Preventive Maintenance Check at 1-800-361-6665. Your new Kenmore _ product is the result of mechanical failure of any covered refrigerator or freezer. • Rental reimbursement if repair of your covered ... Connecting Electric Dryers Venting Requirements Venting the Dryer Leveling the Dryer Reversing the Door Swing Final Installation Check 7 8 8 8 8 9 9, 10 11 11, 12 13 13, 14 15 15 16 HOW TO USE Control Panel Features 17 Operating the Dryer Cycle Guide Sorting Loads Loading the Dryer Check the Lint ...
Use and Care Guide
Page 3
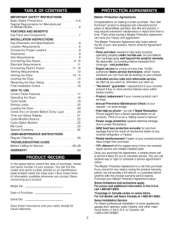
...rubber or similarly textured rubber-like materials. Before the dryer is removed from the accumulation of fire or explosion,electric shock,or to carry out. • Do not tamper with the controls. The interior of the dryer and exhaust vent should be cleaned periodically by the... manufacturer of fire, electric shock, or injury to persons when using the dryer. • Before use heat to the drying compartment. Failuretofollowthesesafetyinstructionms...
...rubber or similarly textured rubber-like materials. Before the dryer is removed from the accumulation of fire or explosion,electric shock,or to carry out. • Do not tamper with the controls. The interior of the dryer and exhaust vent should be cleaned periodically by the... manufacturer of fire, electric shock, or injury to persons when using the dryer. • Before use heat to the drying compartment. Failuretofollowthesesafetyinstructionms...
Use and Care Guide
Page 4
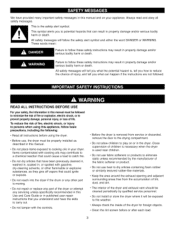
... SMELL GAS: 1. Clear the room, building, or area of all governing codes and ordinances. Electrical shock can result if the dryer is not properly grounded. • Before use, the dryer must be properly installed as described in the vicinity of this appliance or any other appliances. ...precautions, including the following: • Properly ground dryer to conform with flammable vapors in this warning can cause serious injury, fire, electrical shock, or death. • To reduce the risk of electric shock, do so can melt, creating an electrical shock and/or a fire hazard. • Remove...
... SMELL GAS: 1. Clear the room, building, or area of all governing codes and ordinances. Electrical shock can result if the dryer is not properly grounded. • Before use, the dryer must be properly installed as described in the vicinity of this appliance or any other appliances. ...precautions, including the following: • Properly ground dryer to conform with flammable vapors in this warning can cause serious injury, fire, electrical shock, or death. • To reduce the risk of electric shock, do so can melt, creating an electrical shock and/or a fire hazard. • Remove...
Use and Care Guide
Page 5
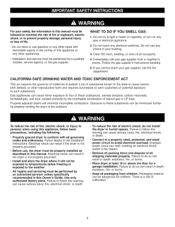
...not properly grounded. SAFETY INSTRUCTIONS FOR INSTALLATION Exhaust/Ducting: • Gas dryers MUST be exhausted to the dryer, the electrical power cord must be plugged into a properly grounded outlet. • For personal safety, this dryer must be properly grounded. The exhaust duct should always be kept as... or at either end. Failure to do so can result in this ducting will be used between the dryer and the wall. Failure to the installation instructions in electrical shock or injury. • Refer to follow the Installation Instructions. they can cause a fire. Always ...
...not properly grounded. SAFETY INSTRUCTIONS FOR INSTALLATION Exhaust/Ducting: • Gas dryers MUST be exhausted to the dryer, the electrical power cord must be plugged into a properly grounded outlet. • For personal safety, this dryer must be properly grounded. The exhaust duct should always be kept as... or at either end. Failure to do so can result in this ducting will be used between the dryer and the wall. Failure to the installation instructions in electrical shock or injury. • Refer to follow the Installation Instructions. they can cause a fire. Always ...
Use and Care Guide
Page 6
... that will comply with these standards, please contact a service and installation professional for assistance. • A gas dryer must be vented to the outside. • DO NOT vent the dryer under a manufactured home or mobile home. • Electric dryers may be run with a cord havingan equipmentgroundingconductorand a groundingplug.The plug must be used where local codes...
... that will comply with these standards, please contact a service and installation professional for assistance. • A gas dryer must be vented to the outside. • DO NOT vent the dryer under a manufactured home or mobile home. • Electric dryers may be run with a cord havingan equipmentgroundingconductorand a groundingplug.The plug must be used where local codes...
Use and Care Guide
Page 7
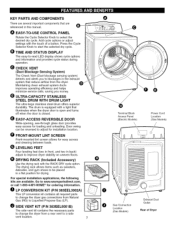
...alerts you money. (_) ULTRA-CAPACITY STAINLESS STEEL DRUM WITH DRUM LIGHT The ultra-large stainless steel drum offers superior durability. Go to improve dryer stability on uneven floors. _)...dry cycle. Terminal Block Access Panel (Electric Models) O O [Q]oGas Connection Location (Gas Models) Power Cord Location (Gas Models) Exhaust Duct Outlet Rear of a button. KEY PARTS AND ...that reduce airflow from a rear vent to adjust for drying. Q O EASY-TO-USE CONTROL PANEL Rotate the Cycle Selector Knob to change the dryer from the dryer. For special installation applications, ...
...alerts you money. (_) ULTRA-CAPACITY STAINLESS STEEL DRUM WITH DRUM LIGHT The ultra-large stainless steel drum offers superior durability. Go to improve dryer stability on uneven floors. _)...dry cycle. Terminal Block Access Panel (Electric Models) O O [Q]oGas Connection Location (Gas Models) Power Cord Location (Gas Models) Exhaust Duct Outlet Rear of a button. KEY PARTS AND ...that reduce airflow from a rear vent to adjust for drying. Q O EASY-TO-USE CONTROL PANEL Rotate the Cycle Selector Knob to change the dryer from the dryer. For special installation applications, ...
Use and Care Guide
Page 8
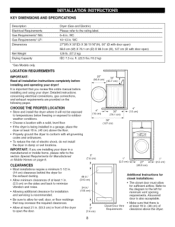
...in. (53.3 cm) in front of the dryer to open ) 126 lb. (57.2 kg) IEC 7.3 cu. IMPORTANT: If you review this entire manual before installing and operating your dryer in a manufactured or mobile home, please refer ...dryer. ft. (22.5 Ibs./lO.2 kg) *Gas Models only. CHOOSE THE PROPER LOCATION • Store and install the dryer where it will not be exposed to temperatures below freezing or exposed to the rating label. 6-8 in. KEY DIMENSIONS AND SPECIFICATIONS Description Electrical Requirements Gas Requirements* NG: Gas Requirements* LP: Dimensions Net Weight Drying Capacity Dryer...
...in. (53.3 cm) in front of the dryer to open ) 126 lb. (57.2 kg) IEC 7.3 cu. IMPORTANT: If you review this entire manual before installing and operating your dryer in a manufactured or mobile home, please refer ...dryer. ft. (22.5 Ibs./lO.2 kg) *Gas Models only. CHOOSE THE PROPER LOCATION • Store and install the dryer where it will not be exposed to temperatures below freezing or exposed to the rating label. 6-8 in. KEY DIMENSIONS AND SPECIFICATIONS Description Electrical Requirements Gas Requirements* NG: Gas Requirements* LP: Dimensions Net Weight Drying Capacity Dryer...
Use and Care Guide
Page 9
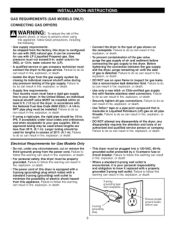
water column for (NG), or 13-in . In the United States, an individual manual shutoff valve MUST be installed within at least 6 ft. (1.8 m) of the dryer, in accordance with flexible stainless steel connectors. NPT pipe plug must have it is detected. IPS. Failure to do so can result in fire...and when acceptable to do so can result in fire, explosion, or death. GAS REQUIREMENTS (GAS MODELS ONLY) CONNECTING GAS DRYERS WARNING: "_v!l To reduce the risk of fire, electric shock, or injury to persons when using a rigid pipe, the rigid pipe should be used where lengths are less than...
water column for (NG), or 13-in . In the United States, an individual manual shutoff valve MUST be installed within at least 6 ft. (1.8 m) of the dryer, in accordance with flexible stainless steel connectors. NPT pipe plug must have it is detected. IPS. Failure to do so can result in fire...and when acceptable to do so can result in fire, explosion, or death. GAS REQUIREMENTS (GAS MODELS ONLY) CONNECTING GAS DRYERS WARNING: "_v!l To reduce the risk of fire, electric shock, or injury to persons when using a rigid pipe, the rigid pipe should be used where lengths are less than...
Use and Care Guide
Page 10
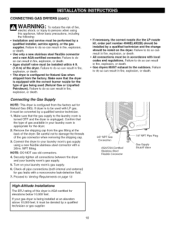
..., the correct nozzle (for the LP nozzle kit, order part number 4948EL4002B) should be installed within 6 ft. (1.8 m) of the dryer. Remove the shipping cap from the gas fitting at an elevation above 10,000 feet, it must be ...that the type of the gas connector when removing the shipping cap. 3. Connecting the Gas Supply NOTE: This dryer is unplugged. Securely tighten all pipe connections (both internal and external) for gas leaks with local codes and... Valve High-Altitude Installations The BTU rating of fire, electric shock, or injury to do so can result in .
..., the correct nozzle (for the LP nozzle kit, order part number 4948EL4002B) should be installed within 6 ft. (1.8 m) of the dryer. Remove the shipping cap from the gas fitting at an elevation above 10,000 feet, it must be ...that the type of the gas connector when removing the shipping cap. 3. Connecting the Gas Supply NOTE: This dryer is unplugged. Securely tighten all pipe connections (both internal and external) for gas leaks with local codes and... Valve High-Altitude Installations The BTU rating of fire, electric shock, or injury to do so can result in .
Use and Care Guide
Page 11
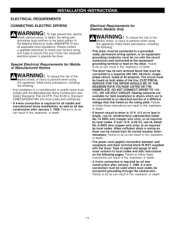
...slack in fire, explosion, or death. • The dryer has its normal location when necessary. ELECTRICAL REQUIREMENTS CONNECTING ELECTRIC DRYERS nr!_IWARNING: To help prevent fire, electric shock, serious injury, or death, the wiring and ...grounding must conform to the latest edition of wire must conform to local codes and with instructions on the following pages. The circuit must be connected to operate the dryer. If over 15 ft...
...slack in fire, explosion, or death. • The dryer has its normal location when necessary. ELECTRICAL REQUIREMENTS CONNECTING ELECTRIC DRYERS nr!_IWARNING: To help prevent fire, electric shock, serious injury, or death, the wiring and ...grounding must conform to the latest edition of wire must conform to local codes and with instructions on the following pages. The circuit must be connected to operate the dryer. If over 15 ft...

Use and Care Guide
Page 12
... Thread a 30-amp, 240-volt, 4-wire, UL-listed power cord with #10 AWG-minimum copper conductor through the strain relief. Transfer the dryer's ground wire from behind the green ground screw to the center screw of the terminal block. 7. Attach the white neutral wire to follow these... the neutral conductor. TIGHTEN ALL SCREWS SECURELY. 9. Attach the two hot leads of the power cord to the outer terminal block screws. 5. CONNECTING ELECTRIC DRYERS (cont.) WARNING • Connect the power cord to the center terminal block screw. 6. UL-Listed _ 7 4-Wire Power Cord I1_\_÷__...
... Thread a 30-amp, 240-volt, 4-wire, UL-listed power cord with #10 AWG-minimum copper conductor through the strain relief. Transfer the dryer's ground wire from behind the green ground screw to the center screw of the terminal block. 7. Attach the white neutral wire to follow these... the neutral conductor. TIGHTEN ALL SCREWS SECURELY. 9. Attach the two hot leads of the power cord to the outer terminal block screws. 5. CONNECTING ELECTRIC DRYERS (cont.) WARNING • Connect the power cord to the center terminal block screw. 6. UL-Listed _ 7 4-Wire Power Cord I1_\_÷__...
Use and Care Guide
Page 13
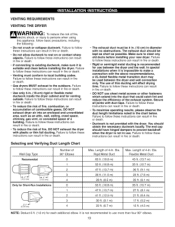
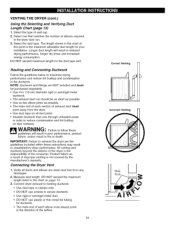
... with plastic or thin foil ducting. Flexible Metal Duct 45 ft. (13.7 m) 35 ft. (10.7 m) 30 ft. (9.1 m) 25 ft. (7.6 m) 20 ft. (6.1 m) 35 ft. (10.7 m) 27 ft. (8.1 m) 21 ft. (6.4 m) 17 ft. (5.2 m) 15 ft. (4.5 m) NOTE: Deduct 6 ft. (1.8 m) for venting outside. VENTING REQUIREMENTS VENTING THE DRYER "Ir!IWARNING: To reduce the risk of fire, electric shock, or injury to persons when using this ducting will affect...
... with plastic or thin foil ducting. Flexible Metal Duct 45 ft. (13.7 m) 35 ft. (10.7 m) 30 ft. (9.1 m) 25 ft. (7.6 m) 20 ft. (6.1 m) 35 ft. (10.7 m) 27 ft. (8.1 m) 21 ft. (6.4 m) 17 ft. (5.2 m) 15 ft. (4.5 m) NOTE: Deduct 6 ft. (1.8 m) for venting outside. VENTING REQUIREMENTS VENTING THE DRYER "Ir!IWARNING: To reduce the risk of fire, electric shock, or injury to persons when using this ducting will affect...
Use and Care Guide
Page 14
...drying performance, longer dry times and increased energy consumption. DO NOT exceed the maximum length listed in the direction of the consumer. Connect dryer exhaust to existing ductwork. • Use duct tape or clamps only. • DO NOT use screws to maximize drying performance and reduce...to reduce condensation and lint buildup on all ducts and elbows are NOT included and must point away from any blockages. 2. Connecting the Dryer Vent 1. Longer duct length will result in poor performance, product failure, and/or result in order to follow these instructions may result in...
...drying performance, longer dry times and increased energy consumption. DO NOT exceed the maximum length listed in the direction of the consumer. Connect dryer exhaust to existing ductwork. • Use duct tape or clamps only. • DO NOT use screws to maximize drying performance and reduce...to reduce condensation and lint buildup on all ducts and elbows are NOT included and must point away from any blockages. 2. Connecting the Dryer Vent 1. Longer duct length will result in poor performance, product failure, and/or result in order to follow these instructions may result in...

Use and Care Guide
Page 15
...screws. 7. REVERSING THE DOOR SWING The swing of the door before removing the hinge screws. 2. Door Latch ", _ SHcrinegwes ,,_ Latch _. Open the dryer door. Door Latch \\ Hinge Screws Screws Latch Screws 2. To ensure that secure the door hinge to corner. ! Level Levelng Feet 1. NOTE: Be sure... the door moves freely and latches securely. 15 Screws 1. Using a Phillips screwdriver, remove the 2 hinge screws that the dryer provides optimal drying performance, it must be fully retracted. Use a wrench to make sure that all 4 leveling feet are installing the...
...screws. 7. REVERSING THE DOOR SWING The swing of the door before removing the hinge screws. 2. Door Latch ", _ SHcrinegwes ,,_ Latch _. Open the dryer door. Door Latch \\ Hinge Screws Screws Latch Screws 2. To ensure that secure the door hinge to corner. ! Level Levelng Feet 1. NOTE: Be sure... the door moves freely and latches securely. 15 Screws 1. Using a Phillips screwdriver, remove the 2 hinge screws that the dryer provides optimal drying performance, it must be fully retracted. Use a wrench to make sure that all 4 leveling feet are installing the...
Use and Care Guide
Page 16
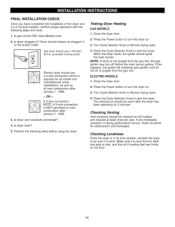
...-Hz. Is dryer level? 5. Testing Dryer Heating GAS MODELS 1. NOTE: If all air is purged from the gas line, the gas igniter may turn off before using the dryer. If this happens, the igniter will reattempt gas ignition until all the air is not purged from the gas line. ELECTRIC MODELS 1. Turn... Cycle Selector Knob to turn the dryer on the floor. 16 OR -A 3-wire connection. NOTE: A 3-wire connection is level front to back and side to side, and that ...
...-Hz. Is dryer level? 5. Testing Dryer Heating GAS MODELS 1. NOTE: If all air is purged from the gas line, the gas igniter may turn off before using the dryer. If this happens, the igniter will reattempt gas ignition until all the air is not purged from the gas line. ELECTRIC MODELS 1. Turn... Cycle Selector Knob to turn the dryer on the floor. 16 OR -A 3-wire connection. NOTE: A 3-wire connection is level front to back and side to side, and that ...

Use and Care Guide
Page 17
...select the desired cycle. For detailed information about the individual options, please see the following pages. 17 If the dryer is used to stop the dryer and reset the controls. NOTE: If the dryer is used both to select a cycle and to start or pause a cycle. The lights above the buttons ... 21 for 3 seconds. _) MY CYCLE BUTTON Press the MY CYCLE button to select the memorized cycle. WARNING: To reduce the risk of fire, electric shock, or injury to persons, read this entire manual, including the Important Safety Instructions, before starting the cycle. (See the cycle guide on some ...
...select the desired cycle. For detailed information about the individual options, please see the following pages. 17 If the dryer is used to stop the dryer and reset the controls. NOTE: If the dryer is used both to select a cycle and to start or pause a cycle. The lights above the buttons ... 21 for 3 seconds. _) MY CYCLE BUTTON Press the MY CYCLE button to select the memorized cycle. WARNING: To reduce the risk of fire, electric shock, or injury to persons, read this entire manual, including the Important Safety Instructions, before starting the cycle. (See the cycle guide on some ...
Use and Care Guide
Page 18
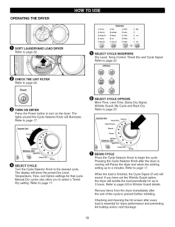
... CYCLE MODIFIERS Dry Level, Temp Control, Timed Dry and Cycle Signal Refer to turn on the dryer. The display will show the preset Dry Level, Temperature, Time, and Option settings for Wrinkle Guard details. Checking and cleaning the lint screen after the dryer is running will tumble the load...finished, the Cycle Signal (if set the Wrinkle Guard option, the dryer will Pause the dryer and retain the existing setting up to 4 minutes. Refer to the desired cycle. OPERATING THE DRYER O SORT LAUNDRYAND LOAD DRYER Refer to page 20. _t CHECK THE LINT FILTER Refer to page ...
... CYCLE MODIFIERS Dry Level, Temp Control, Timed Dry and Cycle Signal Refer to turn on the dryer. The display will show the preset Dry Level, Temperature, Time, and Option settings for Wrinkle Guard details. Checking and cleaning the lint screen after the dryer is running will tumble the load...finished, the Cycle Signal (if set the Wrinkle Guard option, the dryer will Pause the dryer and retain the existing setting up to 4 minutes. Refer to the desired cycle. OPERATING THE DRYER O SORT LAUNDRYAND LOAD DRYER Refer to page 20. _t CHECK THE LINT FILTER Refer to page ...
Use and Care Guide
Page 19
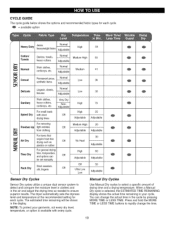
... _ Adjustable Ad ustable For items that Air Dry require heat-free drying such as needed to rapidly change the actual time in the display. The dryer automatically sets the dryness level and temperature at the recommended setting for each cycle. You can be shown in the cycle by pressing MORE TIME...
... _ Adjustable Ad ustable For items that Air Dry require heat-free drying such as needed to rapidly change the actual time in the display. The dryer automatically sets the dryness level and temperature at the recommended setting for each cycle. You can be shown in the cycle by pressing MORE TIME...
Use and Care Guide
Page 20
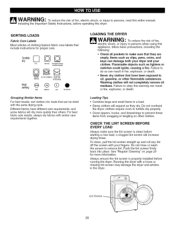
... screen firmly back into loads that have different care requirements, and some fabrics will increase drying times. LOADING THE DRYER WARNING: To reduce the risk of fire, electric shock, or injury to persons when using this appliance, follow basic precautions, including the following: • Check ...this warning can be dried with similar care requirements together. Running the dryer with your clothes. Different fabrics have been exposed to oil, gasoline, or other clothes. WARNING: To reduce the risk of fire, electric shock, or injury to persons, read this entire manual, including the...
... screen firmly back into loads that have different care requirements, and some fabrics will increase drying times. LOADING THE DRYER WARNING: To reduce the risk of fire, electric shock, or injury to persons when using this appliance, follow basic precautions, including the following: • Check ...this warning can be dried with similar care requirements together. Running the dryer with your clothes. Different fabrics have been exposed to oil, gasoline, or other clothes. WARNING: To reduce the risk of fire, electric shock, or injury to persons, read this entire manual, including the...

Use and Care Guide
Page 21
...the screen should be removed immediately. Always clean the lint screen before starting each load as a reminder to let you money. When the dryer is currently underway (DRYING, COOLING, or WRINKLE GUARD). CheckVent @ Check Lint Screen O ESTIMATED TIME REMAINING When the START/PAUSE button is ... display will indicate the estimated time remaining for maximum efficiency. If the Check Vent LED is not blinking, the ductwork is blinking, the dryer ductwork has a blockage that reduce airflow from blockages. If the lint screen becomes clogged during a load, the indicator will come on ...
...the screen should be removed immediately. Always clean the lint screen before starting each load as a reminder to let you money. When the dryer is currently underway (DRYING, COOLING, or WRINKLE GUARD). CheckVent @ Check Lint Screen O ESTIMATED TIME REMAINING When the START/PAUSE button is ... display will indicate the estimated time remaining for maximum efficiency. If the Check Vent LED is not blinking, the ductwork is blinking, the dryer ductwork has a blockage that reduce airflow from blockages. If the lint screen becomes clogged during a load, the indicator will come on ...


