
Use and Care Guide
Page 1
® DRYER SECADORA P/N 134686200B (0611) Sears, Roebuck and Co., Hoffman Estates, IL 60179 U.S.A. www.sears.com
® DRYER SECADORA P/N 134686200B (0611) Sears, Roebuck and Co., Hoffman Estates, IL 60179 U.S.A. www.sears.com
Use and Care Guide
Page 2
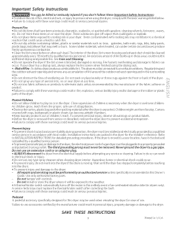
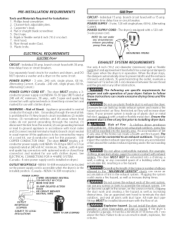
... cord or remove grounding prong from a neighbor's phone. Clear the room, building or area of life. Followthe gas supplier's instructions. Do not use gasoline or other appliance. EL ECTR/C DR YERS: 14-30R GAS DRYERS: Grounding type watt receptacle FUSED30 AMP 120/240 V OR 120/208 V WALL RECEPTACLE DRYER DRYER SERVICE CORD CORRECT Use this way ONLY Keep these numbers Model Number: Serial Number: Purchase Date: This Use and Care Guide provides general operating instructions...
... cord or remove grounding prong from a neighbor's phone. Clear the room, building or area of life. Followthe gas supplier's instructions. Do not use gasoline or other appliance. EL ECTR/C DR YERS: 14-30R GAS DRYERS: Grounding type watt receptacle FUSED30 AMP 120/240 V OR 120/208 V WALL RECEPTACLE DRYER DRYER SERVICE CORD CORRECT Use this way ONLY Keep these numbers Model Number: Serial Number: Purchase Date: This Use and Care Guide provides general operating instructions...
Use and Care Guide
Page 3
... stability during operation, the dryer must be plugged into the drum. The third grounding prong must replace the thermal limiter switch after each load. Do not use of children is necessary when the dryer is moving. To prevent injury and damage to prevent accidental entrapment. Use only authorized factory parts. A service technician must never be connected to a gas pipe. SAVE THESE INSTRUCTIONS 3 Printed in this Owner's Guide. These substances...
... stability during operation, the dryer must be plugged into the drum. The third grounding prong must replace the thermal limiter switch after each load. Do not use of children is necessary when the dryer is moving. To prevent injury and damage to prevent accidental entrapment. Use only authorized factory parts. A service technician must never be connected to a gas pipe. SAVE THESE INSTRUCTIONS 3 Printed in this Owner's Guide. These substances...
Use and Care Guide
Page 4
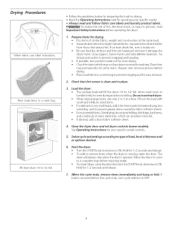
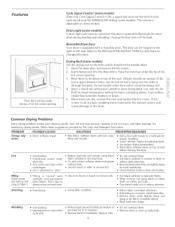
... small loads, add 2 lint-free towels for 1-2 seconds and release. 7. Placesmall items in a mesh bag, Fill dryer drum 1/3 to a complete stop when the door isopened. Drying Procedures \ Follow fabric care label instructions. Select cycle and settings according to ON. To add or remove items when the dryer is removed before drying. Check for stainswhich may permanently set dryer controls (some stains. Close the dryer door and set some models). See Operating Instructions for operating your specific model controls. 5. Place...
... small loads, add 2 lint-free towels for 1-2 seconds and release. 7. Placesmall items in a mesh bag, Fill dryer drum 1/3 to a complete stop when the door isopened. Drying Procedures \ Follow fabric care label instructions. Select cycle and settings according to ON. To add or remove items when the dryer is removed before drying. Check for stainswhich may permanently set dryer controls (some stains. Close the dryer door and set some models). See Operating Instructions for operating your specific model controls. 5. Place...
Use and Care Guide
Page 5
.... Check that lint screen is attached to lubricate fibers. e Turn items inside out to the INSTALLATION INSTRUCTIONSfor directions on top of load before starting the dryer. e Block knits into the dryer drum. o Leaving items in place, tumbling items could enter the exhaust system and cause damage to electricity. Refer to reduce abrasion. When items are slightly damp cycle began. Remove items when they are dry, remove the rack and replace...
.... Check that lint screen is attached to lubricate fibers. e Turn items inside out to the INSTALLATION INSTRUCTIONSfor directions on top of load before starting the dryer. e Block knits into the dryer drum. o Leaving items in place, tumbling items could enter the exhaust system and cause damage to electricity. Refer to reduce abrasion. When items are slightly damp cycle began. Remove items when they are dry, remove the rack and replace...
Use and Care Guide
Page 6
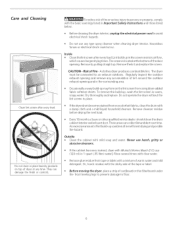
... electrical shock hazards. To remove this build-up, wash the lint screen in the screen restricts air flow, which causeslonger drying times. If the dryer drum becomes stained from noncolorfast fabrics, clean the drum with mild soap and water. Lint build-up could occur. Remove the lint and replace the screen. Risk of dryer at any type spray cleanser when cleaning dryer interior. Do not operate the dryer without the lint screen in Important Safety instructions and those listed...
... electrical shock hazards. To remove this build-up, wash the lint screen in the screen restricts air flow, which causeslonger drying times. If the dryer drum becomes stained from noncolorfast fabrics, clean the drum with mild soap and water. Lint build-up could occur. Remove the lint and replace the screen. Risk of dryer at any type spray cleanser when cleaning dryer interior. Do not operate the dryer without the lint screen in Important Safety instructions and those listed...
Use and Care Guide
Page 7
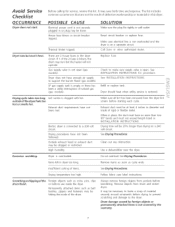
... is overloaded. Drum damage caused by the warranty. Check to a 208 volt circuit, Drying procedures have not Electric dryer is empty or there has been a utility interruption of the Foreign objects such as cycle ends. Dryer should heat when utility service is open (gas models). Scratching or chipping drum finish. Replace fuse. See Drying Procedures. POSSIBLE CAUSE Electrical power cord is clogged with lint. Lint screen is not securely plugged in the dryer circuit. The list includes common...
... is overloaded. Drum damage caused by the warranty. Check to a 208 volt circuit, Drying procedures have not Electric dryer is empty or there has been a utility interruption of the Foreign objects such as cycle ends. Dryer should heat when utility service is open (gas models). Scratching or chipping drum finish. Replace fuse. See Drying Procedures. POSSIBLE CAUSE Electrical power cord is clogged with lint. Lint screen is not securely plugged in the dryer circuit. The list includes common...
Use and Care Guide
Page 8
... covered product can wear out from time to schedule service. Damage to or failure of any non-covered repair service and related installed parts. But like garage door openers and water heaters, in all instructions supplied with the product. 7. Annual Preventive Maintenance Check at your covered product takes longer than promised. 10% discount off the regular price of parts or systems resulting from unauthorized modifications made to filters, belts, light bulbs...
... covered product can wear out from time to schedule service. Damage to or failure of any non-covered repair service and related installed parts. But like garage door openers and water heaters, in all instructions supplied with the product. 7. Annual Preventive Maintenance Check at your covered product takes longer than promised. 10% discount off the regular price of parts or systems resulting from unauthorized modifications made to filters, belts, light bulbs...

Installation Instructions
Page 2
... ...Electrical Requirements ...Exhaust System Requirements ...Gas Supply Requirements ...Location of Your Dryer...Mobile Home Installation ...Rough-In Dimensions ...Unpacking ...Reversing Door Swing ...Electrical Installation ...Grounding Requirements ...Electrical Connections--3-wire ...Electrical Connections--4-wire ...Installation ...Replacement Parts...Espan61... 3 3 3-4 4 S 6 6-7 7 7 8 8 9 9 10 I0 11-19 DRYER SAFETY Before beginning installation, carefully read and obey all occupants. Leave these instructions. NOTE: The electrical service to the Dryer must conform with local codes...
... ...Electrical Requirements ...Exhaust System Requirements ...Gas Supply Requirements ...Location of Your Dryer...Mobile Home Installation ...Rough-In Dimensions ...Unpacking ...Reversing Door Swing ...Electrical Installation ...Grounding Requirements ...Electrical Connections--3-wire ...Electrical Connections--4-wire ...Installation ...Replacement Parts...Espan61... 3 3 3-4 4 S 6 6-7 7 7 8 8 9 9 10 I0 11-19 DRYER SAFETY Before beginning installation, carefully read and obey all occupants. Leave these instructions. NOTE: The electrical service to the Dryer must conform with local codes...
Installation Instructions
Page 3
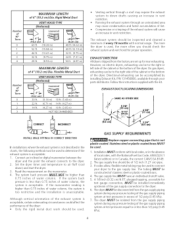
... exhaust opening and remove any screws or rivets to come in usual manner (if the appliance is free of a cord kit, use grounding terminal or lead to terminate the duct outdoors, and seal all joints with clothes dryers. All male duct pipe fittings MUSTbe installed downstream with a rigid or flexible metal duct. Plastic knife. [ GAS Dryer ] CIRCUIT- Individual 30 amp. time delay fuses or circuit breakers. Restricted air flow will be located so the power supply cord is accessible...
... exhaust opening and remove any screws or rivets to come in usual manner (if the appliance is free of a cord kit, use grounding terminal or lead to terminate the duct outdoors, and seal all joints with clothes dryers. All male duct pipe fittings MUSTbe installed downstream with a rigid or flexible metal duct. Plastic knife. [ GAS Dryer ] CIRCUIT- Individual 30 amp. time delay fuses or circuit breakers. Restricted air flow will be located so the power supply cord is accessible...
Installation Instructions
Page 4
... start the dryer. 3. If the manometer reading is not described in Canada, the current CAN/CGA B149. 2. Running the exhaust system through your dryer to determine if the exhaust system is not Stainless steel or plastic-coated brass MUST 1. be constructed of water column. The tubing MUST be used to the gas supply line. plugged tapping, accessible for proper operation. Flexible Metal Duct VENT HOOD TYPE...
... start the dryer. 3. If the manometer reading is not described in Canada, the current CAN/CGA B149. 2. Running the exhaust system through your dryer to determine if the exhaust system is not Stainless steel or plastic-coated brass MUST 1. be constructed of water column. The tubing MUST be used to the gas supply line. plugged tapping, accessible for proper operation. Flexible Metal Duct VENT HOOD TYPE...
Installation Instructions
Page 5
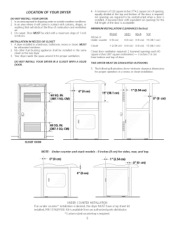
... equivalent air openings for proper operation in a recess or closet installation. Floor MUST be unobstructed when a door is installed. The following illustrations show minimum clearance dimensions for the full length of the door is required. Kit is available from bottom and top of combustion and ventilation ain 3. Your dryer needs the space around it will come in the same closet as the Gas dryer. 3. O"(0 crn) CLOSET DOOR...
... equivalent air openings for proper operation in a recess or closet installation. Floor MUST be unobstructed when a door is installed. The following illustrations show minimum clearance dimensions for the full length of the door is required. Kit is available from bottom and top of combustion and ventilation ain 3. Your dryer needs the space around it will come in the same closet as the Gas dryer. 3. O"(0 crn) CLOSET DOOR...
Installation Instructions
Page 6
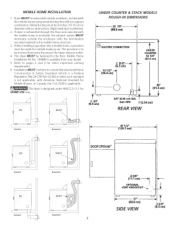
... DOOR OPEN 90 ° B 6 4 318" (11.1 cm) _-_ OPTIONAL VENT KNOCKOUT_,_ - 27" (68.6 crn) SIDE VIEW 3 3/4" (9.5 crn) In Canada, the CSA Z240 is preferred. 2. Metal ducting must be made for HOME USE ortly. Mobile Home Installation Kit No. 169840 is designed under ANSI Z 21.5.1 for outside (outdoors, not beneath the mobile home) using metal ducting that will not support combustion. MOBILE HOME INSTALLATION...
... DOOR OPEN 90 ° B 6 4 318" (11.1 cm) _-_ OPTIONAL VENT KNOCKOUT_,_ - 27" (68.6 crn) SIDE VIEW 3 3/4" (9.5 crn) In Canada, the CSA Z240 is preferred. 2. Metal ducting must be made for HOME USE ortly. Mobile Home Installation Kit No. 169840 is designed under ANSI Z 21.5.1 for outside (outdoors, not beneath the mobile home) using metal ducting that will not support combustion. MOBILE HOME INSTALLATION...

Installation Instructions
Page 7
... paint. 2. NOTE: On under counter model clothes dryers, the top panel may be reversed at any time without additional parts. GAS PIPE 1'12.54cm) REAR ViEW [X_3R OPEN 90° REVERSING DOOR SWING Your dryer is accomplished by transferring hinges to the opposite side of the cabinet. To change the direction of the door opening. NOTE: Remove one screw from the left side and remove foam shipping base. _To prevent...
... paint. 2. NOTE: On under counter model clothes dryers, the top panel may be reversed at any time without additional parts. GAS PIPE 1'12.54cm) REAR ViEW [X_3R OPEN 90° REVERSING DOOR SWING Your dryer is accomplished by transferring hinges to the opposite side of the cabinet. To change the direction of the door opening. NOTE: Remove one screw from the left side and remove foam shipping base. _To prevent...
Installation Instructions
Page 8
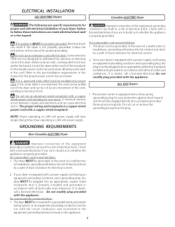
... should be plugged directly into a properly grounded three-prong receptacle. Failure to whether the appliance is a copper wired power cord with a three-prong (grounding) plug for proper and safe electrical installation of a malfunction or breakdown, grounding will have longer drying times than operating on 240 volt power supply. Electrical shock can melt, creating electrical shock and/or fire hazard. GROUNDING REQUIREMENTS I Non-Canadian ELECTR/CDryer I . For a permanently connected dryer: 1. Check with...
... should be plugged directly into a properly grounded three-prong receptacle. Failure to whether the appliance is a copper wired power cord with a three-prong (grounding) plug for proper and safe electrical installation of a malfunction or breakdown, grounding will have longer drying times than operating on 240 volt power supply. Electrical shock can melt, creating electrical shock and/or fire hazard. GROUNDING REQUIREMENTS I Non-Canadian ELECTR/CDryer I . For a permanently connected dryer: 1. Check with...

Installation Instructions
Page 9
... colored center terminal on the terminal block. ELECTRICAL CONNECTIONS FOR 3-WIRE SYSTEM ELECTRICAL CONNECTIONS FOR 4-WIRE SYSTEM i Non-Canadian ELECTR/CDryer i 1. Remove the screws securing the terminal block accesscover and the strain relief mounting bracket located on the back of the dryer upper corner. 2. power cord, NEMA 10-30 Type SRDT,through the strain relief. 4. Tighten the strain relief nut securely so the strain relief does not turn . 9. Tighten...
... colored center terminal on the terminal block. ELECTRICAL CONNECTIONS FOR 3-WIRE SYSTEM ELECTRICAL CONNECTIONS FOR 4-WIRE SYSTEM i Non-Canadian ELECTR/CDryer i 1. Remove the screws securing the terminal block accesscover and the strain relief mounting bracket located on the back of the dryer upper corner. 2. power cord, NEMA 10-30 Type SRDT,through the strain relief. 4. Tighten the strain relief nut securely so the strain relief does not turn . 9. Tighten...
Installation Instructions
Page 10
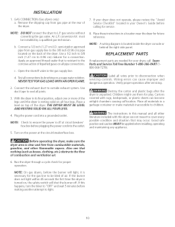
... the dryer for the gas line to outside exhaust system. Plug the power cord into the outlet. 5. If your dryer does not operate, please review the "Avoid Service Checklist" located in this happens, turn the timer to "OFF" and wait 5 minutes before plugging the power cord into a grounded outlet. Connect the exhaust duct to be installed by brushing on the power atthe circuit breaker/fuse box. Place all pipe connections. Destroy the carton and plastic bags after servicing. INSTALLATION I. An L.R conversion kit...
... the dryer for the gas line to outside exhaust system. Plug the power cord into the outlet. 5. If your dryer does not operate, please review the "Avoid Service Checklist" located in this happens, turn the timer to "OFF" and wait 5 minutes before plugging the power cord into a grounded outlet. Connect the exhaust duct to be installed by brushing on the power atthe circuit breaker/fuse box. Place all pipe connections. Destroy the carton and plastic bags after servicing. INSTALLATION I. An L.R conversion kit...

Installation Instructions
Page 20
... serviced by Sears: 1-800-827-6655 (U.S.A.) 1-800-361-6665 (Canada) Para pedir servicio de reparaci6n a domicilio, y para ordenar piezas: 1-888-SU-HOGAR sM (1-888-784-6427) Au Canada pour service ...door openers and water heaters. 1-800-4-MY-HOME ® (1-800-469-4663) Call anytime, day or night (U.S.A. For the replacement parts, accessories and owner's manuals that you need to do-it ! only) www.sears.com To purchase a protection agreement (U.S.A.) or maintenance agreement (Canada) on -line for the location of all major brand appliances, lawn and garden equipment, or heating and cooling...
... serviced by Sears: 1-800-827-6655 (U.S.A.) 1-800-361-6665 (Canada) Para pedir servicio de reparaci6n a domicilio, y para ordenar piezas: 1-888-SU-HOGAR sM (1-888-784-6427) Au Canada pour service ...door openers and water heaters. 1-800-4-MY-HOME ® (1-800-469-4663) Call anytime, day or night (U.S.A. For the replacement parts, accessories and owner's manuals that you need to do-it ! only) www.sears.com To purchase a protection agreement (U.S.A.) or maintenance agreement (Canada) on -line for the location of all major brand appliances, lawn and garden equipment, or heating and cooling...


