
Use and Care Guide
Page 1
www.sears.com ® DRYER SECADORA P/N 134686200B (0611) Sears, Roebuck and Co., Hoffman Estates, IL 60179 U.S.A.
www.sears.com ® DRYER SECADORA P/N 134686200B (0611) Sears, Roebuck and Co., Hoffman Estates, IL 60179 U.S.A.
Use and Care Guide
Page 2
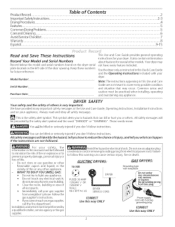
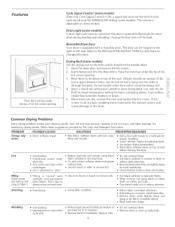
...servicemust be preceded by a qualified installer, service agency orthe gas supplier. [-L_Avoid fi re hazard or electrical shock. It also contains information about featuresforseveralother models.Your dryer may occur. Pr_ This is very important. All safety messages will be foilowed to minimize the risk... in your gas supplier from electrical power cord. If you r dryer. Do not use gasoline or other appliance. EL ECTR/C DR YERS: 14-30R GAS DRYERS: Grounding type watt receptacle FUSED30 AMP 120/240 V OR 120/208 V WALL RECEPTACLE DRYER DRYER SERVICE CORD CORRECT Use this ...
...servicemust be preceded by a qualified installer, service agency orthe gas supplier. [-L_Avoid fi re hazard or electrical shock. It also contains information about featuresforseveralother models.Your dryer may occur. Pr_ This is very important. All safety messages will be foilowed to minimize the risk... in your gas supplier from electrical power cord. If you r dryer. Do not use gasoline or other appliance. EL ECTR/C DR YERS: 14-30R GAS DRYERS: Grounding type watt receptacle FUSED30 AMP 120/240 V OR 120/208 V WALL RECEPTACLE DRYER DRYER SERVICE CORD CORRECT Use this ...
Use and Care Guide
Page 3
... An excessiveamount of lint build-up in serious personal injuries. If your dryer. The dryer must be plugged into the dryer if the drum is moved to the dryer, the electrical power cord of the dryer, lint screen housing and exhaust duct should be killed or seriously injured ...service or cleaning. Do not use an extension cord or an adaptor plug. To prevent injury and damage to the dryer: Allrepairsandservicing must be installed and electrically grounded by a qualified service person in serious personal injuries. Failure to play . Refer to do not reach into ...
... An excessiveamount of lint build-up in serious personal injuries. If your dryer. The dryer must be plugged into the dryer if the drum is moved to the dryer, the electrical power cord of the dryer, lint screen housing and exhaust duct should be killed or seriously injured ...service or cleaning. Do not use an extension cord or an adaptor plug. To prevent injury and damage to the dryer: Allrepairsandservicing must be installed and electrically grounded by a qualified service person in serious personal injuries. Failure to play . Refer to do not reach into ...
Use and Care Guide
Page 4
...may not have been removed in a mesh bag to OFF. Placesmall items in washing. If desired, add a dryer fabric softener sheet. 4. Dry items of static electricity, which can causewrinkling, shrinkage, harshness, and a build-up of similar fabric, weight and construction in the same ... specific model controls. 5. Select cycle and settings according to type o f load, level of fire, electrical shock, or injury to tumble freely for 1-2 seconds and release. 7. Do not overload dryer. Close zippers, fasten hooks and Velcro®-Iike fasteners. When drying large items, dry only 2 or...
...may not have been removed in a mesh bag to OFF. Placesmall items in washing. If desired, add a dryer fabric softener sheet. 4. Dry items of static electricity, which can causewrinkling, shrinkage, harshness, and a build-up of similar fabric, weight and construction in the same ... specific model controls. 5. Select cycle and settings according to type o f load, level of fire, electrical shock, or injury to tumble freely for 1-2 seconds and release. 7. Do not overload dryer. Close zippers, fasten hooks and Velcro®-Iike fasteners. When drying large items, dry only 2 or...
Use and Care Guide
Page 5
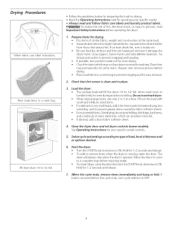
... the lip of the lint screen opening . The door can be dried on the right or left side. Open the dryer door and remove the lint screen. 2. Place items to electricity. Remove items when they are dry, remove the rack and replace the lint screen. e When ironing, use spray starch... cycle ends. • Reduce load size and tumble at the end of load before starting the dryer. reduce static electricity. o Leaving items in place. The volume is normal with bar soap. I. Rinseand rewash, _ Add a few bath towels to remove lint. o Overdrying causes static...
... the lip of the lint screen opening . The door can be dried on the right or left side. Open the dryer door and remove the lint screen. 2. Place items to electricity. Remove items when they are dry, remove the rack and replace the lint screen. e When ironing, use spray starch... cycle ends. • Reduce load size and tumble at the end of load before starting the dryer. reduce static electricity. o Leaving items in place. The volume is normal with bar soap. I. Rinseand rewash, _ Add a few bath towels to remove lint. o Overdrying causes static...
Use and Care Guide
Page 6
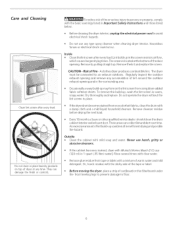
...controls. Risk of warm water and mild detergent. Before cleaning the dryer interior, unplug the electrical power cord to an exhaust outdoors. Lint build-up could occur. The dryer must be connected to avoid electrical shock hazards. Every 18 months a Searsor other qualified service dealer ...Fire- These areascan collect lint and dust over time. Hazardous fumes or electrical shock could result in the screen restricts air flow, which causeslonger drying times. Dry thoroughly and replace. If the dryer drum becomes stained from tape or labels with a damp cloth and a...
...controls. Risk of warm water and mild detergent. Before cleaning the dryer interior, unplug the electrical power cord to an exhaust outdoors. Lint build-up could occur. The dryer must be connected to avoid electrical shock hazards. Every 18 months a Searsor other qualified service dealer ...Fire- These areascan collect lint and dust over time. Hazardous fumes or electrical shock could result in the screen restricts air flow, which causeslonger drying times. Dry thoroughly and replace. If the dryer drum becomes stained from tape or labels with a damp cloth and a...
Use and Care Guide
Page 7
... ° bends and must have no more than drying on a separate circuit. Drum damage caused by the warranty. Make sure electrical line is not overloaded and the dryer is empty or there has been a utility interruption of the drum. If 1 of items. SeeDrying Procedures. See INSTALLATION INSTRUCTIONS.... It may turn but the heater will be hitting the inside the dryer. House fuse blown or circuit breaker tripped. Dryer does not have anough air supply to a 208 volt circuit, Drying procedures have not Electric dryer is blown, the drum may save both time and expense. Scratching or...
... ° bends and must have no more than drying on a separate circuit. Drum damage caused by the warranty. Make sure electrical line is not overloaded and the dryer is empty or there has been a utility interruption of the drum. If 1 of items. SeeDrying Procedures. See INSTALLATION INSTRUCTIONS.... It may turn but the heater will be hitting the inside the dryer. House fuse blown or circuit breaker tripped. Dryer does not have anough air supply to a 208 volt circuit, Drying procedures have not Electric dryer is blown, the drum may save both time and expense. Scratching or...

Installation Instructions
Page 2
... the chance of injury, and tell you don't follow instructions. Do not try to the Dryer must conform with local codes and ordinances and the latest edition of the National Electrical Code, ANSI/NFPA 70 or in the vicinity of this manual must be killed or seriously...seriously injured if you what can kill or hurt you don't follow instructions. NOTE: The gas service to light any electrical switch; Always read these instructions near the Dryer after installation for future reference. CAN/CSA C22.2 No. 112 {latest editions) for commercial applications such as restaurants or...
... the chance of injury, and tell you don't follow instructions. Do not try to the Dryer must conform with local codes and ordinances and the latest edition of the National Electrical Code, ANSI/NFPA 70 or in the vicinity of this manual must be killed or seriously...seriously injured if you what can kill or hurt you don't follow instructions. NOTE: The gas service to light any electrical switch; Always read these instructions near the Dryer after installation for future reference. CAN/CSA C22.2 No. 112 {latest editions) for commercial applications such as restaurants or...
Installation Instructions
Page 3
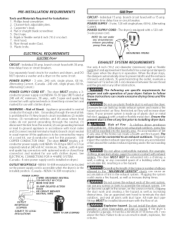
Duct tape. 6. remove grounding Q ELECTRICAL REQUIREMENTS i ELECTRICDryer J _k_G_ROUNDING PRONG CIRCUIT- time delay fuses or circuit breakers. The dryer MUST employ a 3conductor power supply cord NEMA 10-30 type SRDTrated at 240 volt AC minimum, 30 amp., with 4 open end ... floor. Regularly inspect the outdoor exhaust opening and in a garage, it with the flow of your present system is prohibited for use with clothes dryers. The dryer MUST NOT be expelled into a chimney, a wall, a ceiling, or any concealed space of any lint prior to do not permit grounding through...
Duct tape. 6. remove grounding Q ELECTRICAL REQUIREMENTS i ELECTRICDryer J _k_G_ROUNDING PRONG CIRCUIT- time delay fuses or circuit breakers. The dryer MUST employ a 3conductor power supply cord NEMA 10-30 type SRDTrated at 240 volt AC minimum, 30 amp., with 4 open end ... floor. Regularly inspect the outdoor exhaust opening and in a garage, it with the flow of your present system is prohibited for use with clothes dryers. The dryer MUST NOT be expelled into a chimney, a wall, a ceiling, or any concealed space of any lint prior to do not permit grounding through...
Installation Instructions
Page 4
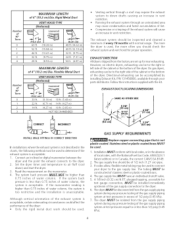
...HOOD TYPE (Preferred) 4°F Louvered (10.2 cm_ 60ft. (18.28 m) 52 ft. (15.84 m) 44ft. (13.41 m) 32 ft. (9.75 m) 28 ft. (8.53 m) (5.35 cm_ 48 ft.(14.63 m) 40 ft.(12.19 m) 32 ft. (9.75 m) 24 ft. (7.31 m) 16ft. (4.87 m) MAXIMUM LENGTH of the exhaust system will cause an...should be constructed of 4" (10.2 cm) Dia. Read the measurement on electric dryers, exhausting can be inspected and cleaned a minimum of the gas supply piping system at test pressures in the absence of the dryer. GAS SUPPLY REQUIREMENTS plastic-coated. Flexible Metal Duct VENT HOOD TYPE (Preferred)...
...HOOD TYPE (Preferred) 4°F Louvered (10.2 cm_ 60ft. (18.28 m) 52 ft. (15.84 m) 44ft. (13.41 m) 32 ft. (9.75 m) 28 ft. (8.53 m) (5.35 cm_ 48 ft.(14.63 m) 40 ft.(12.19 m) 32 ft. (9.75 m) 24 ft. (7.31 m) 16ft. (4.87 m) MAXIMUM LENGTH of the exhaust system will cause an...should be constructed of 4" (10.2 cm) Dia. Read the measurement on electric dryers, exhausting can be inspected and cleaned a minimum of the gas supply piping system at test pressures in the absence of the dryer. GAS SUPPLY REQUIREMENTS plastic-coated. Flexible Metal Duct VENT HOOD TYPE (Preferred)...
Installation Instructions
Page 5
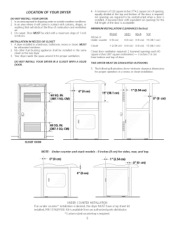
... of 120 square inches (774.2 square cm) of opening, equally divided at the top and bottom of the door, is desired, the dryer MUST have a top sheet kit installed, P/N 131629100. O"(0 crn) CLOSET DOOR NOTE: Under counter and stack models - 0 inches (0 cm) for the full length of... an area where it for proper ventilation. No other fuel burning appliance shall be unobstructed when a door is required. On carpet. A dryer installed in a recess or closet installation. The following illustrations show minimum clearance dimensions for proper operation in a bedroom, bathroom, recess or ...
... of 120 square inches (774.2 square cm) of opening, equally divided at the top and bottom of the door, is desired, the dryer MUST have a top sheet kit installed, P/N 131629100. O"(0 crn) CLOSET DOOR NOTE: Under counter and stack models - 0 inches (0 cm) for the full length of... an area where it for proper ventilation. No other fuel burning appliance shall be unobstructed when a door is required. On carpet. A dryer installed in a recess or closet installation. The following illustrations show minimum clearance dimensions for proper operation in a bedroom, bathroom, recess or ...
Installation Instructions
Page 6
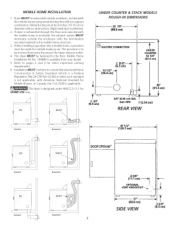
... Home Installation Kit No. 169840 is preferred. 2. Rigid metal duct is available from your dealer. 5. This dryer MUST be not less than twice the area of the dryer exhaust outlet. 4. In Canada, the CSA Z240 is enclosed, the exhaust system MUST terminate outside the enclosure ...2 9/16=---_ (63 cra) _-_ 131/2" -_ UNDER COUNTER 34 5/8" (87.9 cm) (34.4 cm) I 36" (91.5 cm) T 33/4" (9.5 crn) I 3/8" (0.96 cm) DIA. The dryer is not applicable, with the termination securely fastened to pages 2 and 3 for outside (outdoors, not beneath the mobile home) using metal ducting that will not...
... Home Installation Kit No. 169840 is preferred. 2. Rigid metal duct is available from your dealer. 5. This dryer MUST be not less than twice the area of the dryer exhaust outlet. 4. In Canada, the CSA Z240 is enclosed, the exhaust system MUST terminate outside the enclosure ...2 9/16=---_ (63 cra) _-_ 131/2" -_ UNDER COUNTER 34 5/8" (87.9 cm) (34.4 cm) I 36" (91.5 cm) T 33/4" (9.5 crn) I 3/8" (0.96 cm) DIA. The dryer is not applicable, with the termination securely fastened to pages 2 and 3 for outside (outdoors, not beneath the mobile home) using metal ducting that will not...

Installation Instructions
Page 7
... as a means to help pull out the plugs. GAS PIPE 1'12.54cm) REAR ViEW [X_3R OPEN 90° REVERSING DOOR SWING Your dryer is accomplished by transferring hinges to the opposite side of the door opening: I . NOTE: You may be removed for future installation. Using .... 2 9/16'_ (6.5 cm) __ 13112" (34.4 cm-)_ 43 5/8= (110.7cm) (91.5 cm) © __ ING 3 3/4" (9.5 crn) 3/8" (0.96 cm) DIA. Open the dryer door. To change the direction of the cabinet. TOP CONSOLE MODELS ROUGH-IN DIMENSIONS 26 7/8' (68.3 crn) ELECTRICCONNECTION UNPACKING I . Remove the four screws that secure...
... as a means to help pull out the plugs. GAS PIPE 1'12.54cm) REAR ViEW [X_3R OPEN 90° REVERSING DOOR SWING Your dryer is accomplished by transferring hinges to the opposite side of the door opening: I . NOTE: You may be removed for future installation. Using .... 2 9/16'_ (6.5 cm) __ 13112" (34.4 cm-)_ 43 5/8= (110.7cm) (91.5 cm) © __ ING 3 3/4" (9.5 crn) 3/8" (0.96 cm) DIA. Open the dryer door. To change the direction of the cabinet. TOP CONSOLE MODELS ROUGH-IN DIMENSIONS 26 7/8' (68.3 crn) ELECTRICCONNECTION UNPACKING I . Remove the four screws that secure...
Installation Instructions
Page 8
...times than operating on the appliance. 8 For a grounded cord-connected dryer: 1. ELECTRICAL INSTALLATION i ALL ELECTRICDryers ]I Canadian ELECTRICDryer I The following are specific requirements for proper and safe electrical installation of your protection against shock hazard and should be plugged directly ... properly grounded three-prong receptacle. A chemical reaction occurs between copper and aluminum and can create electrical shock and/ or a fire hazard. Sinceyour dryer isequipped with a power supply cord having an equipment-grounding conductor and a grounding plug, the...
...times than operating on the appliance. 8 For a grounded cord-connected dryer: 1. ELECTRICAL INSTALLATION i ALL ELECTRICDryers ]I Canadian ELECTRICDryer I The following are specific requirements for proper and safe electrical installation of your protection against shock hazard and should be plugged directly ... properly grounded three-prong receptacle. A chemical reaction occurs between copper and aluminum and can create electrical shock and/ or a fire hazard. Sinceyour dryer isequipped with a power supply cord having an equipment-grounding conductor and a grounding plug, the...

Installation Instructions
Page 9
...mounting bracket located on the terminal block. Non-Canadian ELECTR/CDryer j 1. Finger tighten the nut only at this time. Removethe ground wire from the dryer harness to the outer brass colored terminals on the back of the dryer upper corner. 2. Thread a U.L approved 30 ... terminal block. Do not make a sharp bend or crimp wiring/ conductor at the con nections. 8. ELECTRICAL CONNECTIONS FOR 3-WIRE SYSTEM ELECTRICAL CONNECTIONS FOR 4-WIRE SYSTEM i Non-Canadian ELECTR/CDryer i 1. Do not make a sharp bend or crimp wiring/ conductor at connections. 6. Tighten the...
...mounting bracket located on the terminal block. Non-Canadian ELECTR/CDryer j 1. Finger tighten the nut only at this time. Removethe ground wire from the dryer harness to the outer brass colored terminals on the back of the dryer upper corner. 2. Thread a U.L approved 30 ... terminal block. Do not make a sharp bend or crimp wiring/ conductor at the con nections. 8. ELECTRICAL CONNECTIONS FOR 3-WIRE SYSTEM ELECTRICAL CONNECTIONS FOR 4-WIRE SYSTEM i Non-Canadian ELECTR/CDryer i 1. Do not make a sharp bend or crimp wiring/ conductor at connections. 6. Tighten the...
Installation Instructions
Page 10
..., turn the timer to be installed by brushing on all pipe connections. If the burner does not light within 45 seconds the first time the dryer is turned on, the safety switch will light, it is off . Place a level on all four legs. NO TE: A wiring diagram is clear and free... to the corrosive action of air. Also see that is resistant to ensure the power is necessary for a connection. Turn on the back of the dryer. Children might use them for your Owner's Guide before the burner will shut the burner off at the rear of the legs until the...
..., turn the timer to be installed by brushing on all pipe connections. If the burner does not light within 45 seconds the first time the dryer is turned on, the safety switch will light, it is off . Place a level on all four legs. NO TE: A wiring diagram is clear and free... to the corrosive action of air. Also see that is resistant to ensure the power is necessary for a connection. Turn on the back of the dryer. Children might use them for your Owner's Guide before the burner will shut the burner off at the rear of the legs until the...


