Operating Instructions
Page 1
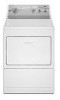
... the cool down period. Set Drying Temperature control 6. Select the temperature setting most suitable for best drying results. The Automatic and Timed Dry cycles end with any cycle setting. This reduces wrinkling and makes items easier to tumble during unloading. Drying time varies depending on fabric care labels. P/N 134818600(0611) Load the dryer, If desired, add a dryer fabric softener sheet. 4, Close the dryer door, Printed in place. 3. @ All COOi _OWN OF/ Laundry Center Dryer Operating Instructions Models...
... the cool down period. Set Drying Temperature control 6. Select the temperature setting most suitable for best drying results. The Automatic and Timed Dry cycles end with any cycle setting. This reduces wrinkling and makes items easier to tumble during unloading. Drying time varies depending on fabric care labels. P/N 134818600(0611) Load the dryer, If desired, add a dryer fabric softener sheet. 4, Close the dryer door, Printed in place. 3. @ All COOi _OWN OF/ Laundry Center Dryer Operating Instructions Models...
Operating Instructions
Page 2
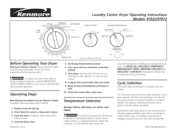
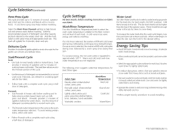
...--HIGH HEAT temperature setting. ,, REGULAR- If you wish to OFF. Opening the door needlessly causes warm air to the left of the cycle. For loads requiring less drying time, set the Automatic WrinkleRid option to partially dry before hanging or ironing. Select the temperature setting most knit items, or the DELICATES--LOWHEAT temperature setting for cotton items. Select the REGULAR--HIGH HEAT temperature setting. Energy Saving Tips * Keep the lint screen clean and exhaust the dryer...
...--HIGH HEAT temperature setting. ,, REGULAR- If you wish to OFF. Opening the door needlessly causes warm air to the left of the cycle. For loads requiring less drying time, set the Automatic WrinkleRid option to partially dry before hanging or ironing. Select the temperature setting most knit items, or the DELICATES--LOWHEAT temperature setting for cotton items. Select the REGULAR--HIGH HEAT temperature setting. Energy Saving Tips * Keep the lint screen clean and exhaust the dryer...
Operating Instructions
Page 3
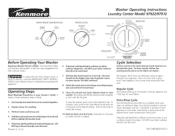
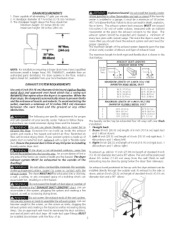
@ WASH/RINSE TE_SPEB£=I/_ RE WA/_M W,qSM COLD COLD WATEB LEVEL _4EI}I/JM tOAD I(}A_> _S, RE
@ WASH/RINSE TE_SPEB£=I/_ RE WA/_M W,qSM COLD COLD WATEB LEVEL _4EI}I/JM tOAD I(}A_> _S, RE
Operating Instructions
Page 4
...; Usewarmwater towash mostloads. Cycle Settings For best results, follow washing care labels. The following chart suggests wash/rinse temperatures for the fabric. + Follow Soak with cold water during rinse, followed by a cold spray rinse during final spin. Select a cold water rinse and appropriate load size. To conserve energy, the hot wash water is selected, the washer will fill with a complete wash cycle using a half dose...
...; Usewarmwater towash mostloads. Cycle Settings For best results, follow washing care labels. The following chart suggests wash/rinse temperatures for the fabric. + Follow Soak with cold water during rinse, followed by a cold spray rinse during final spin. Select a cold water rinse and appropriate load size. To conserve energy, the hot wash water is selected, the washer will fill with a complete wash cycle using a half dose...
Installation Instructions
Page 2
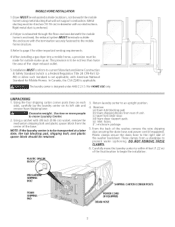
... CORD KIT- Vent hood. 8. I/NFPA 54, or in your gas supplier from plug. For your laundry center's water inlet. Ratchet with 30 amp minimum time delay fuses or circuit breakers. S UBJECT Contents PA GE Pre-lnstallation Requirements 2 Electrical Requirements 2 Water Supply Requirements 2 Drain Requirements 3 Exhaust System Requirements 3-4 Gas Supply Requirements 4 Location 4 Rough-In Dimensions 4 Mobile Home Installation 5 Unpacking 5 Electrical Installation 6 Grounding Requirements 6 3 & 4-Wire Connections 6-7 Installation...
... CORD KIT- Vent hood. 8. I/NFPA 54, or in your gas supplier from plug. For your laundry center's water inlet. Ratchet with 30 amp minimum time delay fuses or circuit breakers. S UBJECT Contents PA GE Pre-lnstallation Requirements 2 Electrical Requirements 2 Water Supply Requirements 2 Drain Requirements 3 Exhaust System Requirements 3-4 Gas Supply Requirements 4 Location 4 Rough-In Dimensions 4 Mobile Home Installation 5 Unpacking 5 Electrical Installation 6 Grounding Requirements 6 3 & 4-Wire Connections 6-7 Installation...
Installation Instructions
Page 3
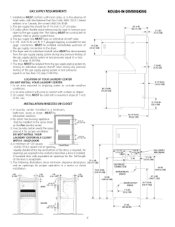
... increase drying times. The maximum length for proper operation. Failure to prevent drafts and the entrance of any other flammables are specific requirements for example: clothing,draperies/curtains, paper) to the side or down ) 3. Restricted air flow will be installed downstream with the flow of water column, measured with rear flush installation: 1. Use an approved vent hood to installing laundry center dryer duct. 0 56 ft. (17.07 m) 42 ft. (12.8 m) 1 46 ft...
... increase drying times. The maximum length for proper operation. Failure to prevent drafts and the entrance of any other flammables are specific requirements for example: clothing,draperies/curtains, paper) to the side or down ) 3. Restricted air flow will be installed downstream with the flow of water column, measured with rear flush installation: 1. Use an approved vent hood to installing laundry center dryer duct. 0 56 ft. (17.07 m) 42 ft. (12.8 m) 1 46 ft...
Installation Instructions
Page 4
... than 1/2 psig (3.45 kPa). 7.The dryer MUSTbe isolated from the gas supply piping system during any pressure testing of the door, is required. plugged tapping, accessible for proper operation in the same closet as the Gas laundry centen 3. IN. (387.1 SQ. A louvered door with a maximum slope of opening, Closet Door equally divided at test pressures equal to the gas supply line. R T. CM) 30 13/16...
... than 1/2 psig (3.45 kPa). 7.The dryer MUSTbe isolated from the gas supply piping system during any pressure testing of the door, is required. plugged tapping, accessible for proper operation in the same closet as the Gas laundry centen 3. IN. (387.1 SQ. A louvered door with a maximum slope of opening, Closet Door equally divided at test pressures equal to the gas supply line. R T. CM) 30 13/16...
Installation Instructions
Page 5
... final location to begin the installation. Excessive weight. Carefully move Laundry Center. 2. From the back of the washer backsheet. MOBILE HOME INSTALLATION 1.Dryer MUST be exhausted outside the enclosure with the termination securely fastened to the mobile home structure. 3. DO NOT REMOVE THESE CLAMPS. 6. Return laundry center to prevent water syphoning. Remove: (a) foam tub blocking pad. (b) foam shipping blocks from dryer door. (d) foam dryer support pads. (e) inlet hoses...
... final location to begin the installation. Excessive weight. Carefully move Laundry Center. 2. From the back of the washer backsheet. MOBILE HOME INSTALLATION 1.Dryer MUST be exhausted outside the enclosure with the termination securely fastened to the mobile home structure. 3. DO NOT REMOVE THESE CLAMPS. 6. Return laundry center to prevent water syphoning. Remove: (a) foam tub blocking pad. (b) foam shipping blocks from dryer door. (d) foam dryer support pads. (e) inlet hoses...
Installation Instructions
Page 6
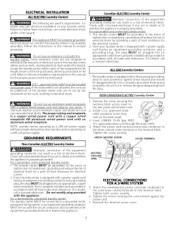
... terminal block access cover to follow these instructions can create electrical shock and/or a fire hazard. If in doubt, call a licensed electrician. or an equipment grounding conductor MUST be plugged into a properly grounded three-prong receptacle. Failure to the rear panel and remove cover. 2. Since your laundry center is equipped with a power supply cord having an equipment-grounding conductor and a grounding plug, the plug MUST be plugged directly...
... terminal block access cover to follow these instructions can create electrical shock and/or a fire hazard. If in doubt, call a licensed electrician. or an equipment grounding conductor MUST be plugged into a properly grounded three-prong receptacle. Failure to the rear panel and remove cover. 2. Since your laundry center is equipped with a power supply cord having an equipment-grounding conductor and a grounding plug, the plug MUST be plugged directly...
Installation Instructions
Page 7
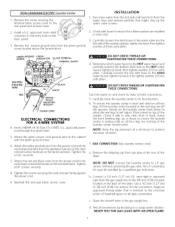
... the dryer. 7. NON-CANADIAN ELECTRICLaundry Center 1. Remove the screw securing the terminal block access cover to prevent excessive vibration. 7. GAS CONNECTION (Gas laundry centers only) a. Tighten the screws securing the cord restraint firmly against the power cord. 9. An LR conversion kit must be installed by hand, then tighten another 2/3 turn with pliers. b. To ensure the laundry center is resting solid on and check for the connection. Gently set the...
... the dryer. 7. NON-CANADIAN ELECTRICLaundry Center 1. Remove the screw securing the terminal block access cover to prevent excessive vibration. 7. GAS CONNECTION (Gas laundry centers only) a. Tighten the screws securing the cord restraint firmly against the power cord. 9. An LR conversion kit must be installed by hand, then tighten another 2/3 turn with pliers. b. To ensure the laundry center is resting solid on and check for the connection. Gently set the...
Installation Instructions
Page 8
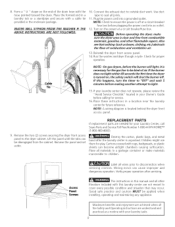
... on the power at a circuit breaker/ fuse box before making another attempt to outside duct work. Use duct tape to the dryer cabinet. REPLACEMENT PARTS If replacement parts are needed for play. Destroy the carton, plastic bags, and metal band after servicing. Run the washer and dryer though a cycle. Place all joints. 11. Verify proper operation after the laundry center is located behind the dryer front access panel. NOTE: A wiring diagram is unpacked. Wiring errors can become airtight...
... on the power at a circuit breaker/ fuse box before making another attempt to outside duct work. Use duct tape to the dryer cabinet. REPLACEMENT PARTS If replacement parts are needed for play. Destroy the carton, plastic bags, and metal band after servicing. Run the washer and dryer though a cycle. Place all joints. 11. Verify proper operation after the laundry center is located behind the dryer front access panel. NOTE: A wiring diagram is unpacked. Wiring errors can become airtight...

Installation Instructions
Page 16
..., Roebuck and Co. For the replacement parts, accessories and owner's manuals that you need to do-it ! For Sears professional installation of home appliances and items like vacuums, lawn equipment, and electronics, call or go on a product serviced by Sears: 1-800-827-6655 (U.S.A.) 1-800-361-6665 (Canada) Para pedir servicio de reparaci6n a domicilio, y para ordenar piezas: 1-888-SU-HOGAR...
..., Roebuck and Co. For the replacement parts, accessories and owner's manuals that you need to do-it ! For Sears professional installation of home appliances and items like vacuums, lawn equipment, and electronics, call or go on a product serviced by Sears: 1-800-827-6655 (U.S.A.) 1-800-361-6665 (Canada) Para pedir servicio de reparaci6n a domicilio, y para ordenar piezas: 1-888-SU-HOGAR...


